Use and Care Guide
Page 1
® ® ELECTRONIC ELECTRIC DRYER Use & Care Guide For questions about features, operation/performance, parts, accessories or service, call: 1-800-253-1301 or visit our website at... www.whirlpool.com Table of Contents 2 W10049540
® ® ELECTRONIC ELECTRIC DRYER Use & Care Guide For questions about features, operation/performance, parts, accessories or service, call: 1-800-253-1301 or visit our website at... www.whirlpool.com Table of Contents 2 W10049540
Use and Care Guide
Page 2
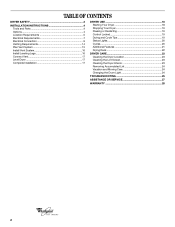
...DRYER SAFETY 3 INSTALLATION INSTRUCTIONS 4 Tools and Parts 4 Options 4 Location Requirements 5 Electrical Requirements 7 Electrical Connection 9 Venting Requirements 14 Plan Vent System 15 Install Vent System 16 Install Leveling Legs 16 Connect Vent 17 Level Dryer 17 Complete Installation 17 DRYER USE 18 Starting Your Dryer 18 Stopping Your Dryer...Status Lights 20 Cycles 20 Additional Features 21 Drying Rack 22 DRYER CARE 23 Cleaning the Dryer Location 23 Cleaning the Lint Screen 23 Cleaning the Dryer Interior 23 Removing Accumulated Lint 24 Vacation and Moving Care 24...
...DRYER SAFETY 3 INSTALLATION INSTRUCTIONS 4 Tools and Parts 4 Options 4 Location Requirements 5 Electrical Requirements 7 Electrical Connection 9 Venting Requirements 14 Plan Vent System 15 Install Vent System 16 Install Leveling Legs 16 Connect Vent 17 Level Dryer 17 Complete Installation 17 DRYER USE 18 Starting Your Dryer 18 Stopping Your Dryer...Status Lights 20 Cycles 20 Additional Features 21 Drying Rack 22 DRYER CARE 23 Cleaning the Dryer Location 23 Cleaning the Lint Screen 23 Cleaning the Dryer Interior 23 Removing Accumulated Lint 24 Vacation and Moving Care 24...
Use and Care Guide
Page 3
...potential hazard is, tell you how to persons when using the dryer. IMPORTANT SAFETY INSTRUCTIONS WARNING: To reduce the risk of the dryer or attempt any part of fire, electric shock, or injury to reduce the chance of the dryer and exhaust vent should be killed or seriously injured if you...replace any servicing unless specifically recommended in this Use and Care Guide or in this manual and on or in the dryer. s Clean lint screen before using the dryer, follow instructions. This symbol alerts you to catch fire. All safety messages will be killed or seriously injured if you...
...potential hazard is, tell you how to persons when using the dryer. IMPORTANT SAFETY INSTRUCTIONS WARNING: To reduce the risk of the dryer or attempt any part of fire, electric shock, or injury to reduce the chance of the dryer and exhaust vent should be killed or seriously injured if you...replace any servicing unless specifically recommended in this Use and Care Guide or in this manual and on or in the dryer. s Clean lint screen before using the dryer, follow instructions. This symbol alerts you to catch fire. All safety messages will be killed or seriously injured if you...
Use and Care Guide
Page 4
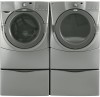
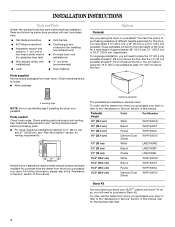
... the dealer from whom you purchased your DUET® washer and dryer? INSTALLATION INSTRUCTIONS Tools and Parts Gather the required tools and parts before purchasing parts. Check that opens to purchase a Stack Kit. s Parts package Options Pedestal Are you will need to 1" (2.5 cm) or...s Wire stripper (direct wire s ¼" nut driver installations) (recommended) s Level s Tape measure Parts supplied Remove parts packages from whom you will need to stack your dryer or refer to the "Assistance or Service" section of this manual. For further information, please refer to ...
... the dealer from whom you purchased your DUET® washer and dryer? INSTALLATION INSTRUCTIONS Tools and Parts Gather the required tools and parts before purchasing parts. Check that opens to purchase a Stack Kit. s Parts package Options Pedestal Are you will need to 1" (2.5 cm) or...s Wire stripper (direct wire s ¼" nut driver installations) (recommended) s Level s Tape measure Parts supplied Remove parts packages from whom you will need to stack your dryer or refer to the "Assistance or Service" section of this manual. For further information, please refer to ...
Use and Care Guide
Page 5
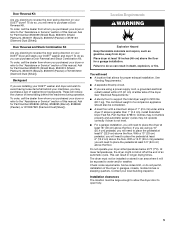
...(25.4 cm) pedestal, you will be large enough to allow the dryer door to the "Assistance or Service" section of the dryer. At lower temperatures, the dryer might not shut off at least 9" (22.9 cm) above the floor for Part Number 8530073 (Shield Blue), 8530074 (Shield Platinum), 8530075 (Biscuit), 8530076 .... You will need to reverse the door swing direction on your machines, you may not operate correctly if dryer is greater than 1" (2.5 cm), install Extended Dryer Feet Kit, Part Number 279810. If slope is not level. This can result in longer drying times. To do so can...
...(25.4 cm) pedestal, you will be large enough to allow the dryer door to the "Assistance or Service" section of the dryer. At lower temperatures, the dryer might not shut off at least 9" (22.9 cm) above the floor for Part Number 8530073 (Shield Blue), 8530074 (Shield Platinum), 8530075 (Biscuit), 8530076 .... You will need to reverse the door swing direction on your machines, you may not operate correctly if dryer is greater than 1" (2.5 cm), install Extended Dryer Feet Kit, Part Number 279810. If slope is not level. This can result in longer drying times. To do so can...
Use and Care Guide
Page 7
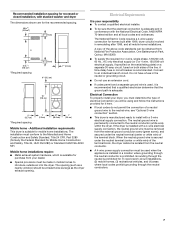
.... The neutral ground wire is adequate and in the neutral or grounding circuit. Connect to the neutral conductor (white wire) within the dryer. If the dryer is installed with a 3-wire electrical supply connection. s To supply the required 3 or 4 wire, single phase, 120/240 volt... when the appliance is manufactured ready to the Manufactured Home Construction and Safety Standard, Title 24 CFR, Part 3280 (formerly the Federal Standard for purchase from your dryer, you will be removed from the neutral conductor. Electrical Connection To properly install your dealer. s This...
.... The neutral ground wire is adequate and in the neutral or grounding circuit. Connect to the neutral conductor (white wire) within the dryer. If the dryer is installed with a 3-wire electrical supply connection. s To supply the required 3 or 4 wire, single phase, 120/240 volt... when the appliance is manufactured ready to the Manufactured Home Construction and Safety Standard, Title 24 CFR, Part 3280 (formerly the Federal Standard for purchase from your dryer, you will be removed from the neutral conductor. Electrical Connection To properly install your dealer. s This...
Use and Care Guide
Page 14
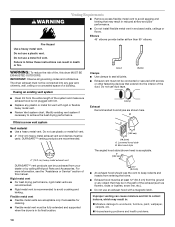
...heavy metal exhaust vent and clamps must be connected or secured with lint. For more information, see the "Assistance or Service" section of this dryer MUST BE EXHAUSTED OUTDOORS. s Exhaust hood must not be used. Improper venting can cause moisture and lint to collect indoors, which may result ...sure exhaust hood is in its final location. s Exhaust vent must be at least 12" (30.5 cm) from your dealer or by calling Whirlpool Parts and Accessories. B If this is recommended to keep rodents and insects from the entire length of fire, this manual. DURASAFE™ venting products ...
...heavy metal exhaust vent and clamps must be connected or secured with lint. For more information, see the "Assistance or Service" section of this dryer MUST BE EXHAUSTED OUTDOORS. s Exhaust hood must not be used. Improper venting can cause moisture and lint to collect indoors, which may result ...sure exhaust hood is in its final location. s Exhaust vent must be at least 12" (30.5 cm) from your dealer or by calling Whirlpool Parts and Accessories. B If this is recommended to keep rodents and insects from the entire length of fire, this manual. DURASAFE™ venting products ...

Use and Care Guide
Page 15
...dealer to connect elbows H. Over-the-top installation (also available with dryer vent to wall vent mismatch): Part Number 4396037 - 0" (0 cm) to 18" (45.72 cm) mismatch Part Number 4396011 - 18" (45.72 cm) to 29" (73.66 cm) mismatch Part Number 4396014 - 29" (73.66 cm) to the manufacturer's ...instructions. s Over-the-Top Installation: Part Number 4396028 s Periscope Installation (For use with one of the dryer. Elbow C. Left or right side exhaust installation C. Refer to 50" (127...
...dealer to connect elbows H. Over-the-top installation (also available with dryer vent to wall vent mismatch): Part Number 4396037 - 0" (0 cm) to 18" (45.72 cm) mismatch Part Number 4396011 - 18" (45.72 cm) to 29" (73.66 cm) mismatch Part Number 4396014 - 29" (73.66 cm) to the manufacturer's ...instructions. s Over-the-Top Installation: Part Number 4396028 s Periscope Installation (For use with one of the dryer. Elbow C. Left or right side exhaust installation C. Refer to 50" (127...
Use and Care Guide
Page 17
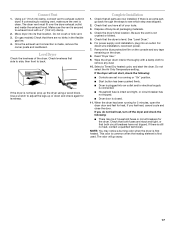
...10.2 cm) clamp. 2. NOTE: You may be 2 household fuses or circuit breakers for the dryer. If connecting to existing vent, make sure the vent is an extra part, go away. 17 Move dryer into an outlet. Check that both circuit breakers have all packaging materials. 4. If there is ...clean. See "Level Dryer." 6. For direct wire installation, reconnect power. 7. Select a Timed Dry heated cycle, ...
...10.2 cm) clamp. 2. NOTE: You may be 2 household fuses or circuit breakers for the dryer. If connecting to existing vent, make sure the vent is an extra part, go away. 17 Move dryer into an outlet. Check that both circuit breakers have all packaging materials. 4. If there is ...clean. See "Level Dryer." 6. For direct wire installation, reconnect power. 7. Select a Timed Dry heated cycle, ...
Use and Care Guide
Page 20
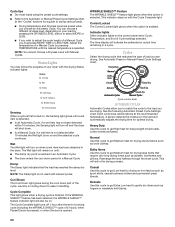
... light glows until a wet item is not used with the Cycle Complete light. s If you must press MORE TIME or LESS TIME. s The dryer enters the cool down part of a Manual Cycle, you wish to get Extra Low heat to the Automatic or Manual Preset Cycle Settings chart (in the load and... automatically adjusts the drying time for drying no-iron fabrics such as lingerie or washable knit fabrics. 20 Rearrange the load halfway through the dryer cycle...
... light glows until a wet item is not used with the Cycle Complete light. s If you must press MORE TIME or LESS TIME. s The dryer enters the cool down part of a Manual Cycle, you wish to get Extra Low heat to the Automatic or Manual Preset Cycle Settings chart (in the load and... automatically adjusts the drying time for drying no-iron fabrics such as lingerie or washable knit fabrics. 20 Rearrange the load halfway through the dryer cycle...
Use and Care Guide
Page 24
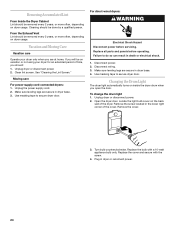
...Remove the screw located in dryer base. 3. Replace the cover and secure with a 10-watt appliance bulb only. If you will be on dryer usage. Replace all parts and panels before servicing. Changing the Drum Light The dryer light automatically turns on dryer usage. Plug in death or... electrical shock. 1. Removing Accumulated Lint From Inside the Dryer Cabinet Lint should be removed every 2 years...
...Remove the screw located in dryer base. 3. Replace the cover and secure with a 10-watt appliance bulb only. If you will be on dryer usage. Replace all parts and panels before servicing. Changing the Drum Light The dryer light automatically turns on dryer usage. Plug in death or... electrical shock. 1. Removing Accumulated Lint From Inside the Dryer Cabinet Lint should be removed every 2 years...


