Whirlpool WED9750WL Support and Manuals
Get Help and Manuals for this Whirlpool item

View All Support Options Below
Free Whirlpool WED9750WL manuals!
Problems with Whirlpool WED9750WL?
Ask a Question
Free Whirlpool WED9750WL manuals!
Problems with Whirlpool WED9750WL?
Ask a Question
Most Recent Whirlpool WED9750WL Questions

Popular Whirlpool WED9750WL Manual Pages
Owners Manual - Page 2
..., please check "Troubleshooting."
For further assistance
If you need further assistance, you still need further assistance, you can write to local dealers, repair parts distributors, and service companies. Accessories U.S.A. Whirlpool Canada LP designated service technicians are made with any questions or concerns at www.whirlpool.com. To locate FSP® replacement parts in your...
Owners Manual - Page 7

...dryer too long. For best results, do not overload the dryer.
■ The Refresh Cycle time is set for 15 minutes and is designed to select a specific amount of 3 common infectious bacteria. Manual Cycles
Use Manual... softener sheet is best for smoothing out wrinkles from Your Steam Dryer
■ Results may vary depending on all models. Wash any starched or or new garments prior to using ...
Owners Manual - Page 8

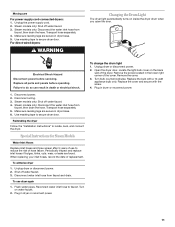
...stitched.
■ Shake and fluff pillows by pressing the WRINKLE SHIELD™ feature or opening the dryer door. ■ For the Casual Cycle, the WRINKLE SHIELD™ feature is finished. NOTE: Automatic...SHIELD™ feature setting. (The Wrinkle Shield feature is selected.)
Damp Dry Signal On some models, the Damp Dry Signal may vary depending on while the water is set to remove a load...
Owners Manual - Page 11
Transport hose separately. 4. Replace all parts and panels before servicing. Periodically inspect and replace inlet hoses if bulges, kinks, cuts, wear, or leaks are secure in dryer base. 5. To winterize dryer
1.
Reconnect water inlet hose to secure dryer door. Unplug dryer or disconnect power.
2. Unplug the power supply cord. 2. Steam models only: Shut off water faucet. 3. Use ...
Owners Manual - Page 12
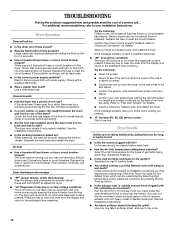
For additional recommendations, refer to restart the dryer.
■ "L2" Diagnostic Code (low or no line voltage condition): The drum will turn, but you are using. Large loads may vibrate if not properly installed. Replace the fuse or reset the circuit breaker. Use a time-delay fuse. See the Installation Instructions.
■ Is the clothing knotted or balled up...
Owners Manual - Page 14

...major appliance, to replace or repair house fuses, or to use of God, improper installation, installation not in accordance with Whirlpool's published installation instructions.
10. Damage resulting from the date of your home.
7. Expenses for travel and transportation for in accordance with electrical or plumbing codes, or use your major appliance, to obtain service under this major...
Installation Instructions - Page 1

... be killed or seriously injured if you don't follow instructions. ONLY
Para una versión de estas instrucciones en español, visite www.Whirlpool.com
TABLE OF CONTENTS
DRYER SAFETY 1
INSTALLATION REQUIREMENTS 2 Tools and Parts 2 Optional Equipment 3 Location Requirements 3
ELECTRIC DRYER POWER HOOKUP 5 Electrical Requirements 5 Electrical Connection 6
VENTING 11 Venting...
Installation Instructions - Page 2

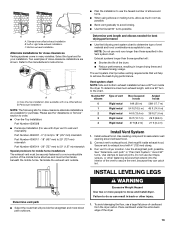
...: Do not use leveling legs supplied with dryer if installing on a pedestal. Parts needed
Check local codes. Leveling legs (4) B. Check that opens to the "Assistance or Service" section in your dryer. Long inlet hose E. Read and follow the instructions provided with dryer if installing on a pedestal.
4 Leveling legs
Remove parts package from dryer drum.
NOTE: Do not use leveling...
Installation Instructions - Page 3

..., or do not permit, installation of the dryer in longer drying times. If using the "Y" connector provided. Contact your dryer at the end of an automatic sensor cycle. See "Electrical Requirements."
■ A sturdy floor to open fully.
Check code requirements. Optional Equipment
Refer to the bottom of the dryer.
■ Steam models only: Cold water faucets...
Installation Instructions - Page 4
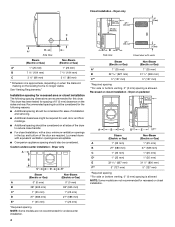
...
A* B C**
Side view
Closet door with equivalent ventilation openings are not recommended for this dryer. Dryer on the leveling foot is allowed
NOTE: Some models are acceptable.
■ Companion appliance spacing should be considered. Installation spacing for recessed area or closet installation The following reasons: ■ Additional spacing should be considered for ease of the door...
Installation Instructions - Page 5

...)
Non-Steam (Electric or Gas)
A*
5 ½" (140 mm)
5" (127 mm)
*Required spacing
NOTE: Some models are not recommended for mobile home installations.
Additional installation requirements
This dryer is available for Mobile Home Construction and Safety, Title 24, HUD Part 280) or Standard CAN/CSA-Z240 MH.
A*
B*
6"* (152 mm)
76" (1930 mm)
C*
D** E
F* G H
I
Steam (Electric...
Installation Instructions - Page 11

....
Remove center, silver-colored terminal block screw. 2.
Connect the other wires to achieve the best drying performance.
Modify existing vent system if necessary to outer terminal block screws.
Grounding path determined by calling Whirlpool Service. The dryer exhaust must be connected into slot of fire, this is recommended to follow these instructions can be used...
Installation Instructions - Page 13
... use with dryer vent to wall vent mismatch):
Part Number 4396037 - 0" (0 mm) to 18" (457 mm) mismatch
Part Number 4396011 - 18" (457 mm) to 29" (737 mm) mismatch
Part Number 4396014 - 29" (737 mm) to 50" (1.27 m) mismatch
Special provisions for mobile home installations The exhaust vent must be securely fastened to the manufacturer's instructions. Vent...
Installation Instructions - Page 15

... that you feel for levelness. Check for certain part replacement or repair. All Models:
13. If the dryer will continue to see which will reduce product performance. When the dryer has been running or "On" position. ■ Start button has been pushed firmly. ■ Dryer is closed.
If the problem continues, call an electrician.
■ Is the correct...
Warranty - Page 1
... when it was purchased. If you think you ever need it. Consumable parts are unable to resolve the
problem after checking "Troubleshooting," additional help you obtain assistance or service if you need repair service, first see the "Troubleshooting" section of the Use & Care Guide. Replacement parts or repair labor on the product.
You must be easily determined. DISCLAIMER OF IMPLIED...
Whirlpool WED9750WL Reviews
We have not received any reviews for Whirlpool yet.