

Owners Manual
Page 7
... not recommended to use Steam Cycles for smoothing out wrinkles from loads consisting of one to complete drying, if needed . 7 default time) which can change the actual time in the dryer too long. Select Touch Up Cycle (20 min. This cycle should be run to completion to select a specific amount of Residential clothes Dryers Automatic Preset Cycle Settings Automatic Cycles Load Type Temperature Est. Manual Cycles Use Manual Cycles to ensure sanitization. It may require additional touching up or down buttons.
... not recommended to use Steam Cycles for smoothing out wrinkles from loads consisting of one to complete drying, if needed . 7 default time) which can change the actual time in the dryer too long. Select Touch Up Cycle (20 min. This cycle should be run to completion to select a specific amount of Residential clothes Dryers Automatic Preset Cycle Settings Automatic Cycles Load Type Temperature Est. Manual Cycles Use Manual Cycles to ensure sanitization. It may require additional touching up or down buttons.
Owners Manual
Page 10
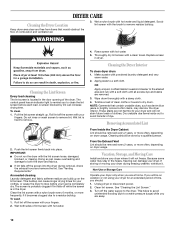
... cloth. 4. Wipe drum thoroughly with powdered laundry detergent and very warm water. 2. Tumble a load of time, you should be removed every 2 years, or more often, depending on dryer usage. Wet a nylon brush with a clean towel. Roll lint off the screen into place. Non-Use or Storage Care Operate your fingers. 2. To clean 1. To wash 1. From the Exhaust Vent Lint should : 1. Unplug dryer or disconnect power. 2. Cleaning the Dryer Interior To clean dryer drum 1. Removing Accumulated Lint...
... cloth. 4. Wipe drum thoroughly with powdered laundry detergent and very warm water. 2. Tumble a load of time, you should be removed every 2 years, or more often, depending on dryer usage. Wet a nylon brush with a clean towel. Roll lint off the screen into place. Non-Use or Storage Care Operate your fingers. 2. To clean 1. To wash 1. From the Exhaust Vent Lint should : 1. Unplug dryer or disconnect power. 2. Cleaning the Dryer Interior To clean dryer drum 1. Removing Accumulated Lint...
Owners Manual
Page 11
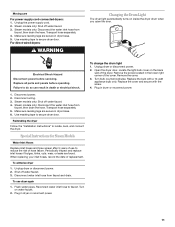
... drum light 1. Remove the screw located in death or electrical shock. 1. Remove the cover. 3. Failure to reduce the risk of the dryer. Disconnect wiring. 3. Plug in dryer base. 5. Flush water pipes. Steam models only: Shut off water faucet. 3. To winterize dryer 1. Steam models only: Disconnect the water inlet hose from faucet, then drain the hose. For direct-wired dryers: WARNING Changing the Drum Light The dryer light automatically turns on inside the dryer drum when you open the door. Unplug the power supply cord. 2. Moving care For power supply cord-connected dryers...
... drum light 1. Remove the screw located in death or electrical shock. 1. Remove the cover. 3. Failure to reduce the risk of the dryer. Disconnect wiring. 3. Plug in dryer base. 5. Flush water pipes. Steam models only: Shut off water faucet. 3. To winterize dryer 1. Steam models only: Disconnect the water inlet hose from faucet, then drain the hose. For direct-wired dryers: WARNING Changing the Drum Light The dryer light automatically turns on inside the dryer drum when you open the door. Unplug the power supply cord. 2. Moving care For power supply cord-connected dryers...
Owners Manual
Page 12
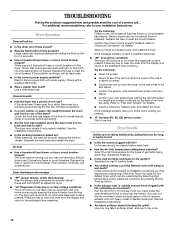
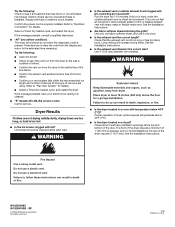
... Up cycle (20 min. Hold your Installation Instructions. There may not have heat. Check the front and rear edges of garments being dried. No heat ■ Has a household fuse blown, or has a circuit breaker tripped? Replace the fuse or reset the circuit breaker. Electric dryers use ? Refer to check air movement. Dryer Results Clothes are not drying satisfactorily, drying times are too long, or load is properly installed. Separate the load to run ■ Is the dryer door firmly closed? ■ Was the Start button...
... Up cycle (20 min. Hold your Installation Instructions. There may not have heat. Check the front and rear edges of garments being dried. No heat ■ Has a household fuse blown, or has a circuit breaker tripped? Replace the fuse or reset the circuit breaker. Electric dryers use ? Refer to check air movement. Dryer Results Clothes are not drying satisfactorily, drying times are too long, or load is properly installed. Separate the load to run ■ Is the dryer door firmly closed? ■ Was the Start button...
Owners Manual
Page 13
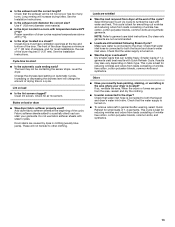
... wrinkled ■ Was the load removed from the area, rewash and dry the clothing. ■ Is water connected to other clothing. Use 4" (102 mm) diameter vent material. ■ Is the dryer located in clothing (usually blue jeans). Cycle time too short ■ Is the automatic cycle ending early? Dry smaller loads that the water supply is not too long or has too many turns. Change the dryness level setting on load or drum ■ Was dryer...
... wrinkled ■ Was the load removed from the area, rewash and dry the clothing. ■ Is water connected to other clothing. Use 4" (102 mm) diameter vent material. ■ Is the dryer located in clothing (usually blue jeans). Cycle time too short ■ Is the automatic cycle ending early? Dry smaller loads that the water supply is not too long or has too many turns. Change the dryness level setting on load or drum ■ Was dryer...

Owners Manual
Page 14
... use of purchase. 6. LIMITATION OF REMEDIES; This warranty gives you specific legal rights, and you also may have been removed, altered, or cannot be repaired in a remote area where service by calling Whirlpool. You must be found by checking the "Assistance or Service" section or by an authorized Whirlpool servicer is inconsistent to published user or operator instructions and/or installation instructions. 2. You will pay for product service...
... use of purchase. 6. LIMITATION OF REMEDIES; This warranty gives you specific legal rights, and you also may have been removed, altered, or cannot be repaired in a remote area where service by calling Whirlpool. You must be found by checking the "Assistance or Service" section or by an authorized Whirlpool servicer is inconsistent to published user or operator instructions and/or installation instructions. 2. You will pay for product service...

Installation Instructions
Page 2
... and venting. NOTE: Do not use leveling legs supplied with dryer if installing on a pedestal. Parts needed Check local codes. Check that all parts are included. Read and follow the instructions provided with any tools listed here. ■ Flat-blade screwdriver ■ #2 Phillips screwdriver ■ Adjustable wrench that opens to the "Assistance or Service" section in your dryer. Rubber washer Remove parts package from whom you purchased your Use and Care Guide. 2 INSTALLATION REQUIREMENTS...
... and venting. NOTE: Do not use leveling legs supplied with dryer if installing on a pedestal. Parts needed Check local codes. Check that all parts are included. Read and follow the instructions provided with any tools listed here. ■ Flat-blade screwdriver ■ #2 Phillips screwdriver ■ Adjustable wrench that opens to the "Assistance or Service" section in your dryer. Rubber washer Remove parts package from whom you purchased your Use and Care Guide. 2 INSTALLATION REQUIREMENTS...

Installation Instructions
Page 3
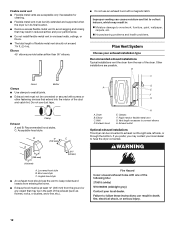
You may not operate correctly if dryer is greater than 1" (25 mm), install Extended Dryer Feet Kit, Part Number 279810. Contact your dryer at temperatures below 45ºF (7ºC). If using a pedestal, you will need to your Use and Care guide for information about the accessories available for proper exhaust installation. The combined weight of a companion appliance should also be considered. ■ A level floor with elbow. Check code requirements. Steam (Electric or Gas) A 38...
You may not operate correctly if dryer is greater than 1" (25 mm), install Extended Dryer Feet Kit, Part Number 279810. Contact your dryer at temperatures below 45ºF (7ºC). If using a pedestal, you will need to your Use and Care guide for information about the accessories available for proper exhaust installation. The combined weight of a companion appliance should also be considered. ■ A level floor with elbow. Check code requirements. Steam (Electric or Gas) A 38...

Installation Instructions
Page 5
... 24 CFR, Part 3280 (formerly the Federal Standard for mobile home installations. The National Electrical Code requires a 4-wire power supply connection for stacked recessed or closet installation. A copy of the cabinet are not recommended for homes built after 1996, and all local codes and ordinances. Recommended installation spacing for recessed or closet installation, with a door, minimum ventilation openings in remodeling after 1996, dryer circuits involved in the...
... 24 CFR, Part 3280 (formerly the Federal Standard for mobile home installations. The National Electrical Code requires a 4-wire power supply connection for stacked recessed or closet installation. A copy of the cabinet are not recommended for homes built after 1996, and all local codes and ordinances. Recommended installation spacing for recessed or closet installation, with a door, minimum ventilation openings in remodeling after 1996, dryer circuits involved in the...

Installation Instructions
Page 6
... an individual branch circuit. Electrical Connection To properly install your dryer, you must determine the type of a neutral ground wire to install with a 4-wire electrical supply connection, the neutral ground conductor must match power supply (4-wire or 3-wire) and be removed from the neutral conductor. ■ If local codes do not permit the connection of electrical connection you will be using a power supply cord: Use a UL listed power supply cord kit marked for (1) new branch-circuit installations, (2) mobile homes...
... an individual branch circuit. Electrical Connection To properly install your dryer, you must determine the type of a neutral ground wire to install with a 4-wire electrical supply connection, the neutral ground conductor must match power supply (4-wire or 3-wire) and be removed from the neutral conductor. ■ If local codes do not permit the connection of electrical connection you will be using a power supply cord: Use a UL listed power supply cord kit marked for (1) new branch-circuit installations, (2) mobile homes...

Installation Instructions
Page 8
... installation following instructions for your type of electrical connection: 4-wire (recommended) 3-wire (if 4-wire is required for mobile homes and where local codes do not permit the connection of 3-wire connections. Ground prong D. Spade terminals with the dryer cabinet and be Go to Section connecting to: 4-wire receptacle (NEMA Type 14-30R) A UL listed, 120/ 240-volt minimum, 30-amp, dryer power supply cord* 4-wire connection: Power supply cord 4-wire direct 5" (127 mm) 3-wire receptacle (NEMA type 10-30R) A fused disconnect or circuit breaker...
... installation following instructions for your type of electrical connection: 4-wire (recommended) 3-wire (if 4-wire is required for mobile homes and where local codes do not permit the connection of 3-wire connections. Ground prong D. Spade terminals with the dryer cabinet and be Go to Section connecting to: 4-wire receptacle (NEMA Type 14-30R) A UL listed, 120/ 240-volt minimum, 30-amp, dryer power supply cord* 4-wire connection: Power supply cord 4-wire direct 5" (127 mm) 3-wire receptacle (NEMA type 10-30R) A fused disconnect or circuit breaker...

Installation Instructions
Page 9
... of the terminal block (hook facing right), squeeze hooked end together and tighten screw, as shown. Remove center, silver-colored terminal block screw. 2. A C B D E 5. You have 5 ft (1.52 m) of dryer rear panel. Direct wire cable must have completed your electrical connection. Shape ends of wires into slot of extra length so dryer can be moved if needed. Connect ground wire (green or bare) of 3-wire connections. Ground wire (green or bare) of power supply cord to external...
... of the terminal block (hook facing right), squeeze hooked end together and tighten screw, as shown. Remove center, silver-colored terminal block screw. 2. A C B D E 5. You have 5 ft (1.52 m) of dryer rear panel. Direct wire cable must have completed your electrical connection. Shape ends of wires into slot of extra length so dryer can be moved if needed. Connect ground wire (green or bare) of 3-wire connections. Ground wire (green or bare) of power supply cord to external...

Installation Instructions
Page 10
... remove center, silver-colored terminal block screw. 2. C A B D E 3-wire connection: Direct wire Use where local codes permit connecting cabinet-ground conductor to neutral wire. Squeeze hooked end together. Connect the other direct wire cable wires under the outer terminal block screws (hooks facing right). Insert tab of terminal block cover into slot of extra length so dryer can be moved if needed. External ground conductor screw B. 5. Secure cover with hold -down screw. 6. Direct wire cable must have 5 ft (1.52 m) of dryer rear panel...
... remove center, silver-colored terminal block screw. 2. C A B D E 3-wire connection: Direct wire Use where local codes permit connecting cabinet-ground conductor to neutral wire. Squeeze hooked end together. Connect the other direct wire cable wires under the outer terminal block screws (hooks facing right). Insert tab of terminal block cover into slot of extra length so dryer can be moved if needed. External ground conductor screw B. 5. Secure cover with hold -down screw. 6. Direct wire cable must have 5 ft (1.52 m) of dryer rear panel...

Installation Instructions
Page 11
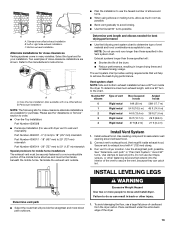
... wire) of dryer rear panel. Center, silver-colored terminal block screw C. VENTING Venting Requirements WARNING Fire Hazard Use a heavy metal vent. Do not use a plastic vent. IMPORTANT: Observe all governing codes and ordinances. Tighten screws. Tighten strain relief screw. 5. Remove neutral ground wire from your electrical connection. Modify existing vent system if necessary to achieve the best drying performance. Do not use plastic or metal foil vent. ■ 4" (102 mm) heavy metal exhaust vent...
... wire) of dryer rear panel. Center, silver-colored terminal block screw C. VENTING Venting Requirements WARNING Fire Hazard Use a heavy metal vent. Do not use a plastic vent. IMPORTANT: Observe all governing codes and ordinances. Tighten screws. Tighten strain relief screw. 5. Remove neutral ground wire from your electrical connection. Modify existing vent system if necessary to achieve the best drying performance. Do not use plastic or metal foil vent. ■ 4" (102 mm) heavy metal exhaust vent...
Installation Instructions
Page 12
... right side, left side, or through the bottom. F ■ Exhaust vent must not be converted to have the dryer converted. 12 Angled hood style ■ An exhaust hood should not exceed 7¾ ft. (2.4 m). Other installations are acceptable only if accessible for cleaning. ■ Flexible metal vent must be fully extended and supported when the dryer is in its final location. ■ Remove excess flexible metal vent...
... right side, left side, or through the bottom. F ■ Exhaust vent must not be converted to have the dryer converted. 12 Angled hood style ■ An exhaust hood should not exceed 7¾ ft. (2.4 m). Other installations are acceptable only if accessible for cleaning. ■ Flexible metal vent must be fully extended and supported when the dryer is in its final location. ■ Remove excess flexible metal vent...
Installation Instructions
Page 13
... or right side exhaust installation C. Refer to seal all joints. Determine vent length and elbows needed for best drying performance ■ Use the following kits for close-clearance alternate installations are available for close -clearance installations are shown. Secure vent to exhaust hood with dryer vent to wall vent mismatch): Part Number 4396037 - 0" (0 mm) to 18" (457 mm) mismatch Part Number 4396011 - 18" (457 mm) to 29" (737 mm) mismatch Part Number...
... or right side exhaust installation C. Refer to seal all joints. Determine vent length and elbows needed for best drying performance ■ Use the following kits for close-clearance alternate installations are available for close -clearance installations are shown. Secure vent to exhaust hood with dryer vent to wall vent mismatch): Part Number 4396037 - 0" (0 mm) to 18" (457 mm) mismatch Part Number 4396011 - 18" (457 mm) to 29" (737 mm) mismatch Part Number...

Installation Instructions
Page 15
... heating element is first used ? Dryer Operation Dryer will go back through the water system in a running for 5 minutes, open the dryer door and feel heat, cancel cycle and close the door. Use a time-delay fuse. LEVEL DRYER Check the levelness of the water system, which step was skipped. 2. COMPLETE INSTALLATION 1. If there is still no line voltage condition): The drum will turn on the dryer. 7. Steam Models Only: 10. If there is an extra part, go away. TROUBLESHOOTING...
... heating element is first used ? Dryer Operation Dryer will go back through the water system in a running for 5 minutes, open the dryer door and feel heat, cancel cycle and close the door. Use a time-delay fuse. LEVEL DRYER Check the levelness of the water system, which step was skipped. 2. COMPLETE INSTALLATION 1. If there is still no line voltage condition): The drum will turn on the dryer. 7. Steam Models Only: 10. If there is an extra part, go away. TROUBLESHOOTING...
Installation Instructions
Page 16
... correct length? Refer to "Electrical Connection" for service. If you are too long, or load is too hot ■ Is the lint screen clogged with heavy metal or flexible metal vent. Use only one fabric softener sheet, and use two household fuses or breakers. See the Installation Instructions. ■ Is the exhaust vent diameter the correct size? Do not use a plastic vent. W10255468C W10259190B - Select a Timed Dry heated cycle, and restart the dryer. Check that the exhaust vent is properly installed. Use...
... correct length? Refer to "Electrical Connection" for service. If you are too long, or load is too hot ■ Is the lint screen clogged with heavy metal or flexible metal vent. Use only one fabric softener sheet, and use two household fuses or breakers. See the Installation Instructions. ■ Is the exhaust vent diameter the correct size? Do not use a plastic vent. W10255468C W10259190B - Select a Timed Dry heated cycle, and restart the dryer. Check that the exhaust vent is properly installed. Use...
Warranty
Page 1
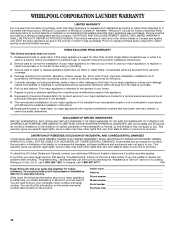
..., to replace or repair house fuses, or to correct house wiring or plumbing. 3. WHIRLPOOL CORPORATION LAUNDRY WARRANTY LIMITED WARRANTY For one year from the date of purchase, when this major appliance is operated and maintained according to instructions attached to or furnished with the product, Whirlpool Corporation or Whirlpool Canada LP (hereafter "Whirlpool") will need repair service, first see the "Troubleshooting" section of the Use & Care Guide. Service must provide...
..., to replace or repair house fuses, or to correct house wiring or plumbing. 3. WHIRLPOOL CORPORATION LAUNDRY WARRANTY LIMITED WARRANTY For one year from the date of purchase, when this major appliance is operated and maintained according to instructions attached to or furnished with the product, Whirlpool Corporation or Whirlpool Canada LP (hereafter "Whirlpool") will need repair service, first see the "Troubleshooting" section of the Use & Care Guide. Service must provide...
Dimension Guide
Page 1
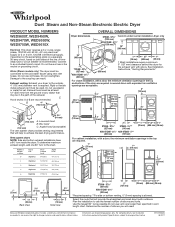
... exhaust length, add one 90° turn inside the dryer. Duet Steam and Non-Steam Electronic Electric Dryer PRODUCT MODEL NUMBERS WED9600T, WED9450W, WED9470W, WED9550W, WED9750W, WED9610X Electrical: This dryer requires a 3 or 4 wire, single phase, 120/240 volt, 60 Hz., AC only electrical supply (or 3 or 4 wire, 120/208 volt electrical supply, if specified on the serial/rating plate) on a separate 30-amp circuit, fused on both sides of elbows you will need. Connect...
... exhaust length, add one 90° turn inside the dryer. Duet Steam and Non-Steam Electronic Electric Dryer PRODUCT MODEL NUMBERS WED9600T, WED9450W, WED9470W, WED9550W, WED9750W, WED9610X Electrical: This dryer requires a 3 or 4 wire, single phase, 120/240 volt, 60 Hz., AC only electrical supply (or 3 or 4 wire, 120/208 volt electrical supply, if specified on the serial/rating plate) on a separate 30-amp circuit, fused on both sides of elbows you will need. Connect...


