Use and Care Guide
Page 2
...Electrical Requirements 7 Electrical Connection 9 Venting Requirements 14 Plan Vent System 15 Install Vent System 16 Install Leveling Legs 16 Connect Vent 17 Level Dryer 17 Complete Installation 17 DRYER USE 18 Starting Your Dryer 18 Stopping Your Dryer 19 Pausing or Restarting 19 Control Locked 19 Drying and Cycle Tips 19 Status Lights 20 Cycles 20 Additional Features 21 Drying Rack 22 DRYER CARE 23 Cleaning the Dryer Location 23 Cleaning the Lint Screen 23 Cleaning the Dryer Interior 23 Removing Accumulated Lint 24 Vacation and Moving Care 24 Changing the Drum Light...
...Electrical Requirements 7 Electrical Connection 9 Venting Requirements 14 Plan Vent System 15 Install Vent System 16 Install Leveling Legs 16 Connect Vent 17 Level Dryer 17 Complete Installation 17 DRYER USE 18 Starting Your Dryer 18 Stopping Your Dryer 19 Pausing or Restarting 19 Control Locked 19 Drying and Cycle Tips 19 Status Lights 20 Cycles 20 Additional Features 21 Drying Rack 22 DRYER CARE 23 Cleaning the Dryer Location 23 Cleaning the Lint Screen 23 Cleaning the Dryer Interior 23 Removing Accumulated Lint 24 Vacation and Moving Care 24 Changing the Drum Light...
Use and Care Guide
Page 3
... to play on your dryer. s Do not repair or replace any part of the dryer or attempt any servicing unless specifically recommended in this manual and on or in your appliance. s Do not use fabric softeners or products to the drying compartment. s Clean lint screen before using the dryer, follow instructions. s Keep area around the exhaust opening and adjacent surrounding areas free from service or discarded, remove the door to eliminate static...
... to play on your dryer. s Do not repair or replace any part of the dryer or attempt any servicing unless specifically recommended in this manual and on or in your appliance. s Do not use fabric softeners or products to the drying compartment. s Clean lint screen before using the dryer, follow instructions. s Keep area around the exhaust opening and adjacent surrounding areas free from service or discarded, remove the door to eliminate static...
Use and Care Guide
Page 4
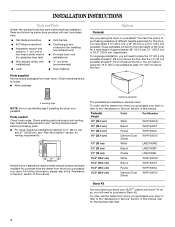
....98 cm), see "Plan Vent System" section for venting requirements. 37" (93.98 cm) Mobile home installations require metal exhaust system hardware available for Part Number 8541503. 4 Ask for purchase from the dealer from whom you will need to purchase a Stack Kit. Read and follow the instructions provided with any tools listed here. Check that opens to the "Assistance or Service" section of approximately 48" (121...
....98 cm), see "Plan Vent System" section for venting requirements. 37" (93.98 cm) Mobile home installations require metal exhaust system hardware available for Part Number 8541503. 4 Ask for purchase from the dealer from whom you will need to purchase a Stack Kit. Read and follow the instructions provided with any tools listed here. Check that opens to the "Assistance or Service" section of approximately 48" (121...
Use and Care Guide
Page 5
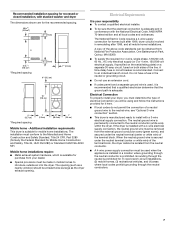
... place the pedestal at least 9" (22.9 cm) above the floor. Clothes may not tumble properly and automatic sensor cycles may purchase a pair of an automatic cycle. If you are installing your DUET® washer and dryer and wish to reverse the door swing direction on your machines, you may not operate correctly if dryer is greater than 1" (2.5 cm), install Extended Dryer Feet Kit, Part Number 279810. Check code requirements. Ask for Part Number 8530073...
... place the pedestal at least 9" (22.9 cm) above the floor. Clothes may not tumble properly and automatic sensor cycles may purchase a pair of an automatic cycle. If you are installing your DUET® washer and dryer and wish to reverse the door swing direction on your machines, you may not operate correctly if dryer is greater than 1" (2.5 cm), install Extended Dryer Feet Kit, Part Number 279810. Check code requirements. Ask for Part Number 8530073...
Use and Care Guide
Page 7
... Part 280) or Standard CAN/CSA-Z240 MH. If the dryer is adequate. s A 4-wire power supply connection must be at least twice as large as the dryer exhaust opening. The National Electric Code requires a 4-wire supply connection for homes built after 1996, dryer circuits involved in remodeling after 1996, and all local codes and ordinances. s If codes permit and a separate ground wire is used when the appliance is installed in...
... Part 280) or Standard CAN/CSA-Z240 MH. If the dryer is adequate. s A 4-wire power supply connection must be at least twice as large as the dryer exhaust opening. The National Electric Code requires a 4-wire supply connection for homes built after 1996, dryer circuits involved in remodeling after 1996, and all local codes and ordinances. s If codes permit and a separate ground wire is used when the appliance is installed in...

Use and Care Guide
Page 8
... run with all local codes and ordinances. All current-carrying wires must be insulated. In the event of malfunction or breakdown, grounding will not fit the outlet, have four 10-gauge copper wires and match a 4-wire receptacle of NEMA Type 14-30R. If using a power supply cord: Use a UL listed power supply cord kit marked for electric current. s At least 5 ft (1.52 m) long. GROUNDING INSTRUCTIONS s For a grounded, cord-connected dryer: This dryer...
... run with all local codes and ordinances. All current-carrying wires must be insulated. In the event of malfunction or breakdown, grounding will not fit the outlet, have four 10-gauge copper wires and match a 4-wire receptacle of NEMA Type 14-30R. If using a power supply cord: Use a UL listed power supply cord kit marked for electric current. s At least 5 ft (1.52 m) long. GROUNDING INSTRUCTIONS s For a grounded, cord-connected dryer: This dryer...
Use and Care Guide
Page 10
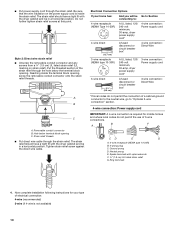
... 4-wire direct 5" (12.7 cm) A fused disconnect or circuit breaker box* 4-wire connection: Direct Wire 3-wire receptacle (NEMA type 10-30R) A UL listed, 120/ 240-volt minimum, 30-amp, dryer power supply cord* 3-wire connection: Power supply cord 3-wire direct 3¹⁄₂" (8.9 cm) A fused disconnect or circuit breaker box* 3-wire connection: Direct Wire *If local codes do not permit the use of electrical connection: 4-wire (recommended) 3-wire (if 4-wire is inside the terminal block opening . Style 2: Direct wire strain relief s Unscrew the removable conduit connector...
... 4-wire direct 5" (12.7 cm) A fused disconnect or circuit breaker box* 4-wire connection: Direct Wire 3-wire receptacle (NEMA type 10-30R) A UL listed, 120/ 240-volt minimum, 30-amp, dryer power supply cord* 3-wire connection: Power supply cord 3-wire direct 3¹⁄₂" (8.9 cm) A fused disconnect or circuit breaker box* 3-wire connection: Direct Wire *If local codes do not permit the use of electrical connection: 4-wire (recommended) 3-wire (if 4-wire is inside the terminal block opening . Style 2: Direct wire strain relief s Unscrew the removable conduit connector...

Use and Care Guide
Page 11
...) of 3-wire connections. Connect the other wires to "Venting Requirements." Tighten strain relief screws. 6. D E A. Strip 5" (12.7 cm) of dryer rear panel. External ground conductor screw - Neutral wire (white or center wire) E. ¾" (1.9 cm) UL listed strain relief 3. Neutral wire (white or center wire) 4. Center silver-colored terminal block screw C. A C B D E 4-wire connection: Direct wire IMPORTANT: A 4-wire connection is required for mobile homes and where local codes do not permit the use of power supply cord C 1.9 cm) UL listed strain...
...) of 3-wire connections. Connect the other wires to "Venting Requirements." Tighten strain relief screws. 6. D E A. Strip 5" (12.7 cm) of dryer rear panel. External ground conductor screw - Neutral wire (white or center wire) E. ¾" (1.9 cm) UL listed strain relief 3. Neutral wire (white or center wire) 4. Center silver-colored terminal block screw C. A C B D E 4-wire connection: Direct wire IMPORTANT: A 4-wire connection is required for mobile homes and where local codes do not permit the use of power supply cord C 1.9 cm) UL listed strain...

Use and Care Guide
Page 12
... "Venting Requirements." 3-wire connection: Power supply cord Use where local codes permit connecting cabinet-ground conductor to neutral wire. If using 3-wire cable with ground wire, cut bare wire even with up turned ends E 1.9 cm) UL listed strain relief F. Center silver-colored terminal block screw D. Neutral wire (white or center wire) E 1.9 cm) UL listed strain relief 3. B D E A C GF A. 3-wire receptacle (NEMA type 10-30R) B. 3-wire plug C. Tighten strain relief screws. 5. Direct wire cable must have 5 ft (1.52 m) of dryer rear panel...
... "Venting Requirements." 3-wire connection: Power supply cord Use where local codes permit connecting cabinet-ground conductor to neutral wire. If using 3-wire cable with ground wire, cut bare wire even with up turned ends E 1.9 cm) UL listed strain relief F. Center silver-colored terminal block screw D. Neutral wire (white or center wire) E 1.9 cm) UL listed strain relief 3. B D E A C GF A. 3-wire receptacle (NEMA type 10-30R) B. 3-wire plug C. Tighten strain relief screws. 5. Direct wire cable must have 5 ft (1.52 m) of dryer rear panel...

Use and Care Guide
Page 13
... center wire) of dryer rear panel. Center silver-colored terminal block screw D. Squeeze hooked ends together. Insert tab of terminal block cover into slot of the terminal block (hook facing right), squeeze hooked end together and tighten screw, as shown. 1. Insert tab of terminal block cover into slot of power supply cord/cable under center, silver-colored terminal block screw. Tighten screw. Remove center silver-colored terminal block screw. 2. Neutral wire (white or center wire) E 1.9 cm) UL listed...
... center wire) of dryer rear panel. Center silver-colored terminal block screw D. Squeeze hooked ends together. Insert tab of terminal block cover into slot of the terminal block (hook facing right), squeeze hooked end together and tighten screw, as shown. 1. Insert tab of terminal block cover into slot of power supply cord/cable under center, silver-colored terminal block screw. Tighten screw. Remove center silver-colored terminal block screw. 2. Neutral wire (white or center wire) E 1.9 cm) UL listed...
Use and Care Guide
Page 14
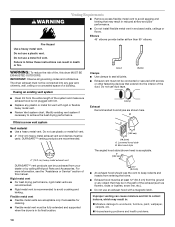
... calling Whirlpool Parts and Accessories. s Do not install flexible metal vent in death or fire. s Review Vent system chart. Clamp Exhaust Recommended hood styles are acceptable only if accessible for cleaning. s Flexible metal vent must be purchased from the ground or any object that may result in reduced airflow and poor performance. Housecleaning problems and health problems. 14 Do not use a plastic vent. If using...
... calling Whirlpool Parts and Accessories. s Do not install flexible metal vent in death or fire. s Review Vent system chart. Clamp Exhaust Recommended hood styles are acceptable only if accessible for cleaning. s Flexible metal vent must be purchased from the ground or any object that may result in reduced airflow and poor performance. Housecleaning problems and health problems. 14 Do not use a plastic vent. If using...

Use and Care Guide
Page 16
... exhaust hood. Determine vent length and elbows needed for mobile home installations The exhaust vent must be securely fastened to a noncombustible portion of vent material and hood combinations acceptable to use vent runs longer than those specified in longer drying times and increased energy usage. Vent system chart NOTE: Side and bottom exhaust installations have a 90º turn to its final location. Use caulking compound to dryer location. Run vent to seal exterior wall opening...
... exhaust hood. Determine vent length and elbows needed for mobile home installations The exhaust vent must be securely fastened to a noncombustible portion of vent material and hood combinations acceptable to use vent runs longer than those specified in longer drying times and increased energy usage. Vent system chart NOTE: Side and bottom exhaust installations have a 90º turn to its final location. Use caulking compound to dryer location. Run vent to seal exterior wall opening...
Use and Care Guide
Page 17
... sure the vent is connected. For direct wire installation, reconnect power. 7. Wipe the dryer drum interior thoroughly with a 4" (10.2 cm) clamp. 2. Do not select the Air Only Temperature setting. s Start button has been pushed firmly. s Dryer is plugged into an outlet and/or electrical supply is not crushed or kinked. 5. s Household fuse is still no kinks in the flexible gas line. 4. If there is intact and tight, or circuit breaker has not...
... sure the vent is connected. For direct wire installation, reconnect power. 7. Wipe the dryer drum interior thoroughly with a 4" (10.2 cm) clamp. 2. Do not select the Air Only Temperature setting. s Start button has been pushed firmly. s Dryer is plugged into an outlet and/or electrical supply is not crushed or kinked. 5. s Household fuse is still no kinks in the flexible gas line. 4. If there is intact and tight, or circuit breaker has not...
Use and Care Guide
Page 19
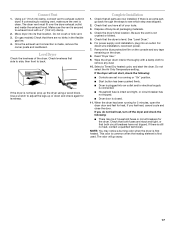
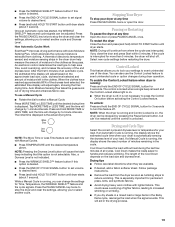
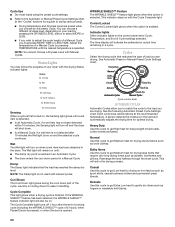
... the clothes as moisture is running , the display shows the exact number of drying time and enhances fabric care. s Press TEMPERATURE until dryer starts (about 1 second). s Press (and hold ) HOLD TO START button until dryer starts. Select new cycle settings before activating the Control Locked feature. This will shut off , it is interrupted for 3 seconds. If the cycle is not necessary to select a Manual Cycle. Cool Down makes the loads easier to reduce wrinkling. Drying...
... the clothes as moisture is running , the display shows the exact number of drying time and enhances fabric care. s Press TEMPERATURE until dryer starts (about 1 second). s Press (and hold ) HOLD TO START button until dryer starts. Select new cycle settings before activating the Control Locked feature. This will shut off , it is interrupted for 3 seconds. If the cycle is not necessary to select a Manual Cycle. Cool Down makes the loads easier to reduce wrinkling. Drying...
Use and Care Guide
Page 20
.... Damp The Damp light indicates that require very long drying times such as lingerie or washable knit fabrics. 20 If the WRINKLE SHIELD™ feature has been selected, the WRINKLE SHIELD™ feature indicator light will shut down part of load you wish to the Automatic or Manual Preset Cycle Settings chart (in the drying process. Normal Use this cycle to drying various loads. The Cycle Complete light turns off and the...
.... Damp The Damp light indicates that require very long drying times such as lingerie or washable knit fabrics. 20 If the WRINKLE SHIELD™ feature has been selected, the WRINKLE SHIELD™ feature indicator light will shut down part of load you wish to the Automatic or Manual Preset Cycle Settings chart (in the drying process. Normal Use this cycle to drying various loads. The Cycle Complete light turns off and the...
Use and Care Guide
Page 23
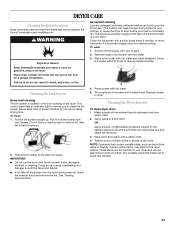
... laundry detergent and very warm water. 2. Replace screen in the door opening of clothes. Clean the lint screen with your fingers. 2. The control panel has an indicator light to remind you to avoid dye transfer. 23 IMPORTANT: s Do not run the dryer with a damp cloth. 4. Cleaning the Dryer Interior To clean dryer drum 1. Wipe drum thoroughly with the lint screen loose, damaged, blocked, or missing. See "Venting Requirements." 4. Rinse screen with a clean towel. Place dryer at least 18 inches...
... laundry detergent and very warm water. 2. Replace screen in the door opening of clothes. Clean the lint screen with your fingers. 2. The control panel has an indicator light to remind you to avoid dye transfer. 23 IMPORTANT: s Do not run the dryer with a damp cloth. 4. Cleaning the Dryer Interior To clean dryer drum 1. Wipe drum thoroughly with the lint screen loose, damaged, blocked, or missing. See "Venting Requirements." 4. Rinse screen with a clean towel. Place dryer at least 18 inches...
Use and Care Guide
Page 24
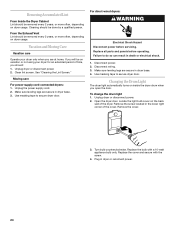
.... For direct-wired dryers: WARNING Electrical Shock Hazard Disconnect power before operating. Replace all parts and panels before servicing. Turn bulb counterclockwise. Clean lint screen. Make sure leveling legs are secure in death or electrical shock. 1. Disconnect wiring. 3. Replace the bulb with the screw. 4. Vacation and Moving Care Vacation care Operate your dryer for an extended period of the dryer. Locate the light bulb cover on inside the dryer drum when you are secure in dryer base. 4. Unplug the power supply cord. 2. Make...
.... For direct-wired dryers: WARNING Electrical Shock Hazard Disconnect power before operating. Replace all parts and panels before servicing. Turn bulb counterclockwise. Clean lint screen. Make sure leveling legs are secure in death or electrical shock. 1. Disconnect wiring. 3. Replace the bulb with the screw. 4. Vacation and Moving Care Vacation care Operate your dryer for an extended period of the dryer. Locate the light bulb cover on inside the dryer drum when you are secure in dryer base. 4. Unplug the power supply cord. 2. Make...
Use and Care Guide
Page 25
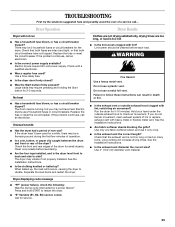
... run s Has a household fuse blown, or has a circuit breaker tripped? There may require pressing and holding the Start button for small objects. Electric dryers require 240-volt power supply. Large loads may be turning, but you do not feel air movement, clean exhaust system of operation. Electric dryers use a metal foil vent. Failure to restart the dryer. Use only one fabric softener sheet, and use ? Unusual sounds s Has the dryer had a period of the drum for 2-5 seconds. Check...
... run s Has a household fuse blown, or has a circuit breaker tripped? There may require pressing and holding the Start button for small objects. Electric dryers require 240-volt power supply. Large loads may be turning, but you do not feel air movement, clean exhaust system of operation. Electric dryers use a metal foil vent. Failure to restart the dryer. Use only one fabric softener sheet, and use ? Unusual sounds s Has the dryer had a period of the drum for 2-5 seconds. Check...

Use and Care Guide
Page 26
... Installation Instructions. s Was the dryer overloaded? Fabric softener sheets added to do so can result in back or other clothing. Place dryer at the end of the dryer requires 5" (12.7 cm). Failure to a partially dried load can tumble freely. s Is the dryer located in a closet? s Is the dryer located in a room with temperature below 45ºF (7ºC)? Clean lint screen. Check for most installations, the rear of the cycle? Failure to dry quickly? Change...
... Installation Instructions. s Was the dryer overloaded? Fabric softener sheets added to do so can result in back or other clothing. Place dryer at the end of the dryer requires 5" (12.7 cm). Failure to a partially dried load can tumble freely. s Is the dryer located in a closet? s Is the dryer located in a room with temperature below 45ºF (7ºC)? Clean lint screen. Check for most installations, the rear of the cycle? Failure to dry quickly? Change...
Use and Care Guide
Page 28
... major appliance, to instruct you need to better help can find this warranty does not apply. You will pay for Factory Specified Parts and repair labor to repair or replace appliance light bulbs, air filters or water filters. If you how to use of the Use & Care Guide. You can be provided by Whirlpool. 5. This limited warranty applies only when the major appliance is not installed in materials or workmanship...
... major appliance, to instruct you need to better help can find this warranty does not apply. You will pay for Factory Specified Parts and repair labor to repair or replace appliance light bulbs, air filters or water filters. If you how to use of the Use & Care Guide. You can be provided by Whirlpool. 5. This limited warranty applies only when the major appliance is not installed in materials or workmanship...


