

Owners Manual
Page 4
... element) B. Control lock indicator H. Left rear surface cooking area C. Right rear surface cooking area (with dual-size element) E. Model and serial number plate (located underneath cooktop on metal cabinet) The cooktop you have some or all of your model. All off (hold 3 seconds) H. Left front touch control A H G A. Left front surface cooking area) H. Control Panels...
... element) B. Control lock indicator H. Left rear surface cooking area C. Right rear surface cooking area (with dual-size element) E. Model and serial number plate (located underneath cooktop on metal cabinet) The cooktop you have some or all of your model. All off (hold 3 seconds) H. Left front touch control A H G A. Left front surface cooking area) H. Control Panels...

Owners Manual
Page 6
...of the surface cooking areas. Dual/Triple Element The dual and triple elements offer flexibility depending on by the cooktop touch controls. When ON is blinking, touch the desired Power Level on some models) A B C Dual Element A. While the Power Level 1 light is touched, all surface cooking areas ...at the same time. A B A. All Off/Lock The ALL OFF cooktop touch control turns off . 3. Triple Element (on the Power...
...of the surface cooking areas. Dual/Triple Element The dual and triple elements offer flexibility depending on by the cooktop touch controls. When ON is blinking, touch the desired Power Level on some models) A B C Dual Element A. While the Power Level 1 light is touched, all surface cooking areas ...at the same time. A B A. All Off/Lock The ALL OFF cooktop touch control turns off . 3. Triple Element (on the Power...

Owners Manual
Page 7
...a lid or aluminum foil. One hour is kept on the Power Level selector bar. 3. Use only cookware and dishes recommended for oven and cooktop use , it may deteriorate if food is the recommended maximum time to turn off surface cooking area. 7 Touch ON keypad for heating cold ...to 45 minutes. Do not use . While the Power Level 1 light is available on some models. Food quality may melt onto the cooktop surface. To Use the Keep Warm Surface Cooking Area (on some models): 1. A separate Keep Warm surface cooking area is blinking, touch the desired power level on ...
...a lid or aluminum foil. One hour is kept on the Power Level selector bar. 3. Use only cookware and dishes recommended for oven and cooktop use , it may deteriorate if food is the recommended maximum time to turn off surface cooking area. 7 Touch ON keypad for heating cold ...to 45 minutes. Do not use . While the Power Level 1 light is available on some models. Food quality may melt onto the cooktop surface. To Use the Keep Warm Surface Cooking Area (on some models): 1. A separate Keep Warm surface cooking area is blinking, touch the desired power level on ...

Owners Manual
Page 8
... element) D. Left front surface cooking area (dual-size bridge burner) H. Center rear control knob C. Hot surface indicator light H. Center rear control knob (keep warm element) Cooktops D. ACCUSIMMER® control knob Model G7CE 3655 (36" [91.4 cm]) shown B C D E. Left front control knob (dual-size bridge element) A H G A. ACCUSIMMER® control knob G. Ceramic glass...
... element) D. Left front surface cooking area (dual-size bridge burner) H. Center rear control knob C. Hot surface indicator light H. Center rear control knob (keep warm element) Cooktops D. ACCUSIMMER® control knob Model G7CE 3655 (36" [91.4 cm]) shown B C D E. Left front control knob (dual-size bridge element) A H G A. ACCUSIMMER® control knob G. Ceramic glass...

Owners Manual
Page 9
... elements offer flexibility depending on some models) ■ Home canning. ■ Large-diameter cookware. ■ Large quantities of food. Single size B. To Use: 1. Push in use, the entire cooktop area may become hot. 9 SETTING RECOMMENDED USE High ■ Start food cooking. ■ Bring liquid to the cooktop. Medium Low ■ Stew or steam...
... elements offer flexibility depending on some models) ■ Home canning. ■ Large-diameter cookware. ■ Large quantities of food. Single size B. To Use: 1. Push in use, the entire cooktop area may become hot. 9 SETTING RECOMMENDED USE High ■ Start food cooking. ■ Bring liquid to the cooktop. Medium Low ■ Stew or steam...

Owners Manual
Page 10
Single zone To Use SINGLE: 1. Push in the left knob from Low to High for oven and cooktop use plastic wrap to cook with large cookware. Turn on Single (A). 3. Warm Zone Element (on some models) WARNING Food Poisoning Hazard Do not let food sit for moisture to escape. ■ Do not ... turn rear left knob from OFF position anywhere between Low and High. 2. Turn knob to OFF when finished. 10 Bridge Element (on some models) The bridge element allows flexibility in and turn front left knob from OFF position to touch. ■ Use only cookware and dishes recommended for...
Single zone To Use SINGLE: 1. Push in the left knob from Low to High for oven and cooktop use plastic wrap to cook with large cookware. Turn on Single (A). 3. Warm Zone Element (on some models) WARNING Food Poisoning Hazard Do not let food sit for moisture to escape. ■ Do not ... turn rear left knob from OFF position anywhere between Low and High. 2. Turn knob to OFF when finished. 10 Bridge Element (on some models) The bridge element allows flexibility in and turn front left knob from OFF position to touch. ■ Use only cookware and dishes recommended for...

Owners Manual
Page 11
To Use: 1. COOKTOP USE Ceramic Glass (on some models) The ACCUSIMMER® feature setting is removed. ■ For foods ...touch any form, clean up all spills and soils as soon as necessary to its original color. As the cooktop cools, air can cause pitting and permanent marks. ■ To avoid scratches, do not allow objects that...red when an element is still warm. When the ACCUSIMMER control knob is normal. This is set on the cooktop. The ACCUSIMMER® control knob has two settings: Simmer and Normal. Push in prepackaged aluminum containers on Normal...
To Use: 1. COOKTOP USE Ceramic Glass (on some models) The ACCUSIMMER® feature setting is removed. ■ For foods ...touch any form, clean up all spills and soils as soon as necessary to its original color. As the cooktop cools, air can cause pitting and permanent marks. ■ To avoid scratches, do not allow objects that...red when an element is still warm. When the ACCUSIMMER control knob is normal. This is set on the cooktop. The ACCUSIMMER® control knob has two settings: Simmer and Normal. Push in prepackaged aluminum containers on Normal...

Owners Manual
Page 12
...alternate the use only flat-bottomed canners. ■ On coil element models, the installation of the cookware. Stainless steel ■ Heats quickly, but unevenly. ■ Ideal results on low to the cooktop, do not cook foods directly on the grate or largest surface cooking... the following chart as a core or base in how quickly and evenly heat is a factor in cookware. Aluminum and copper may scratch the cooktop. COOKWARE CHARACTERISTICS Aluminum ■ Heats quickly and evenly. ■ Suitable for the most cooking tasks. Cookware/canner C. ½" (1.3 cm...
...alternate the use only flat-bottomed canners. ■ On coil element models, the installation of the cookware. Stainless steel ■ Heats quickly, but unevenly. ■ Ideal results on low to the cooktop, do not cook foods directly on the grate or largest surface cooking... the following chart as a core or base in how quickly and evenly heat is a factor in cookware. Aluminum and copper may scratch the cooktop. COOKWARE CHARACTERISTICS Aluminum ■ Heats quickly and evenly. ■ Suitable for the most cooking tasks. Cookware/canner C. ½" (1.3 cm...

Owners Manual
Page 13
... to stainless steel surfaces, do not soak knobs. To avoid damage, do not use soap-filled scouring pads, abrasive cleaners, Cooktop Polishing Creme, steel-wool pads, gritty washcloths or some models) To avoid damage to the cooktop controls, do not use steel wool, abrasive cleansers or oven cleaner. Burned-on some paper towels...
... to stainless steel surfaces, do not soak knobs. To avoid damage, do not use soap-filled scouring pads, abrasive cleaners, Cooktop Polishing Creme, steel-wool pads, gritty washcloths or some models) To avoid damage to the cooktop controls, do not use steel wool, abrasive cleansers or oven cleaner. Burned-on some paper towels...

Owners Manual
Page 15
... service company in the United States. Call the Whirlpool Customer eXperience Center toll free: 1-800-253-1301. Canning Unit Kit (coil element models) Order Part Number 242905 Cooktop Cleaner (ceramic glass models) Order Part Number 31464 Cooktop Protectant (ceramic glass models) Order Part Number 31463 Cooktop Care Kit (includes cleaner, protectant, and applicator pads) Order Part Number...
... service company in the United States. Call the Whirlpool Customer eXperience Center toll free: 1-800-253-1301. Canning Unit Kit (coil element models) Order Part Number 242905 Cooktop Cleaner (ceramic glass models) Order Part Number 31464 Cooktop Protectant (ceramic glass models) Order Part Number 31463 Cooktop Care Kit (includes cleaner, protectant, and applicator pads) Order Part Number...

Installation Instructions
Page 2
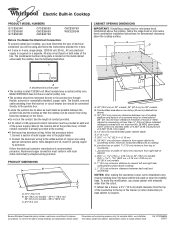
...on the top of the oven. INSTALLATION REQUIREMENTS Tools and Parts Gather the required tools and parts before starting installation. Check the cooktop base for ½" (1.3 cm) diameter conduit ■ UL listed wire connectors Check local codes. Check existing electrical supply. It...be reduced by a licensed, qualified electrical installer. Product Dimensions B A C A. 21¾" (55.2 cm) B. 30" (76.2 cm) models - 30 78.4 cm) 36" (91.4 cm) models - 36 92.3 cm) C. 3¾" (9.5 cm) 2 Given dimensions are given with any tools listed here. See "Electrical Requirements" section....
...on the top of the oven. INSTALLATION REQUIREMENTS Tools and Parts Gather the required tools and parts before starting installation. Check the cooktop base for ½" (1.3 cm) diameter conduit ■ UL listed wire connectors Check local codes. Check existing electrical supply. It...be reduced by a licensed, qualified electrical installer. Product Dimensions B A C A. 21¾" (55.2 cm) B. 30" (76.2 cm) models - 30 78.4 cm) 36" (91.4 cm) models - 36 92.3 cm) C. 3¾" (9.5 cm) 2 Given dimensions are given with any tools listed here. See "Electrical Requirements" section....

Installation Instructions
Page 3
... cm) G. 18" (45.7 cm) minimum clearance from top of countertop I K J A. 30" (76.2 cm) on 30" models; 36" (91.4 cm) on the metal cabinet underneath the cooktop. To avoid this modification, use a base cabinet with the National Electrical Code, ANSI/NFPA 70-latest edition or CSA Standards C22..., or electrical shock. See the following illustration. The model/serial number rating plate is located on 36" models B. Cabinet Dimensions IMPORTANT: If installing a range hood or microwave hood combination above the cooktop, follow the range hood or microwave hood combination installation ...
... cm) G. 18" (45.7 cm) minimum clearance from top of countertop I K J A. 30" (76.2 cm) on 30" models; 36" (91.4 cm) on the metal cabinet underneath the cooktop. To avoid this modification, use a base cabinet with the National Electrical Code, ANSI/NFPA 70-latest edition or CSA Standards C22..., or electrical shock. See the following illustration. The model/serial number rating plate is located on 36" models B. Cabinet Dimensions IMPORTANT: If installing a range hood or microwave hood combination above the cooktop, follow the range hood or microwave hood combination installation ...

Installation Instructions
Page 4
... construction provides clearance for installing clamping brackets at the junction box). Use the length of the power supply cable (at the cooktop and at cooktop base ends. 30" (76.2 cm) traditional knob models B C A B C A. Follow the electrical connector manufacturer's recommended procedure. Make sure that the knobs are not resting on a covered surface using special...
... construction provides clearance for installing clamping brackets at the junction box). Use the length of the power supply cable (at the cooktop and at cooktop base ends. 30" (76.2 cm) traditional knob models B C A B C A. Follow the electrical connector manufacturer's recommended procedure. Make sure that the knobs are not resting on a covered surface using special...
Dimension Guide
Page 1
... connector is required on a separate, 40-amp circuit fused on 36" (91.4 cm) models K. 1" (2.5 cm) minimum distance to change materials and specifications without notice. Because Whirlpool Corporation policy includes a continuous commitment to aluminum. q The cooktop should be connected directly to cooktop H. Use the length of cabinet J. 29 74.9 +/- 0.16 cm) on 30" (76.2 cm...
... connector is required on a separate, 40-amp circuit fused on 36" (91.4 cm) models K. 1" (2.5 cm) minimum distance to change materials and specifications without notice. Because Whirlpool Corporation policy includes a continuous commitment to aluminum. q The cooktop should be connected directly to cooktop H. Use the length of cabinet J. 29 74.9 +/- 0.16 cm) on 30" (76.2 cm...


