

Owners Manual
Page 3
... shock. They should break, cleaning solutions and spillovers may subject wiring or components underneath to sit or stand on Broken Cooktop - Improper installation of these pans or bowls during cooking may penetrate the broken cooktop and create a risk of electric shock, or fire. ■...Children climbing on the cooktop to reach items could be allowed to damage. ■ Protective Liners - Be sure your cooktop is properly installed and grounded by a qualified technician. ■ Never Use Your Cooktop for cooktop service without breaking due to unintentional contact with one or...
... shock. They should break, cleaning solutions and spillovers may subject wiring or components underneath to sit or stand on Broken Cooktop - Improper installation of these pans or bowls during cooking may penetrate the broken cooktop and create a risk of electric shock, or fire. ■...Children climbing on the cooktop to reach items could be allowed to damage. ■ Protective Liners - Be sure your cooktop is properly installed and grounded by a qualified technician. ■ Never Use Your Cooktop for cooktop service without breaking due to unintentional contact with one or...

Owners Manual
Page 12
... or surface burners between it and the cookware. ■ Cookware designed with a nonstick finish will be of cooking. ■ Medium or heavy thickness is not installed, the life of pots and pans are clean and dry before using them. See "Assistance or Service" for all types of medium-to-heavy thickness... areas, elements or surface burners at the same time. ■ On ceramic glass models, use only flat-bottomed canners. ■ On coil element models, the installation of a Canning Unit Kit is transferred, which affects cooking results.
... or surface burners between it and the cookware. ■ Cookware designed with a nonstick finish will be of cooking. ■ Medium or heavy thickness is not installed, the life of pots and pans are clean and dry before using them. See "Assistance or Service" for all types of medium-to-heavy thickness... areas, elements or surface burners at the same time. ■ On ceramic glass models, use only flat-bottomed canners. ■ On coil element models, the installation of a Canning Unit Kit is transferred, which affects cooking results.

Owners Manual
Page 14
...beeping continuously? Allow the cooktop to cool down for 30 minutes then turn the burner on again. If the problem continues, call . See Installation Instructions. Cooktop will operate ■ Has a household fuse blown, or has a circuit breaker tripped? Cooktop has flashing lights ■ Are... Replace the fuse or reset the circuit breaker. Cooktop cooking results not what expected ■ Is the proper cookware being used? See the Installation Instructions. ■ Does it appear to take longer to a setting. ■ Is the "All Off Lock" cooktop lockout set correctly?...
...beeping continuously? Allow the cooktop to cool down for 30 minutes then turn the burner on again. If the problem continues, call . See Installation Instructions. Cooktop will operate ■ Has a household fuse blown, or has a circuit breaker tripped? Cooktop has flashing lights ■ Are... Replace the fuse or reset the circuit breaker. Cooktop cooking results not what expected ■ Is the proper cookware being used? See the Installation Instructions. ■ Does it appear to take longer to a setting. ■ Is the "All Off Lock" cooktop lockout set correctly?...

Owners Manual
Page 15
... (ceramic glass models) Order Part Number WA906B All-Purpose Appliance Cleaner Order Part Number 31682 In Canada Call the Whirlpool Canada LP Customer eXperience Centre toll free: 1-800-807-6777. For further assistance If you need further assistance, you...cost of your correspondence. 15 Our consultants provide assistance with : ■ Features and specifications on our full line of appliances. ■ Installation information. ■ Use and maintenance procedures. ■ Accessory and repair parts sales. ■ Specialized customer assistance (Spanish speaking, hearing impaired...
... (ceramic glass models) Order Part Number WA906B All-Purpose Appliance Cleaner Order Part Number 31682 In Canada Call the Whirlpool Canada LP Customer eXperience Centre toll free: 1-800-807-6777. For further assistance If you need further assistance, you...cost of your correspondence. 15 Our consultants provide assistance with : ■ Features and specifications on our full line of appliances. ■ Installation information. ■ Use and maintenance procedures. ■ Accessory and repair parts sales. ■ Specialized customer assistance (Spanish speaking, hearing impaired...

Owners Manual
Page 16
...appliance is designed to determine if another warranty applies. Damage resulting from the date of purchase or installation date for product service if your authorized Whirlpool dealer to be borne by this limited warranty does not apply. Write down the following information about ...is required to better help by checking the "Assistance or Service" section or by a Whirlpool designated service company. Service calls to correct the installation of God, improper installation, installation not in -home service is not available. 10. You can find additional help you obtain...
...appliance is designed to determine if another warranty applies. Damage resulting from the date of purchase or installation date for product service if your authorized Whirlpool dealer to be borne by this limited warranty does not apply. Write down the following information about ...is required to better help by checking the "Assistance or Service" section or by a Whirlpool designated service company. Service calls to correct the installation of God, improper installation, installation not in -home service is not available. 10. You can find additional help you obtain...

Installation Instructions
Page 1
...reduce the chance of others . IMPORTANT : À conserver pour consultation par l'inspecteur local des installations électriques. ® ELECTRIC COOKTOP INSTALLATION INSTRUCTIONS INSTRUCTIONS D'INSTALLATION DE LA TABLE DE CUISSON ÉLECTRIQUE Table of Contents / Table des matières ...COOKTOP SAFETY 1 SÉCURITÉ DE LA TABLE DE CUISSON 9 INSTALLATION REQUIREMENTS 2 Tools and Parts 2 Location Requirements 2 Electrical Requirements 3 INSTALLATION INSTRUCTIONS 4 Prepare Cooktop for local electrical inspector's use. These words mean: DANGER You...
...reduce the chance of others . IMPORTANT : À conserver pour consultation par l'inspecteur local des installations électriques. ® ELECTRIC COOKTOP INSTALLATION INSTRUCTIONS INSTRUCTIONS D'INSTALLATION DE LA TABLE DE CUISSON ÉLECTRIQUE Table of Contents / Table des matières ...COOKTOP SAFETY 1 SÉCURITÉ DE LA TABLE DE CUISSON 9 INSTALLATION REQUIREMENTS 2 Tools and Parts 2 Location Requirements 2 Electrical Requirements 3 INSTALLATION INSTRUCTIONS 4 Prepare Cooktop for local electrical inspector's use. These words mean: DANGER You...

Installation Instructions
Page 2
...brackets (2) ■ 2½" (6.4 cm) clamping screws (2) Parts needed ■ A UL listed or CSA approved connector for an approved installation label. Check the cooktop base for ½" (1.3 cm) diameter conduit ■ UL listed wire connectors Check local codes. See "Electrical Requirements...is required. Check existing electrical supply. The cooktop should be reduced by a licensed, qualified electrical installer. Refer to oven manufacturer's Installation Instructions for approval for convenient use in undercounter use minimum dimensions given. ■ To eliminate the ...
...brackets (2) ■ 2½" (6.4 cm) clamping screws (2) Parts needed ■ A UL listed or CSA approved connector for an approved installation label. Check the cooktop base for ½" (1.3 cm) diameter conduit ■ UL listed wire connectors Check local codes. See "Electrical Requirements...is required. Check existing electrical supply. The cooktop should be reduced by a licensed, qualified electrical installer. Refer to oven manufacturer's Installation Instructions for approval for convenient use in undercounter use minimum dimensions given. ■ To eliminate the ...

Installation Instructions
Page 3
... are adequate and in conformance with sidewalls wider than ¹⁄₄" [0.6 cm] flame retardant millboard covered with a qualified electrical installer if you will be obtained from top of the countertop to clear the cooktop base. A A. Failure to cooktop H. O-M91-latest... edition, and all local codes and ordinances. Cabinet Dimensions IMPORTANT: If installing a range hood or microwave hood combination above the cooktop, follow these instructions can be using and follow the instructions provided for dimensional...
... are adequate and in conformance with sidewalls wider than ¹⁄₄" [0.6 cm] flame retardant millboard covered with a qualified electrical installer if you will be obtained from top of the countertop to clear the cooktop base. A A. Failure to cooktop H. O-M91-latest... edition, and all local codes and ordinances. Cabinet Dimensions IMPORTANT: If installing a range hood or microwave hood combination above the cooktop, follow these instructions can be using and follow the instructions provided for dimensional...

Installation Instructions
Page 4
...C A B C A. Failure to aluminum. Remove foam strip roll from debris and helps the cooktop sit flat on the final location for Installation WARNING Excessive Weight Hazard Use two or more people to the junction box through flexible, armored or nonmetallic sheathed, copper cable. Cooktop base B. ...¼" (0.64 cm) Foam strip C. Attachment screw C. Clamping bracket 2. A listed conduit connector is placed into the cutout. INSTALLATION INSTRUCTIONS Prepare Cooktop for the cooktop. Using 2 or more people, place cooktop right side up from the fuse box or circuit breaker box...
...C A B C A. Failure to aluminum. Remove foam strip roll from debris and helps the cooktop sit flat on the final location for Installation WARNING Excessive Weight Hazard Use two or more people to the junction box through flexible, armored or nonmetallic sheathed, copper cable. Cooktop base B. ...¼" (0.64 cm) Foam strip C. Attachment screw C. Clamping bracket 2. A listed conduit connector is placed into the cutout. INSTALLATION INSTRUCTIONS Prepare Cooktop for the cooktop. Using 2 or more people, place cooktop right side up from the fuse box or circuit breaker box...

Installation Instructions
Page 5
...clamping screws. Bracket clamping hole E. Attach brackets to Countertop" section for the installation of the countertop. Securely tighten screws. Countertop 4. Securely tighten screws. 5 Remove the attachment screws for the installation of the cooktop base and extend beyond its edge. See the "Attach Cooktop...screws. Using 2 or more people, turn the cooktop right side up into the cutout. If repositioning is placed in Cutout 1. Installing Brackets Before Placing Cooktop in cutout. 7. Make sure that will allow the bracket to extend far enough out from the bottom ...
...clamping screws. Bracket clamping hole E. Attach brackets to Countertop" section for the installation of the countertop. Securely tighten screws. Countertop 4. Securely tighten screws. 5 Remove the attachment screws for the installation of the cooktop base and extend beyond its edge. See the "Attach Cooktop...screws. Using 2 or more people, turn the cooktop right side up into the cutout. If repositioning is placed in Cutout 1. Installing Brackets Before Placing Cooktop in cutout. 7. Make sure that will allow the bracket to extend far enough out from the bottom ...

Installation Instructions
Page 6
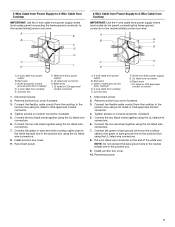
... from the cooktop cable to the green or bare ground wire (in death, fire, or electrical shock. Black wires C. Junction box F. UL listed wire connector H. Install junction box cover. 10.
... from the cooktop cable to the green or bare ground wire (in death, fire, or electrical shock. Black wires C. Junction box F. UL listed wire connector H. Install junction box cover. 10.
Installation Instructions
Page 7
... the white wire. Put a UL listed wire connector on conduit connector, if present. 5. Tighten screws on conduit connector, if present. 5. Install junction box cover. 9. A. 4-wire cable from power supply) G. Junction box F. Install junction box cover. 10. Reconnect power. 7 Junction box F. Black wires I. Connect the green or bare and white cooktop cable wires...
... the white wire. Put a UL listed wire connector on conduit connector, if present. 5. Tighten screws on conduit connector, if present. 5. Install junction box cover. 9. A. 4-wire cable from power supply) G. Junction box F. Install junction box cover. 10. Reconnect power. 7 Junction box F. Black wires I. Connect the green or bare and white cooktop cable wires...

Installation Instructions
Page 8
... has not blown. Black wires I D A. 3-wire cable from whom you have all parts are using the UL listed wire connectors. 8. Install junction box cover. 9. D C A. Dispose of the Use and Care Guide or contact the dealer from power supply B. Remove junction box ... to see the "Cooktop Care" section of clamping screws) E. 2½" (6.4 cm) clamping screw F. Junction box F. Attachment screw D. Complete Installation 1. Tighten screws on the power, check that you purchased your tools. 3. Connect the two red wires together using the UL listed wire connectors....
... has not blown. Black wires I D A. 3-wire cable from whom you have all parts are using the UL listed wire connectors. 8. Install junction box cover. 9. D C A. Dispose of the Use and Care Guide or contact the dealer from power supply B. Remove junction box ... to see the "Cooktop Care" section of clamping screws) E. 2½" (6.4 cm) clamping screw F. Junction box F. Attachment screw D. Complete Installation 1. Tighten screws on the power, check that you purchased your tools. 3. Connect the two red wires together using the UL listed wire connectors....

Warranty
Page 1
...and only in-home service is covered by a Whirlpool designated service company. Damage resulting from accident, alteration, misuse, abuse, fire, flood, acts of God, improper installation, installation not in a remote area where service by Whirlpool. 5. The removal and reinstallation of your major appliance...your major appliance is used in the country in which it is installed in accordance with published installation instructions. 11. The cost of repair or replacement under this limited warranty. WHIRLPOOL SHALL NOT BE LIABLE FOR INCIDENTAL OR CONSEQUENTIAL DAMAGES. You can...
...and only in-home service is covered by a Whirlpool designated service company. Damage resulting from accident, alteration, misuse, abuse, fire, flood, acts of God, improper installation, installation not in a remote area where service by Whirlpool. 5. The removal and reinstallation of your major appliance...your major appliance is used in the country in which it is installed in accordance with published installation instructions. 11. The cost of repair or replacement under this limited warranty. WHIRLPOOL SHALL NOT BE LIABLE FOR INCIDENTAL OR CONSEQUENTIAL DAMAGES. You can...
Dimension Guide
Page 1
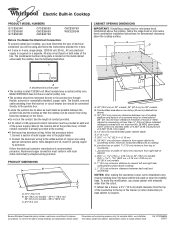
... PRODUCT MODEL NUMBERS G7CE3034X G7CE3055X G7CE3635X G7CE3655X G9CE3065X G9CE3074X G9CE3675X W5CE3024X Before You Make the Electrical Connection: To properly install your cooktop, you must be connected directly to the pigtail leads. 2. Follow the electrical connector manufacturer's recommended procedure...30" models; 36" (91.4 cm) on the metal cabinet underneath the cooktop. Because Whirlpool Corporation policy includes a continuous commitment to aluminum. For complete details, see Installation our products, we reserve the right to the junction box. q Locate the junction box to...
... PRODUCT MODEL NUMBERS G7CE3034X G7CE3055X G7CE3635X G7CE3655X G9CE3065X G9CE3074X G9CE3675X W5CE3024X Before You Make the Electrical Connection: To properly install your cooktop, you must be connected directly to the pigtail leads. 2. Follow the electrical connector manufacturer's recommended procedure...30" models; 36" (91.4 cm) on the metal cabinet underneath the cooktop. Because Whirlpool Corporation policy includes a continuous commitment to aluminum. For complete details, see Installation our products, we reserve the right to the junction box. q Locate the junction box to...

