

Owners Manual
Page 2
... Cookware 12 COOKTOP CARE 13 General Cleaning 13 TROUBLESHOOTING 14 ASSISTANCE OR SERVICE 15 In the U.S.A 15 Accessories 15 In Canada 15 WARRANTY 16 TABLE DES MATIÈRES SÉCURITÉ DE LA TABLE DE CUISSON 17 PIÈCES ET CARACTÉRISTIQUES - TABLE OF CONTENTS COOKTOP SAFETY 2 PARTS AND FEATURES - KNOB CONTROLS 8 COOKTOP CONTROLS - WARNING You can happen if the instructions are...
... Cookware 12 COOKTOP CARE 13 General Cleaning 13 TROUBLESHOOTING 14 ASSISTANCE OR SERVICE 15 In the U.S.A 15 Accessories 15 In Canada 15 WARRANTY 16 TABLE DES MATIÈRES SÉCURITÉ DE LA TABLE DE CUISSON 17 PIÈCES ET CARACTÉRISTIQUES - TABLE OF CONTENTS COOKTOP SAFETY 2 PARTS AND FEATURES - KNOB CONTROLS 8 COOKTOP CONTROLS - WARNING You can happen if the instructions are...

Owners Manual
Page 3
... Leave Surface Units Unattended at High Heat Settings - If a wet sponge or cloth is properly installed and grounded by a qualified technician. ■ Never Use Your Cooktop for cooktop service without breaking due to cause burns. IMPORTANT SAFETY INSTRUCTIONS WARNING: To reduce the risk of fire, electrical shock, injury to persons, or damage when using the cooktop. ■ User Servicing - Be sure your cooktop is used to wipe...
... Leave Surface Units Unattended at High Heat Settings - If a wet sponge or cloth is properly installed and grounded by a qualified technician. ■ Never Use Your Cooktop for cooktop service without breaking due to cause burns. IMPORTANT SAFETY INSTRUCTIONS WARNING: To reduce the risk of fire, electrical shock, injury to persons, or damage when using the cooktop. ■ User Servicing - Be sure your cooktop is used to wipe...

Owners Manual
Page 5
.... ■ Cook soups, sauces and gravies. ■ Stew or steam food. ■ Provide lowest simmer/heat setting. ■ Simmer (range of simmer temperatures). ■ Melt chocolate and butter Dual/Triple Elements ■ Large-diameter cookware. ■ Large quantities of the control panel, above the Power Level selector bar. Hot Surface Indicator Light The Hot Surface Indicator Light is located in death or fire. The lights for the desired element. The power level 1 light next...
.... ■ Cook soups, sauces and gravies. ■ Stew or steam food. ■ Provide lowest simmer/heat setting. ■ Simmer (range of simmer temperatures). ■ Melt chocolate and butter Dual/Triple Elements ■ Large-diameter cookware. ■ Large quantities of the control panel, above the Power Level selector bar. Hot Surface Indicator Light The Hot Surface Indicator Light is located in death or fire. The lights for the desired element. The power level 1 light next...

Owners Manual
Page 6
.... To change the burner zones being used while cooking, touch ON once then again while the Power Level 1 light is blinking. 5. All Off/Lock The ALL OFF cooktop touch control turns off surface cooking area(s) individually or ALL OFF/LOCK to indicate if the burner will glow. To Lock Cooktop: Touch and hold the ALL OFF/LOCK keypad for 3 seconds. Triple element light C. Dual size C. Triple size A B A. When the cooktop is locked out, the surface cooking areas...
.... To change the burner zones being used while cooking, touch ON once then again while the Power Level 1 light is blinking. 5. All Off/Lock The ALL OFF cooktop touch control turns off surface cooking area(s) individually or ALL OFF/LOCK to indicate if the burner will glow. To Lock Cooktop: Touch and hold the ALL OFF/LOCK keypad for 3 seconds. Triple element light C. Dual size C. Triple size A B A. When the cooktop is locked out, the surface cooking areas...

Owners Manual
Page 8
...Right front surface cooking area F. KNOB CONTROLS This manual covers different models. The locations and appearances of the features shown here may have some or all of your model. ACCUSIMMER® control knob G. Hot surface indicator light F. Left front control knob (dual-size bridge element) A H G A. Left rear control knob B. Left front control knob E. Cooktop on metal cabinet) Right front control knob (dual-zone burner) F. Ceramic glass cooktop B. Right rear surface cooking area (with triple-size element) D. Center rear warming zone 8 F D. Control panel...
...Right front surface cooking area F. KNOB CONTROLS This manual covers different models. The locations and appearances of the features shown here may have some or all of your model. ACCUSIMMER® control knob G. Hot surface indicator light F. Left front control knob (dual-size bridge element) A H G A. Left rear control knob B. Left front control knob E. Cooktop on metal cabinet) Right front control knob (dual-zone burner) F. Ceramic glass cooktop B. Right rear surface cooking area (with triple-size element) D. Center rear warming zone 8 F D. Control panel...

Owners Manual
Page 11
COOKTOP USE Ceramic Glass (on some models) The ACCUSIMMER® feature setting is an adjustable heat setting for more precise simmering. Some parts of the surface cooking area may not glow red when an element is on and off the cooktop before and after each use the cooktop as possible. As the glass cools, it free from stains and provide the most even heating. Then, while wearing oven mitts, remove the spills using lids...
COOKTOP USE Ceramic Glass (on some models) The ACCUSIMMER® feature setting is an adjustable heat setting for more precise simmering. Some parts of the surface cooking area may not glow red when an element is on and off the cooktop before and after each use the cooktop as possible. As the glass cools, it free from stains and provide the most even heating. Then, while wearing oven mitts, remove the spills using lids...

Owners Manual
Page 12
... empty cookware on 2 surface cooking areas, elements or surface burners at the same time. ■ On ceramic glass models, use of aluminum or copper on low to medium heat settings. Aluminum and copper may scratch the cooktop. Use the following chart as a guide for best heat conduction and energy efficiency. Ceramic or Ceramic glass ■ Follow manufacturer's instructions. ■ Heats slowly, but unevenly. ■ A core or base of surface cooking areas, elements or surface burners between it and...
... empty cookware on 2 surface cooking areas, elements or surface burners at the same time. ■ On ceramic glass models, use of aluminum or copper on low to medium heat settings. Aluminum and copper may scratch the cooktop. Use the following chart as a guide for best heat conduction and energy efficiency. Ceramic or Ceramic glass ■ Follow manufacturer's instructions. ■ Heats slowly, but unevenly. ■ A core or base of surface cooking areas, elements or surface burners between it and...

Owners Manual
Page 13
... spots. STAINLESS STEEL (on surface and scrape. When replacing knobs, make sure all controls are suggested first unless otherwise noted. Rub creme into surface with electronic controls, lock the controls. Burned-on cleaning products. Repeat for hard water spots. Polish entire cooktop with a damp paper towel or soft cloth. CERAMIC GLASS To avoid damage to order. Metal marks from control panel to the cooktop controls, do not use steel wool...
... spots. STAINLESS STEEL (on surface and scrape. When replacing knobs, make sure all controls are suggested first unless otherwise noted. Rub creme into surface with electronic controls, lock the controls. Burned-on cleaning products. Repeat for hard water spots. Polish entire cooktop with a damp paper towel or soft cloth. CERAMIC GLASS To avoid damage to order. Metal marks from control panel to the cooktop controls, do not use steel wool...

Owners Manual
Page 14
... the cooktop lights continue to flash, disconnect power or unplug the cooktop. 4. The cooktop regulates the temperature of the internal components and automatically reduces the power of an unnecessary service call. Replace the fuse or reset the circuit breaker. After 1 minute, reconnect power or plug in use, the entire cooktop area may become hot? If the lights continue to blink on and off ? See "Cookware" section. ■ Is the control knob set ? All cooktop control panel lights...
... the cooktop lights continue to flash, disconnect power or unplug the cooktop. 4. The cooktop regulates the temperature of the internal components and automatically reduces the power of an unnecessary service call. Replace the fuse or reset the circuit breaker. After 1 minute, reconnect power or plug in use, the entire cooktop area may become hot? If the lights continue to blink on and off ? See "Cookware" section. ■ Is the control knob set ? All cooktop control panel lights...

Owners Manual
Page 15
... any questions or concerns at 1-866-664-2449 and follow the instructions below. Canning Unit Kit (coil element models) Order Part Number 242905 Cooktop Cleaner (ceramic glass models) Order Part Number 31464 Cooktop Protectant (ceramic glass models) Order Part Number 31463 Cooktop Care Kit (includes cleaner, protectant, and applicator pads) Order Part Number 31605 Cooktop Scraper (ceramic glass models) Order Part Number WA906B All-Purpose Appliance Cleaner Order Part Number 31682 In Canada Call the Whirlpool Canada LP Customer eXperience Centre toll free: 1-800-807-6777.
... any questions or concerns at 1-866-664-2449 and follow the instructions below. Canning Unit Kit (coil element models) Order Part Number 242905 Cooktop Cleaner (ceramic glass models) Order Part Number 31464 Cooktop Protectant (ceramic glass models) Order Part Number 31463 Cooktop Care Kit (includes cleaner, protectant, and applicator pads) Order Part Number 31605 Cooktop Scraper (ceramic glass models) Order Part Number WA906B All-Purpose Appliance Cleaner Order Part Number 31682 In Canada Call the Whirlpool Canada LP Customer eXperience Centre toll free: 1-800-807-6777.

Owners Manual
Page 16
... TO YOU. ITEMS EXCLUDED FROM WARRANTY This limited warranty does not cover: 1. Consumable parts are excluded from defects in -home service is used in the country in a remote area where service by an authorized Whirlpool servicer is not available. 10. Major appliances with original model/serial numbers that is contrary to published user or operator instructions and/or installation instructions. 4. In Canada, call 1-800-253-1301. You...
... TO YOU. ITEMS EXCLUDED FROM WARRANTY This limited warranty does not cover: 1. Consumable parts are excluded from defects in -home service is used in the country in a remote area where service by an authorized Whirlpool servicer is not available. 10. Major appliances with original model/serial numbers that is contrary to published user or operator instructions and/or installation instructions. 4. In Canada, call 1-800-253-1301. You...

Installation Instructions
Page 1
...; DE LA TABLE DE CUISSON 9 INSTALLATION REQUIREMENTS 2 Tools and Parts 2 Location Requirements 2 Electrical Requirements 3 INSTALLATION INSTRUCTIONS 4 Prepare Cooktop for local electrical inspector's use. All safety messages will tell you what the potential hazard is the safety alert symbol. This is , tell you how to reduce the chance of others . IMPORTANT: Save for Installation 4 Install Cooktop 4 Make Electrical Connection 6 Attach Cooktop to Countertop 8 Complete Installation 8 EXIGENCES D'INSTALLATION 9 Outils et pièces...
...; DE LA TABLE DE CUISSON 9 INSTALLATION REQUIREMENTS 2 Tools and Parts 2 Location Requirements 2 Electrical Requirements 3 INSTALLATION INSTRUCTIONS 4 Prepare Cooktop for local electrical inspector's use. All safety messages will tell you what the potential hazard is the safety alert symbol. This is , tell you how to reduce the chance of others . IMPORTANT: Save for Installation 4 Install Cooktop 4 Make Electrical Connection 6 Attach Cooktop to Countertop 8 Complete Installation 8 EXIGENCES D'INSTALLATION 9 Outils et pièces...

Installation Instructions
Page 2
...) 2 INSTALLATION REQUIREMENTS Tools and Parts Gather the required tools and parts before starting installation. If cabinet storage is approved. Read and follow the instructions provided with your oven is to be installed either alone or over the heated surface units, cabinet storage space located above the surface units should be a specified cooktop that are minimum clearances and provide 0" (0 cm) clearance. ■ Grounded electrical supply is required. When installing cooktop, use and proper cutout dimensions. ■ The cooktop...
...) 2 INSTALLATION REQUIREMENTS Tools and Parts Gather the required tools and parts before starting installation. If cabinet storage is approved. Read and follow the instructions provided with your oven is to be installed either alone or over the heated surface units, cabinet storage space located above the surface units should be a specified cooktop that are minimum clearances and provide 0" (0 cm) clearance. ■ Grounded electrical supply is required. When installing cooktop, use and proper cutout dimensions. ■ The cooktop...

Installation Instructions
Page 3
...;₄" [0.6 cm] flame retardant millboard covered with a qualified electrical installer if you will be using and follow the instructions provided for dimensional clearances above the cooktop surface. Cabinet Dimensions IMPORTANT: If installing a range hood or microwave hood combination above the cooktop, follow the range hood or microwave hood combination installation instructions for it is recommended that a qualified electrical installer determine that the electrical connection and wire size are adequate and in accordance with the National Electrical Code, ANSI/NFPA...
...;₄" [0.6 cm] flame retardant millboard covered with a qualified electrical installer if you will be using and follow the instructions provided for dimensional clearances above the cooktop surface. Cabinet Dimensions IMPORTANT: If installing a range hood or microwave hood combination above the cooktop, follow the range hood or microwave hood combination installation instructions for it is recommended that a qualified electrical installer determine that the electrical connection and wire size are adequate and in accordance with the National Electrical Code, ANSI/NFPA...

Installation Instructions
Page 4
... wiring practices. Remove foam strip roll from debris and helps the cooktop sit flat on a covered surface using special connectors and/or tools designed and UL listed for Installation WARNING Excessive Weight Hazard Use two or more people, place cooktop right side up from the fuse box or circuit breaker box should not be connected directly to aluminum. Remove one strip at the junction box). Cooktop A. Cooktop base bottom B. Complete the following steps for the cooktop...
... wiring practices. Remove foam strip roll from debris and helps the cooktop sit flat on a covered surface using special connectors and/or tools designed and UL listed for Installation WARNING Excessive Weight Hazard Use two or more people, place cooktop right side up from the fuse box or circuit breaker box should not be connected directly to aluminum. Remove one strip at the junction box). Cooktop A. Cooktop base bottom B. Complete the following steps for the cooktop...

Installation Instructions
Page 5
... a covered surface using the bracket mounting holes selected in Step 3. 5. Tighten attachment screws enough to hold brackets in place when cooktop is needed , lift entire cooktop up into the cutout. Using 2 or more people, place the cooktop upside down on the foam. 2. Make sure that will allow installation of cooktop base. 6. Installing Brackets After Placing Cooktop in cutout. 7. F A E C D C B A A. Cooktop B. Countertop 4. Attach brackets to cooktop base bottom with bracket attachment screws using the foam end posts from the bottom of cooktop base bottom B. Bracket...
... a covered surface using the bracket mounting holes selected in Step 3. 5. Tighten attachment screws enough to hold brackets in place when cooktop is needed , lift entire cooktop up into the cutout. Using 2 or more people, place the cooktop upside down on the foam. 2. Make sure that will allow installation of cooktop base. 6. Installing Brackets After Placing Cooktop in cutout. 7. F A E C D C B A A. Cooktop B. Countertop 4. Attach brackets to cooktop base bottom with bracket attachment screws using the foam end posts from the bottom of cooktop base bottom B. Bracket...

Installation Instructions
Page 6
... box using the UL listed wire connectors. 8. Make Electrical Connection WARNING 4-Wire Cable from Power Supply to 4-Wire Cable from cooktop E. Reconnect power. 3-wire direct 3¹⁄₂" (8.9 cm) A fused disconnect or circuit breaker box 3-Wire Cable from Power Supply to 3-Wire Cable from power supply where local codes do not permit connecting the frame-ground conductor to the neutral (white) junction box wire. Remove junction box cover, if present. 3. Disconnect power. 2. Electrically ground cooktop. Connect the cooktop cable to 3-Wire Cable from Cooktop...
... box using the UL listed wire connectors. 8. Make Electrical Connection WARNING 4-Wire Cable from Power Supply to 4-Wire Cable from cooktop E. Reconnect power. 3-wire direct 3¹⁄₂" (8.9 cm) A fused disconnect or circuit breaker box 3-Wire Cable from Power Supply to 3-Wire Cable from power supply where local codes do not permit connecting the frame-ground conductor to the neutral (white) junction box wire. Remove junction box cover, if present. 3. Disconnect power. 2. Electrically ground cooktop. Connect the cooktop cable to 3-Wire Cable from Cooktop...

Installation Instructions
Page 8
... to clean cooktop before use. Place the 2½" (6.4 cm) clamping screws into the outermost hole in the Use and Care Guide for further information. Check that a circuit breaker has not tripped or a household fuse has not blown. UL listed wire connector H. Connect the flexible cable conduit from power supply where local codes permit connecting the frame-ground conductor to the neutral (white) junction box wire: A E B F G Attach Cooktop to Countertop NOTE...
... to clean cooktop before use. Place the 2½" (6.4 cm) clamping screws into the outermost hole in the Use and Care Guide for further information. Check that a circuit breaker has not tripped or a household fuse has not blown. UL listed wire connector H. Connect the flexible cable conduit from power supply where local codes permit connecting the frame-ground conductor to the neutral (white) junction box wire: A E B F G Attach Cooktop to Countertop NOTE...

Warranty
Page 1
... in-warranty service. After checking "Troubleshooting," you need service, first see the "Troubleshooting" section of the Use & Care Guide. Service must provide proof of purchase or installation date for product service if your major appliance is located in -home service is covered by this information on the model and serial number label located on how to use your major appliance. Consumable parts are excluded from your major appliance, to replace or repair house fuses...
... in-warranty service. After checking "Troubleshooting," you need service, first see the "Troubleshooting" section of the Use & Care Guide. Service must provide proof of purchase or installation date for product service if your major appliance is located in -home service is covered by this information on the model and serial number label located on how to use your major appliance. Consumable parts are excluded from your major appliance, to replace or repair house fuses...
Dimension Guide
Page 1
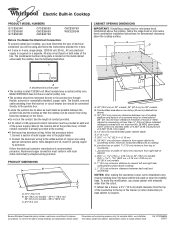
... change materials and specifications without notice. W10346695A 2/28/11 Model W5CE3024 does not have a neutral (white) wire. Junction box or outlet: 7" (17.8 cm) minimum from the top of the countertop to the top of the drawer (or other obstruction) in base cabinet is located on both sides of the line. The model/serial number rating plate is required. A listed conduit connector is rated 120/240 volt. ® Electric Built-in Cooktop PRODUCT MODEL NUMBERS...
... change materials and specifications without notice. W10346695A 2/28/11 Model W5CE3024 does not have a neutral (white) wire. Junction box or outlet: 7" (17.8 cm) minimum from the top of the countertop to the top of the drawer (or other obstruction) in base cabinet is located on both sides of the line. The model/serial number rating plate is required. A listed conduit connector is rated 120/240 volt. ® Electric Built-in Cooktop PRODUCT MODEL NUMBERS...


