Whirlpool WCG55US0H Support and Manuals
Get Help and Manuals for this Whirlpool item
View All Support Options Below
Free Whirlpool WCG55US0H manuals!
Problems with Whirlpool WCG55US0H?
Ask a Question
Free Whirlpool WCG55US0H manuals!
Problems with Whirlpool WCG55US0H?
Ask a Question
Popular Whirlpool WCG55US0H Manual Pages
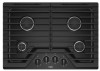
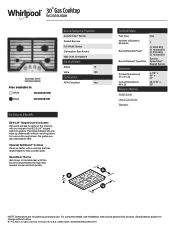
Specification Sheet - Page 1
...Specifications subject to spills on the cooktop with product.
D200104XXE.
WCG55US0HSpecSheetV01. For complete details, see Installation Instructions packed with our industry-first EZ-2-Lift™ hinged cast-iron grates. Printed in :
White
WCG55US0HW
Black
WCG55US0HB... D) Cutout Dimensions (W x D)
Reference Material
Install Guide Use & Care Guide Warranty
Gas
4
(1) 5000 BTU (1) 15,...
Installation Instructions - Page 2
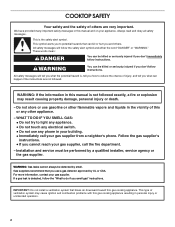
... ignition and combustion problems with this gas cooking appliance resulting in the vicinity of injury, and tell you what can be performed by a qualified installer, service agency or the gas... safety messages will follow instructions. WARNING: If the information in this manual and on your building. • Immediately call the fire department.
- Installation and service must be killed or ...
Installation Instructions - Page 7

... gas connections. The model/serial rating plate located on the underside of the cooktop base has information on the left underside of local codes, installation must conform with Natural gas. Do not remove ground prong. If codes permit and a separate ground wire is used . Install a shut-off valve. See the Gas Conversion instructions provided in the...
Owners Manual - Page 3

...INSTRUCTIONS
WARNING: To reduce the risk of fire, electrical shock, injury to
persons, or damage when using the cooktop, follow basic precautions, including the following:
WARNING: NEVER use with the National Electrical Code, ANSI/NFPA70 or the Canadian Electrical Code, Part 1.
Proper Installation...if the knob is factory set for use this plug.... should be lit manually. Top burner flame...
Owners Manual - Page 5

...; burner is available on 36" (91.4 cm) models.
5 The grates will light, making this the best burner for rapid boiling, searing and frying. Simmer range B. Position the knob closer to hold a simmer. Remove the small burner cap and replace it with hinged grates for cleaning.
Set the knob to the end of the...
Owners Manual - Page 6

... visit us at: www.whirlpool.com/accessories. For more information on food prior to placing the grates in the lowest rack in the "Key Usage" section. Gray grates: order Part Number W10594440 for model number WCG51US0DW or Part Number W10594443 for cooking meats... as cast iron cookware.
Rub in the dishwasher or reassemble caps on "Service and Support" and then "Replacement Parts."
Owners Manual - Page 8

... 3 prong outlet.
■■ Replace the fuse or reset the circuit breaker. PROBLEM Nothing will operate
Burners will light only...Service
Yellow Tips on any questions or concerns at the address below . Refer to the installation instructions. In Canada, visit http://www.whirool.ca. In Canada:
Whirlpool Brand Home Appliances Customer eXperience Centre 200 - 6750 Century Ave. TROUBLESHOOTING...
Owners Manual - Page 10

..., multiple-family use, or use of repair or replacement under this warranty. In-home instruction on the duration of implied warranties of the product.
15. labor to review the Troubleshooting or Problem Solver section of God or use your retailer about the quality, durability, or need for warranty service to determine whether another warranty applies. Damage...
Instruction Sheet - Page 1

... Parts 3...installation instructions with the homeowner. Homeowner: Keep installation instructions for future reference. W10733303A IMPORTANT :
Installateur : Remettre les instructions d'installation au propriétaire. Propriétaire : Conserver les instructions d'installation pour référence ultérieure.
LP GAS CONVERSION INSTRUCTIONS
For WCG, MGC, KCGS and ICS5/6 Model...
Instruction Sheet - Page 3

... and all other models use the following parts: ■ LP orifice package (W10676661)
■ Conversion instructions (W10597146A)
High Altitude Conversion
To convert the cooktop for elevations above 6,560 ft (1999.5 m), order a High Altitude Conversion Kit. The qualified service agency is a registered trademark of Acument Intellectual Properties, LLC.
3 Install a shut-off the gas...
Instruction Sheet - Page 4

...Pink
80
0.40 mm 0.80 mm
A
A. Gas pressure regulator
D.
Size stamp
Burner Models for operation and checking the regulator setting:
LP Gas: Minimum pressure 10" (25.4 cm) W.C.P.
Turn the cap and ...manual shutoff valve during any pressure testing of the gas supply piping system at test pressures equal to or less than ½ psi (3.5 kPa).
5. The gas pressure regulator has 2 settings...
Instruction Sheet - Page 5

... orifice spud (A). ■ Set gas orifice spud aside. ■ Replace with correct LP gas orifice ...support E.
Remove all burner caps and burner bases (see the User Guide for the Dual Flame and Dual Tier Ultra Torch burners use a Torx® T10 driver...
Torch Burner A. Outer burner base D. Burner cap B. Burner Models for Kit W10676662
Model No. Right rear E. Right front
6.
A
A
B
D
B...
Instruction Sheet - Page 6

...manual... keep with package containing literature.
10. To cooktop B. Replace burner bases and burner caps. Open shutoff valve in cooktop...A. Spring
IMPORTANT: Place Natural gas orifice spuds in plastic parts bag for leaks by brushing on either side of regulator ... type of the cap. The gas pressure regulator has 2 settings that the electrode comes through the hole in the following illustration...
Instruction Sheet - Page 8

... is shown in plastic parts bag for future use a Torx® T10 driver to loosen and remove the orifice spud (A).
■ Set gas orifice spud aside.
■ Replace with package containing literature....for leaks by brushing on an approved noncorrosive leak-detection solution. Gas tube opening
6. Burner support E. Burner cap B. If bubbles appear, a leak is ceramic and could break during ...
Instruction Sheet - Page 9

... has been factory set the minimum flame height. To Adjust: The flame can be adjusted. Adjustment screw location
4. Replace the control knob....model number begins with a pair of the burners do not light properly, turn the screw located within 4 seconds. See "Complete Burner Adjustment" section.
5.
Hold knob stem with KGCS5 or KGCS9, call service, as this point, see the User
Guide...
Whirlpool WCG55US0H Reviews
We have not received any reviews for Whirlpool yet.