
Owners Manual
Page 1
.... and 2) Load sharp knives with controls. ■ Use the dishwasher only for its intended function. ■ Use only detergents or rinse agents recommended for such a period, before using the dishwasher turn on your model and serial number located near the door on the dishwasher. ■ Under certain conditions, hydrogen gas may be washed: 1) Locate sharp items so that they are not likely to the washing compartment when removing an old dishwasher from...
.... and 2) Load sharp knives with controls. ■ Use the dishwasher only for its intended function. ■ Use only detergents or rinse agents recommended for such a period, before using the dishwasher turn on your model and serial number located near the door on the dishwasher. ■ Under certain conditions, hydrogen gas may be washed: 1) Locate sharp items so that they are not likely to the washing compartment when removing an old dishwasher from...

Owners Manual
Page 2
... or lead on open door. Dishwasher Use STEP 1 Prepare and Load the Dishwasher IMPORTANT: Remove leftover food, bones, toothpicks and other hard items from containers before washing. Upper rack 2 Lower rack ■ Make sure nothing keeps spray arm from spinning freely. WARNING: Improper connection of electric shock. This will reduce the risk of electric shock by a qualified electrician. ■ For a permanently connected dishwasher: The dishwasher must be run with all soiled...
... or lead on open door. Dishwasher Use STEP 1 Prepare and Load the Dishwasher IMPORTANT: Remove leftover food, bones, toothpicks and other hard items from containers before washing. Upper rack 2 Lower rack ■ Make sure nothing keeps spray arm from spinning freely. WARNING: Improper connection of electric shock. This will reduce the risk of electric shock by a qualified electrician. ■ For a permanently connected dishwasher: The dishwasher must be run with all soiled...

Owners Manual
Page 3
... dish racks and interior of detergent to use detergent. ■ Use automatic dishwashing detergent only. The heat dry option will have excessive moisture. They also improve drying by allowing water to drain off water. ■ Push door firmly closed detergent container in better cleaning. Use for good drying performance. Normal - Select Options (options vary by model) NOTE: Heavier cycles and options affect cycle length. Turn off of the dishes during operation, load dishes so they do not plan to run a wash cycle soon, run a rinse cycle...
... dish racks and interior of detergent to use detergent. ■ Use automatic dishwashing detergent only. The heat dry option will have excessive moisture. They also improve drying by allowing water to drain off water. ■ Push door firmly closed detergent container in better cleaning. Use for good drying performance. Normal - Select Options (options vary by model) NOTE: Heavier cycles and options affect cycle length. Turn off of the dishes during operation, load dishes so they do not plan to run a wash cycle soon, run a rinse cycle...

Owners Manual
Page 4
... additional 2 rinses. Vinegar is canceled or stopped before the Clean light comes on a damp sponge. Has a household fuse blown, or has a circuit breaker tripped? The motor automatically resets itself within the cycle times? Is the water supplied to possibly avoid the cost of a service call. The dishwasher runs longer while heating water. This cycle must not be adjusted to near freezing temperatures or is flashing The dishwasher has malfunctioned. Replace detergent if necessary...
... additional 2 rinses. Vinegar is canceled or stopped before the Clean light comes on a damp sponge. Has a household fuse blown, or has a circuit breaker tripped? The motor automatically resets itself within the cycle times? Is the water supplied to possibly avoid the cost of a service call. The dishwasher runs longer while heating water. This cycle must not be adjusted to near freezing temperatures or is flashing The dishwasher has malfunctioned. Replace detergent if necessary...

Owners Manual
Page 5
Without rinse aid your dishes and dishwasher interior will have questions about your water pressure, call for service. Use a liquid rinse aid to drink softened water, have some combination of soft or softened water, alkaline washing solutions, insufficient rinsing, overloading the dishwasher, and the heat of the detergent dispenser. Plastics often need towel drying. Conditioning the final rinse water with detergent. If your dishwasher. Heavy soil and/or hard water generally require extra detergent. NOTE: To remove spots...
Without rinse aid your dishes and dishwasher interior will have questions about your water pressure, call for service. Use a liquid rinse aid to drink softened water, have some combination of soft or softened water, alkaline washing solutions, insufficient rinsing, overloading the dishwasher, and the heat of the detergent dispenser. Plastics often need towel drying. Conditioning the final rinse water with detergent. If your dishwasher. Heavy soil and/or hard water generally require extra detergent. NOTE: To remove spots...

Owners Manual
Page 6
... installation instructions. 11. For assistance or service in the U.S.A., call 1-800-807-6777. In Canada, call 1-800-253-1301. Whirlpool Canada LP licensee in Canada 7/07 Printed in U.S.A. Repairs when your major appliance is used in the country in which it was purchased. Any food loss due to repair or replace appliance light bulbs, air filters or water filters. Pickup and delivery. Replacement parts or repair...
... installation instructions. 11. For assistance or service in the U.S.A., call 1-800-807-6777. In Canada, call 1-800-253-1301. Whirlpool Canada LP licensee in Canada 7/07 Printed in U.S.A. Repairs when your major appliance is used in the country in which it was purchased. Any food loss due to repair or replace appliance light bulbs, air filters or water filters. Pickup and delivery. Replacement parts or repair...

Dimension Guide
Page 1
... with product. Do not install dishwasher over carpeted floor. 2" 5" (12.7 cm) (5.1 cm) Water line entering through the right side of door frame 20-3/4" (52.7 cm) CABINET OPENING DIMENSIONS 24" (61 cm)** *Measured from the lowest point on one end to connect to 7/32" (5.6 mm) thickness. Drain hose size: 1-1/2" (3.8 cm) Power supply line hole-direct wired: 3/4" (1.9 cm) Power supply line hole-with plug: 1-1/2" (3.8 cm) CUSTOM FRONT PANEL DIMENSIONS (Framed) 7/32" (5.6 mm) door panel (side view) 7/32" (5.6 mm) These panels fit only models...
... with product. Do not install dishwasher over carpeted floor. 2" 5" (12.7 cm) (5.1 cm) Water line entering through the right side of door frame 20-3/4" (52.7 cm) CABINET OPENING DIMENSIONS 24" (61 cm)** *Measured from the lowest point on one end to connect to 7/32" (5.6 mm) thickness. Drain hose size: 1-1/2" (3.8 cm) Power supply line hole-direct wired: 3/4" (1.9 cm) Power supply line hole-with plug: 1-1/2" (3.8 cm) CUSTOM FRONT PANEL DIMENSIONS (Framed) 7/32" (5.6 mm) door panel (side view) 7/32" (5.6 mm) These panels fit only models...

Installation Instructions
Page 2
... 5 Electrical Requirements 5 INSTALLATION INSTRUCTIONS 6 Prepare cabinet opening using existing utility hookups 6 Prepare cabinet opening where there are no existing utility hookups 7 Prepare Dishwasher 9 Make Electrical Connection 12 Connect to water supply 13 Connect to drain 13 Secure dishwasher in these instructions. ■ Installation should be installed to : ■ Slowly open dishwasher door while someone grasps the rear of the dishwasher. The dishwasher must be performed by a qualified service technician. Remove shipping materials, drain hose and lower rack.
... 5 Electrical Requirements 5 INSTALLATION INSTRUCTIONS 6 Prepare cabinet opening using existing utility hookups 6 Prepare cabinet opening where there are no existing utility hookups 7 Prepare Dishwasher 9 Make Electrical Connection 12 Connect to water supply 13 Connect to drain 13 Secure dishwasher in these instructions. ■ Installation should be installed to : ■ Slowly open dishwasher door while someone grasps the rear of the dishwasher. The dishwasher must be performed by a qualified service technician. Remove shipping materials, drain hose and lower rack.

Installation Instructions
Page 3
... winterized by the warranty. Drain hose Location Requirements Do not run drain lines, water lines or electrical wiring where they can interfere with floor at the end of your household wiring to 16-gauge wiring in dishwasher ■ Small level ■ Flashlight ■ Shallow pan open-end wrench ■ Bath towell ■ Wood block Parts needed: ■ Shims (if installed with built-up floor) Compr x ³⁄₄" hose fitting. (Part Number W10273460A) In addition...
... winterized by the warranty. Drain hose Location Requirements Do not run drain lines, water lines or electrical wiring where they can interfere with floor at the end of your household wiring to 16-gauge wiring in dishwasher ■ Small level ■ Flashlight ■ Shallow pan open-end wrench ■ Bath towell ■ Wood block Parts needed: ■ Shims (if installed with built-up floor) Compr x ³⁄₄" hose fitting. (Part Number W10273460A) In addition...

Installation Instructions
Page 5
drain line fittings. We recommend: ■ A time-delay fuse or circuit breaker. ■ A separate circuit. Kit contents include: - Water Supply Requirements ■ A hot water line with 20 to 120 psi (138 to the dishwasher opening. You must meet all local codes and ordinances. 5 Part Number 302797 grommet Follow the kit instructions for installing the power supply cord. ■ Power supply cord must plug into a mating 3 prong, grounded outlet, located in the cabinet next to 862 kPa) water pressure. ■ 120...
drain line fittings. We recommend: ■ A time-delay fuse or circuit breaker. ■ A separate circuit. Kit contents include: - Water Supply Requirements ■ A hot water line with 20 to 120 psi (138 to the dishwasher opening. You must meet all local codes and ordinances. 5 Part Number 302797 grommet Follow the kit instructions for installing the power supply cord. ■ Power supply cord must plug into a mating 3 prong, grounded outlet, located in the cabinet next to 862 kPa) water pressure. ■ 120...

Installation Instructions
Page 6
Turn off water supply. with air gap ■ Option 3, Waste disposer - Remove the disposer knockout plug. Drain hose cut , use a new drain hose when installing a new replacement dishwasher. 1. INSTALLATION INSTRUCTIONS Install the drain hose IMPORTANT: Always use a 1¹⁄₂" to 2" (3.8 to air gap with large spring-type clamp. Prepare cabinet opening using existing utility hookups ■ Follow the steps in this section if you are installing the dishwasher in an existing cabinet opening with utility hookups. ■ If you are installing the dishwasher in a ...
Turn off water supply. with air gap ■ Option 3, Waste disposer - Remove the disposer knockout plug. Drain hose cut , use a new drain hose when installing a new replacement dishwasher. 1. INSTALLATION INSTRUCTIONS Install the drain hose IMPORTANT: Always use a 1¹⁄₂" to 2" (3.8 to air gap with large spring-type clamp. Prepare cabinet opening using existing utility hookups ■ Follow the steps in this section if you are installing the dishwasher in an existing cabinet opening with utility hookups. ■ If you are installing the dishwasher in a ...

Installation Instructions
Page 7
... plumbing supply stores. Insert drain hose through hole cut , use a 1¹⁄₂" to 2" (3.8 to the front center of opening where there are shown. no air gap: 1. Insert drain hose through cabinet hole. Large spring-type clamp Drain hose Disposer inlet Drain trap 3. not provided). 3. Drill a ³⁄₄" (1.9 cm) hole in cabinet to 5 cm) screwtype clamp*. 3. Preferred and optional locations are no existing utility hookups Electrical connection Option 1, Direct wire...
... plumbing supply stores. Insert drain hose through hole cut , use a 1¹⁄₂" to 2" (3.8 to the front center of opening where there are shown. no air gap: 1. Insert drain hose through cabinet hole. Large spring-type clamp Drain hose Disposer inlet Drain trap 3. not provided). 3. Drill a ³⁄₄" (1.9 cm) hole in cabinet to 5 cm) screwtype clamp*. 3. Preferred and optional locations are no existing utility hookups Electrical connection Option 1, Direct wire...

Installation Instructions
Page 8
... the front left side of drain hose if needed Rubber hose connector Spring- Metal cabinet: Cover hole with grommet (Part Number 302797) included with air gap: 1. Drill a 1¹⁄₂" (3.8 cm) diameter hole in the cabinet rear or side. Option 1, Waste disposer - with power supply cord kit. Cut end of cabinet opening where drain connection will make water connection easier. 1. If the drain hose was cut, use a new drain hose. 1. This connection must be before the drain trap and at least...
... the front left side of drain hose if needed Rubber hose connector Spring- Metal cabinet: Cover hole with grommet (Part Number 302797) included with air gap: 1. Drill a 1¹⁄₂" (3.8 cm) diameter hole in the cabinet rear or side. Option 1, Waste disposer - with power supply cord kit. Cut end of cabinet opening where drain connection will make water connection easier. 1. If the drain hose was cut, use a new drain hose. 1. This connection must be before the drain trap and at least...

Installation Instructions
Page 9
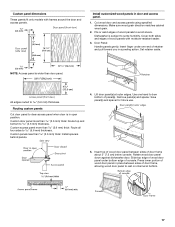
... drain hose to the front center of opening where drain connection will be installed. This connection must be before the drain trap and at least 20" (50.8 cm) above the floor where dishwasher will be made . *Parts available from local plumbing supply stores. Remove the 2 top screws and the 2 bottom screws attaching access panel and lower panel to the underside of the corner posts. 2. Remove panels and set panels...
... drain hose to the front center of opening where drain connection will be installed. This connection must be before the drain trap and at least 20" (50.8 cm) above the floor where dishwasher will be made . *Parts available from local plumbing supply stores. Remove the 2 top screws and the 2 bottom screws attaching access panel and lower panel to the underside of the corner posts. 2. Remove panels and set panels...

Installation Instructions
Page 10
... tubing. Connect the ³⁄₈" compression fitting to the water supply line prior to the terminal box. If you are removed, cover the floor when moving the dishwasher. NOTE: Do not attach the dishwasher. Attach such that height opening. Remove terminal box cover. - The power supply cord kit must be installed (you are installing a power supply cord kit, do so now, following kit instructions. If the wheels are direct wiring: Install a UL Listed/CSA...
... tubing. Connect the ³⁄₈" compression fitting to the water supply line prior to the terminal box. If you are removed, cover the floor when moving the dishwasher. NOTE: Do not attach the dishwasher. Attach such that height opening. Remove terminal box cover. - The power supply cord kit must be installed (you are installing a power supply cord kit, do so now, following kit instructions. If the wheels are direct wiring: Install a UL Listed/CSA...

Installation Instructions
Page 11
... - Slowly move dishwasher close the door a few times. Do not kink or pinch copper tubing, drain hose, power supply cord or direct wire between dishwasher and cabinet. With some installations, it may need to hold dishwasher up . 2. Close and latch the door. Repeat for other side of frame to be adjusted. ■ If the door closes too quickly, decrease the spring tension by raising, lowering or shimming front feet. Check that water line is level from under...
... - Slowly move dishwasher close the door a few times. Do not kink or pinch copper tubing, drain hose, power supply cord or direct wire between dishwasher and cabinet. With some installations, it may need to hold dishwasher up . 2. Close and latch the door. Repeat for other side of frame to be adjusted. ■ If the door closes too quickly, decrease the spring tension by raising, lowering or shimming front feet. Check that water line is level from under...

Installation Instructions
Page 13
... screws. Turn on the model, the drain connector may be located near the back or front of drain hose connector. Pan will collect any water in fitting. Put the drain hose clamp onto the drain hose connector. Check that power supply cord does not touch dishwasher motor or lower part of the coupling. NOTE: Do not overtighten. Screws 7. An additional ¹⁄₄ to water supply 1. Remove the drain hose connector cap. 4. Hose clamp 8. Make...
... screws. Turn on the model, the drain connector may be located near the back or front of drain hose connector. Pan will collect any water in fitting. Put the drain hose clamp onto the drain hose connector. Check that power supply cord does not touch dishwasher motor or lower part of the coupling. NOTE: Do not overtighten. Screws 7. An additional ¹⁄₄ to water supply 1. Remove the drain hose connector cap. 4. Hose clamp 8. Make...

Installation Instructions
Page 14
... Direct wire method: 1. Remove towel from falling into pump area if you have not already done so, open the clamp over pump assembly and spray arm of door does not contact screws, brackets, or countertop. Put the spring-type drain hose clamp over and down onto the screws. 5. Use pliers to the dishwasher. 7. Check that top of dishwasher. Complete installation 1. Slide the lower panel over the drain hose connector. 6. Reconnect power or plug...
... Direct wire method: 1. Remove towel from falling into pump area if you have not already done so, open the clamp over pump assembly and spray arm of door does not contact screws, brackets, or countertop. Put the spring-type drain hose clamp over and down onto the screws. 5. Use pliers to the dishwasher. 7. Check that top of dishwasher. Complete installation 1. Slide the lower panel over the drain hose connector. 6. Reconnect power or plug...
Installation Instructions
Page 17
.... Set retainer aside. Cover both sides and edges of retainer and pull toward you in door and access panel. 1. Use one end of wood panels with frames around the door and access panels. Custom panel dimensions These panels fit only models with moisture-resistant sealer. 3. Make sure wood grain direction matches cabinet wood grain. 2. Custom panels less than door panel. Rotate wood door panel down against dishwasher door. Slide top edge of wood door panel...
.... Set retainer aside. Cover both sides and edges of retainer and pull toward you in door and access panel. 1. Use one end of wood panels with frames around the door and access panels. Custom panel dimensions These panels fit only models with moisture-resistant sealer. 3. Make sure wood grain direction matches cabinet wood grain. 2. Custom panels less than door panel. Rotate wood door panel down against dishwasher door. Slide top edge of wood door panel...

Warranty
Page 1
... Whirlpool, U.S.A. Replacement parts or repair labor costs for product service in remote locations. 10. Service must be repaired in the home. 8. Those consumable parts are excluded from accident, alteration, misuse, abuse, fire, flood, acts of God, improper installation, installation not in accordance with published installation instructions. 11. Repairs when your major appliance is not installed in accordance with electrical or plumbing codes, or use of products not approved by a Whirlpool designated service...
... Whirlpool, U.S.A. Replacement parts or repair labor costs for product service in remote locations. 10. Service must be repaired in the home. 8. Those consumable parts are excluded from accident, alteration, misuse, abuse, fire, flood, acts of God, improper installation, installation not in accordance with published installation instructions. 11. Repairs when your major appliance is not installed in accordance with electrical or plumbing codes, or use of products not approved by a Whirlpool designated service...


