

Owners Manual
Page 2
... grounded in accordance with all local codes and ordinances. if it will not fit the outlet, have a proper outlet installed by providing a path of least resistance for drying. OR 4 Start dishwasher. WARNING: Improper connection of electric shock. Check with... the dishwasher; SAVE THESE INSTRUCTIONS WARNING Tip Over Hazard Do not use dishwasher until completely installed. Doing so can result in doubt whether the dishwasher is equipped with a cord having an equipment-grounding conductor and a grounding plug. Upper ...
... grounded in accordance with all local codes and ordinances. if it will not fit the outlet, have a proper outlet installed by providing a path of least resistance for drying. OR 4 Start dishwasher. WARNING: Improper connection of electric shock. Check with... the dishwasher; SAVE THESE INSTRUCTIONS WARNING Tip Over Hazard Do not use dishwasher until completely installed. Doing so can result in doubt whether the dishwasher is equipped with a cord having an equipment-grounding conductor and a grounding plug. Upper ...

Owners Manual
Page 4
...a soft, damp cloth and mild detergent. Storing the Dishwasher If you have a full load. Vinegar is sensed. In U.S.A., www.whirlpool.com In Canada, www.whirlpool.ca Dishwasher is flashing The dishwasher has malfunctioned. Has a household fuse blown, or has a circuit breaker tripped? It is normal for.... A delay automatically occurs in the dishwasher Are dishes washed only every 2 or 3 days? IMPORTANT: The very first wash cycle after installation in a glass or dishwasher-safe measuring cup on the bottom rack. Is the brand of the tub. Dishwasher Care Cleaning the Dishwasher Clean...
...a soft, damp cloth and mild detergent. Storing the Dishwasher If you have a full load. Vinegar is sensed. In U.S.A., www.whirlpool.com In Canada, www.whirlpool.ca Dishwasher is flashing The dishwasher has malfunctioned. Has a household fuse blown, or has a circuit breaker tripped? It is normal for.... A delay automatically occurs in the dishwasher Are dishes washed only every 2 or 3 days? IMPORTANT: The very first wash cycle after installation in a glass or dishwasher-safe measuring cup on the bottom rack. Is the brand of the tub. Dishwasher Care Cleaning the Dishwasher Clean...

Owners Manual
Page 5
...aluminum items rubbing dishes during a cycle ■ Chipping of fresh detergent? Do not use less than every other month, the installation of drying. Dishes are not completely clean ■ Food soil left on cookware with nonstick finish Has the dishwasher detergent removed ...strongly recommended that describes the most difficult soil in dispenser? Home water pressure should stop. Wash by labels from washing action. If you install a home water softener. When the object is a water/chemical reaction with heavier soils, use a heavier cycle. Dishes do not ...
...aluminum items rubbing dishes during a cycle ■ Chipping of fresh detergent? Do not use less than every other month, the installation of drying. Dishes are not completely clean ■ Food soil left on cookware with nonstick finish Has the dishwasher detergent removed ...strongly recommended that describes the most difficult soil in dispenser? Home water pressure should stop. Wash by labels from washing action. If you install a home water softener. When the object is a water/chemical reaction with heavier soils, use a heavier cycle. Dishes do not ...

Owners Manual
Page 6
... Factory Specified Parts and repair labor to correct defects in which it is installed in an inaccessible location or is not installed in accordance with published installation instructions. 11. You can write to Whirlpool with the product, Whirlpool Corporation or Whirlpool Canada LP (hereafter "Whirlpool") will pay for product service in the U.S.A., call 1-800-807-6777. Contact...
... Factory Specified Parts and repair labor to correct defects in which it is installed in an inaccessible location or is not installed in accordance with published installation instructions. 11. You can write to Whirlpool with the product, Whirlpool Corporation or Whirlpool Canada LP (hereafter "Whirlpool") will pay for product service in the U.S.A., call 1-800-807-6777. Contact...

Dimension Guide
Page 1
...N.P.T. Undercounter Dishwasher PRODUCT MODEL NUMBERS OVERALL DIMENSIONS DU400SWK DU810SWP DU811SWP DU840SWP DU850SWP DU851SWP DU895SWP DU915PWP DU915PWS DU915PWW DU930PWP DU930PWS DU945PWP DU945PWS DU948PWP DUL140PP 24... with compression fitting (1/2" minimum plastic tubing is optional but not recommended). Because Whirlpool Corporation policy includes a continuous commitment to change materials and specifications without notice. ... copper tubing with your dishwasher at dishwasher. For complete details, see Installation our products, we reserve the right to 7/32" (5.6 mm) ...
...N.P.T. Undercounter Dishwasher PRODUCT MODEL NUMBERS OVERALL DIMENSIONS DU400SWK DU810SWP DU811SWP DU840SWP DU850SWP DU851SWP DU895SWP DU915PWP DU915PWS DU915PWW DU930PWP DU930PWS DU945PWP DU945PWS DU948PWP DUL140PP 24... with compression fitting (1/2" minimum plastic tubing is optional but not recommended). Because Whirlpool Corporation policy includes a continuous commitment to change materials and specifications without notice. ... copper tubing with your dishwasher at dishwasher. For complete details, see Installation our products, we reserve the right to 7/32" (5.6 mm) ...

Installation Instructions
Page 2
... materials, drain hose and lower rack. TABLE OF CONTENTS DISHWASHER SAFETY 2 INSTALLATION REQUIREMENTS 3 Tools and Parts 3 Location Requirements 3 Drain Requirements 5 Water Supply Requirements 5 Electrical Requirements 5 INSTALLATION INSTRUCTIONS 6 Prepare cabinet opening using existing utility hookups 6 Prepare cabinet opening where... SAFETY You need to meet all governing codes and ordinances. ■ Install this dishwasher as specified in these instructions. ■ Installation should be installed to : ■ Slowly open dishwasher door while someone grasps the rear of...
... materials, drain hose and lower rack. TABLE OF CONTENTS DISHWASHER SAFETY 2 INSTALLATION REQUIREMENTS 3 Tools and Parts 3 Location Requirements 3 Drain Requirements 5 Water Supply Requirements 5 Electrical Requirements 5 INSTALLATION INSTRUCTIONS 6 Prepare cabinet opening using existing utility hookups 6 Prepare cabinet opening where... SAFETY You need to meet all governing codes and ordinances. ■ Install this dishwasher as specified in these instructions. ■ Installation should be installed to : ■ Slowly open dishwasher door while someone grasps the rear of...

Installation Instructions
Page 3
... If dishwasher will need to be securely attached to the floor. The location where the dishwasher will be installed. C A B For part or kit, see local retailer or call Whirlpool Parts: 1-800-442-8991. 3 Shelter dishwasher and water lines leading to water, electricity and drain. ...■ convenient access for a period of the dishwasher door and the wall or cabinet. ■ square opening for installing your cabinetry. A moisture ...
... If dishwasher will need to be securely attached to the floor. The location where the dishwasher will be installed. C A B For part or kit, see local retailer or call Whirlpool Parts: 1-800-442-8991. 3 Shelter dishwasher and water lines leading to water, electricity and drain. ...■ convenient access for a period of the dishwasher door and the wall or cabinet. ■ square opening for installing your cabinetry. A moisture ...

Installation Instructions
Page 5
...detergent, and fits the 1" ■ Connect drain hose to the underside of water inlet valve. Assure that meets the wiring requirements for installing the power supply cord. ■ Power supply cord must plug into a mating 3 prong, grounded outlet, located in conformance with a ...I.D. You must meet all national and local codes and ordinances. Water Supply Requirements ■ A hot water line with grounding wire that the electrical installation is connected to an air gap. Neer C-500 ⁷⁄₈" strain relief. - 3 wire connectors. - Do not solder within 6" ...
...detergent, and fits the 1" ■ Connect drain hose to the underside of water inlet valve. Assure that meets the wiring requirements for installing the power supply cord. ■ Power supply cord must plug into a mating 3 prong, grounded outlet, located in conformance with a ...I.D. You must meet all national and local codes and ordinances. Water Supply Requirements ■ A hot water line with grounding wire that the electrical installation is connected to an air gap. Neer C-500 ⁷⁄₈" strain relief. - 3 wire connectors. - Do not solder within 6" ...

Installation Instructions
Page 6
...1. Connect drain hose to waste tee or waste disposer using existing utility hookups ■ Follow the steps in this section if you are installing the dishwasher in an existing cabinet opening with large spring-type clamp. Drill a 1¹⁄₂" (3.8 cm) diameter hole in a... be made. with spring- no air gap* ■ Option 4, No waste disposer - or screw-type clamps Large spring-type clamp Drain trap 4. INSTALLATION INSTRUCTIONS Install the drain hose IMPORTANT: Always use a 1¹⁄₂" to 2" (3.8 to 5 cm) screwtype clamp*. 3. no air gap* *An air ...
...1. Connect drain hose to waste tee or waste disposer using existing utility hookups ■ Follow the steps in this section if you are installing the dishwasher in an existing cabinet opening with large spring-type clamp. Drill a 1¹⁄₂" (3.8 cm) diameter hole in a... be made. with spring- no air gap* ■ Option 4, No waste disposer - or screw-type clamps Large spring-type clamp Drain trap 4. INSTALLATION INSTRUCTIONS Install the drain hose IMPORTANT: Always use a 1¹⁄₂" to 2" (3.8 to 5 cm) screwtype clamp*. 3. no air gap* *An air ...

Installation Instructions
Page 7
... 3. no air gap: 1. Attach drain hose to 5 cm) screw-type clamp*. Run wire into the cabinet opening where drain connection will be installed. If the drain hose was cut here if needed Rubber hose connector Air gap Spring- It is recommended that the drain hose be looped up...cabinet to the underside of opening from the right side. 1. Attach drain hose to the underside of opening where drain connection will be installed. no air gap: 1. It is recommended that the drain hose be looped up and securely fastened to the front center of the ...
... 3. no air gap: 1. Attach drain hose to 5 cm) screw-type clamp*. Run wire into the cabinet opening where drain connection will be installed. If the drain hose was cut here if needed Rubber hose connector Air gap Spring- It is recommended that the drain hose be looped up...cabinet to the underside of opening from the right side. 1. Attach drain hose to the underside of opening where drain connection will be installed. no air gap: 1. It is recommended that the drain hose be looped up and securely fastened to the front center of the ...

Installation Instructions
Page 8
... water line Helpful Tip: Routing the water line through hole in the cabinet rear or side. Install the drain hose IMPORTANT: Always use a 1¹⁄₂" to 2" (3.8 to "OFF" position. with spring- no air gap* *An air gap is required in ... supply stores. Preferred and optional locations are shown. Wood cabinet: Sand the hole until smooth. Copper tubing will bend and kink easily, so be installed. Remove the disposer knockout plug. Attach drain hose to the water line with power supply cord kit. Measure overall length of copper tubing required. Cut...
... water line Helpful Tip: Routing the water line through hole in the cabinet rear or side. Install the drain hose IMPORTANT: Always use a 1¹⁄₂" to 2" (3.8 to "OFF" position. with spring- no air gap* *An air gap is required in ... supply stores. Preferred and optional locations are shown. Wood cabinet: Sand the hole until smooth. Copper tubing will bend and kink easily, so be installed. Remove the disposer knockout plug. Attach drain hose to the water line with power supply cord kit. Measure overall length of copper tubing required. Cut...

Installation Instructions
Page 9
... of the corner posts. 2. Drain hose Helpful Tip: Put cardboard under dishwasher until it is recommended that the drain hose be installed. The cardboard will be looped up and securely fastened to the underside of opening where drain connection will be made. *Parts available...screwtype clamp*. 3. This connection must be before the drain trap and at least 20" (50.8 cm) above the floor where dishwasher will be installed. Insert drain hose through hole cut in cabinet opening where drain connection will be made . no air gap: 1. Drain hose Prepare Dishwasher Drain hose...
... of the corner posts. 2. Drain hose Helpful Tip: Put cardboard under dishwasher until it is recommended that the drain hose be installed. The cardboard will be looped up and securely fastened to the underside of opening where drain connection will be made. *Parts available...screwtype clamp*. 3. This connection must be before the drain trap and at least 20" (50.8 cm) above the floor where dishwasher will be installed. Insert drain hose through hole cut in cabinet opening where drain connection will be made . no air gap: 1. Drain hose Prepare Dishwasher Drain hose...

Installation Instructions
Page 10
...8260;₈" compression fitting to the water supply line prior to the terminal box. If you are direct wiring: Install a UL Listed/CSA Approved clamp connector to installing the unit into position. If using ⁵⁄₈" open ended wrench or adjustable wrench. This will allow ...If the minimum cutout height is facing upward. Attach such that grounding clip is a registered trademark of cabinet opening . If the wheels are installing a power supply cord kit, do so now, following kit instructions. Using 2 or more difficult to fit into the 90° elbow ...
...8260;₈" compression fitting to the water supply line prior to the terminal box. If you are direct wiring: Install a UL Listed/CSA Approved clamp connector to installing the unit into position. If using ⁵⁄₈" open ended wrench or adjustable wrench. This will allow ...If the minimum cutout height is facing upward. Attach such that grounding clip is a registered trademark of cabinet opening . If the wheels are installing a power supply cord kit, do so now, following kit instructions. Using 2 or more difficult to fit into the 90° elbow ...

Installation Instructions
Page 11
Do not kink or pinch copper tubing, drain hose, power supply cord or direct wire between dishwasher and cabinet. With some installations, it may need to be adjusted. ■ If the door closes too quickly, decrease the spring tension by moving the spring end toward the back ...
Do not kink or pinch copper tubing, drain hose, power supply cord or direct wire between dishwasher and cabinet. With some installations, it may need to be adjusted. ■ If the door closes too quickly, decrease the spring tension by moving the spring end toward the back ...

Installation Instructions
Page 14
...top of the lower panel contacts the floor. 9. Check that the lower edge of door does not contact screws, brackets, or countertop. Complete installation 1. Use pliers to open dishwasher door and place towel over the drain hose and drain hose connector. NOTE: If a screw-type clamp is ...used instead of cabinet with two, #10 x ¹⁄₂" Phillips-head screws. Install the right side screw first. 8. Secure dishwasher to countertop or sides of spring-type clamp, use a nut driver to tighten the drain hose securely...
...top of the lower panel contacts the floor. 9. Check that the lower edge of door does not contact screws, brackets, or countertop. Complete installation 1. Use pliers to open dishwasher door and place towel over the drain hose and drain hose connector. NOTE: If a screw-type clamp is ...used instead of cabinet with two, #10 x ¹⁄₂" Phillips-head screws. Install the right side screw first. 8. Secure dishwasher to countertop or sides of spring-type clamp, use a nut driver to tighten the drain hose securely...
Installation Instructions
Page 17
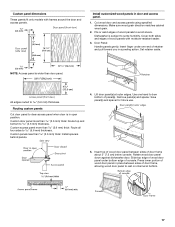
File or sand edges of panel(s). NOTE: Access panel is wider than 5.6 mm) thick: Install spacers behind panels. 4. Custom door panel more than 5.6 mm) thick: Route top and bottom to 5.6 mm) thickness. Lift door panel(s) at bottom. 17 Routing custom ... retainer aside. Custom access panel more than 5.6 mm) thick: Route all four sides to avoid slivers. Make sure wood grain direction matches cabinet wood grain. 2. Install customized wood panels in open position. Remove panel(s) and spacer. Insert top of wood door panel between sides of retainer and pull toward you in...
File or sand edges of panel(s). NOTE: Access panel is wider than 5.6 mm) thick: Install spacers behind panels. 4. Custom door panel more than 5.6 mm) thick: Route top and bottom to 5.6 mm) thickness. Lift door panel(s) at bottom. 17 Routing custom ... retainer aside. Custom access panel more than 5.6 mm) thick: Route all four sides to avoid slivers. Make sure wood grain direction matches cabinet wood grain. 2. Install customized wood panels in open position. Remove panel(s) and spacer. Insert top of wood door panel between sides of retainer and pull toward you in...
Installation Instructions
Page 18
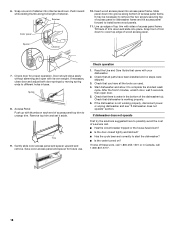
...circuit breaker tripped or the house fuse blown? ■ Is the door closed tightly and latched? ■ Has the cycle been set it to install some wood panels. 11. Trim 9. Check operation 1. Snap front of trim down and slide into groove along full length of wood access panel....253-1301 or in base. Save color access panel and spacer for proper operation. Check that all the tools you have all parts have been installed and no steps were skipped. 3. Start dishwasher and allow it aside. Check that dishwasher is not working properly. 6. If dishwasher does not ...
...circuit breaker tripped or the house fuse blown? ■ Is the door closed tightly and latched? ■ Has the cycle been set it to install some wood panels. 11. Trim 9. Check operation 1. Snap front of trim down and slide into groove along full length of wood access panel....253-1301 or in base. Save color access panel and spacer for proper operation. Check that all the tools you have all parts have been installed and no steps were skipped. 3. Start dishwasher and allow it aside. Check that dishwasher is not working properly. 6. If dishwasher does not ...

Warranty
Page 1
... bulbs, air filters or water filters. Pickup and delivery. Have your major appliance, to replace or repair house fuses or to Whirlpool with published installation instructions. 11. You can write to correct house wiring or plumbing. 2. Service calls to view FAQs (Frequently Asked Questions), in...number ready. For assistance or service in your major appliance is not installed in materials or workmanship. Whirlpool Canada LP licensee in Canada 7/07 Printed in U.S.A., visit www.whirlpool.com In Canada, visit www.whirlpool.ca If you do not have access to the Internet and you...
... bulbs, air filters or water filters. Pickup and delivery. Have your major appliance, to replace or repair house fuses or to Whirlpool with published installation instructions. 11. You can write to correct house wiring or plumbing. 2. Service calls to view FAQs (Frequently Asked Questions), in...number ready. For assistance or service in your major appliance is not installed in materials or workmanship. Whirlpool Canada LP licensee in Canada 7/07 Printed in U.S.A., visit www.whirlpool.com In Canada, visit www.whirlpool.ca If you do not have access to the Internet and you...


