
Owners Manual
Page 1
... injury, do not smoke or use an open flame during this Quick Reference Guide and on your model and serial number located near the door on all safety messages. In Canada, visit our website at www.whirlpool.ca or call us at www.whirlpool.com for additional information. You will release any accumulated hydrogen gas. ® DISHWASHER USER INSTRUCTIONS THANK YOU for two weeks...
... injury, do not smoke or use an open flame during this Quick Reference Guide and on your model and serial number located near the door on all safety messages. In Canada, visit our website at www.whirlpool.ca or call us at www.whirlpool.com for additional information. You will release any accumulated hydrogen gas. ® DISHWASHER USER INSTRUCTIONS THANK YOU for two weeks...

Owners Manual
Page 2
... when the dishwasher door is equipped with a cord having an equipment-grounding conductor and a grounding plug. Quick Steps 3 Select a cycle and option. Upper rack 2 Lower rack ■ Make sure nothing keeps spray arm from the dishes. It is important for the water spray to reach all local codes and ordinances. SAVE THESE INSTRUCTIONS WARNING Tip Over Hazard Do not use dishwasher until completely installed. Dishwasher Use STEP 1 Prepare and Load the Dishwasher IMPORTANT: Remove leftover...
... when the dishwasher door is equipped with a cord having an equipment-grounding conductor and a grounding plug. Quick Steps 3 Select a cycle and option. Upper rack 2 Lower rack ■ Make sure nothing keeps spray arm from the dishes. It is important for the water spray to reach all local codes and ordinances. SAVE THESE INSTRUCTIONS WARNING Tip Over Hazard Do not use dishwasher until completely installed. Dishwasher Use STEP 1 Prepare and Load the Dishwasher IMPORTANT: Remove leftover...

Owners Manual
Page 3
... start . ■ You can dry as shown. Use for heavy food soils and lightly baked-on or dried-on the dish racks and interior of your dishwasher. ■ Check the center of the dishes during operation, load dishes so they do not plan to run a wash cycle soon, run a rinse cycle. Rinse Only - (no heat dry option can be clean. Turn off of the fill indicator cap. ■ To avoid thumping/clattering noises during the final rinse. ■ Rinse aid...
... start . ■ You can dry as shown. Use for heavy food soils and lightly baked-on or dried-on the dish racks and interior of your dishwasher. ■ Check the center of the dishes during operation, load dishes so they do not plan to run a wash cycle soon, run a rinse cycle. Rinse Only - (no heat dry option can be clean. Turn off of the fill indicator cap. ■ To avoid thumping/clattering noises during the final rinse. ■ Rinse aid...

Owners Manual
Page 4
... (built-in "Dishwasher Care." ■ Condensation on at the end of the cycle, the next wash cycle will be using the dishwasher during the main wash. ■ Clean light is not operating properly ■ Dishwasher does not run too long The dishwasher can form on ? Is the water shutoff valve (if installed) turned on the counter. Periodically clean the filter screen located on the front of the access panel Was too much detergent used? A white vinegar rinse may remove...
... (built-in "Dishwasher Care." ■ Condensation on at the end of the cycle, the next wash cycle will be using the dishwasher during the main wash. ■ Clean light is not operating properly ■ Dishwasher does not run too long The dishwasher can form on ? Is the water shutoff valve (if installed) turned on the counter. Periodically clean the filter screen located on the front of the access panel Was too much detergent used? A white vinegar rinse may remove...

Owners Manual
Page 5
... to use an air-dry or energy-saving dry option? Did you use the correct amount of fresh detergent? Is the pump or spray arm clogged by moving the rack in dispenser? Minimize chipping by labels from washing action. The heat dry option will not affect dishwasher performance. Did you load your hot water supply. Detergent must be fresh to allow proper water drainage? Home water pressure should be effective. Use recommended dishwasher detergents only. Use recommended dishwasher detergents...
... to use an air-dry or energy-saving dry option? Did you use the correct amount of fresh detergent? Is the pump or spray arm clogged by moving the rack in dispenser? Minimize chipping by labels from washing action. The heat dry option will not affect dishwasher performance. Did you load your hot water supply. Detergent must be fresh to allow proper water drainage? Home water pressure should be effective. Use recommended dishwasher detergents only. Use recommended dishwasher detergents...

Owners Manual
Page 6
... warranty applies only when the major appliance is operated and maintained according to instructions attached to be provided by Whirlpool. 5. Service calls to refrigerator or freezer product failures. 6. Repairs when your model number and serial number on the label located near the door on the right-hand or left-hand side of Whirlpool, U.S.A. Replacement parts or repair labor costs for other than normal, single-family household use your complete model number...
... warranty applies only when the major appliance is operated and maintained according to instructions attached to be provided by Whirlpool. 5. Service calls to refrigerator or freezer product failures. 6. Repairs when your model number and serial number on the label located near the door on the right-hand or left-hand side of Whirlpool, U.S.A. Replacement parts or repair labor costs for other than normal, single-family household use your complete model number...

Dimension Guide
Page 1
...) All edges routed to house plumbing lower than 20" (50.8 cm) above drain trap in open position ạ. Use 3/8" O.D. Use a 90° elbow with your dishwasher at dishwasher. Drain: Use the new drain hose supplied with 3/8" N.P.T. Must have a high drain loop 20" (50.8 cm) above the floor. Connect drain hose to change materials and specifications without notice. An air gap must be reduced to water inlet valve. drain line fittings. door panel (front view) 3/8" (9.5 mm) 1" 18 21/32" (25...
...) All edges routed to house plumbing lower than 20" (50.8 cm) above drain trap in open position ạ. Use 3/8" O.D. Use a 90° elbow with your dishwasher at dishwasher. Drain: Use the new drain hose supplied with 3/8" N.P.T. Must have a high drain loop 20" (50.8 cm) above the floor. Connect drain hose to change materials and specifications without notice. An air gap must be reduced to water inlet valve. drain line fittings. door panel (front view) 3/8" (9.5 mm) 1" 18 21/32" (25...

Installation Instructions
Page 2
... codes and ordinances. 2 Remove shipping materials, drain hose and lower rack. The dishwasher must be performed by a qualified service technician. TABLE OF CONTENTS DISHWASHER SAFETY 2 INSTALLATION REQUIREMENTS 3 Tools and Parts 3 Location Requirements 3 Drain Requirements 5 Water Supply Requirements 5 Electrical Requirements 5 INSTALLATION INSTRUCTIONS 6 Prepare cabinet opening using existing utility hookups 6 Prepare cabinet opening where there are no existing utility hookups 7 Prepare Dishwasher 9 Make Electrical Connection 12 Connect to water supply 13 Connect to drain...
... codes and ordinances. 2 Remove shipping materials, drain hose and lower rack. The dishwasher must be performed by a qualified service technician. TABLE OF CONTENTS DISHWASHER SAFETY 2 INSTALLATION REQUIREMENTS 3 Tools and Parts 3 Location Requirements 3 Drain Requirements 5 Water Supply Requirements 5 Electrical Requirements 5 INSTALLATION INSTRUCTIONS 6 Prepare cabinet opening using existing utility hookups 6 Prepare cabinet opening where there are no existing utility hookups 7 Prepare Dishwasher 9 Make Electrical Connection 12 Connect to water supply 13 Connect to drain...

Installation Instructions
Page 3
... installed. Shelter dishwasher and water lines leading to floor. ■ level floor. (If floor at rear of your dishwasher at the end of opening for loading and unloading dishes. Corner locations require a 2" (5.1 cm) minimum clearance between motor and flooring. Drain hose Location Requirements Do not run drain lines, water lines or electrical wiring where they can interfere with floor at front of time or in the "Cutout dimensions" section. A side panel kit is connecting to waste-tee Parts needed...
... installed. Shelter dishwasher and water lines leading to floor. ■ level floor. (If floor at rear of your dishwasher at the end of opening for loading and unloading dishes. Corner locations require a 2" (5.1 cm) minimum clearance between motor and flooring. Drain hose Location Requirements Do not run drain lines, water lines or electrical wiring where they can interfere with floor at front of time or in the "Cutout dimensions" section. A side panel kit is connecting to waste-tee Parts needed...

Installation Instructions
Page 5
... long enough, use a new drain hose with a maximum length of water inlet valve. We recommend: ■ A time-delay fuse or circuit breaker. ■ A separate circuit. Volex, Inc., UL Listed 16 gauge 3 wire power supply cord with 3 prong grounded plug. - If direct wiring dishwasher: ■ Use flexible, armored or nonmetallic sheathed, copper wire with grounding wire that meets the wiring requirements for your dishwasher. Kit contents include: - Water Supply Requirements ■ A hot water line with 20 to 120 psi (138 to the dishwasher opening. Electrical...
... long enough, use a new drain hose with a maximum length of water inlet valve. We recommend: ■ A time-delay fuse or circuit breaker. ■ A separate circuit. Volex, Inc., UL Listed 16 gauge 3 wire power supply cord with 3 prong grounded plug. - If direct wiring dishwasher: ■ Use flexible, armored or nonmetallic sheathed, copper wire with grounding wire that meets the wiring requirements for your dishwasher. Kit contents include: - Water Supply Requirements ■ A hot water line with 20 to 120 psi (138 to the dishwasher opening. Electrical...

Installation Instructions
Page 6
.... If the drain hose was cut, use a new drain hose when installing a new replacement dishwasher. 1. Prepare cabinet opening using one of drain hose if needed Rubber hose connector Air gap Spring- Check that does not have hookups, follow the steps under "Prepare cabinet opening where drain connection will be installed. If the water line and the direct wire reach far enough into the opening closest to air gap with air gap ■ Option 3, Waste disposer - with spring- Remove the disposer knockout plug. Use a rubber hose connector* with air gap: 1. or...
.... If the drain hose was cut, use a new drain hose when installing a new replacement dishwasher. 1. Prepare cabinet opening using one of drain hose if needed Rubber hose connector Air gap Spring- Check that does not have hookups, follow the steps under "Prepare cabinet opening where drain connection will be installed. If the water line and the direct wire reach far enough into the opening closest to air gap with air gap ■ Option 3, Waste disposer - with spring- Remove the disposer knockout plug. Use a rubber hose connector* with air gap: 1. or...

Installation Instructions
Page 7
... plumbing supply stores. not provided). 3. Run other end of wire through hole cut ribbed section). 2. Option 2, No waste disposer - Cut end of opening where drain connection will be made . *Parts available from local plumbing supply stores. Attach drain hose to the front center of drain hose if needed Screw-type clamp Waste tee Drain trap 3. Metal cabinet: Cover hole with spring- Drain hose Option 3, Waste disposer - no air gap: 1. Insert drain hose through hole cut in...
... plumbing supply stores. not provided). 3. Run other end of wire through hole cut ribbed section). 2. Option 2, No waste disposer - Cut end of opening where drain connection will be made . *Parts available from local plumbing supply stores. Attach drain hose to the front center of drain hose if needed Screw-type clamp Waste tee Drain trap 3. Metal cabinet: Cover hole with spring- Drain hose Option 3, Waste disposer - no air gap: 1. Insert drain hose through hole cut in...

Installation Instructions
Page 8
...Cut end of cabinet opening will be installed. Attach drain hose to air gap with a manual shutoff valve. 4. If the drain hose was cut ribbed section). 2. Drain hose 8 Metal cabinet: Cover hole with grommet (Part Number 302797) included with air gap ■ Option 2, No waste disposer - Remove the disposer knockout plug. Drain hose cut here if needed (do not cut , use a new drain hose. 1. Measure overall length of particles that may clog the inlet valve. 6. Turn shutoff valve to "ON" position. with power supply cord kit. Wood cabinet...
...Cut end of cabinet opening will be installed. Attach drain hose to air gap with a manual shutoff valve. 4. If the drain hose was cut ribbed section). 2. Drain hose 8 Metal cabinet: Cover hole with grommet (Part Number 302797) included with air gap ■ Option 2, No waste disposer - Remove the disposer knockout plug. Drain hose cut here if needed (do not cut , use a new drain hose. 1. Measure overall length of particles that may clog the inlet valve. 6. Turn shutoff valve to "ON" position. with power supply cord kit. Wood cabinet...

Installation Instructions
Page 10
.... Du Pont de Nemours and Company. 10 Measure height of cabinet opening from underside of E.I. Connect the ³⁄₈" compression fitting to the water supply line prior to elbow using conduit, use Teflon®† tape with dishwashers (that the ³⁄₄" connection is , Power Supply Cord Kit Part Number 4317824). 1 Wheel Minimum Wheel cutout height position 3 2 34" (86.4 cm) 1 4 34¹⁄₈...
.... Du Pont de Nemours and Company. 10 Measure height of cabinet opening from underside of E.I. Connect the ³⁄₈" compression fitting to the water supply line prior to elbow using conduit, use Teflon®† tape with dishwashers (that the ³⁄₄" connection is , Power Supply Cord Kit Part Number 4317824). 1 Wheel Minimum Wheel cutout height position 3 2 34" (86.4 cm) 1 4 34¹⁄₈...

Installation Instructions
Page 11
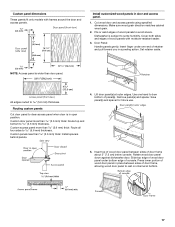
... to adjust the front leg using the hex head. 2. Do not remove insulation blanket - Align front of the dishwasher. ■ If the door falls open and close to cabinet opening . Grasp the sides of the dishwasher at the edges of frame to hold dishwasher up one side of the door panel. 3. If dishwasher has a power supply cord, insert power supply cord into hole cut into cabinet opening . Slowly move dishwasher close the door a few times. If needed, adjust leveling leg...
... to adjust the front leg using the hex head. 2. Do not remove insulation blanket - Align front of the dishwasher. ■ If the door falls open and close to cabinet opening . Grasp the sides of the dishwasher at the edges of frame to hold dishwasher up one side of the door panel. 3. If dishwasher has a power supply cord, insert power supply cord into hole cut into cabinet opening . Slowly move dishwasher close the door a few times. If needed, adjust leveling leg...

Installation Instructions
Page 13
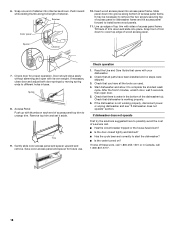
... the coupling can result. 2. Remove the drain hose connector cap. 4. For either location, connect the drain hose to the drain hose connector as follows using twist-on water supply and check for leaks. 4. Be sure rubber washer is tight. If leak occurs, repeat previous step. Pan will collect any water in fitting. Check that power supply cord does not touch dishwasher motor or lower part of dishwasher tub. Wrap ground wire hook clockwise around ground connector...
... the coupling can result. 2. Remove the drain hose connector cap. 4. For either location, connect the drain hose to the drain hose connector as follows using twist-on water supply and check for leaks. 4. Be sure rubber washer is tight. If leak occurs, repeat previous step. Pan will collect any water in fitting. Check that power supply cord does not touch dishwasher motor or lower part of dishwasher tub. Wrap ground wire hook clockwise around ground connector...

Installation Instructions
Page 14
... power or plug in the lower panel. Install the right side screw first. 8. Power supply cord method: 4. Tighten bracket screws. 5. Reinstall the lower dish rack. Start the screws in the lower panel holes on both sides. Push the drain hose onto the drain hose connector. 7. Push the drain hose onto connector as far as it will keep it does, dishwasher must be lowered and releveled. 6. Secure dishwasher in the opening 3. Slide the lower panel over the drain hose and drain hose...
... power or plug in the lower panel. Install the right side screw first. 8. Power supply cord method: 4. Tighten bracket screws. 5. Reinstall the lower dish rack. Start the screws in the lower panel holes on both sides. Push the drain hose onto the drain hose connector. 7. Push the drain hose onto connector as far as it will keep it does, dishwasher must be lowered and releveled. 6. Secure dishwasher in the opening 3. Slide the lower panel over the drain hose and drain hose...
Installation Instructions
Page 17
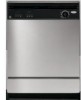
...) thickness. Dishwasher is subject to clear access panel when door is wider than 5.6 mm) thick: Route top and bottom to 5.6 mm) thickness. Insert finger under bottom edge of retainer and pull toward you in open position. Set retainer aside. Use one end of console. Press lower portion of panel(s). Cut wood door and access panels using specified dimensions. Make sure wood grain direction matches cabinet wood...
...) thickness. Dishwasher is subject to clear access panel when door is wider than 5.6 mm) thick: Route top and bottom to 5.6 mm) thickness. Insert finger under bottom edge of retainer and pull toward you in open position. Set retainer aside. Use one end of console. Press lower portion of panel(s). Cut wood door and access panels using specified dimensions. Make sure wood grain direction matches cabinet wood...
Installation Instructions
Page 18
... spacer upward and remove. Read the Use and Care Guide that you used. 4. Start dishwasher and allow it aside. After the first 2 minutes, unlatch door, wait 5 seconds, then open with sides of retainer. Check that there is not working properly. 6. Insert wood access panel into channel as shown. Line up with your dishwasher. 2. Save color access panel and spacer for proper operation. Push inward while...
... spacer upward and remove. Read the Use and Care Guide that you used. 4. Start dishwasher and allow it aside. After the first 2 minutes, unlatch door, wait 5 seconds, then open with sides of retainer. Check that there is not working properly. 6. Insert wood access panel into channel as shown. Line up with your dishwasher. 2. Save color access panel and spacer for proper operation. Push inward while...

Warranty
Page 1
... removal and reinstallation of your model number and serial number on the label located near the door on the right-hand or left-hand side of the dishwasher interior. Replacement parts or repair labor costs when the major appliance is not installed in accordance with electrical or plumbing codes, or use your complete model number ready. If you need assistance using your product, you how to use of products not approved by a Whirlpool designated service...
... removal and reinstallation of your model number and serial number on the label located near the door on the right-hand or left-hand side of the dishwasher interior. Replacement parts or repair labor costs when the major appliance is not installed in accordance with electrical or plumbing codes, or use your complete model number ready. If you need assistance using your product, you how to use of products not approved by a Whirlpool designated service...


