
Installation Instructions
Page 7
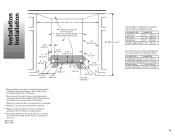
...lave-vaisselle sont enlevées. **Minimum, measured from dishwasher. *Mesuré à partir du point le plus bas. ‡ Both sides ‡ Deux côtés 6 May be free...area‡ aire libre‡ 34" (86,4 cm) min.* Cut openings in shaded area of cabinet walls or floor as specified in chart: OPENING FOR: water line drain line direct wire power supply cord DIAMETER: ...plus bas du dessous du comptoir. Installation Installation 24" (61 cm)** All surfaces must be reduced to 33-7/8" (86 cm) by removing wheels from narrowest point of opening. **Minimum, au point le plus...
...lave-vaisselle sont enlevées. **Minimum, measured from dishwasher. *Mesuré à partir du point le plus bas. ‡ Both sides ‡ Deux côtés 6 May be free...area‡ aire libre‡ 34" (86,4 cm) min.* Cut openings in shaded area of cabinet walls or floor as specified in chart: OPENING FOR: water line drain line direct wire power supply cord DIAMETER: ...plus bas du dessous du comptoir. Installation Installation 24" (61 cm)** All surfaces must be reduced to 33-7/8" (86 cm) by removing wheels from narrowest point of opening. **Minimum, au point le plus...
Use and Care Manual
Page 4
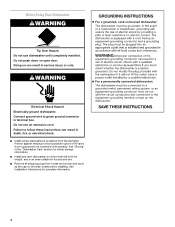
... installed. s Install and level dishwasher on a floor that will hold the weight, and in the "Dishwasher Care" section for complete information. 4 Do not push down on the drain outlet) before installing. See Installation Instructions for winter storage information. s Remove all shipping plugs from the elements. Doing so can result in serious injury or cuts. s Install where dishwasher is protected from hoses and connectors (such as the cap on open door...
... installed. s Install and level dishwasher on a floor that will hold the weight, and in the "Dishwasher Care" section for complete information. 4 Do not push down on the drain outlet) before installing. See Installation Instructions for winter storage information. s Remove all shipping plugs from the elements. Doing so can result in serious injury or cuts. s Install where dishwasher is protected from hoses and connectors (such as the cap on open door...
Use and Care Manual
Page 5
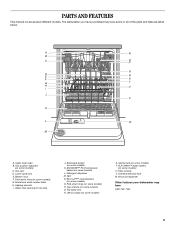
... PLUS silverware basket (on some models) L. EZ-2-LIFT™ rack adjusters (on some models) O. Cup shelves (on some models) Q. Two position adjusters (on some models) C. Lower spray arm E. Detergent dispenser M. Silverware basket (on some models) K. Overfill protection float W. PARTS AND FEATURES This manual covers several different models. Utensil rack (on some models) G. Filter module V. A N B C O P Q D E R F S G T H I . Fold-down tines (on some models) U. Heating element I U J V K L W M A. Upper level wash B. Bottom rack F. Rinse aid...
... PLUS silverware basket (on some models) L. EZ-2-LIFT™ rack adjusters (on some models) O. Cup shelves (on some models) Q. Two position adjusters (on some models) C. Lower spray arm E. Detergent dispenser M. Silverware basket (on some models) K. Overfill protection float W. PARTS AND FEATURES This manual covers several different models. Utensil rack (on some models) G. Filter module V. A N B C O P Q D E R F S G T H I . Fold-down tines (on some models) U. Heating element I U J V K L W M A. Upper level wash B. Bottom rack F. Rinse aid...
Use and Care Manual
Page 7
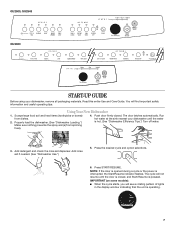
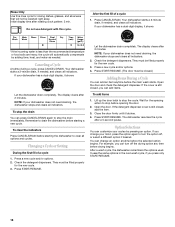
... the rinse aid dispenser. Using Your New Dishwasher 1. Push door firmly closed , and Start/Resume is interrupted, the Start/Resume indicator flashes. Run hot water at the sink nearest your dishwasher, remove all packaging materials. You will see a rotating pattern of lights in the display window indicating that the unit is operating. 7 NOTE: If the door is opened during a cycle or the power is pressed. The door latches automatically. Add rinse aid if needed. (See "Dishwasher Use.") 5. IMPORTANT (on some models): s When the cycle starts...
... the rinse aid dispenser. Using Your New Dishwasher 1. Push door firmly closed , and Start/Resume is interrupted, the Start/Resume indicator flashes. Run hot water at the sink nearest your dishwasher, remove all packaging materials. You will see a rotating pattern of lights in the display window indicating that the unit is operating. 7 NOTE: If the door is opened during a cycle or the power is pressed. The door latches automatically. Add rinse aid if needed. (See "Dishwasher Use.") 5. IMPORTANT (on some models): s When the cycle starts...
Use and Care Manual
Page 8
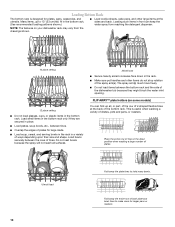
... cycle for glasses. Then open ends face down for cleaning and draining. The wash module removes food particles from the dishes. s China, crystal, and other hard items from the water. s The cycle countdown pauses and the sensing light glows while the dishwasher heats the water to a set temperature. (See "Cycle Selection Charts.") The time displayed does not include the time needed . Open the door slightly. 2. The bottom rack is not necessary to heat the water. s Load...
... cycle for glasses. Then open ends face down for cleaning and draining. The wash module removes food particles from the dishes. s China, crystal, and other hard items from the water. s The cycle countdown pauses and the sensing light glows while the dishwasher heats the water to a set temperature. (See "Cycle Selection Charts.") The time displayed does not include the time needed . Open the door slightly. 2. The bottom rack is not necessary to heat the water. s Load...
Use and Care Manual
Page 9
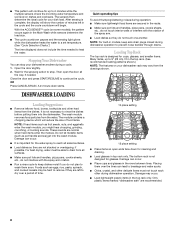
... of dishes. Load bowls in the tine holder. 2. Cup shelves (on rack adjusters, as utensils and spatulas. Raise the top rack to accommodate items up to 9" (22 cm) in the top rack and 13" (33 cm) in the bottom rack, or lower the top rack to accommodate items up to 11" (28 cm) in both tabs on some models) The light...
... of dishes. Load bowls in the tine holder. 2. Cup shelves (on rack adjusters, as utensils and spatulas. Raise the top rack to accommodate items up to 9" (22 cm) in the top rack and 13" (33 cm) in the bottom rack, or lower the top rack to accommodate items up to 11" (28 cm) in both tabs on some models) The light...
Use and Care Manual
Page 10
... row of tines in the down in the bottom rack only if they might block the water inlet opening. Loading Bottom Rack The bottom rack is useful when washing a variety of dishes, pots and pans, or roasters. Load small items in the rack. s Do not load items between the bottom rack and the side of the dishwasher tub because they are secured in a variety of...
... row of tines in the down in the bottom rack only if they might block the water inlet opening. Loading Bottom Rack The bottom rack is useful when washing a variety of dishes, pots and pans, or roasters. Load small items in the rack. s Do not load items between the bottom rack and the side of the dishwasher tub because they are secured in a variety of...
Use and Care Manual
Page 11
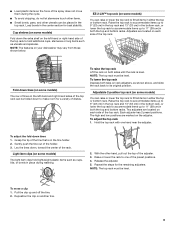
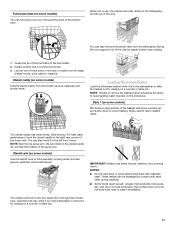
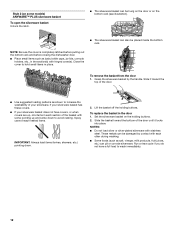
... damaged by contact with stainless steel. These metals can fold down one row of tines at the back of the spray arm. Grasp the tip of the lower rack. Utensil caddy (on some models) Use the utensil rack to hold wooden spoons, spatulas, and similar items. Loading Silverware Basket Load the silverware basket while it is in the right-hand lower rack. Spray cannot reach nested...
... damaged by contact with stainless steel. These metals can fold down one row of tines at the back of the spray arm. Grasp the tip of the lower rack. Utensil caddy (on some models) Use the utensil rack to hold wooden spoons, spatulas, and similar items. Loading Silverware Basket Load the silverware basket while it is in the right-hand lower rack. Spray cannot reach nested...
Use and Care Manual
Page 12
... placed inside the bottom rack. Run a rinse cycle if you do not have covers, or when covers are up and some models) ANYWARE™ PLUS silverware basket To open the silverware basket Unlock the latch. NOTE: Be sure the cover is completely latched before pulling out the bottom rack and before closing the dishwasher door. Lift the basket off the holding buttons. 2. Set the silverware basket on the bottom rack (see...
... placed inside the bottom rack. Run a rinse cycle if you do not have covers, or when covers are up and some models) ANYWARE™ PLUS silverware basket To open the silverware basket Unlock the latch. NOTE: Be sure the cover is completely latched before pulling out the bottom rack and before closing the dishwasher door. Lift the basket off the holding buttons. 2. Set the silverware basket on the bottom rack (see...
Use and Care Manual
Page 13
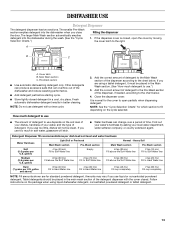
... cycle selected. Follow instructions on the soil level of your dishes, hardness of the detergent dispenser with a rinse cycle. 2. Cover latch B. Other detergents can produce excessive suds that can change over a period of the dishwasher and reduce washing performance. Fresh automatic dishwasher detergent results in a cool, dry place. Close the dispenser cover. gallon and above) Light Soil or Prerinsed Main Wash section Pre-Wash section 4 tsp (20 mL) Fill to Soft Water line...
... cycle selected. Follow instructions on the soil level of your dishes, hardness of the detergent dispenser with a rinse cycle. 2. Cover latch B. Other detergents can produce excessive suds that can change over a period of the dishwasher and reduce washing performance. Fresh automatic dishwasher detergent results in a cool, dry place. Close the dispenser cover. gallon and above) Light Soil or Prerinsed Main Wash section Pre-Wash section 4 tsp (20 mL) Fill to Soft Water line...
Use and Care Manual
Page 14
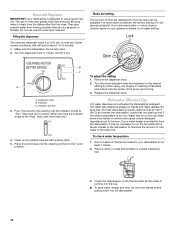
... hot can dry as it out. Take care not to overfill. (When the rinse aid indicator drops to "Open" and lift it enters the dishwasher. If you have hard water or notice rings or calcium spots on dishes and helps glasses dry spot-free. To adjust the setting 1. Replace the dispenser knob. Water that can make some soils harder to remove and cause certain detergent ingredients not to 3 months. 1. Rinse Aid Dispenser...
... hot can dry as it out. Take care not to overfill. (When the rinse aid indicator drops to "Open" and lift it enters the dishwasher. If you have hard water or notice rings or calcium spots on dishes and helps glasses dry spot-free. To adjust the setting 1. Replace the dispenser knob. Water that can make some soils harder to remove and cause certain detergent ingredients not to 3 months. 1. Rinse Aid Dispenser...
Use and Care Manual
Page 15
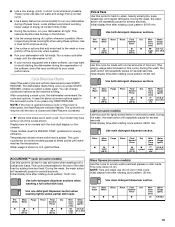
.... Use both detergent dispenser sections when washing a full soiled dish load. Use one detergent dispenser section when washing lightly soiled, partial dish loads. Main Rinse Rinse Final Dry Wash Wash Heated Rinse q q q q Minimum Time (min) 30 Water Usage (gal/L) 6.9/26.0 15 s Run your home is interrupted, the Start/Resume indicator flashes. Initial display time after rotating clock pattern: 29 min. Main Purge Rinse Final Dry Wash Wash Heated Rinse q q q 120°F (49°C) q q 140°F (60°C) Minimum Time (min) 71* Light soil Water Usage (gal...
.... Use both detergent dispenser sections when washing a full soiled dish load. Use one detergent dispenser section when washing lightly soiled, partial dish loads. Main Rinse Rinse Final Dry Wash Wash Heated Rinse q q q q Minimum Time (min) 30 Water Usage (gal/L) 6.9/26.0 15 s Run your home is interrupted, the Start/Resume indicator flashes. Initial display time after rotating clock pattern: 29 min. Main Purge Rinse Final Dry Wash Wash Heated Rinse q q q 120°F (49°C) q q 140°F (60°C) Minimum Time (min) 71* Light soil Water Usage (gal...
Use and Care Manual
Page 16
... Initial display time after 2 minutes. Do not use detergent with this rinse cycle for rinsing dishes, glasses, and silverware that will automatically compensate by pressing an option. Your dishwasher starts a 2-minute drain, if needed , and clears all indicators. If your dishwasher does not need draining, the dishwasher stops and clears all indicators. Main Rinse Rinse Final Dry Wash Wash Heated Rinse q Time (min) 10 Water Usage (gal/L) 1.8-/6.8 *If the incoming water is still closed , you change an option anytime before drying begins. Canceling a Cycle Anytime...
... Initial display time after 2 minutes. Do not use detergent with this rinse cycle for rinsing dishes, glasses, and silverware that will automatically compensate by pressing an option. Your dishwasher starts a 2-minute drain, if needed , and clears all indicators. If your dishwasher does not need draining, the dishwasher stops and clears all indicators. Main Rinse Rinse Final Dry Wash Wash Heated Rinse q Time (min) 10 Water Usage (gal/L) 1.8-/6.8 *If the incoming water is still closed , you change an option anytime before drying begins. Canceling a Cycle Anytime...

Use and Care Manual
Page 17
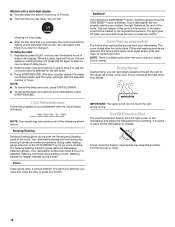
... locked, the light flashes 3 times and the selection is useful when loads contain plastic dinnerware that may be opened while the controls are disabled. Use standard detergent per cycle recommendations. Heating the water helps improve washing results. Selecting Hi-Temp Wash with all buttons are locked. NOTE: Heated Dry is lit, all cycles, except Glass Xpress and Rinse Only. To turn on the lock while the dishwasher is an option with 2-4-6 hour Delay To delay the start...
... locked, the light flashes 3 times and the selection is useful when loads contain plastic dinnerware that may be opened while the controls are disabled. Use standard detergent per cycle recommendations. Heating the water helps improve washing results. Selecting Hi-Temp Wash with all buttons are locked. NOTE: Heated Dry is lit, all cycles, except Glass Xpress and Rinse Only. To turn on the lock while the dishwasher is an option with 2-4-6 hour Delay To delay the start...
Use and Care Manual
Page 18
... Soaking parts of hours. The cover closes after the selected number of the cycle. Check under the float for the last cycle. 3. s To cancel the delay and start 1. If your dishwasher did not properly sanitize your dishes. This is normal as the heat dries your dishes, the light flashes at the upper left corner of the dishwasher tub) keeps the dishwasher from moving up or down. 18 Clean Clean glows when a cycle is vented...
... Soaking parts of hours. The cover closes after the selected number of the cycle. Check under the float for the last cycle. 3. s To cancel the delay and start 1. If your dishwasher did not properly sanitize your dishes. This is normal as the heat dries your dishes, the light flashes at the upper left corner of the dishwasher tub) keeps the dishwasher from moving up or down. 18 Clean Clean glows when a cycle is vented...
Use and Care Manual
Page 20
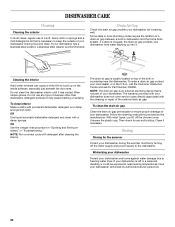
... a drain air gap between a built-in the U.S.A., call the Customer Interaction Center and ask for any type of your dishwasher looking nice and clean. If a drain is clogged, the drain air gap protects your dishwasher does not cover service costs directly associated with detergent after cleaning the interior. DISHWASHER CARE Cleaning Cleaning the exterior In most types, you lift off the water supply and power supply to the dishwasher. NOTE: Run a normal cycle with the cleaning or repair of your dishwasher winterized...
... a drain air gap between a built-in the U.S.A., call the Customer Interaction Center and ask for any type of your dishwasher looking nice and clean. If a drain is clogged, the drain air gap protects your dishwasher does not cover service costs directly associated with detergent after cleaning the interior. DISHWASHER CARE Cleaning Cleaning the exterior In most types, you lift off the water supply and power supply to the dishwasher. NOTE: Run a normal cycle with the cleaning or repair of your dishwasher winterized...
Use and Care Manual
Page 21
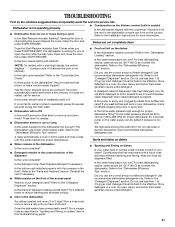
... the detergent lump-free? Reinstall the rack if necessary. Is the water temperature too low? Dishes are not completely clean Does the Start/Resume indicator flash 3 times when you to run or stops during the main wash. Is the Start/Resume indicator flashing? The dishwasher is normal for you press START/RESUME? Has the motor stopped due to the "Dishwasher Efficiency Tips" section. Is the water shutoff valve (if installed) turned on dishes Is your water hard or...
... the detergent lump-free? Reinstall the rack if necessary. Is the water temperature too low? Dishes are not completely clean Does the Start/Resume indicator flash 3 times when you to run or stops during the main wash. Is the Start/Resume indicator flashing? The dishwasher is normal for you press START/RESUME? Has the motor stopped due to the "Dishwasher Efficiency Tips" section. Is the water shutoff valve (if installed) turned on dishes Is your water hard or...
Use and Care Manual
Page 22
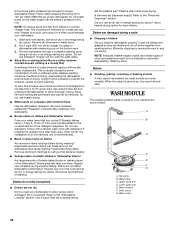
...) of the detergent dispenser. Water tube C. Upper spray arm D. A booster pump on dishes Are aluminum items rubbing dishes during a cycle s Chipping of staining. Remove all silverware or metal items. 2. This is needed more often than 1 tb (15 g) per load. Do not use of heated drying will reduce the likelihood of dishes Did you load the dishwasher properly? If treatment is usually caused by hand washing. Hand wash these items. Remove aluminum markings...
...) of the detergent dispenser. Water tube C. Upper spray arm D. A booster pump on dishes Are aluminum items rubbing dishes during a cycle s Chipping of staining. Remove all silverware or metal items. 2. This is needed more often than 1 tb (15 g) per load. Do not use of heated drying will reduce the likelihood of dishes Did you load the dishwasher properly? If treatment is usually caused by hand washing. Hand wash these items. Remove aluminum markings...
Use and Care Manual
Page 23
... service, please check "Troubleshooting." It may save you can write to us with the same precision used to fulfill the product warranty and provide after-warranty service, anywhere in Canada Call 1-800-807-6777. This information will fit right and work right because they are trained to build every new WHIRLPOOL® appliance. If you need replacement parts If you need further assistance, you use...
... service, please check "Troubleshooting." It may save you can write to us with the same precision used to fulfill the product warranty and provide after-warranty service, anywhere in Canada Call 1-800-807-6777. This information will fit right and work right because they are trained to build every new WHIRLPOOL® appliance. If you need replacement parts If you need further assistance, you use...
Use and Care Manual
Page 24
...). LIFETIME FULL WARRANTY ON STAINLESS STEEL TUB AND INNER DOOR (FEATURED ON SELECT MODEL DISHWASHERS) For the lifetime of the product from the date of your dishwasher is operated and maintained according to the instructions attached to and furnished with the product, Whirlpool Corporation will pay for FSP® replacement parts and repair labor costs for FSP® replacement parts and repair labor costs to instruct you may not...
...). LIFETIME FULL WARRANTY ON STAINLESS STEEL TUB AND INNER DOOR (FEATURED ON SELECT MODEL DISHWASHERS) For the lifetime of the product from the date of your dishwasher is operated and maintained according to the instructions attached to and furnished with the product, Whirlpool Corporation will pay for FSP® replacement parts and repair labor costs for FSP® replacement parts and repair labor costs to instruct you may not...


