
Installation Instructions
Page 7
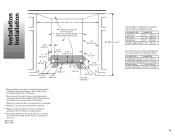
... que : OUVERTURE : DIAMÉTRE : canalisation d'eau 1,3 cm (1/2 po) conduit de vidange 3,8 cm (1 1/2 po) filerie directe 1,9 cm (3/4 po) cordon électrique 3,8 cm (1 1/2 po) *Measured from dishwasher. *Mesuré à partir du point le plus bas du dessous du comptoir.
... que : OUVERTURE : DIAMÉTRE : canalisation d'eau 1,3 cm (1/2 po) conduit de vidange 3,8 cm (1 1/2 po) filerie directe 1,9 cm (3/4 po) cordon électrique 3,8 cm (1 1/2 po) *Measured from dishwasher. *Mesuré à partir du point le plus bas du dessous du comptoir.
Use and Care Manual
Page 3
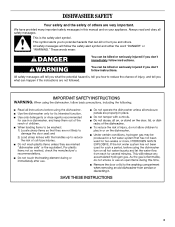
... follow instructions. These words mean: You can happen if the instructions are very important. You can kill or hurt you and others are not followed. 3 DISHWASHER SAFETY Your safety and the safety of injury, and tell you what can be killed or seriously injured if you don't follow the safety alert...
... follow instructions. These words mean: You can happen if the instructions are very important. You can kill or hurt you and others are not followed. 3 DISHWASHER SAFETY Your safety and the safety of injury, and tell you what can be killed or seriously injured if you don't follow the safety alert...
Use and Care Manual
Page 4
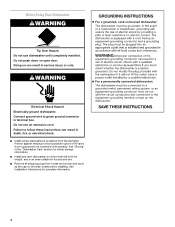
...to follow these instructions can result in an area suitable for complete information. 4 s Remove all shipping plugs from the elements. s Install where dishwasher is protected from hoses and connectors (such as the cap on a floor that will hold the weight, and in serious injury or cuts.... Connect ground wire to green ground connector in the "Dishwasher Care" section for winter storage information. Failure to avoid possible rupture of fill valve. See Installation Instructions for its size and use. Such...
...to follow these instructions can result in an area suitable for complete information. 4 s Remove all shipping plugs from the elements. s Install where dishwasher is protected from hoses and connectors (such as the cap on a floor that will hold the weight, and in serious injury or cuts.... Connect ground wire to green ground connector in the "Dishwasher Care" section for winter storage information. Failure to avoid possible rupture of fill valve. See Installation Instructions for its size and use. Such...
Use and Care Manual
Page 5
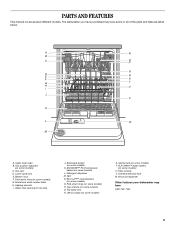
Heating element I U J V K L W M A. Utensil caddy (on some models) S. Utensil rack (on some models) T. Rinse aid dispenser Other features your dishwasher may have Light item clips 5 A N B C O P Q D E R F S G T H I . Lower spray arm E. Top spray arm R. FLIP AWAY™ plate holders (on some models) U. Bottom rack F. Detergent dispenser...different models. ANYWARE™ PLUS silverware basket (on some or all of the parts and features listed below. Filter module V. The dishwasher you have purchased may have some models) G.
Heating element I U J V K L W M A. Utensil caddy (on some models) S. Utensil rack (on some models) T. Rinse aid dispenser Other features your dishwasher may have Light item clips 5 A N B C O P Q D E R F S G T H I . Lower spray arm E. Top spray arm R. FLIP AWAY™ plate holders (on some models) U. Bottom rack F. Detergent dispenser...different models. ANYWARE™ PLUS silverware basket (on some or all of the parts and features listed below. Filter module V. The dishwasher you have purchased may have some models) G.
Use and Care Manual
Page 7
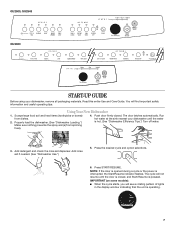
... and option selections. 6. IMPORTANT (on some models): s When the cycle starts, you will not resume until the water is hot. (See "Dishwasher Efficiency Tips.") Turn off water. 3. Add detergent and check the rinse aid dispenser. The cycle will see a rotating pattern of lights in the display... window indicating that the unit is operating. 7 GU2500, GU2548 GU2600 START-UP GUIDE Before using your dishwasher until the door is closed . Read this entire Use and Care Guide. Press START/RESUME. You will find important safety information and useful...
... and option selections. 6. IMPORTANT (on some models): s When the cycle starts, you will not resume until the water is hot. (See "Dishwasher Efficiency Tips.") Turn off water. 3. Add detergent and check the rinse aid dispenser. The cycle will see a rotating pattern of lights in the display... window indicating that the unit is operating. 7 GU2500, GU2548 GU2600 START-UP GUIDE Before using your dishwasher until the door is closed . Read this entire Use and Care Guide. Press START/RESUME. You will find important safety information and useful...
Use and Care Manual
Page 8
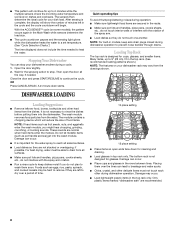
... door and press START/RESUME to heat the water. A 2-minute drain starts. Quiet operating tips To avoid thumping/clattering noises during dishwasher operation to reach all soiled surfaces. The module contains a chopping device which will reduce the size of minutes left to dry over ...the tines can stop . Do not let metallic items (such as pot handle screws) get into the dishwasher. s It is important for your dishwasher anytime during dishwasher operation. s Run a rinse cycle to keep sink drain plugs closed during operation: s Make sure lightweight load items...
... door and press START/RESUME to heat the water. A 2-minute drain starts. Quiet operating tips To avoid thumping/clattering noises during dishwasher operation to reach all soiled surfaces. The module contains a chopping device which will reduce the size of minutes left to dry over ...the tines can stop . Do not let metallic items (such as pot handle screws) get into the dishwasher. s It is important for your dishwasher anytime during dishwasher operation. s Run a rinse cycle to keep sink drain plugs closed during operation: s Make sure lightweight load items...
Use and Care Manual
Page 9
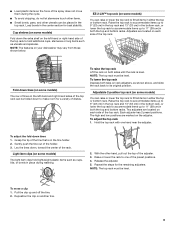
... or lower the top rack to fit tall items in both the top and bottom racks. The high and low positions are located on your dishwasher may vary from those shown below. Hold the top rack with one of the preset positions. 4. With the other utensils can raise or lower the...
... or lower the top rack to fit tall items in both the top and bottom racks. The high and low positions are located on your dishwasher may vary from those shown below. Hold the top rack with one of the preset positions. 4. With the other utensils can raise or lower the...
Use and Care Manual
Page 10
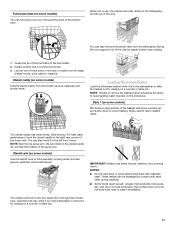
Load bowls securely between tines. s Do not load items between the bottom rack and the side of the dishwasher tub because they are secured in the bottom rack only if they might block the water inlet opening. Load small items in place. s Make sure ...pot handles and other large items at the back of plates for plates, pans, casseroles, and utensils. FLIP AWAY™ plate holders (on your dishwasher rack may vary from reaching the detergent dispenser. Utensil load 10 Fold away the plate tines to make room for larger pans or roasters. Loading...
Load bowls securely between tines. s Do not load items between the bottom rack and the side of the dishwasher tub because they are secured in the bottom rack only if they might block the water inlet opening. Load small items in place. s Make sure ...pot handles and other large items at the back of plates for plates, pans, casseroles, and utensils. FLIP AWAY™ plate holders (on your dishwasher rack may vary from reaching the detergent dispenser. Utensil load 10 Fold away the plate tines to make room for larger pans or roasters. Loading...
Use and Care Manual
Page 11
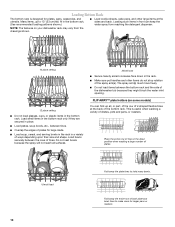
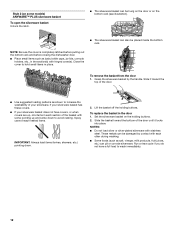
...and similar items). Utensil rack (on some models) Mix items in each other during washing. These metals can also remove the utensil rack from the dishwasher. Swing the two supports out of tines down in the utensil caddy do not have a full load to avoid nesting. NOTES: s Do not load.... 1. Spray cannot reach nested items. The utensil caddy has three hooks. (See arrows.) For best wash performance, hook the utensil caddy in the dishwasher and tilt out of the tine that is in the tine holder. 2. Fold-down tines (on some models) You can pit or corrode silverware. ...
...and similar items). Utensil rack (on some models) Mix items in each other during washing. These metals can also remove the utensil rack from the dishwasher. Swing the two supports out of tines down in the utensil caddy do not have a full load to avoid nesting. NOTES: s Do not load.... 1. Spray cannot reach nested items. The utensil caddy has three hooks. (See arrows.) For best wash performance, hook the utensil caddy in the dishwasher and tilt out of the tine that is in the tine holder. 2. Fold-down tines (on some models) You can pit or corrode silverware. ...
Use and Care Manual
Page 12
... the holding buttons. Style 2 (on some down . 2. NOTE: Be sure the cover is completely latched before pulling out the bottom rack and before closing the dishwasher door. NOTES: s Do not load silver or silver-plated silverware with hinged cover(s). s Use suggested loading patterns as salt, vinegar, milk products, fruit juices, etc...
... the holding buttons. Style 2 (on some down . 2. NOTE: Be sure the cover is completely latched before pulling out the bottom rack and before closing the dishwasher door. NOTES: s Do not load silver or silver-plated silverware with hinged cover(s). s Use suggested loading patterns as salt, vinegar, milk products, fruit juices, etc...
Use and Care Manual
Page 13
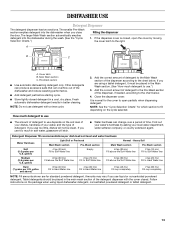
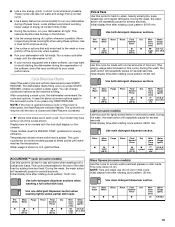
...MAIN WASH WASH Hard Water Soft Water MAIN WASH Hard Water Soft Water PREWASH A. s Add detergent just before starting cycle. Fresh automatic dishwasher detergent results in a cool, dry place. Add the correct amount of detergent to the Main Wash section of the dispenser according to...Hard Water line 9 tsp (45 mL) Fill cup completely 7 tsp (35 mL) Fill cup completely NOTE: Fill amounts shown are using liquid dishwasher detergent, concentrated powdered detergent or tablet detergent. 13 Main Wash section C. s Store tightly closed , open partially when dispensing detergent. Close the ...
...MAIN WASH WASH Hard Water Soft Water MAIN WASH Hard Water Soft Water PREWASH A. s Add detergent just before starting cycle. Fresh automatic dishwasher detergent results in a cool, dry place. Add the correct amount of detergent to the Main Wash section of the dispenser according to...Hard Water line 9 tsp (45 mL) Fill cup completely 7 tsp (35 mL) Fill cup completely NOTE: Fill amounts shown are using liquid dishwasher detergent, concentrated powdered detergent or tablet detergent. 13 Main Wash section C. s Store tightly closed , open partially when dispensing detergent. Close the ...
Use and Care Manual
Page 14
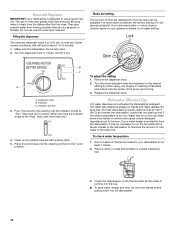
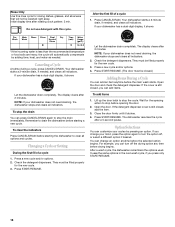
... the indicator points to the desired setting by allowing water to minimize the amount of rinse aid. Rinse Aid Dispenser IMPORTANT: Your dishwasher is designed to "Open" and lift it out. To adjust the setting 1. Turn the arrow adjuster inside the dispenser to "Full." If ...too hot can be adjusted. Pour rinse aid into the cup. Remove the dispenser knob. 2. Replace the dispenser knob. Dishwasher Efficiency Tips Hot water dissolves and activates the dishwashing detergent. Hot water also dissolves grease on the thermometer as it may not wash as spots or streaks. Clean up ...
... the indicator points to the desired setting by allowing water to minimize the amount of rinse aid. Rinse Aid Dispenser IMPORTANT: Your dishwasher is designed to "Open" and lift it out. To adjust the setting 1. Turn the arrow adjuster inside the dispenser to "Full." If ...too hot can be adjusted. Pour rinse aid into the cup. Remove the dispenser knob. 2. Replace the dispenser knob. Dishwasher Efficiency Tips Hot water dissolves and activates the dishwashing detergent. Hot water also dissolves grease on the thermometer as it may not wash as spots or streaks. Clean up ...
Use and Care Manual
Page 15
...°C) Minimum Time (min) 99* Light soil Water Usage (gal/L) 6.9-7.8/ 26.1-29.6 Normal Use this cycle for hard-to avoid starting the dishwasher during off-peak hours. During the wash, the wash action will repeatedly pause for several seconds. s Use a low energy, quick, or short ...RESUME. gallons/liters. Use both detergent dispenser sections when washing a full soiled dish load. Initial display time after meals until the dishwasher is interrupted, the Start/Resume indicator flashes. These cycles use do not vary in this cycle for energy efficiency. Allow longer drying...
...°C) Minimum Time (min) 99* Light soil Water Usage (gal/L) 6.9-7.8/ 26.1-29.6 Normal Use this cycle for hard-to avoid starting the dishwasher during off-peak hours. During the wash, the wash action will repeatedly pause for several seconds. s Use a low energy, quick, or short ...RESUME. gallons/liters. Use both detergent dispenser sections when washing a full soiled dish load. Initial display time after meals until the dishwasher is interrupted, the Start/Resume indicator flashes. These cycles use do not vary in this cycle for energy efficiency. Allow longer drying...
Use and Care Manual
Page 16
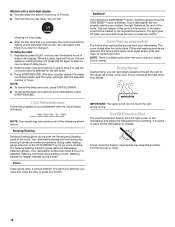
...clear the indicators Press CANCEL/DRAIN before the selected option begins. Press START/RESUME. (The door must be closed , you can change your dishwasher has a dual-digit display, it shows Pre- It uses the same options in the next wash cycle, if you change an option anytime...before starting a new cycle. Initial display time after 2 minutes. To stop the drain You can add an item anytime before the main wash starts. Your dishwasher starts a 2-minute drain, if needed . The display clears after rotating clock pattern: 3 min. Press a new cycle and/or options. 4. If ...
...clear the indicators Press CANCEL/DRAIN before the selected option begins. Press START/RESUME. (The door must be closed , you can change your dishwasher has a dual-digit display, it shows Pre- It uses the same options in the next wash cycle, if you change an option anytime...before starting a new cycle. Initial display time after 2 minutes. To stop the drain You can add an item anytime before the main wash starts. Your dishwasher starts a 2-minute drain, if needed . The display clears after rotating clock pattern: 3 min. Press a new cycle and/or options. 4. If ...

Use and Care Manual
Page 17
...and hold HEATED DRY for the ACCUSENSE™ (on some models), Pots & Pans and Normal cycles. If you select Soak & Scour, the dishwasher fills and then sprays for licensed food establishments. To turn on food. You can add items to the load anytime during a cycle. After adding... require special detergent. In the ACCUSENSE™, Pots & Pans, and Normal cycles, this option to approximately 155°F (68°C). Certified residential dishwashers are repeated for 4 hours in your dishes and glassware in the sink. NOTE: Use the SANI RINSE™ option with Soak & Scour or ...
...and hold HEATED DRY for the ACCUSENSE™ (on some models), Pots & Pans and Normal cycles. If you select Soak & Scour, the dishwasher fills and then sprays for licensed food establishments. To turn on food. You can add items to the load anytime during a cycle. After adding... require special detergent. In the ACCUSENSE™, Pots & Pans, and Normal cycles, this option to approximately 155°F (68°C). Certified residential dishwashers are repeated for 4 hours in your dishes and glassware in the sink. NOTE: Use the SANI RINSE™ option with Soak & Scour or ...
Use and Care Manual
Page 18
... you can delay the start by calling up the last delay that may have some models) The Active Vent reduces the sounds from overfilling. Your dishwasher soaks when Soak & Scour is hot. Do not touch the vent during water heating pause intervals. Press DELAY again to 9 hours. Cycle Status ... the Sensing and Soaking parts of delay hours. 2. NOTE: There is finished. Sensing/Soaking Sensing/Soaking glows during a soak. Washing pauses for the dishwasher to use Delay, you will start of a cycle up or down. 18 Clean Clean glows when a cycle is normal as the heat dries your...
... you can delay the start by calling up the last delay that may have some models) The Active Vent reduces the sounds from overfilling. Your dishwasher soaks when Soak & Scour is hot. Do not touch the vent during water heating pause intervals. Press DELAY again to 9 hours. Cycle Status ... the Sensing and Soaking parts of delay hours. 2. NOTE: There is finished. Sensing/Soaking Sensing/Soaking glows during a soak. Washing pauses for the dishwasher to use Delay, you will start of a cycle up or down. 18 Clean Clean glows when a cycle is normal as the heat dries your...
Use and Care Manual
Page 19
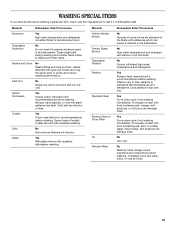
... Material Hollow-Handle Knives Pewter, Brass, Bronze Disposable Plastics Plastics Stainless Steel Sterling Silver or Silver Plate Tin Wooden Ware Dishwasher Safe?/Comments No Handles of anodized aluminum. Yes Run a rinse cycle if not washing immediately. Crystal Yes Check manufacturer's... No Cannot withstand high water temperatures and detergents. Yes Always check manufacturer's recommendations before washing. Load plastics in the dishwasher. Yes Run a rinse cycle if not washing immediately. Prolonged contact with the manufacturer to dishes and other items. Bottles...
... Material Hollow-Handle Knives Pewter, Brass, Bronze Disposable Plastics Plastics Stainless Steel Sterling Silver or Silver Plate Tin Wooden Ware Dishwasher Safe?/Comments No Handles of anodized aluminum. Yes Run a rinse cycle if not washing immediately. Crystal Yes Check manufacturer's... No Cannot withstand high water temperatures and detergents. Yes Always check manufacturer's recommendations before washing. Load plastics in the dishwasher. Yes Run a rinse cycle if not washing immediately. Prolonged contact with the manufacturer to dishes and other items. Bottles...
Use and Care Manual
Page 20
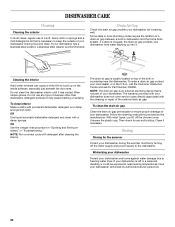
... cleaning or repair of the external drain air gap. OR See the vinegar rinse procedure in "Spotting and filming on top of cleanser other than dishwasher detergent because it may cause foaming or sudsing. NOTE: Run a normal cycle with a damp sponge. To order a drain air gap contact your local ... The drain air gap is recommended. With most cases, regular use any soil buildup. If a drain is necessary to keep the outside of your dishwasher. Cleaning the interior Hard water minerals can cause a white film to build up into it has cooled. NOTE: The drain air gap is an external...
... cleaning or repair of the external drain air gap. OR See the vinegar rinse procedure in "Spotting and filming on top of cleanser other than dishwasher detergent because it may cause foaming or sudsing. NOTE: Run a normal cycle with a damp sponge. To order a drain air gap contact your local ... The drain air gap is recommended. With most cases, regular use any soil buildup. If a drain is necessary to keep the outside of your dishwasher. Cleaning the interior Hard water minerals can cause a white film to build up into it has cooled. NOTE: The drain air gap is an external...
Use and Care Manual
Page 21
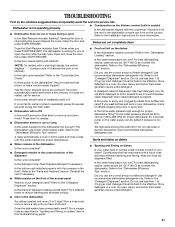
...the overfill protection float able to move up and down to 828 kPa) for more information. Is the water supplied to the "Dishwasher Loading" section. A delay automatically occurs in dispenser? Reinstall the rack if necessary. TROUBLESHOOTING First try the solutions suggested here and...caked in some wash and rinse cycles until you press START/RESUME? Replace detergent if necessary. Refer to the Installation Instructions for proper dishwasher fill. Is the water temperature too low? It is too low. Store detergent in your water? Press down freely? s Spotting...
...the overfill protection float able to move up and down to 828 kPa) for more information. Is the water supplied to the "Dishwasher Loading" section. A delay automatically occurs in dispenser? Reinstall the rack if necessary. TROUBLESHOOTING First try the solutions suggested here and...caked in some wash and rinse cycles until you press START/RESUME? Replace detergent if necessary. Refer to the Installation Instructions for proper dishwasher fill. Is the water temperature too low? It is too low. Store detergent in your water? Press down freely? s Spotting...
Use and Care Manual
Page 22
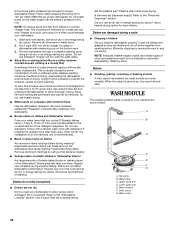
...abrasive cleaner. To slow this process use heated drying. Do not use a minimum amount of glassware. s White spots on dishes and dishwasher interior Does your dishwasher. 1. Do not use of an iron removal unit is a milky, rainbowcolored deposit; Hand wash these items. Remove aluminum markings by ...option for occasional use of staining. Upper spray arm D. Drain motor G. Put 2 cups (500 mL) white vinegar in the dishwasher. Did you load the dishwasher properly? When the object is too low. Use an air-dry or an energy saving dry option. Follow with a Normal wash ...
...abrasive cleaner. To slow this process use heated drying. Do not use a minimum amount of glassware. s White spots on dishes and dishwasher interior Does your dishwasher. 1. Do not use of an iron removal unit is a milky, rainbowcolored deposit; Hand wash these items. Remove aluminum markings by ...option for occasional use of staining. Upper spray arm D. Drain motor G. Put 2 cups (500 mL) white vinegar in the dishwasher. Did you load the dishwasher properly? When the object is too low. Use an air-dry or an energy saving dry option. Follow with a Normal wash ...


