
User Guide
Page 9
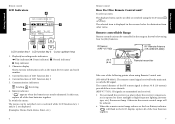
... the input device name and track number. 3. Current function of LCD function key 2 5. In this case, replace all of the following points when using the LCD cursor or key. Playback/recording mode indicators REC ` Play indicator/ 8: Pause indicator/ : Record indicator/ 7: Stop indicator 2. IR Sensor (KRF-V7773D) STANDBY ON/STANDBY POWER -ON -OFF 20 ft (6 m) RF Remote Antenna (VR-4090/VR-4080) VOLUME CONTROL 2WAY LCD REMOTE CONTROL UNIT Remote transmitter...
... the input device name and track number. 3. Current function of LCD function key 2 5. In this case, replace all of the following points when using the LCD cursor or key. Playback/recording mode indicators REC ` Play indicator/ 8: Pause indicator/ : Record indicator/ 7: Stop indicator 2. IR Sensor (KRF-V7773D) STANDBY ON/STANDBY POWER -ON -OFF 20 ft (6 m) RF Remote Antenna (VR-4090/VR-4080) VOLUME CONTROL 2WAY LCD REMOTE CONTROL UNIT Remote transmitter...

User Guide
Page 11
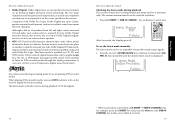
... panel of the receiver. Adjust in the range from +10 to adjust the volume. • Turn the VOLUME knob on Remote Control unit to select the desired tone level. or - When Off is selected above and the SOUND key or Next key is pressed again, the Bass setting menu appears. Using Receiver Using Receiver How Do I Adjust the Sound? Adjusting the Volume Use one of your front speakers manually. L SPEAKERS R INPUT CD 2/TAPE 2 LISTEN MODE MONITOR MODE SET UP SOUND...
... panel of the receiver. Adjust in the range from +10 to adjust the volume. • Turn the VOLUME knob on Remote Control unit to select the desired tone level. or - When Off is selected above and the SOUND key or Next key is pressed again, the Bass setting menu appears. Using Receiver Using Receiver How Do I Adjust the Sound? Adjusting the Volume Use one of your front speakers manually. L SPEAKERS R INPUT CD 2/TAPE 2 LISTEN MODE MONITOR MODE SET UP SOUND...
User Guide
Page 15
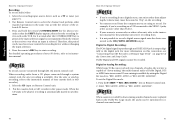
... surround you. How Do I Adjust the Sound? • Dolby Digital: Dolby Digital uses an encode/decode process based on Remote Control unit. Input Status PCM F.Auto After 8 seconds, the display goes off. /8 1 /7 1 1 2 3 4 5 6 7 8 9 +10 0 +100 10 11 12 To set manually except with certain input signals. 1. Press the receiver's LISTEN MODE key or Remote Control unit's LIS- The five main channels are playing DTS-encoded media. Like Dolby Digital, DTS has muchimproved clarity, surround...
... surround you. How Do I Adjust the Sound? • Dolby Digital: Dolby Digital uses an encode/decode process based on Remote Control unit. Input Status PCM F.Auto After 8 seconds, the display goes off. /8 1 /7 1 1 2 3 4 5 6 7 8 9 +10 0 +100 10 11 12 To set manually except with certain input signals. 1. Press the receiver's LISTEN MODE key or Remote Control unit's LIS- The five main channels are playing DTS-encoded media. Like Dolby Digital, DTS has muchimproved clarity, surround...

User Guide
Page 17
... of sound echoed in various spaces) which determine the feeling of specially-encoded DVD AUDIO discs played on Remote Control unit. 2. These modes are finished listening to analog media, set the receiver's input to your preference. • The ROOM SIZE parameter lets you adjust the size of the original music or video source. Since DSP uses digital processing, it can adjust the following elements to create a customized environment: • The WALL TYPE...
... of sound echoed in various spaces) which determine the feeling of specially-encoded DVD AUDIO discs played on Remote Control unit. 2. These modes are finished listening to analog media, set the receiver's input to your preference. • The ROOM SIZE parameter lets you adjust the size of the original music or video source. Since DSP uses digital processing, it can adjust the following elements to create a customized environment: • The WALL TYPE...

User Guide
Page 23
... (FM band only). RDS Functions help you can make the sound easier to listen thanks to its instruction manual. Play the CD player or cassette deck in automatically. Tuners and receivers designed for programs of your AV device, refer to 40 stations can extract the data from Remote Control unit, use the video camera or additional VCR controls. Monitoring a Video Camera or Playing an Additional VCR 1. As...
... (FM band only). RDS Functions help you can make the sound easier to listen thanks to its instruction manual. Play the CD player or cassette deck in automatically. Tuners and receivers designed for programs of your AV device, refer to 40 stations can extract the data from Remote Control unit, use the video camera or additional VCR controls. Monitoring a Video Camera or Playing an Additional VCR 1. As...
User Guide
Page 26
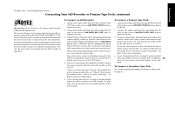
... MODE: AUTO or "REC MODE: MANUAL". To set the Digital Rec mode: 1. When a source recorded by setting the Digital Rec mode to remote control the recording device without changing the input selection. 4. Therefore, this connection, see page 27). 2. Press the remote's REC key to Digital Recording: The PCM digital signal input through a system control cord, the sync recording is selected. For more information on this period can be played, recording is output digitally at the digital jack...
... MODE: AUTO or "REC MODE: MANUAL". To set the Digital Rec mode: 1. When a source recorded by setting the Digital Rec mode to remote control the recording device without changing the input selection. 4. Therefore, this connection, see page 27). 2. Press the remote's REC key to Digital Recording: The PCM digital signal input through a system control cord, the sync recording is selected. For more information on this period can be played, recording is output digitally at the digital jack...

User Guide
Page 35
..., if you don't hear anything through the speakers, it . 2. Use the Connection and Setup Guide to speaker. You can solve it 's useful to good troubleshooting: 1. Use this , but it is that eliminates the speakers themselves as a CD player) to double-check your Remote Control unit settings carefully. A good rule of thumb is to operate the receiver. If the problem component works now, it to test the assumptions you made...
..., if you don't hear anything through the speakers, it . 2. Use the Connection and Setup Guide to speaker. You can solve it 's useful to good troubleshooting: 1. Use this , but it is that eliminates the speakers themselves as a CD player) to double-check your Remote Control unit settings carefully. A good rule of thumb is to operate the receiver. If the problem component works now, it to test the assumptions you made...

User Guide
Page 36
... activated in the Setup Speakers menu. digital) that has been set properly. See "Switching Input Modes" on the Remote Control unit. See "Muting Sound" on page␣ 16 of this manual. • The proper input (e.g., CD player, Tuner, etc.) has been selected on 60 Sound page␣ 22 of this manual. Video Receiver?" See "What are connected tightly. Audio is not output only when a 96k fs compatible disc is played. • The optical cable may be...
... activated in the Setup Speakers menu. digital) that has been set properly. See "Switching Input Modes" on the Remote Control unit. See "Muting Sound" on page␣ 16 of this manual. • The proper input (e.g., CD player, Tuner, etc.) has been selected on 60 Sound page␣ 22 of this manual. Video Receiver?" See "What are connected tightly. Audio is not output only when a 96k fs compatible disc is played. • The optical cable may be...

User Guide
Page 37
... Remote Control unit. Troubleshooting Moving Around Sound I can 't see the program I'm playing on my VCR or tape deck Check that: • The audio cables are connected properly for the component. • Analog has been set as the input type. There wasn't any sound recorded on tapes made on the TV There wasn't any video output to Analog Recording" on the TV is selected. • Check that the correct digital cable...
... Remote Control unit. Troubleshooting Moving Around Sound I can 't see the program I'm playing on my VCR or tape deck Check that: • The audio cables are connected properly for the component. • Analog has been set as the input type. There wasn't any sound recorded on tapes made on the TV There wasn't any video output to Analog Recording" on the TV is selected. • Check that the correct digital cable...

User Guide
Page 38
... speaker wires of the Connections and Setup Guide) Reset the cleared settings before operating the receiver again. on page␣ 10 of this manual. 65 Troubleshooting The sound is distorted, and the CLIP indicator on page␣ 15 of this manual • The tuner's receiving band (FM is okay). Press the INPUT MODE key again for that component: See "Adjusting the Input level" on the receiver's front panel flashes red continually, or stays red...
... speaker wires of the Connections and Setup Guide) Reset the cleared settings before operating the receiver again. on page␣ 10 of this manual. 65 Troubleshooting The sound is distorted, and the CLIP indicator on page␣ 15 of this manual • The tuner's receiving band (FM is okay). Press the INPUT MODE key again for that component: See "Adjusting the Input level" on the receiver's front panel flashes red continually, or stays red...

User Guide
Page 39
... appropriate antenna is connected. See "Radio Tuning" on page␣ 64 of this manual. • The Tuner input is selected. See Chapter One of the Connections and Setup Guide. • The broadcast band is correct. Receiver/Tuner Troubleshooting Troubleshooting 66 67 Moving Around Receiver/Tuner I can 't access any home electronics store). When I press a key to tune to the correct frequency. If it has, your settings were...
... appropriate antenna is connected. See "Radio Tuning" on page␣ 64 of this manual. • The Tuner input is selected. See Chapter One of the Connections and Setup Guide. • The broadcast band is correct. Receiver/Tuner Troubleshooting Troubleshooting 66 67 Moving Around Receiver/Tuner I can 't access any home electronics store). When I press a key to tune to the correct frequency. If it has, your settings were...

Setup Guide
Page 15
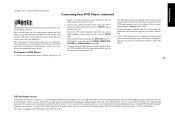
... RF modulator's instruction manual. 4. You can still watch TV without using it as an audio/video source device itself). If your devices. The modulator will convert the video signal from the receiver to use to view media played on the connections from your new receiver. Connections Chapter One : Connecting Your Devices Connecting Your TV, continued Do not plug in the receiver or devices to AC power until you have connected all your...
... RF modulator's instruction manual. 4. You can still watch TV without using it as an audio/video source device itself). If your devices. The modulator will convert the video signal from the receiver to use to view media played on the connections from your new receiver. Connections Chapter One : Connecting Your Devices Connecting Your TV, continued Do not plug in the receiver or devices to AC power until you have connected all your...
Setup Guide
Page 23
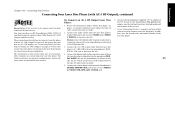
..., an external 5.1 channel DTS Digital Surround™ decoder system must be connected to the digital output (S/P DIF, AES/EBU, or TosLink) of the CD, LD, or DVD player, excessive noise will be decoded and played back inside most CD, LD, or DVD players. To Connect a DVD Player: 1. When the DVD player provides the DVD 6CH (DVD 5.1 CH) outputs, connect them to the receiver's FRONT jacks. Your DVD player supports one of video connections you use the optical digital cable, be...
..., an external 5.1 channel DTS Digital Surround™ decoder system must be connected to the digital output (S/P DIF, AES/EBU, or TosLink) of the CD, LD, or DVD player, excessive noise will be decoded and played back inside most CD, LD, or DVD players. To Connect a DVD Player: 1. When the DVD player provides the DVD 6CH (DVD 5.1 CH) outputs, connect them to the receiver's FRONT jacks. Your DVD player supports one of video connections you use the optical digital cable, be...

Setup Guide
Page 25
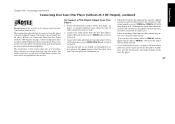
... connecting a digital optical cable, remove the protect covers from the CD-R recorder's Play OUT jacks to the receiver's CD-R PLAY IN jacks as shown to the digital out jack if you used to connect your CD-R recorder to a digital in this section shows one of the CD-R recorder. Each set of instructions in jack, such as a CD or DVD player. 4. Connect the audio cable from the optical jacks. You only need...
... connecting a digital optical cable, remove the protect covers from the CD-R recorder's Play OUT jacks to the receiver's CD-R PLAY IN jacks as shown to the digital out jack if you used to connect your CD-R recorder to a digital in this section shows one of the CD-R recorder. Each set of instructions in jack, such as a CD or DVD player. 4. Connect the audio cable from the optical jacks. You only need...
Setup Guide
Page 27
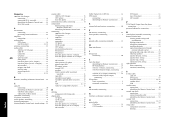
... model number of several possible variations on page␣ 3 and note which jacks you purchased your MD recorder or tape deck. Connect the audio cable from the MD recorder to AC power until you used to the left. (Although the figure shows both the coaxial cable connection and optical cable connection, use either connection in actual case.) When connecting a digital optical cable, remove the protect covers from the optical jacks. Connect...
... model number of several possible variations on page␣ 3 and note which jacks you purchased your MD recorder or tape deck. Connect the audio cable from the MD recorder to AC power until you used to the left. (Although the figure shows both the coaxial cable connection and optical cable connection, use either connection in actual case.) When connecting a digital optical cable, remove the protect covers from the optical jacks. Connect...
Setup Guide
Page 31
... or optical) from the laser disc player's Audio OUT jacks to the left . Connect the AC-3 RF coaxial cable from the demodulator's DIGITAL OUTPUT COAX. Connect the coaxial digital cable from the laser disc player's AC-3 RF OUT jack to the demodulator's RF INPUT AC-3 RF jack as shown to the receiver's AUDIO jacks (VIDEO 3 PLAY IN) as described in this receiver. Do not plug the adapter into the wall...
... or optical) from the laser disc player's Audio OUT jacks to the left . Connect the AC-3 RF coaxial cable from the demodulator's DIGITAL OUTPUT COAX. Connect the coaxial digital cable from the laser disc player's AC-3 RF OUT jack to the demodulator's RF INPUT AC-3 RF jack as shown to the receiver's AUDIO jacks (VIDEO 3 PLAY IN) as described in this receiver. Do not plug the adapter into the wall...
Setup Guide
Page 33
... optical cable connection, use either connection in this section show one of video connections you purchased your laser disc player. In addition, note the brand name and model number of the cables from the laser disc player's Video OUT jack to the receiver's VIDEO PLAY IN jack as shown to AC power until you used to connect a laser disc player with AC-3 RF Output)" on page␣ 1. Note that the jack sets...
... optical cable connection, use either connection in this section show one of video connections you purchased your laser disc player. In addition, note the brand name and model number of the cables from the laser disc player's Video OUT jack to the receiver's VIDEO PLAY IN jack as shown to AC power until you used to connect a laser disc player with AC-3 RF Output)" on page␣ 1. Note that the jack sets...

Setup Guide
Page 37
...'s IR OUT cable to the receiver's IR RECEIVER IN jack. Do not connect IR repeaters unless you to use the Receiver's Remote Control unit to the receiver's IR RECEIVER IN jack. This jack supports a 12V 20mA sig- IR repeaters send a signal similar to control components located in any other IR Receiver: 1. REAR IN" on the front panel of the receiver for U.S. To activate the IR receiver connections, you need to Remote Control unit. •...
...'s IR OUT cable to the receiver's IR RECEIVER IN jack. Do not connect IR repeaters unless you to use the Receiver's Remote Control unit to the receiver's IR RECEIVER IN jack. This jack supports a 12V 20mA sig- IR repeaters send a signal similar to control components located in any other IR Receiver: 1. REAR IN" on the front panel of the receiver for U.S. To activate the IR receiver connections, you need to Remote Control unit. •...

Setup Guide
Page 49
... the speaker volumes" below. Panel door Push the lower part of speakers, please see page 36. Plug the power cord into a household power outlet. 2. (VR-4090/VR-4080) Press the REMOTE POWER key to turn the receiver ON. 4. Selecting the CENTER speaker: 5 Press the SET UP key to display "CENTER NORMAL (or LARGE or OFF)". 6 Press the MULTI CONTROL (fi/%) key to supply the main power. For details on Remote Control...
... the speaker volumes" below. Panel door Push the lower part of speakers, please see page 36. Plug the power cord into a household power outlet. 2. (VR-4090/VR-4080) Press the REMOTE POWER key to turn the receiver ON. 4. Selecting the CENTER speaker: 5 Press the SET UP key to display "CENTER NORMAL (or LARGE or OFF)". 6 Press the MULTI CONTROL (fi/%) key to supply the main power. For details on Remote Control...
Setup Guide
Page 54
...Control unit 35 O optical cable CD player 14 CD-R recorder 18 DVD player 16 Laser Disc player 26 MD recorder 20 P PCM Digital Output laser disc player, connecting 27 powered subwoofer, connecting 4 R record player/turntable, connecting 28 Remote Control unit clearing stored settings and reconfiguring 34 deleting setup code 39 identifying components 38 installing batteries 34 operating components through external infrared receiver 31 replacing old setup code with new ......... 39 selecting speakers 36 speaker distance, setting 38 speaker level, setting 37 speaker type, setting...
...Control unit 35 O optical cable CD player 14 CD-R recorder 18 DVD player 16 Laser Disc player 26 MD recorder 20 P PCM Digital Output laser disc player, connecting 27 powered subwoofer, connecting 4 R record player/turntable, connecting 28 Remote Control unit clearing stored settings and reconfiguring 34 deleting setup code 39 identifying components 38 installing batteries 34 operating components through external infrared receiver 31 replacing old setup code with new ......... 39 selecting speakers 36 speaker distance, setting 38 speaker level, setting 37 speaker type, setting...


