User Manual
Page 2
... MOUNT AND SAFETY BRACKET OPTIONS 38 32 INCH HIGH DEFINITION LCD TV SPECIFICATIONS 39 42 INCH HIGH DEFINITION LCD TV SPECIFICATIONS 39 TROUBLESHOOTING...41 CLEANING THE HIGH DEFINITION LCD TV 43 i English CONTENTS 1. INSTALLATION PACKAGE CONTENTS ...8 FRONT VIEW OF THE HIGH DEFINITION LCD TV 9 SIDE VIEW OF THE HIGH DEFINITION LCD TV 10 REMOTE CONTROL ...13 INSTALLATION ...14 4. OSD FUNCTION OSD...
... MOUNT AND SAFETY BRACKET OPTIONS 38 32 INCH HIGH DEFINITION LCD TV SPECIFICATIONS 39 42 INCH HIGH DEFINITION LCD TV SPECIFICATIONS 39 TROUBLESHOOTING...41 CLEANING THE HIGH DEFINITION LCD TV 43 i English CONTENTS 1. INSTALLATION PACKAGE CONTENTS ...8 FRONT VIEW OF THE HIGH DEFINITION LCD TV 9 SIDE VIEW OF THE HIGH DEFINITION LCD TV 10 REMOTE CONTROL ...13 INSTALLATION ...14 4. OSD FUNCTION OSD...
User Manual
Page 5
.... Also, any unauthorized changes or modifications not expressly approved by Westinghouse Digital will not occur in the United States and Canada. CAUTION: The power supply outlet should be located near High Definition LCD TV and should look like Figure A1 below: Figure A1 Figure A2...sets may be used in a particular installation. These limits are designed to operate this High Definition LCD TV is connected. • Consult the Westinghouse Service Center or an experienced radio/TV technician for a Class B digital device, pursuant to radio communications if not installed and used in ...
.... Also, any unauthorized changes or modifications not expressly approved by Westinghouse Digital will not occur in the United States and Canada. CAUTION: The power supply outlet should be located near High Definition LCD TV and should look like Figure A1 below: Figure A1 Figure A2...sets may be used in a particular installation. These limits are designed to operate this High Definition LCD TV is connected. • Consult the Westinghouse Service Center or an experienced radio/TV technician for a Class B digital device, pursuant to radio communications if not installed and used in ...
User Manual
Page 6
... long period of the obsolete outlet. 10. Other Notices • Avoid exposing the High Definition LCD TV to direct sunlight or high temperatures. • Avoid exposing the High Definition LCD TV to qualified service personnel. Important Safety Instructions 1. Install in any way, such as radiators, heat...control • Only use caution when moving it. • If the High Definition LCD TV emits smoke, abnormal noise, or a strange odor, immediately turn it off and contact the Westinghouse Service Center. 3 For your safety, please read all the safety and operating instructions ...
... long period of the obsolete outlet. 10. Other Notices • Avoid exposing the High Definition LCD TV to direct sunlight or high temperatures. • Avoid exposing the High Definition LCD TV to qualified service personnel. Important Safety Instructions 1. Install in any way, such as radiators, heat...control • Only use caution when moving it. • If the High Definition LCD TV emits smoke, abnormal noise, or a strange odor, immediately turn it off and contact the Westinghouse Service Center. 3 For your safety, please read all the safety and operating instructions ...
User Manual
Page 7
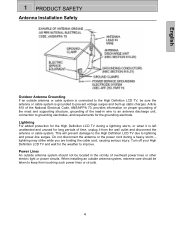
...power cord during a lightning storm, or when it from touching such power lines or circuits. 4 This will prevent damage to the High Definition LCD TV due to keep from the wall outlet and disconnect the antenna or cable system. Power Lines An outside antenna system should be taken to lightning... and power-line surges. Lightning For added protection for the High Definition LCD TV during a heavy storm - lightning may strike while you are holding the cable cord, causing serious injury. Turn off your High Definition...
...power cord during a lightning storm, or when it from touching such power lines or circuits. 4 This will prevent damage to the High Definition LCD TV due to keep from the wall outlet and disconnect the antenna or cable system. Power Lines An outside antenna system should be taken to lightning... and power-line surges. Lightning For added protection for the High Definition LCD TV during a heavy storm - lightning may strike while you are holding the cable cord, causing serious injury. Turn off your High Definition...
User Manual
Page 8
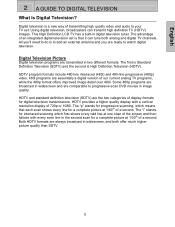
...integrated digital television set . The "i" stands for interlaced scanning which means that it can transmit high definition TV (HDTV) images. Digital Television Picture Digital television programs are essentially a digital version of transmitting high quality video and audio to ...Is Digital Television? HDTV provides a higher quality display with every even line in widescreen, and both analog and digital TV channels. This High Definition LCD TV has a built-in two different formats. Both HDTV formats are the two categories of display formats for a complete picture...
...integrated digital television set . The "i" stands for interlaced scanning which means that it can transmit high definition TV (HDTV) images. Digital Television Picture Digital television programs are essentially a digital version of transmitting high quality video and audio to ...Is Digital Television? HDTV provides a higher quality display with every even line in widescreen, and both analog and digital TV channels. This High Definition LCD TV has a built-in two different formats. Both HDTV formats are the two categories of display formats for a complete picture...
User Manual
Page 10
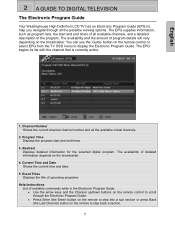
... and end times. 3. Current Time and Date Shows the current time and date. 5. English 2 A GUIDE TO DIGITAL TELEVISION The Electronic Program Guide Your Westinghouse High Definition LCD TV has an Electronic Program Guide (EPG) to help you navigate through the Electronic Program Guide. • Press Enter (the Enter) button on the remote... Displays the title of upcoming programs. Help Instructions List of program details will vary depending on the remote control or select EPG from the TV OSD menu to scroll through all the available virtual channels. 2. The availability of the program.
... and end times. 3. Current Time and Date Shows the current time and date. 5. English 2 A GUIDE TO DIGITAL TELEVISION The Electronic Program Guide Your Westinghouse High Definition LCD TV has an Electronic Program Guide (EPG) to help you navigate through the Electronic Program Guide. • Press Enter (the Enter) button on the remote... Displays the title of upcoming programs. Help Instructions List of program details will vary depending on the remote control or select EPG from the TV OSD menu to scroll through all the available virtual channels. 2. The availability of the program.
User Manual
Page 11
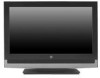
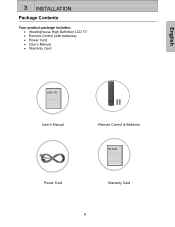
TV User's Manual Remote Control & Batteries W. Card Power Cord Warranty Card 8 English 3 INSTALLATION Package Contents Your product package includes: • Westinghouse High Definition LCD TV • Remote Control (with batteries) • Power Cord • User's Manual • Warranty Card LCD -
TV User's Manual Remote Control & Batteries W. Card Power Cord Warranty Card 8 English 3 INSTALLATION Package Contents Your product package includes: • Westinghouse High Definition LCD TV • Remote Control (with batteries) • Power Cord • User's Manual • Warranty Card LCD -
User Manual
Page 12
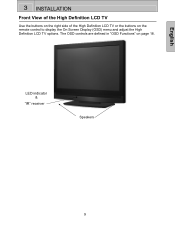
LED indicator & "IR" receiver Speakers 9 The OSD controls are defined in "OSD Functions" on the remote control to display the On Screen Display (OSD) menu and adjust the High Definition LCD TV options. English 3 INSTALLATION Front View of the High Definition LCD TV Use the buttons on the right side of the High Definition LCD TV or the buttons on page 18.
LED indicator & "IR" receiver Speakers 9 The OSD controls are defined in "OSD Functions" on the remote control to display the On Screen Display (OSD) menu and adjust the High Definition LCD TV options. English 3 INSTALLATION Front View of the High Definition LCD TV Use the buttons on the right side of the High Definition LCD TV or the buttons on page 18.
User Manual
Page 13
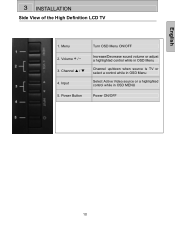
English 3 INSTALLATION Side View of the High Definition LCD TV 1. Volume + / - 3. Channel S / T 4. Input 5. Power Button Turn OSD Menu ON/OFF Increase/Decrease sound volume or adjust a highlighted control while in OSD Menu Channel up/down when source is TV or select a control while in OSD Menu Select Active Video source or a highlighted control while in OSD MENU Power ON/OFF 10 Menu 2.
English 3 INSTALLATION Side View of the High Definition LCD TV 1. Volume + / - 3. Channel S / T 4. Input 5. Power Button Turn OSD Menu ON/OFF Increase/Decrease sound volume or adjust a highlighted control while in OSD Menu Channel up/down when source is TV or select a control while in OSD Menu Select Active Video source or a highlighted control while in OSD MENU Power ON/OFF 10 Menu 2.
User Manual
Page 16
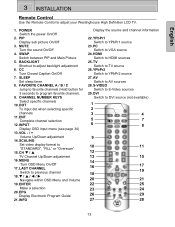
... VOL - / + Volume Up/Down adjustment 14. ENTER Make a selection 20. HDMI Switch to adjust backlight adjustment 6. CH T / S TV Channel Up/Down adjustment 16. AV Switch to YPbPr1 source 23. CC Turn Closed Caption On/Off 7. CHANNEL NUMBER KEYS Select specific channels 10....C Jump to favorite channels (Hold button for 3 seconds to adjust your Westinghouse High Definition LCD TV. 1. MENU Turn OSD Menu On/Off 17. LAST CHANNEL Switch to TV source 26. INFO Display the source and channel information 22. TV Switch to previous channel 18. S-VIDEO Switch to S-Video sources 29.
... VOL - / + Volume Up/Down adjustment 14. ENTER Make a selection 20. HDMI Switch to adjust backlight adjustment 6. CH T / S TV Channel Up/Down adjustment 16. AV Switch to YPbPr1 source 23. CC Turn Closed Caption On/Off 7. CHANNEL NUMBER KEYS Select specific channels 10....C Jump to favorite channels (Hold button for 3 seconds to adjust your Westinghouse High Definition LCD TV. 1. MENU Turn OSD Menu On/Off 17. LAST CHANNEL Switch to TV source 26. INFO Display the source and channel information 22. TV Switch to previous channel 18. S-VIDEO Switch to S-Video sources 29.
User Manual
Page 18
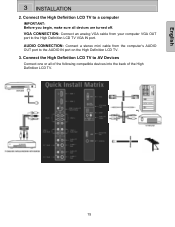
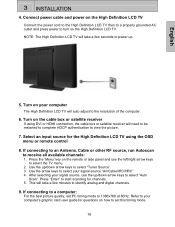
English 3 INSTALLATION 2. Connect the High Definition LCD TV to the AUDIO IN port on the High Definition LCD TV. 3. VGA CONNECTION: Connect an analog VGA cable from the computer's AUDIO OUT port to AV Devices Connect one or all devices are turned off. AUDIO CONNECTION: Connect a stereo mini cable from your computer VGA OUT port to a computer IMPORTANT: Before you begin, make sure all of the following compatible devices into the back of the High Definition LCD TV. 15 Connect the High Definition LCD TV to the High Definition LCD TV VGA IN port.
English 3 INSTALLATION 2. Connect the High Definition LCD TV to the AUDIO IN port on the High Definition LCD TV. 3. VGA CONNECTION: Connect an analog VGA cable from the computer's AUDIO OUT port to AV Devices Connect one or all devices are turned off. AUDIO CONNECTION: Connect a stereo mini cable from your computer VGA OUT port to a computer IMPORTANT: Before you begin, make sure all of the following compatible devices into the back of the High Definition LCD TV. 15 Connect the High Definition LCD TV to the High Definition LCD TV VGA IN port.
User Manual
Page 19
... scanning for channels. 5. NOTE: The High Definition LCD TV will take a few minutes to view the picture. 7. Press the 'Menu' key on the High Definition LCD TV. Use the arrow keys to select your computer The High Definition LCD TV will need to be restarted to complete HDCP authentication to... channels. 9. If connecting to the resolution of the computer. 6. After selecting your computer's graphic card user guide for the High Definition LCD TV using DVI or HDMI connection, the cable box or satellite receiver will auto adjust to a computer: For the best picture quality, set ...
... scanning for channels. 5. NOTE: The High Definition LCD TV will take a few minutes to view the picture. 7. Press the 'Menu' key on the High Definition LCD TV. Use the arrow keys to select your computer The High Definition LCD TV will need to be restarted to complete HDCP authentication to... channels. 9. If connecting to the resolution of the computer. 6. After selecting your computer's graphic card user guide for the High Definition LCD TV using DVI or HDMI connection, the cable box or satellite receiver will auto adjust to a computer: For the best picture quality, set ...
User Manual
Page 21
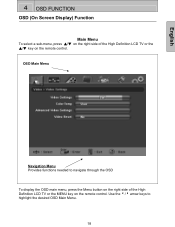
OSD Main Menu Navigation Menu Provides functions needed to highlight the desired OSD Main Menu. 18 Use the 3/4 arrow keys to navigate through the OSD To display the OSD main menu, press the Menu button on the right side of the High Definition LCD TV or the ▲/▼ key on the remote control. English 4 OSD FUNCTION OSD (On Screen Display) Function Main Menu To select a sub-menu, press ▲/▼ on the right side of the High Definition LCD TV or the MENU key on the remote control.
OSD Main Menu Navigation Menu Provides functions needed to highlight the desired OSD Main Menu. 18 Use the 3/4 arrow keys to navigate through the OSD To display the OSD main menu, press the Menu button on the right side of the High Definition LCD TV or the ▲/▼ key on the remote control. English 4 OSD FUNCTION OSD (On Screen Display) Function Main Menu To select a sub-menu, press ▲/▼ on the right side of the High Definition LCD TV or the MENU key on the remote control.
User Manual
Page 23
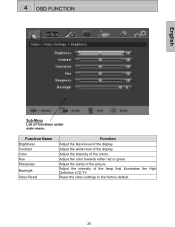
Adjust the white level of the display. Adjust the color towards either red or green. Function Name Brightness Contrast Color Hue Sharpness Backlight Video Reset Function Adjust the black level of the display. Adjust the clarity of the lamp that illuminates the High Definition LCD TV. Reset the video settings to the factory default. 20 Adjust the intensity of the picture. 4 OSD FUNCTION English Sub-Menu List of the colors. Adjust the intensity of functions under main menu.
Adjust the white level of the display. Adjust the color towards either red or green. Function Name Brightness Contrast Color Hue Sharpness Backlight Video Reset Function Adjust the black level of the display. Adjust the clarity of the lamp that illuminates the High Definition LCD TV. Reset the video settings to the factory default. 20 Adjust the intensity of the picture. 4 OSD FUNCTION English Sub-Menu List of the colors. Adjust the intensity of functions under main menu.
User Manual
Page 29
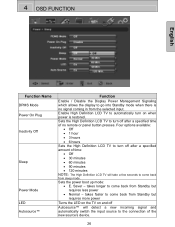
...come back from the selected input. Four options available: • Off • 1 hour • 3 hours • 6 hours Sets the High Definition LCD TV to turn off after a specified amount of no signal coming in from Standby but requires less power • Normal - Enable High Definition... time of time: • Off • 30 minutes • 60 minutes • 90 minutes • 120 minutes NOTE: The High Definition LCD TV will detect a new incoming signal and automatically switch the input source to turn on and off Autosource™ will take a few seconds to come back...
...come back from the selected input. Four options available: • Off • 1 hour • 3 hours • 6 hours Sets the High Definition LCD TV to turn off after a specified amount of no signal coming in from Standby but requires less power • Normal - Enable High Definition... time of time: • Off • 30 minutes • 60 minutes • 90 minutes • 120 minutes NOTE: The High Definition LCD TV will detect a new incoming signal and automatically switch the input source to turn on and off Autosource™ will take a few seconds to come back...
User Manual
Page 30
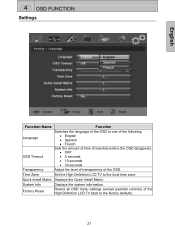
Factory Reset Resets all OSD menu settings (except parental controls) of the OSD. Time Zone Set the High Definition LCD TV to the factory defaults. 27 System Info Displays the system information. 4 OSD FUNCTION Settings English Function Name Function Language OSD Timeout Switches the language of ... inactivity before the OSD disappears. • OFF • 5 seconds • 10 seconds • 30 seconds Transparency Adjust the level of transparency of the High Definition LCD TV back to the local time zone. Quick Install Matrix Displays the Quick Install Matrix.
Factory Reset Resets all OSD menu settings (except parental controls) of the OSD. Time Zone Set the High Definition LCD TV to the factory defaults. 27 System Info Displays the system information. 4 OSD FUNCTION Settings English Function Name Function Language OSD Timeout Switches the language of ... inactivity before the OSD disappears. • OFF • 5 seconds • 10 seconds • 30 seconds Transparency Adjust the level of transparency of the High Definition LCD TV back to the local time zone. Quick Install Matrix Displays the Quick Install Matrix.
User Manual
Page 32
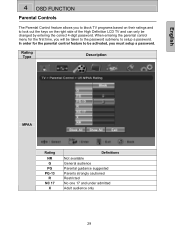
..., you will be taken to the password submenu to lock out the keys on the right side of the High Definition LCD TV and can only be activated, you to block TV programs based on their ratings and to setup a password. When entering the parental control menu for the parental control feature to...
..., you will be taken to the password submenu to lock out the keys on the right side of the High Definition LCD TV and can only be activated, you to block TV programs based on their ratings and to setup a password. When entering the parental control menu for the parental control feature to...
User Manual
Page 41
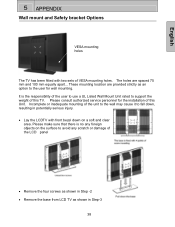
... mount and Safety bracket Options VESA mounting holes The TV has been fitted with front bezel down on the surface to avoid any scratch or damage of the LCD panel • Remove the four screws as shown in Step -2 • Remove the base from LCD TV as an option to the user for the... installation of this TV. Please make sure that there is the responsibility of the user to...
... mount and Safety bracket Options VESA mounting holes The TV has been fitted with front bezel down on the surface to avoid any scratch or damage of the LCD panel • Remove the four screws as shown in Step -2 • Remove the base from LCD TV as an option to the user for the... installation of this TV. Please make sure that there is the responsibility of the user to...
User Manual
Page 42
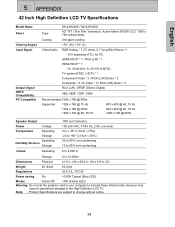
... (TTL) for PC HDMI-HDCP * 1 / RCA (L/R) * 1 HDMI-HDCP * 1 - English 5 APPENDIX 42 Inch High Definition LCD TV Specifications Model Name Panel Viewing Angles Input Signal Output Signal HDTV Compatibility PC Compatible Type Coating Video/Audio SK-42H240S / SK-42H360S 42" TFT (Thin Film Transistor), Active Matrix WXGA LCD, 1366 x 768 vertical stripe Anti-glare coating 176° (H) / 176°...
... (TTL) for PC HDMI-HDCP * 1 / RCA (L/R) * 1 HDMI-HDCP * 1 - English 5 APPENDIX 42 Inch High Definition LCD TV Specifications Model Name Panel Viewing Angles Input Signal Output Signal HDTV Compatibility PC Compatible Type Coating Video/Audio SK-42H240S / SK-42H360S 42" TFT (Thin Film Transistor), Active Matrix WXGA LCD, 1366 x 768 vertical stripe Anti-glare coating 176° (H) / 176°...

User Manual
Page 43
... m Storage 0 to 90% non-condensing. English 5 APPENDIX 32 Inch High Definition LCD TV Specifications Model Name Panel Viewing Angles Input Signal Output Signal HDTV Compatibility PC Compatible Type Coating Video/Audio SK-32H240S / SK-32H520S 32" TFT (Thin Film Transistor), Active Matrix WXGA LCD, 1366 x 768 vertical stripe Anti-glare coating 176° (H) / 176°...
... m Storage 0 to 90% non-condensing. English 5 APPENDIX 32 Inch High Definition LCD TV Specifications Model Name Panel Viewing Angles Input Signal Output Signal HDTV Compatibility PC Compatible Type Coating Video/Audio SK-32H240S / SK-32H520S 32" TFT (Thin Film Transistor), Active Matrix WXGA LCD, 1366 x 768 vertical stripe Anti-glare coating 176° (H) / 176°...


