
User Manual
Page 2
Français Español English TABLE OF CONTENTS IMPORTANT SAFETY AND PRECAUTIONS 1 Important Information...1 Safety Precautions...2 GENERAL INFORMATION 4 Feature...4 Controls and Ports of the Panel 5 Accessories ...9 Remote Control...10 INSTALLATION AND FUNCTION ADJUSTMENT 12 Installation...12 How to remove the BASE 15 Function adjustment ...16 TROUBLESHOOTING ...34 PC INPUT PRESET TIMMING TABLE 37 PRODUCT SPECIFICATION 39 I
Français Español English TABLE OF CONTENTS IMPORTANT SAFETY AND PRECAUTIONS 1 Important Information...1 Safety Precautions...2 GENERAL INFORMATION 4 Feature...4 Controls and Ports of the Panel 5 Accessories ...9 Remote Control...10 INSTALLATION AND FUNCTION ADJUSTMENT 12 Installation...12 How to remove the BASE 15 Function adjustment ...16 TROUBLESHOOTING ...34 PC INPUT PRESET TIMMING TABLE 37 PRODUCT SPECIFICATION 39 I

User Manual
Page 8
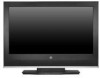
...buttons control the basic features of your TV, including the on-screen menu. REMOTE SENSOR WINDOWʳ: aim the remote control towards this spot on AMBER LIGHT ѧ power sleep EXTINGUISHED ѧ power off . 6. Controls and Ports of LCD TV display is appeared, press the button ...;: Select the input source ( TV, Video 1, Video 2 , YPbPr, HDMI1, HDMI2, PC ). 5. To use advanced features, you must use the remote controlˁʳ NOTE 2 : The picture of the Panel Front Panel Views (SK-26H540S) Français Español English Remote sensor window & Power indicator Function...
...buttons control the basic features of your TV, including the on-screen menu. REMOTE SENSOR WINDOWʳ: aim the remote control towards this spot on AMBER LIGHT ѧ power sleep EXTINGUISHED ѧ power off . 6. Controls and Ports of LCD TV display is appeared, press the button ...;: Select the input source ( TV, Video 1, Video 2 , YPbPr, HDMI1, HDMI2, PC ). 5. To use advanced features, you must use the remote controlˁʳ NOTE 2 : The picture of the Panel Front Panel Views (SK-26H540S) Français Español English Remote sensor window & Power indicator Function...

User Manual
Page 9
..., PC ). 5. POWERʳ: Turn the LCD-TV on AMBER LIGHT ѧ power sleep EXTINGUISHED ѧ power off . 6. REMOTE SENSOR WINDOWʳ: aim the remote control towards this spot on -screen menu. VOLUME Increase/decrease the volume or be the up/down arrow button for menu. 4. Front Panel Views (SK-26H730S) Remote sensor window & Power indicator Function...
..., PC ). 5. POWERʳ: Turn the LCD-TV on AMBER LIGHT ѧ power sleep EXTINGUISHED ѧ power off . 6. REMOTE SENSOR WINDOWʳ: aim the remote control towards this spot on -screen menu. VOLUME Increase/decrease the volume or be the up/down arrow button for menu. 4. Front Panel Views (SK-26H730S) Remote sensor window & Power indicator Function...
User Manual
Page 13
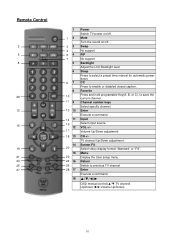
Remote Control 2 5 8 29 12 15 19 21 23 25 27 1 12 33 4 64 7 5 6 97 8 10 11 9 13 10 14 11 16 12 17 18 13 14 20 15 22 24 16 26 28 17 18 Power Switch TV power on /off . VOL +/Volume Up/Down adjustment. Channel number keys Select specific channel. Return Switch... a command. Ÿ/ź/Ż/Ź OSD menual control(Ÿ/ź:TV channel Up/Down;Ż/Ź:Volume Up/Down) 10 CC Press to select a preset time interval for automatic power down. Swap No support PIP No support Backlight Adjust the LCD Backlight level Sleep Press to enable or disabled closed caption. Menu...
Remote Control 2 5 8 29 12 15 19 21 23 25 27 1 12 33 4 64 7 5 6 97 8 10 11 9 13 10 14 11 16 12 17 18 13 14 20 15 22 24 16 26 28 17 18 Power Switch TV power on /off . VOL +/Volume Up/Down adjustment. Channel number keys Select specific channel. Return Switch... a command. Ÿ/ź/Ż/Ź OSD menual control(Ÿ/ź:TV channel Up/Down;Ż/Ź:Volume Up/Down) 10 CC Press to select a preset time interval for automatic power down. Swap No support PIP No support Backlight Adjust the LCD Backlight level Sleep Press to enable or disabled closed caption. Menu...
User Manual
Page 15
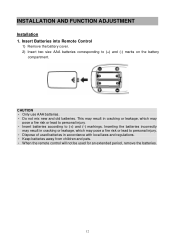
Insert Batteries into Remote Control 1) Remove the battery cover. 2) Insert two size AAA batteries corresponding to (+) and (-) markings. This may result in cracking or leakage, which may pose a fire ... the batteries incorrectly may result in accordance with local laws and regulations. Ǹʳ Keep batteries away from children and pets. Ǹʳ When the remote control will not be used batteries in cracking or leakage, which may pose a fire risk or lead to personal injury. Ǹʳ Dispose of used...
Insert Batteries into Remote Control 1) Remove the battery cover. 2) Insert two size AAA batteries corresponding to (+) and (-) markings. This may result in cracking or leakage, which may pose a fire ... the batteries incorrectly may result in accordance with local laws and regulations. Ǹʳ Keep batteries away from children and pets. Ǹʳ When the remote control will not be used batteries in cracking or leakage, which may pose a fire risk or lead to personal injury. Ǹʳ Dispose of used...

User Manual
Page 17
... to Antenna, Cable or other RF source on the remote control. 5. IMPORTANT: The power input voltage for the LCD TV using the OSD menu or remote control direct select buttons 6. make sure all devices are turned off. 4. Connect power cables Connect the power cord to the LCD TV then to set this timing. 14 Refer to... the right side of your computer to a proper AC outlet. If connecting to a PC(VGA): For the best picture quality, set the timing of the LCD TV, or press the power (Red) button on TV inputs: See page 19 to 1366 x 768 at 60Hz.
... to Antenna, Cable or other RF source on the remote control. 5. IMPORTANT: The power input voltage for the LCD TV using the OSD menu or remote control direct select buttons 6. make sure all devices are turned off. 4. Connect power cables Connect the power cord to the LCD TV then to set this timing. 14 Refer to... the right side of your computer to a proper AC outlet. If connecting to a PC(VGA): For the best picture quality, set the timing of the LCD TV, or press the power (Red) button on TV inputs: See page 19 to 1366 x 768 at 60Hz.

User Manual
Page 19
... Setup Menus; Viewing OSD Menu To display the main menu, press the Menu button on the right side of front control keys of the LCD TV or the MENU key on the LCD TV's right side. All the functions can be adjusted either by the remote control or by using the control keys on the...
... Setup Menus; Viewing OSD Menu To display the main menu, press the Menu button on the right side of front control keys of the LCD TV or the MENU key on the LCD TV's right side. All the functions can be adjusted either by the remote control or by using the control keys on the...
User Manual
Page 35
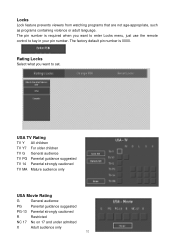
...Locks Select what you want to key in your pin number. USA TV Rating TV Y All children TV Y7 For older children TV G General audience TV PG Parental guidance suggested TV 14 Parental strongly cautioned TV MA Mature audience only USA Movie Rating G General audience PG Parental ...guidance suggested PG-13 Parental strongly cautioned R Restricted NC 17 No on 17 and under admitted X Adult audience only 32 The factory default pin number is required when you want to enter Locks menu, just use the remote...
...Locks Select what you want to key in your pin number. USA TV Rating TV Y All children TV Y7 For older children TV G General audience TV PG Parental guidance suggested TV 14 Parental strongly cautioned TV MA Mature audience only USA Movie Rating G General audience PG Parental ...guidance suggested PG-13 Parental strongly cautioned R Restricted NC 17 No on 17 and under admitted X Adult audience only 32 The factory default pin number is required when you want to enter Locks menu, just use the remote...

User Manual
Page 38
... not work. ƒ Install new batteries. ƒ Make sure the remote sensor window isn't blocked. ƒ Make sure the system is in the right mode (TV / VCR / CBL / AUX) There are stripes on the screen or colors fade. ƒ There may be interference between the video source cable and the power ... have reached the end of its life. The picture is light or improperly tinted. ƒ Check the Hue, Saturation and Color adjustments. ƒ Reset the TV to the factory default settings. Contact an authorized service center.
... not work. ƒ Install new batteries. ƒ Make sure the remote sensor window isn't blocked. ƒ Make sure the system is in the right mode (TV / VCR / CBL / AUX) There are stripes on the screen or colors fade. ƒ There may be interference between the video source cable and the power ... have reached the end of its life. The picture is light or improperly tinted. ƒ Check the Hue, Saturation and Color adjustments. ƒ Reset the TV to the factory default settings. Contact an authorized service center.


