
User Manual
Page 6
... designed to provide reasonable protection against harmful interference in a residential installation. SEV Canada CSA Britain BASE/BS Germany .......... If this High Definition LCD TV is not enclosed. The cord set must meet IEC-60320 requirements and should be used . Cord Type SJT SVT Size of Conductors 18 ...set is enclosed and has been selected according to replace the original cord set, or if the cord set must be determined by turning the equipment off and on a desk or table, type SVT or SJT cord sets may cause harmful interference to radio communications if...
... designed to provide reasonable protection against harmful interference in a residential installation. SEV Canada CSA Britain BASE/BS Germany .......... If this High Definition LCD TV is not enclosed. The cord set must meet IEC-60320 requirements and should be used . Cord Type SJT SVT Size of Conductors 18 ...set is enclosed and has been selected according to replace the original cord set, or if the cord set must be determined by turning the equipment off and on a desk or table, type SVT or SJT cord sets may cause harmful interference to radio communications if...
User Manual
Page 8
...equipment (including amplifiers) that produce heat. 5. Avoid exposing the High Definition LCD TV to fir; Never remove the rear cover. If the High Definition LCD TV emits smoke, abnormal noise, or a strange odor, immediately turn it has been dropped. Take care to remove. Only use caution when ... does not operate normally, or it off and contact the Westinghouse Service Center. Clean only with dry cloth. 3. If your High Definition LCD TV will not be seriously injured if you operate the High Definition LCD TV--and keep this apparatus during lightning storms or when unused for...
...equipment (including amplifiers) that produce heat. 5. Avoid exposing the High Definition LCD TV to fir; Never remove the rear cover. If the High Definition LCD TV emits smoke, abnormal noise, or a strange odor, immediately turn it has been dropped. Take care to remove. Only use caution when ... does not operate normally, or it off and contact the Westinghouse Service Center. Clean only with dry cloth. 3. If your High Definition LCD TV will not be seriously injured if you operate the High Definition LCD TV--and keep this apparatus during lightning storms or when unused for...
User Manual
Page 9
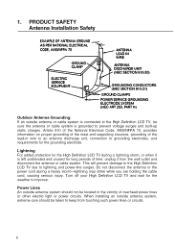
...or circuits. Power Lines An outside antenna system should be located in wire to an antenna discharge unit, connection to the High Definition LCD TV, be sure the antenna or cable system is left unattended and unused for the grounding electrode. COOEJ. When installing an outside antenna ... the antenna or cable system. Lightning For added protection for the weather to lightning and power-line surges. Turn off your High Definition LCD TV and wait for the High Definition LCD TV during a heavy storm--lightning may strike while you are holding the cable cord, causing serious injury. This...
...or circuits. Power Lines An outside antenna system should be located in wire to an antenna discharge unit, connection to the High Definition LCD TV, be sure the antenna or cable system is left unattended and unused for the grounding electrode. COOEJ. When installing an outside antenna ... the antenna or cable system. Lightning For added protection for the weather to lightning and power-line surges. Turn off your High Definition LCD TV and wait for the High Definition LCD TV during a heavy storm--lightning may strike while you are holding the cable cord, causing serious injury. This...
User Manual
Page 14
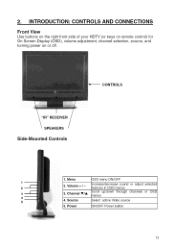
Source 5. Power DSD menu ON/OFF Increase/decrease sound or adjust features in OSD menus Scroll up/down through channels "_enus Select active Video source selected or OSD DN/OFF Power button 13 2. Channel VIA 4. Menu 2. INTRODUCTION: CONTROLS AND CONNECTIONS Front View Use buttons on the right front side of your HDTV (or keys on remote control) for On Screen Display (OSD), volume adjustment, channel selection, source, and turning power on or off. ,_-iCONTROLS "IR"RECEIVER SPEAKERS Side-Mounted Controls 1. Volume + / - 3.
Source 5. Power DSD menu ON/OFF Increase/decrease sound or adjust features in OSD menus Scroll up/down through channels "_enus Select active Video source selected or OSD DN/OFF Power button 13 2. Channel VIA 4. Menu 2. INTRODUCTION: CONTROLS AND CONNECTIONS Front View Use buttons on the right front side of your HDTV (or keys on remote control) for On Screen Display (OSD), volume adjustment, channel selection, source, and turning power on or off. ,_-iCONTROLS "IR"RECEIVER SPEAKERS Side-Mounted Controls 1. Volume + / - 3.

User Manual
Page 18
... Volume Up/Down adjustment 14.SCALING Set video display format to previous channel 18. 2. LAST CHANNEL Switch to "STANDARD", "FILL" 15.0H VIA TV Channel Up/Down adjustment 16.MENU Turn OSD Menu On/Off 17. PIP Display sub picture On/Off Note: This feature is not available on this... 19" HDTV. 5. SWAP Switch between PIP and Main Picture Note: This feature is not available on this 19" HDTV. 3. INTRODUCTION: CONTROLS AND CONNECTIONS Remote Control ...
... Volume Up/Down adjustment 14.SCALING Set video display format to previous channel 18. 2. LAST CHANNEL Switch to "STANDARD", "FILL" 15.0H VIA TV Channel Up/Down adjustment 16.MENU Turn OSD Menu On/Off 17. PIP Display sub picture On/Off Note: This feature is not available on this... 19" HDTV. 5. SWAP Switch between PIP and Main Picture Note: This feature is not available on this 19" HDTV. 3. INTRODUCTION: CONTROLS AND CONNECTIONS Remote Control ...
User Manual
Page 20
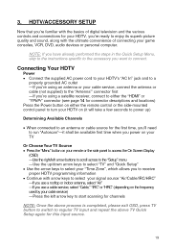
...and locations) Press the Power button on either the remote control or the side-mounted control panel to turn your HDTV on (it will take a few seconds to power up) Determining Available Channels • When...right/leftarrow bLltons to scroll across to the "Setup" menu --Use the up/down arrow keys to select "TV" and "Quick Setup" • Use the arrow keys to select your "Time Zone", which allows you ...abov_, process is comple_od, pMaee _x]_ OSD, press_ TV bu_ton _o e_/iMh _o _guM_ TV h_}uf and _l_eat the above TV Ou_ek S_tup agMn [ythis #}put source 19 NOTE: ff yeu hp,erMtmed _he steps k_ the...
...and locations) Press the Power button on either the remote control or the side-mounted control panel to turn your HDTV on (it will take a few seconds to power up) Determining Available Channels • When...right/leftarrow bLltons to scroll across to the "Setup" menu --Use the up/down arrow keys to select "TV" and "Quick Setup" • Use the arrow keys to select your "Time Zone", which allows you ...abov_, process is comple_od, pMaee _x]_ OSD, press_ TV bu_ton _o e_/iMh _o _guM_ TV h_}uf and _l_eat the above TV Ou_ek S_tup agMn [ythis #}put source 19 NOTE: ff yeu hp,erMtmed _he steps k_ the...
User Manual
Page 21
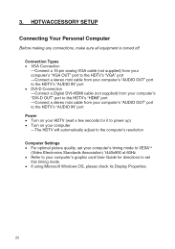
HDTV/ACCESSORY SETUP Connecting Your Personal Computer Before making any connections, make sure all equipment is turned off. Connection Types • VGA Connection --Connect a 15-pin analog VGA cable (not supplied) from your computer's "VGA OUT" port to the HDTV's "VGA" ... --Connect a stereo mini cable from your computer's "AUDIO OUT" port to the HDTV's "AUDIO IN" port Power • Turn on your HDTV (wait a few seconds for it to power Lip) • Turn on your computer --The HDTV will automatically adjust to the computer's resolution Computer Settings • For optimal picture quality...
HDTV/ACCESSORY SETUP Connecting Your Personal Computer Before making any connections, make sure all equipment is turned off. Connection Types • VGA Connection --Connect a 15-pin analog VGA cable (not supplied) from your computer's "VGA OUT" port to the HDTV's "VGA" ... --Connect a stereo mini cable from your computer's "AUDIO OUT" port to the HDTV's "AUDIO IN" port Power • Turn on your HDTV (wait a few seconds for it to power Lip) • Turn on your computer --The HDTV will automatically adjust to the computer's resolution Computer Settings • For optimal picture quality...
User Manual
Page 22
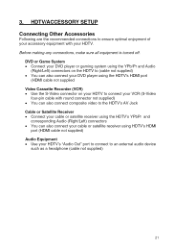
...'s "Audio Out" port to connect to ensure optimal enjoyment of your accessory equipment with your HDTV. Before making any connections, make sure all equipment is turned off.
...'s "Audio Out" port to connect to ensure optimal enjoyment of your accessory equipment with your HDTV. Before making any connections, make sure all equipment is turned off.
User Manual
Page 25
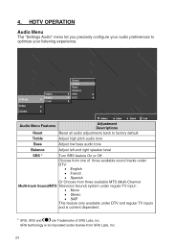
...to factory default Treble _,djust high pitch audio tone Bass _,djust low bass audio tone Balance Adjust left and right speaker level SRS * Turn SRS feature On or Off Shoose from one of SRS Labs, Inc. Reset Reset all audio adjustments back to optimize your listening experience.... French Multi-track Sound/MTS ° Spanish Or Choose from SRS Labs, Inc. 24 under DTV and regular TV inputs * SRS, SRS and (_O)' are Trademarks of three available sound tracks under regular TV input : ° Mono ° Stereo • SAP This feature only available and is content dependent.
...to factory default Treble _,djust high pitch audio tone Bass _,djust low bass audio tone Balance Adjust left and right speaker level SRS * Turn SRS feature On or Off Shoose from one of SRS Labs, Inc. Reset Reset all audio adjustments back to optimize your listening experience.... French Multi-track Sound/MTS ° Spanish Or Choose from SRS Labs, Inc. 24 under DTV and regular TV inputs * SRS, SRS and (_O)' are Trademarks of three available sound tracks under regular TV input : ° Mono ° Stereo • SAP This feature only available and is content dependent.
User Manual
Page 32
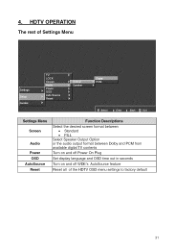
4. HDTV OPERATION The rest of Settings Menu Screen Audio Power OSD AutoSource Reset Select the desired screen format between • Standard • FILL Select Speaker Output Option or the audio output format between Dolby and PCM from available digital TV contents Turn on and off Power On Plug Set display language and OSD time out in seconds Turn on and off WDE's AutoSource feature Reset all of the HDTV OSD menu settings to factory default 31
4. HDTV OPERATION The rest of Settings Menu Screen Audio Power OSD AutoSource Reset Select the desired screen format between • Standard • FILL Select Speaker Output Option or the audio output format between Dolby and PCM from available digital TV contents Turn on and off Power On Plug Set display language and OSD time out in seconds Turn on and off WDE's AutoSource feature Reset all of the HDTV OSD menu settings to factory default 31
User Manual
Page 39
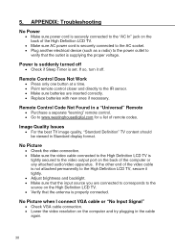
Power is suddenly turned off . No Picture when I connect VGA cable or "No Input Signal" • Check VGA cable connection. • Lower the video resolution on the High Definition LCD TV. • Verify that the antenna is supplying the proper voltage. Remote Control Does Not Work • Press only one ...securely connected to the AC socket. • Plug another electrical device (such as a radio) to the power outlet to the High Definition LCD TV, secure it off • Check if Sleep Timer is securely connected to www.westinqhousediqital.com for a list of the computer or any ...
Power is suddenly turned off . No Picture when I connect VGA cable or "No Input Signal" • Check VGA cable connection. • Lower the video resolution on the High Definition LCD TV. • Verify that the antenna is supplying the proper voltage. Remote Control Does Not Work • Press only one ...securely connected to the AC socket. • Plug another electrical device (such as a radio) to the power outlet to the High Definition LCD TV, secure it off • Check if Sleep Timer is securely connected to www.westinqhousediqital.com for a list of the computer or any ...
User Manual
Page 40
...; Replace poor antenna cables and/or connectors to : www.westinghousedigital.com • Contact Westinghouse Customer Service at (866) 287-5555 service @westinghousedigital.com or write us at 39 ...in the cable connector could cause an improper connection. • Connect the High Definition LCD TV to reset the password. AUDIO Interconnection Issues • Remember--S-Video and Composite AV1 ...securely connected. Snow Appears on the remote control to turn the function off /with sidebar screen. • Use "Auto Adjust" in TV mode. • Check your antenna connection. 5. Blocky...
...; Replace poor antenna cables and/or connectors to : www.westinghousedigital.com • Contact Westinghouse Customer Service at (866) 287-5555 service @westinghousedigital.com or write us at 39 ...in the cable connector could cause an improper connection. • Connect the High Definition LCD TV to reset the password. AUDIO Interconnection Issues • Remember--S-Video and Composite AV1 ...securely connected. Snow Appears on the remote control to turn the function off /with sidebar screen. • Use "Auto Adjust" in TV mode. • Check your antenna connection. 5. Blocky...
User Manual
Page 41
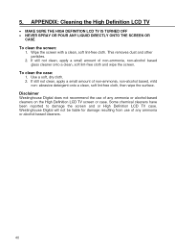
...wipe the screen. Disclaimer Westinghouse Digital does not recommend the use of any ammonia or alcohol-based cleaners. 40 Wipe the screen with a clean, soft lint-free cloth. APPENDIX: Cleaninq the Hiqh Definition LCD TV • MAKE SURE THE HIGH DEFINITION LCD TV IS TURNED OFF • NEVER ...SPRAY OR POUR ANY LIQUID DIRECTLY ONTO THE SCREEN OR CASE To clean the screen: 1. This removes dust and other particles. 2. Westinghouse Digital will not be liable for ...
...wipe the screen. Disclaimer Westinghouse Digital does not recommend the use of any ammonia or alcohol-based cleaners. 40 Wipe the screen with a clean, soft lint-free cloth. APPENDIX: Cleaninq the Hiqh Definition LCD TV • MAKE SURE THE HIGH DEFINITION LCD TV IS TURNED OFF • NEVER ...SPRAY OR POUR ANY LIQUID DIRECTLY ONTO THE SCREEN OR CASE To clean the screen: 1. This removes dust and other particles. 2. Westinghouse Digital will not be liable for ...


