
User Manual
Page 2
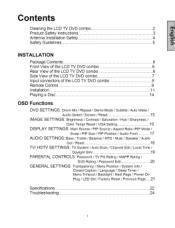
...Guidelines 5 INSTALLATION Package Contents 6 Front View of the LCD TV DVD combo 6 Rear View of the LCD TV DVD combo 6 Side View of the LCD TV DVD combo 7 Input connectors of the LCD TV DVD combo 8 Remote Control 9 Installation 11 Playing a Disc 14 OSD Functions ... Bass / Treble / Balance / MTS / Mute / Speaker / Audio Out / Reset 18 TV/HDTV SETTINGS: TV System / Auto Scan / Channel Edit / Local Time / Daylight SAV 19 PARENTAL CONTROLS: Password / TV PG Rating / MAPP Rating / DVD Rating / Password Edit 20 GENERAL SETTINGS: Transparency / Menu...
...Guidelines 5 INSTALLATION Package Contents 6 Front View of the LCD TV DVD combo 6 Rear View of the LCD TV DVD combo 6 Side View of the LCD TV DVD combo 7 Input connectors of the LCD TV DVD combo 8 Remote Control 9 Installation 11 Playing a Disc 14 OSD Functions ... Bass / Treble / Balance / MTS / Mute / Speaker / Audio Out / Reset 18 TV/HDTV SETTINGS: TV System / Auto Scan / Channel Edit / Local Time / Daylight SAV 19 PARENTAL CONTROLS: Password / TV PG Rating / MAPP Rating / DVD Rating / Password Edit 20 GENERAL SETTINGS: Transparency / Menu...
User Manual
Page 4
...reliable operation of moisture. • Do not place heavy objects on the cabinet are not likely to be walked on or pinched by Westinghouse Digital. Avoid exposing the LCD TV DVD combo to dripping or splashing and objects filled with care when moving it off and contact the... Risk Of Fire Or Electric Shock, Do Not Expose The LCD TV DVD combo To Rain Or Moisture! Other Notices Avoid exposing the LCD TV DVD combo to reduce glare. • Always handle your LCD TV DVD combo away from the remote control. Your LCD TV DVD combo contains high-voltage parts. Overloading Do not overload...
...reliable operation of moisture. • Do not place heavy objects on the cabinet are not likely to be walked on or pinched by Westinghouse Digital. Avoid exposing the LCD TV DVD combo to dripping or splashing and objects filled with care when moving it off and contact the... Risk Of Fire Or Electric Shock, Do Not Expose The LCD TV DVD combo To Rain Or Moisture! Other Notices Avoid exposing the LCD TV DVD combo to reduce glare. • Always handle your LCD TV DVD combo away from the remote control. Your LCD TV DVD combo contains high-voltage parts. Overloading Do not overload...
User Manual
Page 7
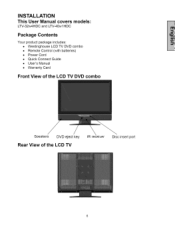
INSTALLATION This User Manual covers models: LTV-32w4HDC and LTV-40w1HDC Package Contents Your product package includes: • Westinghouse LCD TV DVD combo • Remote Control (with batteries) • Power Cord • Quick Connect Guide • User's Manual • Warranty Card Front View of the LCD TV DVD combo Speakers DVD eject key Rear View of the LOB TV IR receiver Disc insert port
INSTALLATION This User Manual covers models: LTV-32w4HDC and LTV-40w1HDC Package Contents Your product package includes: • Westinghouse LCD TV DVD combo • Remote Control (with batteries) • Power Cord • Quick Connect Guide • User's Manual • Warranty Card Front View of the LCD TV DVD combo Speakers DVD eject key Rear View of the LOB TV IR receiver Disc insert port
User Manual
Page 10
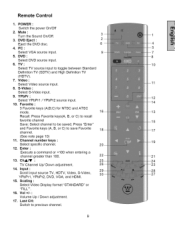
...5. POWER : Switch the power On/Off 2. Video : Select Video source input. 8. Press "Enter" and Favorite keys (A, B, or C) to toggle between Standard Definition TV (SDTV) and High Definition TV (HDTV). 7. YPbPr : Select YPbPrl / YPbPr2 source 10. Favorite : input. 3 Favorite keys (A;B;C) for NTSC and ATSC mode. Vol +/- : Volume Up / Down...greater than 100. 13. Channel number keys : Select specific channel. 12. Scaling : Select Video Display format "STANDARD" or "FILL"". 16. Remote Control 1. TV: Select TV source input to save Favorite channel. (See note page 10) 11.
...5. POWER : Switch the power On/Off 2. Video : Select Video source input. 8. Press "Enter" and Favorite keys (A, B, or C) to toggle between Standard Definition TV (SDTV) and High Definition TV (HDTV). 7. YPbPr : Select YPbPrl / YPbPr2 source 10. Favorite : input. 3 Favorite keys (A;B;C) for NTSC and ATSC mode. Vol +/- : Volume Up / Down...greater than 100. 13. Channel number keys : Select specific channel. 12. Scaling : Select Video Display format "STANDARD" or "FILL"". 16. Remote Control 1. TV: Select TV source input to save Favorite channel. (See note page 10) 11.
User Manual
Page 11
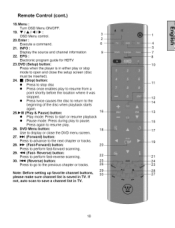
Remote Control (cont.) 18.Menu : Turn OSD Menu ON/OFF. 19. INFO : Display the source and channel information 9 22. Press again to save a channel list in TV. 10 DVD Menu button: Use to display or close the setup screen (disc must be inserted). 24. • (Stop) button: • Press to stop mode ...-forward scanning. 29. _1 (Fast- V/A/_I/I_: 3 OSD Menu control. 20. Note: Before setting up favorite channel buttons, please make sure channel list is in TV.
Remote Control (cont.) 18.Menu : Turn OSD Menu ON/OFF. 19. INFO : Display the source and channel information 9 22. Press again to save a channel list in TV. 10 DVD Menu button: Use to display or close the setup screen (disc must be inserted). 24. • (Stop) button: • Press to stop mode ...-forward scanning. 29. _1 (Fast- V/A/_I/I_: 3 OSD Menu control. 20. Note: Before setting up favorite channel buttons, please make sure channel list is in TV.
User Manual
Page 12
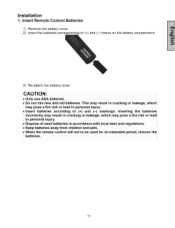
... cracking or leakage, which may result in accordance with local laws and regulations. • Keep batteries away from children and pets. • When the remote control will not to be used for an extended period, remove the batteries. 11 This may pose a fire risk or lead to personal injury. •...; Insert batteries according to (+) and (-) marks on the battery compartment. 3) Re-attach the battery cover. Installation 1, Insert Remote Control Batteries 1) Remove the battery cover. 2) Insert the batteries corres to (+) and (-) markings.
... cracking or leakage, which may result in accordance with local laws and regulations. • Keep batteries away from children and pets. • When the remote control will not to be used for an extended period, remove the batteries. 11 This may pose a fire risk or lead to personal injury. •...; Insert batteries according to (+) and (-) marks on the battery compartment. 3) Re-attach the battery cover. Installation 1, Insert Remote Control Batteries 1) Remove the battery cover. 2) Insert the batteries corres to (+) and (-) markings.
User Manual
Page 14
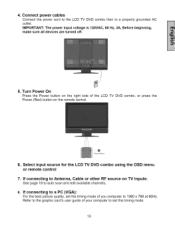
... your computer to set the timing mode of the LCD TV DVD combo, Power (Red) button on TV Inputs: See page 19 to Antenna, Cable or other RF source on the remote control. or press the 6. Connect power cables Connect the power cord to the LCD TV DVD combo then to a PC (VGA): For the best... input voltage is 120VAC, 60 Hz, 3A, Before beginning, make sure all devices are turned off. 5. Select input source for the LCD TV DVD combo using the OSD menu or remote control 7. Turn Power On Press the Power button on the right side of you computer to 1360 x 768 at 60Hz. If connecting...
... your computer to set the timing mode of the LCD TV DVD combo, Power (Red) button on TV Inputs: See page 19 to Antenna, Cable or other RF source on the remote control. or press the 6. Connect power cables Connect the power cord to the LCD TV DVD combo then to a PC (VGA): For the best... input voltage is 120VAC, 60 Hz, 3A, Before beginning, make sure all devices are turned off. 5. Select input source for the LCD TV DVD combo using the OSD menu or remote control 7. Turn Power On Press the Power button on the right side of you computer to 1360 x 768 at 60Hz. If connecting...

User Manual
Page 15
Note: This is an LCD TV DVD combo with Westinghouse Auto Wake feature. Use _ / _ arrow keys when the disc's top menu appears to make selection. i, II PAUSE/PLAY Fast Reverse Fast Forward Chapter Forward I_N ... right side of screen as the disc loads. This section describes the basics on the remote or control panel. 14 Some DVDs with label side facing upward (If the disc has a label) then LCD TV will appear on the remote control or control panel to DVD source, and load disc. Press ENTER to navigate...
Note: This is an LCD TV DVD combo with Westinghouse Auto Wake feature. Use _ / _ arrow keys when the disc's top menu appears to make selection. i, II PAUSE/PLAY Fast Reverse Fast Forward Chapter Forward I_N ... right side of screen as the disc loads. This section describes the basics on the remote or control panel. 14 Some DVDs with label side facing upward (If the disc has a label) then LCD TV will appear on the remote control or control panel to DVD source, and load disc. Press ENTER to navigate...
User Manual
Page 16
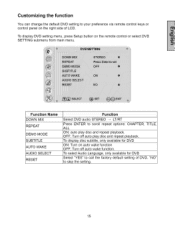
...RT Press ENTER to skip the setting. 15 To display disc subtitle, only available for DVD Select "YES" to call the factory default setting of LCD. OFF: Turn off auto wake function. TITLE, To select Audio Language, only available for DVD ON: Turn on auto wake function OFF: Turn off... auto play disc and repeat playback. Customizing the function You can change the default DVD setting to your preference via remote control keys or control panel on the remote control or select DVD SETTING submenu from main menu. To display DVD setting menu, press Setup button on the right side...
...RT Press ENTER to skip the setting. 15 To display disc subtitle, only available for DVD Select "YES" to call the factory default setting of LCD. OFF: Turn off auto wake function. TITLE, To select Audio Language, only available for DVD ON: Turn on auto wake function OFF: Turn off... auto play disc and repeat playback. Customizing the function You can change the default DVD setting to your preference via remote control keys or control panel on the remote control or select DVD SETTING submenu from main menu. To display DVD setting menu, press Setup button on the right side...
User Manual
Page 17
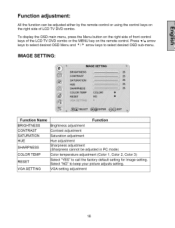
...To display the OSD main menu, press the Menu button on the right side of front control keys of the LCD TV DVD combo or the MENU key on the right side of LCD TV DVD combo. Press via arrow keys to select desired OSD Menu and _ / _' arrow keys to call ... VGA SETTING Function Brightness adjustment Contrast adjustment Saturation adjustment Hue adjustment Sharpness adjustment (Sharpness cannot be adjusted either by the remote control or using the control keys on the remote control. Select "NO" to keep your picture adjusts setting. Function adjustment: All the function can be adjusted in PC...
...To display the OSD main menu, press the Menu button on the right side of front control keys of the LCD TV DVD combo or the MENU key on the right side of LCD TV DVD combo. Press via arrow keys to select desired OSD Menu and _ / _' arrow keys to call ... VGA SETTING Function Brightness adjustment Contrast adjustment Saturation adjustment Hue adjustment Sharpness adjustment (Sharpness cannot be adjusted either by the remote control or using the control keys on the remote control. Select "NO" to keep your picture adjusts setting. Function adjustment: All the function can be adjusted in PC...

User Manual
Page 21
... R Parents strongly cautioned Restricted NC 17 No one 17 and under admitted X OFF Adult audience only None 2O to key Select "TV-MA", "TV-Y", "TV-Y7", "TV-G", "TV-PG", "TV-14", "TV-MA" or "OFF". Use remote control _nthe number and enter the parental controls sub-menu. PARENTAL CONTROL: The parental controls feature prevents viewers from watching programs...
... R Parents strongly cautioned Restricted NC 17 No one 17 and under admitted X OFF Adult audience only None 2O to key Select "TV-MA", "TV-Y", "TV-Y7", "TV-G", "TV-PG", "TV-14", "TV-MA" or "OFF". Use remote control _nthe number and enter the parental controls sub-menu. PARENTAL CONTROL: The parental controls feature prevents viewers from watching programs...

User Manual
Page 25
... in the cable connector could cause an improper connection. • Connect the LCD TV DVD combo to "internal". 24 The LCD TV DVD combo audio may be set to SAP or minimum. • Press the Volume + (Up) key on the remote control. • Make sure that headphones are not connected to the Headphone ...Jack on the LCD TV DVD combo. • Make sure the speaker setting is set to another electrical device (such as a radio)...
... in the cable connector could cause an improper connection. • Connect the LCD TV DVD combo to "internal". 24 The LCD TV DVD combo audio may be set to SAP or minimum. • Press the Volume + (Up) key on the remote control. • Make sure that headphones are not connected to the Headphone ...Jack on the LCD TV DVD combo. • Make sure the speaker setting is set to another electrical device (such as a radio)...
User Manual
Page 26
...I Find More Help? • Log on to: www.westinghousedigital.com • Contact Westinghouse Customer Service [email protected] at (866) 287-5555 or write us at 25 Remote Control Does Not Work • Make sure batteries are inserted correctly. • Replace ...a "Universal" • Purchase a separate "learning" remote control. No subtitle • Some discs have no subtitles. Remote Control Code Not Found in 4:3 format. Remote Image Quality Issues • For the best TV image quality, "Standard Definition" TV should be dirty. Load a playable disc. • ...
...I Find More Help? • Log on to: www.westinghousedigital.com • Contact Westinghouse Customer Service [email protected] at (866) 287-5555 or write us at 25 Remote Control Does Not Work • Make sure batteries are inserted correctly. • Replace ...a "Universal" • Purchase a separate "learning" remote control. No subtitle • Some discs have no subtitles. Remote Control Code Not Found in 4:3 format. Remote Image Quality Issues • For the best TV image quality, "Standard Definition" TV should be dirty. Load a playable disc. • ...


