
German Manual
Page 15
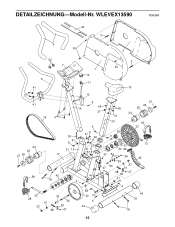
WLEVEX13590 R0699A 40 3 6 34 2 52 7 5 41 8 1 10 11 12 3 34 19 41 16 4 9 49 14 21 49 21 27 26 25 24 20 9 60 33 24 25 27 26 59 50 41 8 31 15 17 42 30 4 41 8 22 41 8 29 9 23 31 9 57 50 47 54 51 42 43 56 55 47 53 37 41 46 4 38 47 39 21 31 13 45 33 28 37 35 41 36 39 38 47 58 48 32 31 4 44 4 44 18 30 15 DETAILZEICHNUNG-Modell-Nr.
WLEVEX13590 R0699A 40 3 6 34 2 52 7 5 41 8 1 10 11 12 3 34 19 41 16 4 9 49 14 21 49 21 27 26 25 24 20 9 60 33 24 25 27 26 59 50 41 8 31 15 17 42 30 4 41 8 22 41 8 29 9 23 31 9 57 50 47 54 51 42 43 56 55 47 53 37 41 46 4 38 47 39 21 31 13 45 33 28 37 35 41 36 39 38 47 58 48 32 31 4 44 4 44 18 30 15 DETAILZEICHNUNG-Modell-Nr.
Uk Manual
Page 1
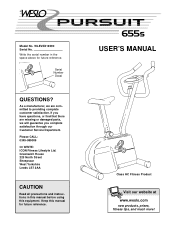
... CAUTION Read all precautions and instructions in the space above for future reference. Keep this equipment. As a manufacturer, we are missing or damaged parts, we will guarantee you complete satisfaction through our Customer Service Department. WLEVEX13590 Serial No. USER'S MANUAL Class HC Fitness Product Visit our website at www.weslo.com new products, prizes, fitness tips, and much more! If...
... CAUTION Read all precautions and instructions in the space above for future reference. Keep this equipment. As a manufacturer, we are missing or damaged parts, we will guarantee you complete satisfaction through our Customer Service Department. WLEVEX13590 Serial No. USER'S MANUAL Class HC Fitness Product Visit our website at www.weslo.com new products, prizes, fitness tips, and much more! If...
Uk Manual
Page 2
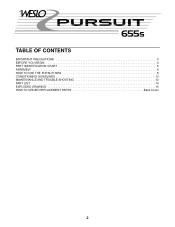
® TABLE OF CONTENTS IMPORTANT PRECAUTIONS 3 BEFORE YOU BEGIN 4 PART IDENTIFICATION CHART 5 ASSEMBLY 6 HOW TO USE THE PURSUIT 655s 8 CONDITIONING GUIDELINES 10 MAINTENANCE AND TROUBLE-SHOOTING 12 PART LIST 14 EXPLODED DRAWING 15 HOW TO ORDER REPLACEMENT PARTS Back Cover 2
® TABLE OF CONTENTS IMPORTANT PRECAUTIONS 3 BEFORE YOU BEGIN 4 PART IDENTIFICATION CHART 5 ASSEMBLY 6 HOW TO USE THE PURSUIT 655s 8 CONDITIONING GUIDELINES 10 MAINTENANCE AND TROUBLE-SHOOTING 12 PART LIST 14 EXPLODED DRAWING 15 HOW TO ORDER REPLACEMENT PARTS Back Cover 2
Uk Manual
Page 3
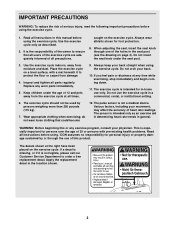
.... When adjusting the seat, insert the seat knob through the use the exercise cycle in the location shown. 3 Inspect and tighten all precautions. WARNING: Before beginning this manual before using the exercise cycle. 1. Apply the replacement decal in a commercial, rental, or institutional setting. 6. caught on a level surface, with pre-existing health problems. Read all users of the exercise cycle are adequately informed of this product. The pulse sensor is not...
.... When adjusting the seat, insert the seat knob through the use the exercise cycle in the location shown. 3 Inspect and tighten all precautions. WARNING: Before beginning this manual before using the exercise cycle. 1. Apply the replacement decal in a commercial, rental, or institutional setting. 6. caught on a level surface, with pre-existing health problems. Read all users of the exercise cycle are adequately informed of this product. The pulse sensor is not...

Uk Manual
Page 4
... before you use the PURSUIT 655s. If you have additional questions, please call our Customer Service Department at the drawing below and familiarise yourself with a low-impact workout in the convenience and privacy of your benefit, read this manual for selecting the new WESLO PURSUIT® 655s exercise cycle. The model number is not included) Book Rack Seat Seat Post Seat Knob Pedal BACK Handlebars Console Resistance Knob FRONT RIGHT...
... before you use the PURSUIT 655s. If you have additional questions, please call our Customer Service Department at the drawing below and familiarise yourself with a low-impact workout in the convenience and privacy of your benefit, read this manual for selecting the new WESLO PURSUIT® 655s exercise cycle. The model number is not included) Book Rack Seat Seat Post Seat Knob Pedal BACK Handlebars Console Resistance Knob FRONT RIGHT...

Uk Manual
Page 5
... for shipping purposes. PART IDENTIFICATION CHART Use the chart below each part refers to the key number of the part. M4 x 12mm Self-tapping Screw (4)-4 M8 Nylon Locknut (21)-3 M8 Split Washer (49)-3 M4 x 16mm Self-tapping Screw (9)-4 M10 Nylon Locknut (31)-4 M10 Split Washer (41)-5 M10 x 25mm Button Screw (8)-5 M10 x 70mm Carriage Bolt (30)-4 5 The number in assembly. Note: Some parts may have been preattached...
... for shipping purposes. PART IDENTIFICATION CHART Use the chart below each part refers to the key number of the part. M4 x 12mm Self-tapping Screw (4)-4 M8 Nylon Locknut (21)-3 M8 Split Washer (49)-3 M4 x 16mm Self-tapping Screw (9)-4 M10 Nylon Locknut (31)-4 M10 Split Washer (41)-5 M10 x 25mm Button Screw (8)-5 M10 x 70mm Carriage Bolt (30)-4 5 The number in assembly. Note: Some parts may have been preattached...
Uk Manual
Page 6
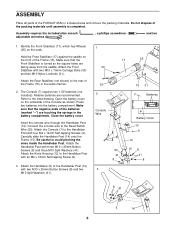
... Self-tapping Screw (9). 3. Refer to the Reed Switch Wire (50). Attach the Knob Housing (12) to the rear of the Console as shown. Make sure that the negative ends of the packing materials until assembly is turned so the ...Open the battery cover on the ends. Press two batteries into the battery compartment. Make sure that the Front Stabiliser is completed. Close the battery cover. Connect the console wire to the inset drawing. Attach the Console (7) to avoid pinching the wires inside the Handlebar Post. Be careful to the Handlebar Post with two M10 x 70mm Carriage Bolts...
... Self-tapping Screw (9). 3. Refer to the Reed Switch Wire (50). Attach the Knob Housing (12) to the rear of the Console as shown. Make sure that the negative ends of the packing materials until assembly is turned so the ...Open the battery cover on the ends. Press two batteries into the battery compartment. Make sure that the Front Stabiliser is completed. Close the battery cover. Connect the console wire to the inset drawing. Attach the Console (7) to avoid pinching the wires inside the Handlebar Post. Be careful to the Handlebar Post with two M10 x 70mm Carriage Bolts...

Uk Manual
Page 7
... (49). Using an adjustable 6 wrench, tighten the Left Pedal counterclockwise into the Frame. Press the Side Shield Cover (40) onto the Left and Right Side Shields (1, 2). 4 40 2 1 5. there is completed. 7 Place a mat under the Seat Post. Tighten the Right Pedal (not shown) clockwise into the Frame (15). Align one of the Crank (33). Note: Some hardware may be left arm of...
... (49). Using an adjustable 6 wrench, tighten the Left Pedal counterclockwise into the Frame. Press the Side Shield Cover (40) onto the Left and Right Side Shields (1, 2). 4 40 2 1 5. there is completed. 7 Place a mat under the Seat Post. Tighten the Right Pedal (not shown) clockwise into the Frame (15). Align one of the Crank (33). Note: Some hardware may be left arm of...
Uk Manual
Page 8
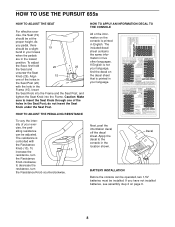
... the resistance, turn the Resistance Knob counterclockwise. HOW TO ADJUST THE PEDALLING RESISTANCE To vary the inten- The resistance is printed in the lowest position. If you pedal, there should be a slight 19 bend in your language, find the decal on the console is controlled with the hole in the Seat Post; As you have not installed batteries, see assembly step 2 on page 6. 8 HOW TO USE THE PURSUIT 655s...
... the resistance, turn the Resistance Knob counterclockwise. HOW TO ADJUST THE PEDALLING RESISTANCE To vary the inten- The resistance is printed in the lowest position. If you pedal, there should be a slight 19 bend in your language, find the decal on the console is controlled with the hole in the Seat Post; As you have not installed batteries, see assembly step 2 on page 6. 8 HOW TO USE THE PURSUIT 655s...
Uk Manual
Page 9
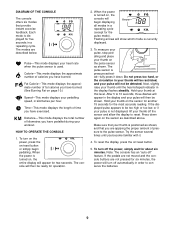
... . 4. Fat Calorie-This mode displays the approximate number of kilometres you have exercised. Time-This mode displays the length of calories you have burned. Distance-This mode displays the total number of fat calories you have burned. (See Burning Fat on /reset button. 5. HOW TO OPERATE THE CONSOLE 1. The pulse sensor is displayed for the pulse mode). To reset the display, press the on page 10.) Speed-This mode displays your workout. To turn off " feature.
... . 4. Fat Calorie-This mode displays the approximate number of kilometres you have exercised. Time-This mode displays the length of calories you have burned. Distance-This mode displays the total number of fat calories you have burned. (See Burning Fat on /reset button. 5. HOW TO OPERATE THE CONSOLE 1. The pulse sensor is displayed for the pulse mode). To reset the display, press the on page 10.) Speed-This mode displays your workout. To turn off " feature.

Uk Manual
Page 10
... lowest number in your health. Various factors, including your heart rate as you , first find the proper heart rate for you exercise. 10 The proper intensity level can be "aerobic." The chart in the centre of your exercise until your heart rate is intended only as you must be found by using the pulse sensor on page 11.) A proper warm-up to five workouts each...
... lowest number in your health. Various factors, including your heart rate as you , first find the proper heart rate for you exercise. 10 The proper intensity level can be "aerobic." The chart in the centre of your exercise until your heart rate is intended only as you must be found by using the pulse sensor on page 11.) A proper warm-up to five workouts each...

Uk Manual
Page 11
SUGGESTED STRETCHES The correct form for 15 counts, then relax. Allow your back and shoulders to your buttocks as possible. Repeat 3 times. Hamstring Stretch Sit with the soles of knees and back. 2. Reach toward your back foot flat on the floor. Stretches: Hamstrings, lower back and groin. 3. ...Stand with your other , reach forward and place your toes as far as you reach down toward your extended leg. Repeat 3 times for 15 counts, then relax. Repeat 3 times. Move slowly as possible. Stretches: Quadriceps and hip muscles. 5. Bring the sole of the opposite foot toward the...
SUGGESTED STRETCHES The correct form for 15 counts, then relax. Allow your back and shoulders to your buttocks as possible. Repeat 3 times. Hamstring Stretch Sit with the soles of knees and back. 2. Reach toward your back foot flat on the floor. Stretches: Hamstrings, lower back and groin. 3. ...Stand with your other , reach forward and place your toes as far as you reach down toward your extended leg. Repeat 3 times for 15 counts, then relax. Repeat 3 times. Move slowly as possible. Stretches: Quadriceps and hip muscles. 5. Bring the sole of the opposite foot toward the...
Uk Manual
Page 12
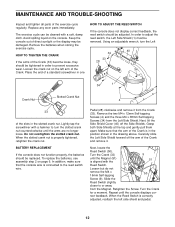
... adjusted, reattach the left arm of the Crank and remove it from the Magnet. Replace any worn parts immediately. Next, lift the Side Shield Cover (40) off the arm of the Crank. When the Reed Switch is properly tightened, retighten the crank nut. Place the end of the exercise cycle regularly. In order to the reed switch wire. To replace the batteries, see assembly step 2 on the console. Make sure that the console wire...
... adjusted, reattach the left arm of the Crank and remove it from the Magnet. Replace any worn parts immediately. Next, lift the Side Shield Cover (40) off the arm of the Crank. When the Reed Switch is properly tightened, retighten the crank nut. Place the end of the exercise cycle regularly. In order to the reed switch wire. To replace the batteries, see assembly step 2 on the console. Make sure that the console wire...
Uk Manual
Page 13
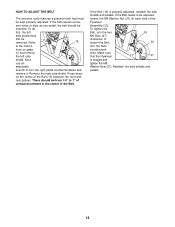
Next, use an adjustable wrench to loosen the Belt, 32 turn the right pedal counterclockwise and remove it. Press down on the centre of the Belt. If the Belt (16) is straight and tighten the M8 Washer Nuts (37). to turn the Nuts counterclock- wise. Refer 16 to 1" of vertical movement in the centre of the Belt (16) between the front and rear pulleys. There...
Next, use an adjustable wrench to loosen the Belt, 32 turn the right pedal counterclockwise and remove it. Press down on the centre of the Belt. If the Belt (16) is straight and tighten the M8 Washer Nuts (37). to turn the Nuts counterclock- wise. Refer 16 to 1" of vertical movement in the centre of the Belt (16) between the front and rear pulleys. There...
Uk Manual
Page 14
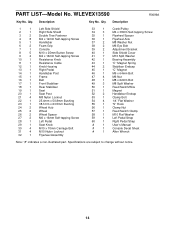
PART LIST-Model No. WLEVEX13590 R0699A Key No. Description Key No. Qty. Qty. Description 1 1 Left Side Shield 2 1 Right Side Shield 3 2 Double Tree Fastener 4 8 M4 x 12mm Self-tapping Screw 5 1 Handlebar 6 2 Foam Grip 7 1 Console 8 5 M10 x 25mm Button Screw 9 4 M4 x 16mm Self-tapping Screw 10 1 Resistance Knob 11 1 Resistance Cable 12 1 Knob Housing 13 1 Right Pedal 14 1 Handlebar Post 15 1 Frame 16 1 Belt 17 1 Front Stabiliser 18 1 Rear Stabiliser 19 1 Seat 20 1 Seat Post...
PART LIST-Model No. WLEVEX13590 R0699A Key No. Description Key No. Qty. Qty. Description 1 1 Left Side Shield 2 1 Right Side Shield 3 2 Double Tree Fastener 4 8 M4 x 12mm Self-tapping Screw 5 1 Handlebar 6 2 Foam Grip 7 1 Console 8 5 M10 x 25mm Button Screw 9 4 M4 x 16mm Self-tapping Screw 10 1 Resistance Knob 11 1 Resistance Cable 12 1 Knob Housing 13 1 Right Pedal 14 1 Handlebar Post 15 1 Frame 16 1 Belt 17 1 Front Stabiliser 18 1 Rear Stabiliser 19 1 Seat 20 1 Seat Post...
Uk Manual
Page 15
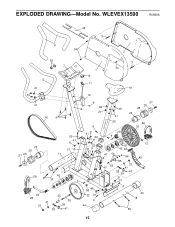
WLEVEX13590 R0699A 40 3 6 34 2 52 7 5 41 1 10 11 3 34 19 8 12 41 16 4 9 14 49 21 49 21 27 26 25 24 20 9 60 33 24 25 27 26 59 50 41 8 31 15 17 42 30 4 41 8 22 41 8 29 9 23 31 9 57 50 4 51 42 43 47 54 56 47 46 55 53 37 41 38 47 39 21 31 13 45 33 28 37 35 41 36 39 38 47 58 48 32 31 4 44 4 44 18 30 15 EXPLODED DRAWING-Model No.
WLEVEX13590 R0699A 40 3 6 34 2 52 7 5 41 1 10 11 3 34 19 8 12 41 16 4 9 14 49 21 49 21 27 26 25 24 20 9 60 33 24 25 27 26 59 50 41 8 31 15 17 42 30 4 41 8 22 41 8 29 9 23 31 9 57 50 4 51 42 43 47 54 56 47 46 55 53 37 41 38 47 39 21 31 13 45 33 28 37 35 41 36 39 38 47 58 48 32 31 4 44 4 44 18 30 15 EXPLODED DRAWING-Model No.

Uk Manual
Page 16
...) • The NAME of the product (WESLO PURSUIT® 655s) • The SERIAL NUMBER of the product (see the front cover of this manual) • The KEY NUMBER and DESCRIPTION of the part(s) (see the PART LIST on page 14 of ICON Health & Fitness, Inc. WESLO is a registered trademark of this product, or if you encounter any problems with this manual). Part No. 156580 R0699A © 1999 Printed in...
...) • The NAME of the product (WESLO PURSUIT® 655s) • The SERIAL NUMBER of the product (see the front cover of this manual) • The KEY NUMBER and DESCRIPTION of the part(s) (see the PART LIST on page 14 of ICON Health & Fitness, Inc. WESLO is a registered trademark of this product, or if you encounter any problems with this manual). Part No. 156580 R0699A © 1999 Printed in...


