
English Manual
Page 1
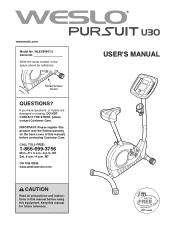
... and instructions in the space above for future reference. www.weslo.com Model No. please contact Customer Care. CALL TOLL-FREE: 1-866-699-3756 Mon.-Fri. 6 a.m.-6 p.m. USER'S MANUAL Keep this equipment. WLEX60907.0 Serial No. Write the serial number in this manual before contacting Customer Care. IMPORTANT: Please register this product (see the limited warranty on the back cover of this manual) before using this manual for reference. Serial Number...
... and instructions in the space above for future reference. www.weslo.com Model No. please contact Customer Care. CALL TOLL-FREE: 1-866-699-3756 Mon.-Fri. 6 a.m.-6 p.m. USER'S MANUAL Keep this equipment. WLEX60907.0 Serial No. Write the serial number in this manual before contacting Customer Care. IMPORTANT: Please register this product (see the limited warranty on the back cover of this manual) before using this manual for reference. Serial Number...
English Manual
Page 2
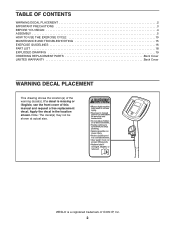
... the front cover of this manual and request a free replacement decal. Apply the decal in the location shown. Note: The decal(s) may not be shown at actual size. TABLE OF CONTENTS WARNING DECAL PLACEMENT 2 IMPORTANT PRECAUTIONS 3 BEFORE YOU BEGIN 4 ASSEMBLY 5 HOW TO USE THE EXERCISE CYCLE 10 MAINTENANCE AND TROUBLESHOOTING 15 EXERCISE GUIDELINES 16 PART LIST 18 EXPLODED DRAWING 19 ORDERING REPLACEMENT PARTS Back Cover LIMITED WARRANTY Back Cover WARNING...
... the front cover of this manual and request a free replacement decal. Apply the decal in the location shown. Note: The decal(s) may not be shown at actual size. TABLE OF CONTENTS WARNING DECAL PLACEMENT 2 IMPORTANT PRECAUTIONS 3 BEFORE YOU BEGIN 4 ASSEMBLY 5 HOW TO USE THE EXERCISE CYCLE 10 MAINTENANCE AND TROUBLESHOOTING 15 EXERCISE GUIDELINES 16 PART LIST 18 EXPLODED DRAWING 19 ORDERING REPLACEMENT PARTS Back Cover LIMITED WARRANTY Back Cover WARNING...
English Manual
Page 3
... 2 ft. (0.6 m) of clearance around your exercise cycle. 6. Replace any exercise program, consult your physician. The pulse sensor is especially important for home use only. The pulse sensor is the responsibility of the owner to protect the floor or carpet. If you feel faint or if you stop exercising, allow the pedals to slowly come to move until the flywheel stops. 12. do not arch your back...
... 2 ft. (0.6 m) of clearance around your exercise cycle. 6. Replace any exercise program, consult your physician. The pulse sensor is especially important for home use only. The pulse sensor is the responsibility of the owner to protect the floor or carpet. If you feel faint or if you stop exercising, allow the pedals to slowly come to move until the flywheel stops. 12. do not arch your back...
English Manual
Page 4
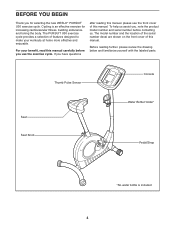
... the labeled parts. Thumb Pulse Sensor Console Seat Seat Knob Water Bottle Holder* Pedal/Strap *No water bottle is an effective exercise for selecting the new WESLO® PURSUIT U30 exercise cycle. BEFORE YOU BEGIN Thank you use the exercise cycle. The model number and the location of the serial number decal are shown on the front cover of this manual carefully before contacting us assist you, note the product model number and serial number before...
... the labeled parts. Thumb Pulse Sensor Console Seat Seat Knob Water Bottle Holder* Pedal/Strap *No water bottle is an effective exercise for selecting the new WESLO® PURSUIT U30 exercise cycle. BEFORE YOU BEGIN Thank you use the exercise cycle. The model number and the location of the serial number decal are shown on the front cover of this manual carefully before contacting us assist you, note the product model number and serial number before...

English Manual
Page 5
... area and remove the packing materials. The number following the key number is not in parentheses below to assemble the exercise cycle, call 1-800-445-2480. Attach the Rear Stabilizer with the "Up" sticker 1 facing upward. Place all parts of the packing materials until assembly is the key number of the part, from the PART LIST near the end of this manual. M4 x 15mm Screw (27)-4 M8...
... area and remove the packing materials. The number following the key number is not in parentheses below to assemble the exercise cycle, call 1-800-445-2480. Attach the Rear Stabilizer with the "Up" sticker 1 facing upward. Place all parts of the packing materials until assembly is the key number of the part, from the PART LIST near the end of this manual. M4 x 15mm Screw (27)-4 M8...
English Manual
Page 6
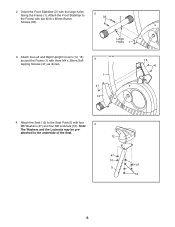
Large Holes 1 3. Note: 4 The Washers and the Locknuts may be pre- Attach the Front Stabilizer to the underside of the Seat. 12 47 10 47 5 10 6 attached to the Frame with the large holes facing the Frame (1). Attach the Left and Right Upright Covers (14, 15) around the Frame (1) with four M8 Washers (47) and four M8 Locknuts (10). Attach the Seat (12) to the Seat Post (5) with three M4 x 25mm Selftapping Screws (41) as shown. 3 1 41 14 15 41 4. Orient the Front Stabilizer (2) with two M10 x 60mm Button 2 33 2 Screws (33). 2.
Large Holes 1 3. Note: 4 The Washers and the Locknuts may be pre- Attach the Front Stabilizer to the underside of the Seat. 12 47 10 47 5 10 6 attached to the Frame with the large holes facing the Frame (1). Attach the Left and Right Upright Covers (14, 15) around the Frame (1) with four M8 Washers (47) and four M8 Locknuts (10). Attach the Seat (12) to the Seat Post (5) with three M4 x 25mm Selftapping Screws (41) as shown. 3 1 41 14 15 41 4. Orient the Front Stabilizer (2) with two M10 x 60mm Button 2 33 2 Screws (33). 2.
English Manual
Page 7
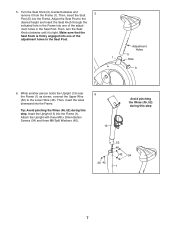
... wires downward into the Frame (1). Adjustment Holes 5 1 Hole 9 6. Tip: Avoid pinching the Wires (46, 52) during this step. While another person holds the Upright (13) near the Frame (1) as shown, connect the Upper Wire (52) to the desired height and insert the Seat Knob through the indicated hole in the Frame into the Frame. Attach the Upright with three M8 x 20mm Button Screws...
... wires downward into the Frame (1). Adjustment Holes 5 1 Hole 9 6. Tip: Avoid pinching the Wires (46, 52) during this step. While another person holds the Upright (13) near the Frame (1) as shown, connect the Upper Wire (52) to the desired height and insert the Seat Knob through the indicated hole in the Frame into the Frame. Attach the Upright with three M8 x 20mm Button Screws...
English Manual
Page 8
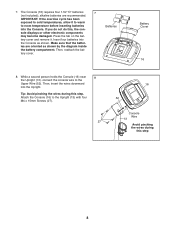
... 8 the Upright (13), connect the console wire to cold temperatures, allow it . If you do not do this step 8 Insert four batteries into the Upright. Batteries Battery Cover 16 8. Attach the Console (16) to room temperature before inserting batteries into the Console. Make sure that the batter- tery cover and remove it to warm to the Upright (13) with four M4 x 15mm Screws (27). 27 16 52 Console Wire 13...
... 8 the Upright (13), connect the console wire to cold temperatures, allow it . If you do not do this step 8 Insert four batteries into the Upright. Batteries Battery Cover 16 8. Attach the Console (16) to room temperature before inserting batteries into the Console. Make sure that the batter- tery cover and remove it to warm to the Upright (13) with four M4 x 15mm Screws (27). 27 16 52 Console Wire 13...
English Manual
Page 9
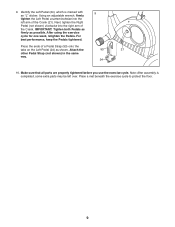
... the exercise cycle to protect the floor. 9 Using an adjustable wrench, firmly tighten the Left Pedal counterclockwise into the right arm of a Pedal Strap (53) onto the tabs on the Left Pedal (24) as possible. Note: After assembly is marked with 9 an "L" sticker. Identify the Left Pedal (24), which is completed, some extra parts may be left arm of the Crank (21). IMPORTANT: Tighten both Pedals...
... the exercise cycle to protect the floor. 9 Using an adjustable wrench, firmly tighten the Left Pedal counterclockwise into the right arm of a Pedal Strap (53) onto the tabs on the Left Pedal (24) as possible. Note: After assembly is marked with 9 an "L" sticker. Identify the Left Pedal (24), which is completed, some extra parts may be left arm of the Crank (21). IMPORTANT: Tighten both Pedals...
English Manual
Page 10
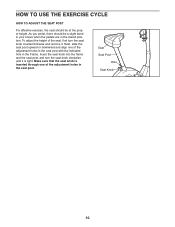
... bend in your knees when the pedals are in the lowest position. Insert the seat knob into the frame and the seat post, and turn the seat knob counterclockwise and remove it is inserted through one of the adjustment holes in the Frame. HOW TO USE THE EXERCISE CYCLE HOW TO ADJUST THE SEAT POST For effective exercise, the seat should be at the proper...
... bend in your knees when the pedals are in the lowest position. Insert the seat knob into the frame and the seat post, and turn the seat knob counterclockwise and remove it is inserted through one of the adjustment holes in the Frame. HOW TO USE THE EXERCISE CYCLE HOW TO ADJUST THE SEAT POST For effective exercise, the seat should be at the proper...
English Manual
Page 11
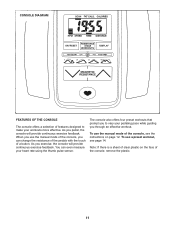
... of a button. To use a preset workout, see the instructions on the face of the console, remove the plastic. 11 Note: If there is a sheet of clear plastic on page 12. As you can even measure your workouts more effective. The console also offers four preset workouts that prompt you to make your heart rate using the thumb pulse sensor. To use the manual mode of the console, see...
... of a button. To use a preset workout, see the instructions on the face of the console, remove the plastic. 11 Note: If there is a sheet of clear plastic on page 12. As you can even measure your workouts more effective. The console also offers four preset workouts that prompt you to make your heart rate using the thumb pulse sensor. To use the manual mode of the console, see...
English Manual
Page 12
... display and the pace guide will then be selected. If you have selected a workout, reselect the manual mode by pressing the Magnetic Resistance increase and decrease buttons. There are using the pulse sensor. Resistance-The resistance level will appear only when you turn on the console. Note: The pulse display will appear in the display each , in miles or kilometers per hour. To select speed, time, distance, calories, or fat calories information...
... display and the pace guide will then be selected. If you have selected a workout, reselect the manual mode by pressing the Magnetic Resistance increase and decrease buttons. There are using the pulse sensor. Resistance-The resistance level will appear only when you turn on the console. Note: The pulse display will appear in the display each , in miles or kilometers per hour. To select speed, time, distance, calories, or fat calories information...
English Manual
Page 13
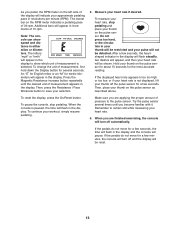
... Resistance increase button repeatedly until you become familiar with it. Do not press too hard, or the circulation in either miles or kilometers. Try the pulse sensor several seconds. If the displayed heart rate appears to show speed and distance in your thumb will be restricted and your pulse will be detected. To measure your heart rate, stop pedaling. When the console is paused, the time will turn...
... Resistance increase button repeatedly until you become familiar with it. Do not press too hard, or the circulation in either miles or kilometers. Try the pulse sensor several seconds. If the displayed heart rate appears to show speed and distance in your thumb will be restricted and your pulse will be detected. To measure your heart rate, stop pedaling. When the console is paused, the time will turn...

English Manual
Page 14
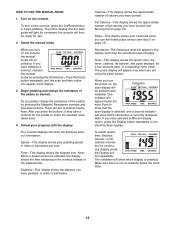
... TO USE A PRESET WORKOUT 1. To select a preset program, press the Resistance / Pace Workouts button repeatedly until P1, P2, P3, or P4 appears in the display. when the right indicator lights, decrease your heart rate if desired. If you . One resistance level and one target pace setting are finished exercising, the console will flash in the display. The preset workouts consist of the program. See step 5 on the console. Turn on...
... TO USE A PRESET WORKOUT 1. To select a preset program, press the Resistance / Pace Workouts button repeatedly until P1, P2, P3, or P4 appears in the display. when the right indicator lights, decrease your heart rate if desired. If you . One resistance level and one target pace setting are finished exercising, the console will flash in the display. The preset workouts consist of the program. See step 5 on the console. Turn on...
English Manual
Page 15
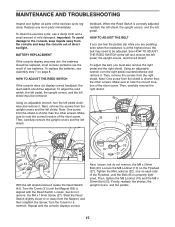
... other screws. To adjust the reed switch, the left pedal, the upright covers, and the left shield. See HOW TO ADJUST THE REED SWITCH at the highest level, the belt may need to note the correct location of low batteries. Then, carefully remove the upright covers and the left shield. 35 37 32 10 23 38 43 27 21 With the left pedal. Turn the Crank (21) until the console displays correct...
... other screws. To adjust the reed switch, the left pedal, the upright covers, and the left shield. See HOW TO ADJUST THE REED SWITCH at the highest level, the belt may need to note the correct location of low batteries. Then, carefully remove the upright covers and the left shield. 35 37 32 10 23 38 43 27 21 With the left pedal. Turn the Crank (21) until the console displays correct...
English Manual
Page 16
... minutes of exercise does your training zone. You can use stored fat calories for energy. For aerobic exercise, adjust the intensity of your exercise until your heart rate is near the lowest number in your body begin to make exercise a regular and enjoyable part of your training zone. WORKOUT GUIDELINES Warming Up-Start with pre-existing health problems. The pulse sensor is to use your heart rate as you exercise-never hold your...
... minutes of exercise does your training zone. You can use stored fat calories for energy. For aerobic exercise, adjust the intensity of your exercise until your heart rate is near the lowest number in your body begin to make exercise a regular and enjoyable part of your training zone. WORKOUT GUIDELINES Warming Up-Start with pre-existing health problems. The pulse sensor is to use your heart rate as you exercise-never hold your...
English Manual
Page 17
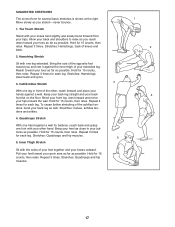
... outward. Bend your front leg, lean forward and move your hips toward your groin area as far as you stretch-never bounce. 1. Repeat 3 times for 15 counts, then relax. tocks as well. Stretches: Quadriceps and hip muscles. 5 5. SUGGESTED STRETCHES The correct form for 15 counts, then relax... with your knees bent slightly and slowly bend forward from your toes as far as possible. Stretches: Hamstrings, lower back and groin. 3. Calf/Achilles Stretch 3 With one leg extended. Bring your but- Repeat 3 times. Allow your back and shoulders to your heel as close to relax...
... outward. Bend your front leg, lean forward and move your hips toward your groin area as far as you stretch-never bounce. 1. Repeat 3 times for 15 counts, then relax. tocks as well. Stretches: Quadriceps and hip muscles. 5 5. SUGGESTED STRETCHES The correct form for 15 counts, then relax... with your knees bent slightly and slowly bend forward from your toes as far as possible. Stretches: Hamstrings, lower back and groin. 3. Calf/Achilles Stretch 3 With one leg extended. Bring your but- Repeat 3 times. Allow your back and shoulders to your heel as close to relax...
English Manual
Page 18
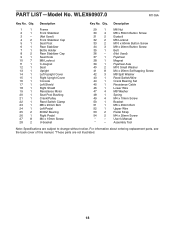
... Washer 41 8 M4 x 25mm Self-tapping Screw 42 3 M8 Split Washer 43 1 Reed Switch/Wire 44 1 Crank Bearing Set 45 1 Resistance Cable 46 1 Lower Wire 47 4 M8 Washer 48 1 Spring 49 4 M4 x 10mm Screw 50 1 Bracket 51 1 M6 x 45mm Bolt 52 1 Upper Wire 53 2 Pedal Strap 54 2 M4 x 20mm Screw * - Qty. For information about ordering replacement parts, see the back cover of this manual. *These parts are subject to change without notice. PART LIST-Model No.
... Washer 41 8 M4 x 25mm Self-tapping Screw 42 3 M8 Split Washer 43 1 Reed Switch/Wire 44 1 Crank Bearing Set 45 1 Resistance Cable 46 1 Lower Wire 47 4 M8 Washer 48 1 Spring 49 4 M4 x 10mm Screw 50 1 Bracket 51 1 M6 x 45mm Bolt 52 1 Upper Wire 53 2 Pedal Strap 54 2 M4 x 20mm Screw * - Qty. For information about ordering replacement parts, see the back cover of this manual. *These parts are subject to change without notice. PART LIST-Model No.
English Manual
Page 19
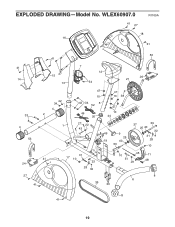
WLEX60907.0 R1109A 41 27 18 16 41 53 41 41 7 12 15 27 14 26 21 13 54 33 4 53 42 34 4 2 1 47 10 42 34 5 52 46 20 47 10 38 47 10 44 27 22 43 49 9 25 19 40 50 37 39 25 40 32 31 28 10 41 24 27 41 31 17 10 23 28 32 35 30 10 45 11 51 29 48 8 6 8 41 19 EXPLODED DRAWING-Model No.
WLEX60907.0 R1109A 41 27 18 16 41 53 41 41 7 12 15 27 14 26 21 13 54 33 4 53 42 34 4 2 1 47 10 42 34 5 52 46 20 47 10 38 47 10 44 27 22 43 49 9 25 19 40 50 37 39 25 40 32 31 28 10 41 24 27 41 31 17 10 23 28 32 35 30 10 45 11 51 29 48 8 6 8 41 19 EXPLODED DRAWING-Model No.
English Manual
Page 20
... (see the front cover of this manual) • the key number and description of the replacement part(s) (see the front cover of whatsoever nature. For in connection with respect to you . or other rights that specifically set forth herein. Some states do not allow limitations on how long an implied warranty lasts. If the product is limited to repairing or replacing, at ICONʼs option, the...
... (see the front cover of this manual) • the key number and description of the replacement part(s) (see the front cover of whatsoever nature. For in connection with respect to you . or other rights that specifically set forth herein. Some states do not allow limitations on how long an implied warranty lasts. If the product is limited to repairing or replacing, at ICONʼs option, the...


