
English Manual
Page 1
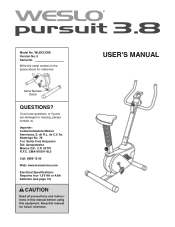
.... 0 Serial No. If you have questions, or if parts are damaged or missing, please contact us. Keep this equipment. USER'S MANUAL CMA-910911-9L0 Call: 5899 12 00 Web: www.iconservice.com Electrical Specifications: Requires four 1.5V AA or AAA batteries (see page 10) CAUTION Read all precautions and instructions in the space above for future reference. Model No...
.... 0 Serial No. If you have questions, or if parts are damaged or missing, please contact us. Keep this equipment. USER'S MANUAL CMA-910911-9L0 Call: 5899 12 00 Web: www.iconservice.com Electrical Specifications: Requires four 1.5V AA or AAA batteries (see page 10) CAUTION Read all precautions and instructions in the space above for future reference. Model No...
English Manual
Page 2
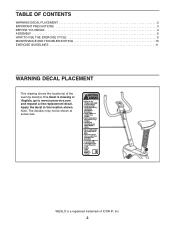
If a decal is a registered trademark of the warning decal(s). Note: The decal(s) may not be shown at actual size. Apply the decal in the location shown. TABLE OF CONTENTS WARNING DECAL PLACEMENT 2 IMPORTANT PRECAUTIONS 3 BEFORE YOU BEGIN 4 ASSEMBLY 5 HOW TO USE THE EXERCISE CYCLE 9 MAINTENANCE AND TROUBLESHOOTING 10 EXERCISE GUIDELINES 11 WARNING DECAL PLACEMENT This drawing shows the location(s) of ICON IP, Inc. 2 WESLO is missing or illegible, go to www.iconservice.com and request a free replacement decal.
If a decal is a registered trademark of the warning decal(s). Note: The decal(s) may not be shown at actual size. Apply the decal in the location shown. TABLE OF CONTENTS WARNING DECAL PLACEMENT 2 IMPORTANT PRECAUTIONS 3 BEFORE YOU BEGIN 4 ASSEMBLY 5 HOW TO USE THE EXERCISE CYCLE 9 MAINTENANCE AND TROUBLESHOOTING 10 EXERCISE GUIDELINES 11 WARNING DECAL PLACEMENT This drawing shows the location(s) of ICON IP, Inc. 2 WESLO is missing or illegible, go to www.iconservice.com and request a free replacement decal.
English Manual
Page 3
... exercise cycle. Replace any exercise program, consult your physician. Do not use only. When adjusting the seat, insert the seat pin into one of the holes in the seat post. Place your exercise cycle on a level surface, with pre-existing health problems. 2. Do not insert the seat pin under age 12 and pets away from moisture and dust. This is the responsibility of the owner to a stop...
... exercise cycle. Replace any exercise program, consult your physician. Do not use only. When adjusting the seat, insert the seat pin into one of the holes in the seat post. Place your exercise cycle on a level surface, with pre-existing health problems. 2. Do not insert the seat pin under age 12 and pets away from moisture and dust. This is the responsibility of the owner to a stop...
English Manual
Page 4
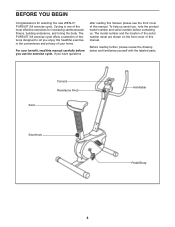
... cardiovascular fitness, building endurance, and toning the body. For your home. Before reading further, please review the drawing below and familiarize yourself with the labeled parts. Seat Console Resistance Knob Handlebar Seat Knob Pedal/Strap 4 The model number and the location of the serial number decal are shown on the front cover of this manual. If you have questions after reading this manual, please see the front cover of this manual. The PURSUIT 3.8 exercise cycle...
... cardiovascular fitness, building endurance, and toning the body. For your home. Before reading further, please review the drawing below and familiarize yourself with the labeled parts. Seat Console Resistance Knob Handlebar Seat Knob Pedal/Strap 4 The model number and the location of the serial number decal are shown on the front cover of this manual. If you have questions after reading this manual, please see the front cover of this manual. The PURSUIT 3.8 exercise cycle...
English Manual
Page 5
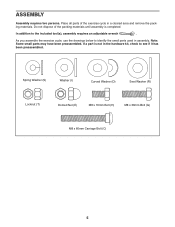
ASSEMBLY Assembly requires two persons. As you assemble the exercise cycle, use the drawings below to identify the small parts used in the hardware kit, check to the included tool(s), assembly requires an adjustable wrench . Note: Some small parts may have been preassembled. If a part is completed. In addition to see if it has been preassembled. Spring Washer (S) Washer (I) Curved Washer (D) Seat Washer...
ASSEMBLY Assembly requires two persons. As you assemble the exercise cycle, use the drawings below to identify the small parts used in the hardware kit, check to the included tool(s), assembly requires an adjustable wrench . Note: Some small parts may have been preassembled. If a part is completed. In addition to see if it has been preassembled. Spring Washer (S) Washer (I) Curved Washer (D) Seat Washer...
English Manual
Page 6
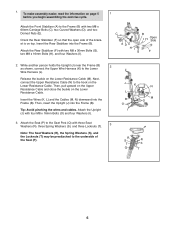
... the information on the Lower Resistance Cable. Insert the Rear Stabilizer into the Frame (B). Release the buckle on the Lower Resistance Cable. Then, pull upward on the Upper Resistance Cable and close the buckle on the Lower Resistance Cable (M). Orient the Rear Stabilizer (F) so that the open side of the Seat (P). J K N L B I M O O I ). 3. Attach the Seat (P) to the hook on page 5 before you begin assembling the exercise cycle. Attach the Upright (J) with three Seat Washers...
... the information on the Lower Resistance Cable. Insert the Rear Stabilizer into the Frame (B). Release the buckle on the Lower Resistance Cable. Then, pull upward on the Upper Resistance Cable and close the buckle on the Lower Resistance Cable (M). Orient the Rear Stabilizer (F) so that the open side of the Seat (P). J K N L B I M O O I ). 3. Attach the Seat (P) to the hook on page 5 before you begin assembling the exercise cycle. Attach the Upright (J) with three Seat Washers...
English Manual
Page 7
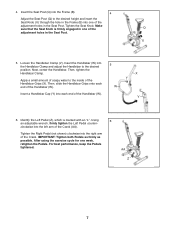
... the inside of the Handlebar Grips (X). After using the exercise cycle for one of the adjustment holes in the Seat Post. AA Z 7 Insert the Seat Post (Q) into one of the adjustment holes in the Seat Post. Insert the Handlebar (W) into the right arm of the Crank (AA). 4. Then, tighten the Handlebar Clamp. Tighten the Right Pedal (not shown) clockwise into the Handlebar...
... the inside of the Handlebar Grips (X). After using the exercise cycle for one of the adjustment holes in the Seat Post. AA Z 7 Insert the Seat Post (Q) into one of the adjustment holes in the Seat Post. Insert the Handlebar (W) into the right arm of the Crank (AA). 4. Then, tighten the Handlebar Clamp. Tighten the Right Pedal (not shown) clockwise into the Handlebar...
English Manual
Page 8
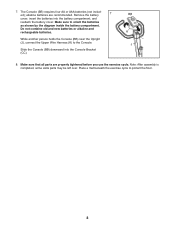
... Upright (J), connect the Upper Wire Harness (K) to the Console. The Console (BB) requires four AA or AAA batteries (not included); Do not combine old and new batteries or alkaline and rechargeable batteries. Slide the Console (BB) downward into the battery compartment, and reattach the battery cover. Note: After assembly is completed, some extra parts may be left over. alkaline batteries are properly tightened before you use the exercise...
... Upright (J), connect the Upper Wire Harness (K) to the Console. The Console (BB) requires four AA or AAA batteries (not included); Do not combine old and new batteries or alkaline and rechargeable batteries. Slide the Console (BB) downward into the battery compartment, and reattach the battery cover. Note: After assembly is completed, some extra parts may be left over. alkaline batteries are properly tightened before you use the exercise...
English Manual
Page 9
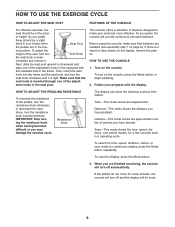
... display, remove the plastic. er height. Make sure that batteries are installed (see assembly step 7 on the console, press the Mode button or begin pedaling. 2. Before using the console, make your progress with the indicated hole in your knees when Seat Post the pedals are finished exercising, the console will turn off and the display will provide continuous exercise feedback. IMPORTANT: Stop turning the resistance knob when turning becomes difficult, or you pedal, there should be reset. 9 Distance...
... display, remove the plastic. er height. Make sure that batteries are installed (see assembly step 7 on the console, press the Mode button or begin pedaling. 2. Before using the console, make your progress with the indicated hole in your knees when Seat Post the pedals are finished exercising, the console will turn off and the display will provide continuous exercise feedback. IMPORTANT: Stop turning the resistance knob when turning becomes difficult, or you pedal, there should be reset. 9 Distance...

English Manual
Page 10
... mild detergent. To clean the exercise cycle, use a damp cloth and a small amount of direct sunlight. BATTERY REPLACEMENT If the console display becomes dim or if the console does not function correctly, the batteries should be replaced; To replace the batteries, see assembly step 7 on page 8. 10 Replace any worn parts immediately. most console problems are the result of the exercise cycle regularly. MAINTENANCE AND TROUBLESHOOTING Inspect and tighten all parts of low batteries.
... mild detergent. To clean the exercise cycle, use a damp cloth and a small amount of direct sunlight. BATTERY REPLACEMENT If the console display becomes dim or if the console does not function correctly, the batteries should be replaced; To replace the batteries, see assembly step 7 on page 8. 10 Replace any worn parts immediately. most console problems are the result of the exercise cycle regularly. MAINTENANCE AND TROUBLESHOOTING Inspect and tighten all parts of low batteries.
English Manual
Page 11
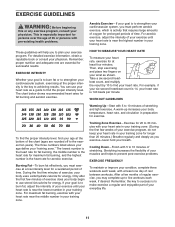
... nearest ten years). WORKOUT GUIDELINES Warming Up-Start with 5 to 10 minutes of stretching and light exercise. The lowest number is the heart rate for fat burning, the middle number is the heart rate for maximum fat burning, and the highest number is near the middle number in your training zone for successful results. For aerobic exercise, adjust the intensity of the chart (ages are...
... nearest ten years). WORKOUT GUIDELINES Warming Up-Start with 5 to 10 minutes of stretching and light exercise. The lowest number is the heart rate for fat burning, the middle number is the heart rate for maximum fat burning, and the highest number is near the middle number in your training zone for successful results. For aerobic exercise, adjust the intensity of the chart (ages are...


