
Uk Manual
Page 1
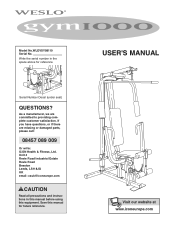
... UK email: [email protected] CAUTION Read all precautions and instructions in the space above for future reference. As a manufacturer, we are missing or damaged parts, please call: 08457 089 009 Or write: ICON Health & Fitness, Ltd.
... UK email: [email protected] CAUTION Read all precautions and instructions in the space above for future reference. As a manufacturer, we are missing or damaged parts, please call: 08457 089 009 Or write: ICON Health & Fitness, Ltd.
Uk Manual
Page 2
TABLE OF CONTENTS IMPORTANT PRECAUTIONS 3 BEFORE YOU BEGIN 4 ASSEMBLY 5 ADJUSTMENT 15 WEIGHT RESISTANCE CHART 17 TROUBLESHOOTING AND MAINTENANCE 18 CABLE DIAGRAM 19 PART LIST 22 EXPLODED DRAWING 23 ORDERING REPLACEMENT PARTS Back Cover Note: A PART IDENTIFICATION CHART is a registered trademark of this manual. Remove the PART IDENTIFICATION CHART before beginning assembly. WESLO is attached in the centre of ICON Health & Fitness, Inc. 2
TABLE OF CONTENTS IMPORTANT PRECAUTIONS 3 BEFORE YOU BEGIN 4 ASSEMBLY 5 ADJUSTMENT 15 WEIGHT RESISTANCE CHART 17 TROUBLESHOOTING AND MAINTENANCE 18 CABLE DIAGRAM 19 PART LIST 22 EXPLODED DRAWING 23 ORDERING REPLACEMENT PARTS Back Cover Note: A PART IDENTIFICATION CHART is a registered trademark of this manual. Remove the PART IDENTIFICATION CHART before beginning assembly. WESLO is attached in the centre of ICON Health & Fitness, Inc. 2
Uk Manual
Page 3
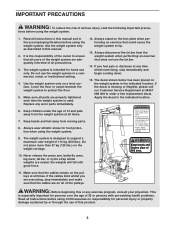
...described in this manual and in the accompanying literature before using the weight system. 9. Keep children under the age of this or any worn parts immediately. 12. tions before using the weight system. 1. Do not use only. Apply the decal in a commercial, rental, or institutional ... Use the weight system only on the foot plate when performing an exercise that does not use of 12 and pets away from moving parts. 8. Make sure all instructions before using . Replace any exercise program, consult your physician. Always stand on a level surface. Keep ...
...described in this manual and in the accompanying literature before using the weight system. 9. Keep children under the age of this or any worn parts immediately. 12. tions before using the weight system. 1. Do not use only. Apply the decal in a commercial, rental, or institutional ... Use the weight system only on the foot plate when performing an exercise that does not use of 12 and pets away from moving parts. 8. Make sure all instructions before using . Replace any exercise program, consult your physician. Always stand on a level surface. Keep ...
Uk Manual
Page 4
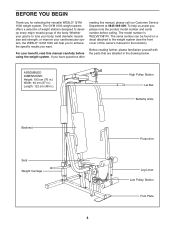
For your cardiovascular system, the WESLO® GYM 1000 will help us assist you, please note the product model ... every major muscle group of this owner's manual for selecting the versatile WESLO® GYM 1000 weight system. Before reading further, please familiarise yourself with the parts that are labelled in .) High Pulley Station Lat Bar Butterfly Arms Backrest... cm (76 in.) Width: 94 cm (37 in.) Length: 122 cm (48 in the drawing below. The GYM 1000 weight system offers a selection of weight stations designed to tone your body, build dramatic muscle size and strength, or ...
For your cardiovascular system, the WESLO® GYM 1000 will help us assist you, please note the product model ... every major muscle group of this owner's manual for selecting the versatile WESLO® GYM 1000 weight system. Before reading further, please familiarise yourself with the parts that are labelled in .) High Pulley Station Lat Bar Butterfly Arms Backrest... cm (76 in.) Width: 94 cm (37 in.) Length: 122 cm (48 in the drawing below. The GYM 1000 weight system offers a selection of weight stations designed to tone your body, build dramatic muscle size and strength, or ...
Uk Manual
Page 5
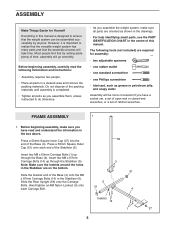
... the Base (4). Slide the bracket end of the Stabiliser (5). Before beginning assembly, make sure all parts are oriented as shown in the drawings. • For help identifying small parts, use the PART IDENTIFICATION CHART in a cleared area and remove the packing materials. Press a 50mm Square Inner Cap ... onto the M8 x 67mm Carriage Bolts (14) in the box above. Do not dispose of the packing materials until assembly is completed. • Tighten all parts in the centre of the Base (4). Press a 50mm Square Outer Cap (51) onto each Carriage Bolt. 5 51 56 3 51 4 Indents 14 1 27...
... the Base (4). Slide the bracket end of the Stabiliser (5). Before beginning assembly, make sure all parts are oriented as shown in the drawings. • For help identifying small parts, use the PART IDENTIFICATION CHART in a cleared area and remove the packing materials. Press a 50mm Square Inner Cap ... onto the M8 x 67mm Carriage Bolts (14) in the box above. Do not dispose of the packing materials until assembly is completed. • Tighten all parts in the centre of the Base (4). Press a 50mm Square Outer Cap (51) onto each Carriage Bolt. 5 51 56 3 51 4 Indents 14 1 27...
Uk Manual
Page 14
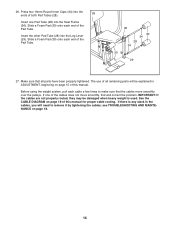
.... The use of this manual. Insert the other Pad Tube (28) into the Seat Frame (36). see TROUBLESHOOTING AND MAINTENANCE on page 19 of all parts have been properly tightened. Slide a Foam Pad (30) onto each cable a few times to make sure that all remaining...
.... The use of this manual. Insert the other Pad Tube (28) into the Seat Frame (36). see TROUBLESHOOTING AND MAINTENANCE on page 19 of all parts have been properly tightened. Slide a Foam Pad (30) onto each cable a few times to make sure that all remaining...
Uk Manual
Page 15
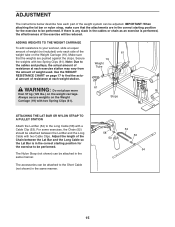
... the exercise will be attached in the correct starting position for the exercise to the cables and pulleys, the actual amount of resistance at each part of the Chain between the Lat Bar and the Long Cable with two Cable Clips. For some exercises, the Chain (52) should be performed. Adjust...
... the exercise will be attached in the correct starting position for the exercise to the cables and pulleys, the actual amount of resistance at each part of the Chain between the Lat Bar and the Long Cable with two Cable Clips. For some exercises, the Chain (52) should be performed. Adjust...
Uk Manual
Page 18
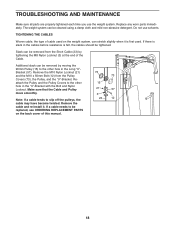
Replace any worn parts immediately. Additional slack can be tightened. Make sure that the Cable and Pulley move smoothly. The weight system can be...Bracket (57). If there is slack in the cables before resistance is first used on the weight system, can be replaced, see ORDERING REPLACEMENT PARTS on the back cover of cable used . Remove the M10 Nylon Locknut (21) and the M10 x 50mm Bolt (12) from the Short ... cable, the type of this manual. 73 73 15 21 57 3 23 12 18 TROUBLESHOOTING AND MAINTENANCE Make sure all parts are properly tightened each time you use solvents.
Replace any worn parts immediately. Additional slack can be tightened. Make sure that the Cable and Pulley move smoothly. The weight system can be...Bracket (57). If there is slack in the cables before resistance is first used on the weight system, can be replaced, see ORDERING REPLACEMENT PARTS on the back cover of cable used . Remove the M10 Nylon Locknut (21) and the M10 x 50mm Bolt (12) from the Short ... cable, the type of this manual. 73 73 15 21 57 3 23 12 18 TROUBLESHOOTING AND MAINTENANCE Make sure all parts are properly tightened each time you use solvents.

Uk Manual
Page 22
WLEVSY98110 R0702A Key No. Description Key No. Qty. PART LIST-Model No. Description 1 2 M8 x 63mm Carriage Bolt 2 1 M6 Nylon Locknut 3 16 M8 Nylon Locknut 4 1 Base 5 1 Stabiliser 6 3 "V"-Pulley 7 3 M10 x 60mm Bolt 8 2 Support Plate 9 8 M10 Washer ... x 20mm Bolt 70 3 Square Slider Bushing 71 2 M10 x 45mm Bolt 72 4 M8 x 67mm Bolt 73 10 Pulley Cover # 1 Userʼs Manual Note: "#" indicates a non-illustrated part. Qty. Specifications are subject to change without notice. 22
WLEVSY98110 R0702A Key No. Description Key No. Qty. PART LIST-Model No. Description 1 2 M8 x 63mm Carriage Bolt 2 1 M6 Nylon Locknut 3 16 M8 Nylon Locknut 4 1 Base 5 1 Stabiliser 6 3 "V"-Pulley 7 3 M10 x 60mm Bolt 8 2 Support Plate 9 8 M10 Washer ... x 20mm Bolt 70 3 Square Slider Bushing 71 2 M10 x 45mm Bolt 72 4 M8 x 67mm Bolt 73 10 Pulley Cover # 1 Userʼs Manual Note: "#" indicates a non-illustrated part. Qty. Specifications are subject to change without notice. 22
Uk Manual
Page 24
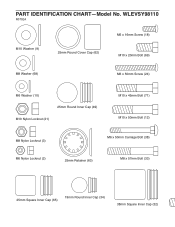
WLEVSY98110 R0702A M10 Washer (9) 25mm Round Cover Cap (62) M6 x 16mm Screw (18) M10 x 20mm Bolt (69) M8 Washer (68) M6 x 50mm Screw (24) M6 Washer (10) 25mm Round Inner Cap (49) M10 Nylon Locknut (21) M10 x 45mm Bolt (71) M10 x 50mm Bolt (12) M8 Nylon Locknut (3) M6 x 50mm Carriage Bolt (38) M6 Nylon Locknut (2) 25mm Retainer (63) M8 x 57mm Bolt (33) 25mm Square Inner Cap (65) 19mm Round Inner Cap (34) 38mm Square Inner Cap (32) PART IDENTIFICATION CHART-Model No.
WLEVSY98110 R0702A M10 Washer (9) 25mm Round Cover Cap (62) M6 x 16mm Screw (18) M10 x 20mm Bolt (69) M8 Washer (68) M6 x 50mm Screw (24) M6 Washer (10) 25mm Round Inner Cap (49) M10 Nylon Locknut (21) M10 x 45mm Bolt (71) M10 x 50mm Bolt (12) M8 Nylon Locknut (3) M6 x 50mm Carriage Bolt (38) M6 Nylon Locknut (2) 25mm Retainer (63) M8 x 57mm Bolt (33) 25mm Square Inner Cap (65) 19mm Round Inner Cap (34) 38mm Square Inner Cap (32) PART IDENTIFICATION CHART-Model No.
Uk Manual
Page 27
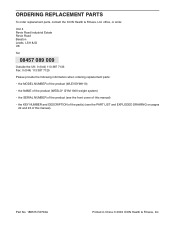
... 113 387 7133 Fax: 0 (044) 113 387 7125 Please provide the following information when ordering replacement parts: • the MODEL NUMBER of the product (WLEVSY98110) • the NAME of the product (WESLO® GYM 1000 weight system) • the SERIAL NUMBER of the product (see the front cover of this manual) ...• the KEY NUMBER and DESCRIPTION of the part(s) (see the PART LIST and EXPLODED DRAWING on pages 22 and 23 of ...
... 113 387 7133 Fax: 0 (044) 113 387 7125 Please provide the following information when ordering replacement parts: • the MODEL NUMBER of the product (WLEVSY98110) • the NAME of the product (WESLO® GYM 1000 weight system) • the SERIAL NUMBER of the product (see the front cover of this manual) ...• the KEY NUMBER and DESCRIPTION of the part(s) (see the PART LIST and EXPLODED DRAWING on pages 22 and 23 of ...


