
English Manual
Page 3
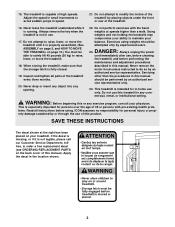
..., or move the treadmill. 18. Do not attempt to avoid sudden jumps in the location shown. 3 Apply the decal in speed. 21. Always remove the key when the treadmill is properly assembled. (See ASSEMBLY on page 5, and HOW TO MOVE THE TREADMILL on the back cover of 35 or persons with...
..., or move the treadmill. 18. Do not attempt to avoid sudden jumps in the location shown. 3 Apply the decal in speed. 21. Always remove the key when the treadmill is properly assembled. (See ASSEMBLY on page 5, and HOW TO MOVE THE TREADMILL on the back cover of 35 or persons with...
English Manual
Page 4
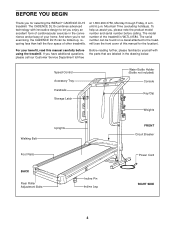
...serial number before using the treadmill. The CADENCE DL15 combines advanced technology with the parts that are labeled in the convenience and privacy of your benefit, read this manual for selecting the WESLO® CADENCE DL15 treadmill. Speed Control Accessory Tray Handrails Storage ...Latch Water Bottle Holder (Bottle not included) Console Key/Clip Weights Walking Belt Uprights FRONT Circuit Breaker Foot Rails Power ...
...serial number before using the treadmill. The CADENCE DL15 combines advanced technology with the parts that are labeled in the convenience and privacy of your benefit, read this manual for selecting the WESLO® CADENCE DL15 treadmill. Speed Control Accessory Tray Handrails Storage ...Latch Water Bottle Holder (Bottle not included) Console Key/Clip Weights Walking Belt Uprights FRONT Circuit Breaker Foot Rails Power ...
English Manual
Page 8
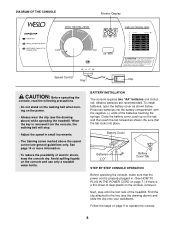
... on the power. • Always wear the clip (see the drawing above ) while operating the treadmill. Avoid spilling liquids on page 9 to the key (see the drawing above ) and slide the clip onto your waistband. Next, step onto the foot rails of electric shock, keep the console dry. ... To install batteries, open the battery cover as shown. Find the clip attached to operate the console. 8 Press two batteries into place. When the key is a thin sheet of the batteries touching the springs. Be sure that the power cord is properly plugged in small increments. • The training ...
... on the power. • Always wear the clip (see the drawing above ) while operating the treadmill. Avoid spilling liquids on page 9 to the key (see the drawing above ) and slide the clip onto your waistband. Next, step onto the foot rails of electric shock, keep the console dry. ... To install batteries, open the battery cover as shown. Find the clip attached to operate the console. 8 Press two batteries into place. When the key is a thin sheet of the batteries touching the springs. Be sure that the power cord is properly plugged in small increments. • The training ...
English Manual
Page 9
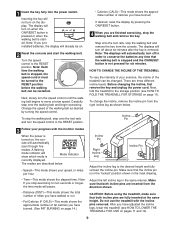
... pins removed. sole will automatically turn on pages 11 and 12). 9 The modes are finished exercising, stop the walking belt and remove the key from the direction shown. After you have burned. (See FAT BURNING on page 11). Turn the speed control to the desired height and fully... reinsert the incline pin. Incline Pin Right Incline Leg Incline Pin Adjust the incline leg to the RESET position. Inserting the key will pause. • Distance (DIST)-This mode shows the total number of miles you have walked or run. • Fat Calories (F CALS)-...
... pins removed. sole will automatically turn on pages 11 and 12). 9 The modes are finished exercising, stop the walking belt and remove the key from the direction shown. After you have burned. (See FAT BURNING on page 11). Turn the speed control to the desired height and fully... reinsert the incline pin. Incline Pin Right Incline Leg Incline Pin Adjust the incline leg to the RESET position. Inserting the key will pause. • Distance (DIST)-This mode shows the total number of miles you have walked or run. • Fat Calories (F CALS)-...
English Manual
Page 12
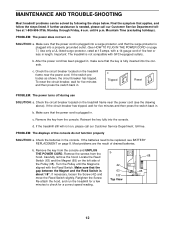
...as shown, the circuit breaker has tripped. c Tripped Reset Tripped Reset PROBLEM: The power turns off during use SOLUTION: a. Reinsert the key fully into the console. Locate the Reed Switch (63) and the Magnet (65) on SOLUTION: a. Make sure that the surge protector.... Check the batteries in . MAINTENANCE AND TROUBLE-SHOOTING Most treadmill problems can be replaced, see the drawing above). Make sure that the key is plugged in . PROBLEM: The displays of drained batteries. c. Remove the screws from the console. Carefully remove the hood. Retighten the...
...as shown, the circuit breaker has tripped. c Tripped Reset Tripped Reset PROBLEM: The power turns off during use SOLUTION: a. Reinsert the key fully into the console. Locate the Reed Switch (63) and the Magnet (65) on SOLUTION: a. Make sure that the surge protector.... Check the batteries in . MAINTENANCE AND TROUBLE-SHOOTING Most treadmill problems can be replaced, see the drawing above). Make sure that the key is plugged in . PROBLEM: The displays of drained batteries. c. Remove the screws from the console. Carefully remove the hood. Retighten the...
English Manual
Page 13
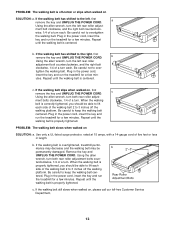
... belt. Be careful not to keep the walking belt centered. Plug in the power cord, insert the key and run the treadmill for a few min- Plug in the power cord, insert the key and run the treadmill for a few minutes. Repeat until the walking belt is properly tightened. Use only... slows when walked on SOLUTION: a. Using the allen wrench, turn each side of five feet or less in the power cord, insert the key and run the treadmill for a few minutes. Be careful to the left rear roller adjustment bolt counterclockwise, and the right bolt clockwise, 1/4 of a ...
... belt. Be careful not to keep the walking belt centered. Plug in the power cord, insert the key and run the treadmill for a few min- Plug in the power cord, insert the key and run the treadmill for a few minutes. Repeat until the walking belt is properly tightened. Use only... slows when walked on SOLUTION: a. Using the allen wrench, turn each side of five feet or less in the power cord, insert the key and run the treadmill for a few minutes. Be careful to the left rear roller adjustment bolt counterclockwise, and the right bolt clockwise, 1/4 of a ...
English Manual
Page 14
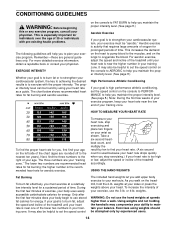
... your sides or press the weights above your physician. EXERCISE INTENSITY Whether your goal is to burn fat or to strengthen your cardiovascular system, the key to achieving the desired results is to strengthen your cardiovascular system, your "training zone." The lower two numbers are rounded off to plan your age...
... your sides or press the weights above your physician. EXERCISE INTENSITY Whether your goal is to burn fat or to strengthen your cardiovascular system, the key to achieving the desired results is to strengthen your cardiovascular system, your "training zone." The lower two numbers are rounded off to plan your age...
English Manual
Page 15
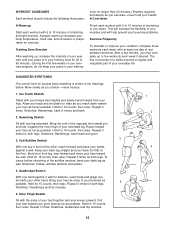
... to make exercise a regular and enjoyable part of the other hand. Bend your front leg, lean forward and move your hips toward your breath. The key to your extended leg. Quadriceps Stretch With one leg in preparation for several basic stretches is to 60 minutes. (During the first few months, you...
... to make exercise a regular and enjoyable part of the other hand. Bend your front leg, lean forward and move your hips toward your breath. The key to your extended leg. Quadriceps Stretch With one leg in preparation for several basic stretches is to 60 minutes. (During the first few months, you...
English Manual
Page 16
...display models. Some states do not allow the exclusion or limitation of this warranty is authorized by ICON. To help us assist you . WESLO is limited in connection with the use or performance of the product or damages with respect to any product or damage to a product ...: • The MODEL NUMBER of the product (WLTL41584) • The NAME of the product (WESLO CADENCE® DL15 treadmill) • The SERIAL NUMBER of the product (see the front cover of this manual) • The KEY NUMBER and DESCRIPTION of ICON Health & Fitness, Inc. until 6 p.m. ORDERING REPLACEMENT PARTS To order ...
...display models. Some states do not allow the exclusion or limitation of this warranty is authorized by ICON. To help us assist you . WESLO is limited in connection with the use or performance of the product or damages with respect to any product or damage to a product ...: • The MODEL NUMBER of the product (WLTL41584) • The NAME of the product (WESLO CADENCE® DL15 treadmill) • The SERIAL NUMBER of the product (see the front cover of this manual) • The KEY NUMBER and DESCRIPTION of ICON Health & Fitness, Inc. until 6 p.m. ORDERING REPLACEMENT PARTS To order ...

English Manual
Page 18
.... Specifications are subject to change without notice. Weight 20 2 2-lb. Weight 18 1 Storage Latch 19 2 3-lb. WLTL41584 R0600A Key No. Qty. See the back cover of the user's manual for information about ordering replacement parts. Qty. PART LIST-Model No. Weight...1/4" Washer 23 4 1/4" x 1" Bolt 24 24 Screw 25 1 Speed Potentiometer 26 1 Speed Control 27 1 Console Assembly 28 1 Wire Harness 29 1 Key/Clip 30 1 Left Handrail 31 1 Upright Base 32 1 Right Handrail 33 1 Upright Plug 34 4 3/8" Nut 35 4 Frame Pivot Washer 36 2 Frame ...
.... Specifications are subject to change without notice. Weight 20 2 2-lb. Weight 18 1 Storage Latch 19 2 3-lb. WLTL41584 R0600A Key No. Qty. See the back cover of the user's manual for information about ordering replacement parts. Qty. PART LIST-Model No. Weight...1/4" Washer 23 4 1/4" x 1" Bolt 24 24 Screw 25 1 Speed Potentiometer 26 1 Speed Control 27 1 Console Assembly 28 1 Wire Harness 29 1 Key/Clip 30 1 Left Handrail 31 1 Upright Base 32 1 Right Handrail 33 1 Upright Plug 34 4 3/8" Nut 35 4 Frame Pivot Washer 36 2 Frame ...


