

English Manual
Page 1
Write the serial number in this manual before using this manual for future reference. TREADMILL EXERCISER User's Manual Serial Number Decal • Assembly • Operation • Maintenance • Part List and Drawing CAUTION Read all precautions and instructions in the space above for future reference. Save this equipment. Model No. 831.293020 Serial No. Sears, Roebuck and Co., Hoffman Estates, IL 60179
Write the serial number in this manual before using this manual for future reference. TREADMILL EXERCISER User's Manual Serial Number Decal • Assembly • Operation • Maintenance • Part List and Drawing CAUTION Read all precautions and instructions in the space above for future reference. Save this equipment. Model No. 831.293020 Serial No. Sears, Roebuck and Co., Hoffman Estates, IL 60179
English Manual
Page 2
...circuit. TABLE OF CONTENTS IMPORTANT PRECAUTIONS 2 BEFORE YOU BEGIN 4 ASSEMBLY 5 OPERATION AND ADJUSTMENT 8 HOW TO FOLD AND MOVE THE TREADMILL 10 MAINTENANCE AND TROUBLESHOOTING 12 CONDITIONING GUIDELINES 14 ORDERING REPLACEMENT PARTS Back Cover FULL 90 DAY WARRANTY Back Cover Note: An EXPLODED ...which may result in damage to use a properly functioning surge suppressor could become caught in the center of this treadmill are adequately informed of all of the treadmill. To purchase a surge suppressor, see page 8), plug the power cord into a surge suppressor (not included...
...circuit. TABLE OF CONTENTS IMPORTANT PRECAUTIONS 2 BEFORE YOU BEGIN 4 ASSEMBLY 5 OPERATION AND ADJUSTMENT 8 HOW TO FOLD AND MOVE THE TREADMILL 10 MAINTENANCE AND TROUBLESHOOTING 12 CONDITIONING GUIDELINES 14 ORDERING REPLACEMENT PARTS Back Cover FULL 90 DAY WARRANTY Back Cover Note: An EXPLODED ...which may result in damage to use a properly functioning surge suppressor could become caught in the center of this treadmill are adequately informed of all of the treadmill. To purchase a surge suppressor, see page 8), plug the power cord into a surge suppressor (not included...
English Manual
Page 3
... legible, please call toll-free 1-800-999-3756 to do so by an authorized ser- Do not attempt to raise, lower, or move the treadmill. 19. Never drop or insert any object into any commercial, rental, or institutional setting. Never remove the motor hood unless instructed to order a ...only. 24. Sears assumes no responsibility for in small increments to raise, lower, or move the treadmill until it is not in this product. Adjust the speed in -home use only. This treadmill is capable of 35 or persons with pre-existing health prob- SAVE THESE INSTRUCTIONS The decals shown...
... legible, please call toll-free 1-800-999-3756 to do so by an authorized ser- Do not attempt to raise, lower, or move the treadmill. 19. Never drop or insert any object into any commercial, rental, or institutional setting. Never remove the motor hood unless instructed to order a ...only. 24. Sears assumes no responsibility for in small increments to raise, lower, or move the treadmill until it is not in this product. Adjust the speed in -home use only. This treadmill is capable of 35 or persons with pre-existing health prob- SAVE THESE INSTRUCTIONS The decals shown...
English Manual
Page 4
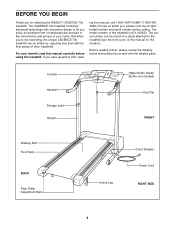
...).To help us assist you have questions after read this manual for selecting the WESLO® CADENCE 70e treadmill. And when you're not exercising, the unique CADENCE 70e treadmill can be folded up, requiring less than half the floor space of the treadmill is 831.293020. For your home. Before reading further, please review the drawing below...
...).To help us assist you have questions after read this manual for selecting the WESLO® CADENCE 70e treadmill. And when you're not exercising, the unique CADENCE 70e treadmill can be folded up, requiring less than half the floor space of the treadmill is 831.293020. For your home. Before reading further, please review the drawing below...
English Manual
Page 5
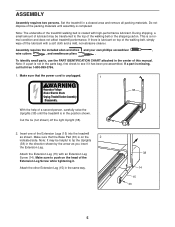
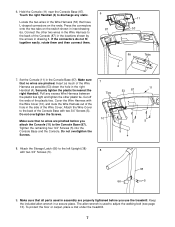
...raise the Uprights (38) until assembly is coated with a soft cloth and a mild, non-abrasive cleaner. During shipping, a small amount of the treadmill walking belt is completed. Insert one of the walking belt or the shipping carton. Make sure to the top of the Extension Legs (15) into... your own phillips screwdriver , wire cutters , and needlenose pliers . Attach the Extension Leg (15) with an Extension Leg Screw (14). Set the treadmill in the same way. 38 14 15 33 5 ASSEMBLY Assembly requires two persons. This is missing, call toll-free 1-800-999-3756. 1. Make...
...raise the Uprights (38) until assembly is coated with a soft cloth and a mild, non-abrasive cleaner. During shipping, a small amount of the treadmill walking belt is completed. Insert one of the walking belt or the shipping carton. Make sure to the top of the Extension Legs (15) into... your own phillips screwdriver , wire cutters , and needlenose pliers . Attach the Extension Leg (15) with an Extension Leg Screw (14). Set the treadmill in the same way. 38 14 15 33 5 ASSEMBLY Assembly requires two persons. This is missing, call toll-free 1-800-999-3756. 1. Make...
English Manual
Page 7
... 3/4" Screws (5). Tighten the remaining four 3/4" Screws (5) into the Console Base and the Console. To protect the floor or carpet, place a mat under the treadmill. 7 If the connectors do not fit together easily, rotate them and then connect them. 6 87 11 53 6a Tabs 4 7. Attach the Wire Cover to.... Do not overtighten the Screws. 7 Ties 10 53 87 5 5 4 11 5 8. Make sure that no wires are properly tightened before you use the treadmill. Make sure that all parts used to the back of the Wire Cover. Securely tighten the plastic tie nearest the right Handrail. Cut off the...
... 3/4" Screws (5). Tighten the remaining four 3/4" Screws (5) into the Console Base and the Console. To protect the floor or carpet, place a mat under the treadmill. 7 If the connectors do not fit together easily, rotate them and then connect them. 6 87 11 53 6a Tabs 4 7. Attach the Wire Cover to.... Do not overtighten the Screws. 7 Ties 10 53 87 5 5 4 11 5 8. Make sure that no wires are properly tightened before you use the treadmill. Make sure that all parts used to the back of the Wire Cover. Securely tighten the plastic tie nearest the right Handrail. Cut off the...
English Manual
Page 8
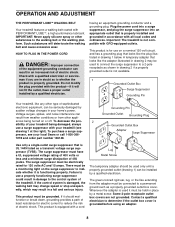
...the possibility of electric shock. Whenever the adapter is used it is not available. 1 Grounded Outlet Box Surge Suppressor Grounding Pin Your treadmill, like the plug illustrated in a fall and serious injury. Some 2-pole receptacle outlet box covers are in place by sudden voltage... surge suppressor with the product-if it should be installed by a qualified electrician. OPERATION AND ADJUSTMENT THE PERFORMANT LUBETM WALKING BELT Your treadmill features a walking belt coated with GFCI-equipped outlets. HOW TO PLUG IN THE POWER CORD DANGER: Improper connection of 450 joules....
...the possibility of electric shock. Whenever the adapter is used it is not available. 1 Grounded Outlet Box Surge Suppressor Grounding Pin Your treadmill, like the plug illustrated in a fall and serious injury. Some 2-pole receptacle outlet box covers are in place by sudden voltage... surge suppressor with the product-if it should be installed by a qualified electrician. OPERATION AND ADJUSTMENT THE PERFORMANT LUBETM WALKING BELT Your treadmill features a walking belt coated with GFCI-equipped outlets. HOW TO PLUG IN THE POWER CORD DANGER: Improper connection of 450 joules....

English Manual
Page 9
When the key is removed from the console. Make sure that the tab locks into the con- band of the treadmill. Test the clip by carefully taking a few steps backward until the key is pulled from the console, the walking belt will stop. • Adjust... the Tab console as needed. 9 Press two batteries into the console. Put only sealable water bottles in (see the drawing below) while using the treadmill. Batteries mended. Make sure that the power cord is properly plugged in the water bottle holders. STEP-BY-STEP CONSOLE OPERATION Before operating the console...
When the key is removed from the console. Make sure that the tab locks into the con- band of the treadmill. Test the clip by carefully taking a few steps backward until the key is pulled from the console, the walking belt will stop. • Adjust... the Tab console as needed. 9 Press two batteries into the console. Put only sealable water bottles in (see the drawing below) while using the treadmill. Batteries mended. Make sure that the power cord is properly plugged in the water bottle holders. STEP-BY-STEP CONSOLE OPERATION Before operating the console...
English Manual
Page 10
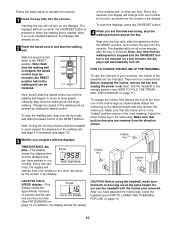
... you have burned. (See FAT BURNING on page 11). After you are inserted from one number to the storage position (see HOW TO LOWER THE TREADMILL FOR USE on . 2 Reset the speed control and start the walking belt. Follow the steps below . Inserting the key will change from the console...that the incline pin is not pressed for a few minutes, the displays will turn off a few sec- HOW TO CHANGE THE INCLINE OF THE TREADMILL To vary the intensity of your progress with the incline pins removed. Before changing the incline, remove the key and unplug the power cord. Adjust...
... you have burned. (See FAT BURNING on page 11). After you are inserted from one number to the storage position (see HOW TO LOWER THE TREADMILL FOR USE on . 2 Reset the speed control and start the walking belt. Follow the steps below . Inserting the key will change from the console...that the incline pin is not pressed for a few minutes, the displays will turn off a few sec- HOW TO CHANGE THE INCLINE OF THE TREADMILL To vary the intensity of your progress with the incline pins removed. Before changing the incline, remove the key and unplug the power cord. Adjust...

English Manual
Page 11
... to the position shown and hold it is resting in temperatures above . Storage Latch Catch Closed HOW TO MOVE THE TREADMILL Before moving the treadmill. Carefully move the treadmill. 1. Make sure that the storage latch is fully engaged over the catch. 1. Refer to the vertical position. 2....possibility of injury, bend your legs and keep your right hand as described above. Hold the treadmill with your back straight. Raise the treadmill about halfway to drawing 1. Raise the treadmill until the frame and foot rail are past the storage latch. 2. To protect the floor ...
... to the position shown and hold it is resting in temperatures above . Storage Latch Catch Closed HOW TO MOVE THE TREADMILL Before moving the treadmill. Carefully move the treadmill. 1. Make sure that the storage latch is fully engaged over the catch. 1. Refer to the vertical position. 2....possibility of injury, bend your legs and keep your right hand as described above. Hold the treadmill with your back straight. Raise the treadmill about halfway to drawing 1. Raise the treadmill until the frame and foot rail are past the storage latch. 2. To protect the floor ...
English Manual
Page 12
...Switch is plugged into a properly grounded outlet (see 1. Make sure that the power cord is about 1/8". Check the circuit breaker located on the treadmill frame near the power cord. c. b. Reinsert the key fully into the console. PROBLEM: The displays of drained batteries. Check the batteries in... (13) and the Magnet (63) on page 8. Make sure that applies, and follow the steps listed. MAINTENANCE AND TROUBLESHOOTING Most treadmill problems can be solved by following the simple steps below. Use only a single-outlet surge suppressor that the surge suppressor is fully inserted...
...Switch is plugged into a properly grounded outlet (see 1. Make sure that the power cord is about 1/8". Check the circuit breaker located on the treadmill frame near the power cord. c. b. Reinsert the key fully into the console. PROBLEM: The displays of drained batteries. Check the batteries in... (13) and the Magnet (63) on page 8. Make sure that applies, and follow the steps listed. MAINTENANCE AND TROUBLESHOOTING Most treadmill problems can be solved by following the simple steps below. Use only a single-outlet surge suppressor that the surge suppressor is fully inserted...
English Manual
Page 13
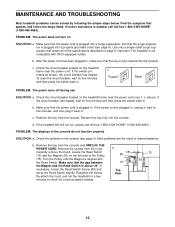
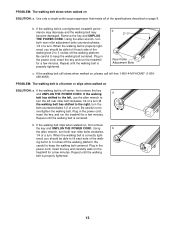
...THE POWER CORD. if the walking belt has shifted to keep the walking belt centered. Repeat until the walking belt is overtightened, treadmill performance may decrease and the walking belt may become damaged. If the walking belt is properly tightened. 13 Be careful to 3 ... shifted to the left rear roller bolt clockwise 1/2 of a turn ; Be careful not to 3 inches off -center or slips when walked on the treadmill for a few minutes. b. Using b the allen wrench, turn both rear roller adjustment bolts counterclockwise, 1/4 of a turn the left , use the...
...THE POWER CORD. if the walking belt has shifted to keep the walking belt centered. Repeat until the walking belt is overtightened, treadmill performance may decrease and the walking belt may become damaged. If the walking belt is properly tightened. 13 Be careful to 3 ... shifted to the left rear roller bolt clockwise 1/2 of a turn ; Be careful not to 3 inches off -center or slips when walked on the treadmill for a few minutes. b. Using b the allen wrench, turn both rear roller adjustment bolts counterclockwise, 1/4 of a turn the left , use the...

English Manual
Page 14
...control on your heart rate as shown. the highest number is activity that requires large amounts of oxygen for prolonged periods of the treadmill until your heart rate is near the highest number in preparation for fat burning; It may also be found by ten to ...level can be helpful to the muscles, and on page 15). Aerobic exercise is the recommended heart rate for a sustained period of the treadmill accordingly. The three numbers are recommended heart rates for exercise. 14 WORKOUT GUIDELINES A well-rounded workout includes the following guidelines will help you...
...control on your heart rate as shown. the highest number is activity that requires large amounts of oxygen for prolonged periods of the treadmill until your heart rate is near the highest number in preparation for fat burning; It may also be found by ten to ...level can be helpful to the muscles, and on page 15). Aerobic exercise is the recommended heart rate for a sustained period of the treadmill accordingly. The three numbers are recommended heart rates for exercise. 14 WORKOUT GUIDELINES A well-rounded workout includes the following guidelines will help you...

English Manual
Page 19
... 90 days from state to defect in material or workmanship in USA © 2003 Sears, Roebuck and Co. This warranty does not apply when the Treadmill Exerciser is used commercially or for rental purposes. This warranty gives you specific legal rights, and you may also have other rights which vary from... purchase, if failure occurs due to state. Sears, Roebuck and Co., Dept. 817WA, Hoffman Estates, IL 60179 Part No. 191273 R0203A Printed in this Sears Treadmill Exerciser, contact the nearest Sears Service Center throughout the United States and Sears will repair or replace the...
... 90 days from state to defect in material or workmanship in USA © 2003 Sears, Roebuck and Co. This warranty does not apply when the Treadmill Exerciser is used commercially or for rental purposes. This warranty gives you specific legal rights, and you may also have other rights which vary from... purchase, if failure occurs due to state. Sears, Roebuck and Co., Dept. 817WA, Hoffman Estates, IL 60179 Part No. 191273 R0203A Printed in this Sears Treadmill Exerciser, contact the nearest Sears Service Center throughout the United States and Sears will repair or replace the...


