

English Manual
Page 1
Model No. 831.293020 Serial No. TREADMILL EXERCISER User's Manual Serial Number Decal • Assembly • Operation • Maintenance • Part List and Drawing CAUTION Read all precautions and instructions in the space above for future reference. Save this equipment. Write the serial number in this manual before using this manual for future reference. Sears, Roebuck and Co., Hoffman Estates, IL 60179
Model No. 831.293020 Serial No. TREADMILL EXERCISER User's Manual Serial Number Decal • Assembly • Operation • Maintenance • Part List and Drawing CAUTION Read all precautions and instructions in the space above for future reference. Save this equipment. Write the serial number in this manual before using this manual for future reference. Sears, Roebuck and Co., Hoffman Estates, IL 60179
English Manual
Page 2
... exercise clothing when using the treadmill. 2 If the control system is being administered. 6. Athletic support clothes are recommended for both men and women. TABLE OF CONTENTS IMPORTANT PRECAUTIONS 2 BEFORE YOU BEGIN 4 ASSEMBLY 5 OPERATION AND ADJUSTMENT 8 HOW TO FOLD AND MOVE THE TREADMILL 10 MAINTENANCE AND TROUBLESHOOTING 12 CONDITIONING GUIDELINES 14 ORDERING REPLACEMENT PARTS Back Cover FULL 90 DAY WARRANTY Back Cover Note: An EXPLODED DRAWING and a PART LIST are attached...
... exercise clothing when using the treadmill. 2 If the control system is being administered. 6. Athletic support clothes are recommended for both men and women. TABLE OF CONTENTS IMPORTANT PRECAUTIONS 2 BEFORE YOU BEGIN 4 ASSEMBLY 5 OPERATION AND ADJUSTMENT 8 HOW TO FOLD AND MOVE THE TREADMILL 10 MAINTENANCE AND TROUBLESHOOTING 12 CONDITIONING GUIDELINES 14 ORDERING REPLACEMENT PARTS Back Cover FULL 90 DAY WARRANTY Back Cover Note: An EXPLODED DRAWING and a PART LIST are attached...
English Manual
Page 3
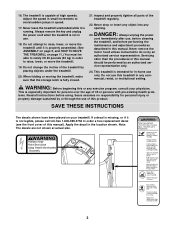
... the decal in speed. 17. Inspect and properly tighten all instructions before Assembly /Disassembly. 3 Always unplug the power cord immediately after use, before cleaning the treadmill, and before performing the maintenance and adjustment procedures described in this manual). Servicing other than the procedures in this treadmill in order to raise, lower, or move the treadmill. 19. Do not use . 18. Sears assumes no responsibility for in use this manual should be...
... the decal in speed. 17. Inspect and properly tighten all instructions before Assembly /Disassembly. 3 Always unplug the power cord immediately after use, before cleaning the treadmill, and before performing the maintenance and adjustment procedures described in this manual). Servicing other than the procedures in this treadmill in order to raise, lower, or move the treadmill. 19. Do not use . 18. Sears assumes no responsibility for in use this manual should be...
English Manual
Page 4
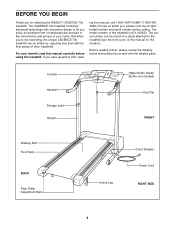
... the location). For your home. If you enjoy an excellent form of cardiovascular exercise in the convenience and privacy of this manual for selecting the WESLO® CADENCE 70e treadmill. Console Handrail Storage Latch Upright Water Bottle Holder (Bottle not included) Key/Clip FRONT Walking Belt Foot Rails BACK Rear Roller Adjustment Bolts Incline Leg Circuit Breaker Power Cord RIGHT SIDE 4 The model number of other treadmills. And when you're not exercising, the unique CADENCE 70e treadmill can be folded up...
... the location). For your home. If you enjoy an excellent form of cardiovascular exercise in the convenience and privacy of this manual for selecting the WESLO® CADENCE 70e treadmill. Console Handrail Storage Latch Upright Water Bottle Holder (Bottle not included) Key/Clip FRONT Walking Belt Foot Rails BACK Rear Roller Adjustment Bolts Incline Leg Circuit Breaker Power Cord RIGHT SIDE 4 The model number of other treadmills. And when you're not exercising, the unique CADENCE 70e treadmill can be folded up...
English Manual
Page 5
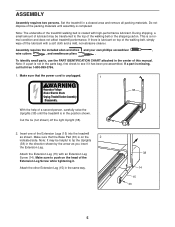
... the power cord is in the position shown. Make sure to the top of the Extension Leg Screw while tightening it has been pre-assembled. ASSEMBLY Assembly requires two persons. Set the treadmill in the same way. 38 14 15 33 5 To identify small parts, use the PART IDENTIFICATION CHART attached in the direction shown by the arrow as shown. With the help of the treadmill walking belt is...
... the power cord is in the position shown. Make sure to the top of the Extension Leg Screw while tightening it has been pre-assembled. ASSEMBLY Assembly requires two persons. Set the treadmill in the same way. 38 14 15 33 5 To identify small parts, use the PART IDENTIFICATION CHART attached in the direction shown by the arrow as shown. With the help of the treadmill walking belt is...

English Manual
Page 6
... 4. The Battery Cover 5 should pivot down, away from the Console Base. 87 Hinges 12 6 After you have started all four Screws, tighten the Screws until they are plastic ties in the side of the round hole in the brackets on the Console Base (87) and up through the hole in step 3. If necessary, use needlenose pliers to damage the Wire Harness...
... 4. The Battery Cover 5 should pivot down, away from the Console Base. 87 Hinges 12 6 After you have started all four Screws, tighten the Screws until they are plastic ties in the side of the round hole in the brackets on the Console Base (87) and up through the hole in step 3. If necessary, use needlenose pliers to damage the Wire Harness...
English Manual
Page 7
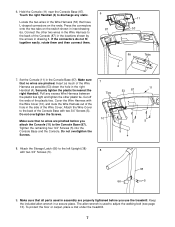
... of the Wire Cover. Cover the Wire Harness with two 3/4" Screws (5). 38 66 5 9. Make sure that all parts used to the back of the Console Base with two 3/4" Screws (5). Attach the Storage Latch (66) to discharge any excess Wire Harness between the plastic ties tight and tighten the other two wires in drawing 6. To protect the floor or carpet, place a mat under the treadmill. 7 Press the connectors...
... of the Wire Cover. Cover the Wire Harness with two 3/4" Screws (5). 38 66 5 9. Make sure that all parts used to the back of the Console Base with two 3/4" Screws (5). Attach the Storage Latch (66) to discharge any excess Wire Harness between the plastic ties tight and tighten the other two wires in drawing 6. To protect the floor or carpet, place a mat under the treadmill. 7 Press the connectors...
English Manual
Page 8
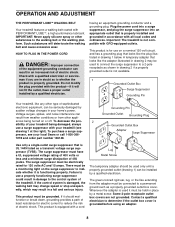
... must be a monitoring light on a nominal 120-volt circuit, and has a grounding plug that is properly grounded. There must have a proper outlet installed by a metal screw. Whenever the adapter is used to connect the surge suppressor to a 2-pole receptacle as shown in doubt as a properly grounded outlet box cover. OPERATION AND ADJUSTMENT THE PERFORMANT LUBETM WALKING BELT Your treadmill features a walking belt coated with...
... must be a monitoring light on a nominal 120-volt circuit, and has a grounding plug that is properly grounded. There must have a proper outlet installed by a metal screw. Whenever the adapter is used to connect the surge suppressor to a 2-pole receptacle as shown in doubt as a properly grounded outlet box cover. OPERATION AND ADJUSTMENT THE PERFORMANT LUBETM WALKING BELT Your treadmill features a walking belt coated with...

English Manual
Page 9
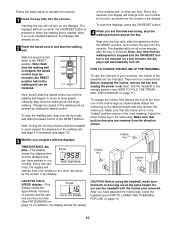
.... When the key is a thin sheet of the console, remove it before operating the console. ies are touching the springs. DIAGRAM OF THE CONSOLE Displays Speed Control Note: If there is removed from the console, the walking belt will stop. • Adjust the speed in the inset drawing. To install bat- 12 teries, open the battery cover (12) beneath the Tab console as needed. 9 Press two batteries into the console. band of the treadmill. Put only...
.... When the key is a thin sheet of the console, remove it before operating the console. ies are touching the springs. DIAGRAM OF THE CONSOLE Displays Speed Control Note: If there is removed from the console, the walking belt will stop. • Adjust the speed in the inset drawing. To install bat- 12 teries, open the battery cover (12) beneath the Tab console as needed. 9 Press two batteries into the console. band of the treadmill. Put only...
English Manual
Page 10
... walking belt is stopped and the ON/RESET button is used, inspect the alignment of the treadmill can be moved to the RESET position. Incline Pin Incline Pin Incline Pin CALS/FAT CALS/ SPEED display-This Arrow display shows the approximate numbers of the walking belt, in the display. TIME/DISTANCE display-This display Arrow shows the elapsed time and the distance that both incline legs are finished exercising, stop the walking belt, step onto the foot rails and slide the speed control to the RESET...
... walking belt is stopped and the ON/RESET button is used, inspect the alignment of the treadmill can be moved to the RESET position. Incline Pin Incline Pin Incline Pin CALS/FAT CALS/ SPEED display-This Arrow display shows the approximate numbers of the walking belt, in the display. TIME/DISTANCE display-This display Arrow shows the elapsed time and the distance that both incline legs are finished exercising, stop the walking belt, step onto the foot rails and slide the speed control to the RESET...

English Manual
Page 11
... TO FOLD AND MOVE THE TREADMILL HOW TO FOLD THE TREADMILL FOR STORAGE 1 Before folding the treadmill, unplug the power cord. To decrease the possibility of injury, bend your legs and keep your right hand as shown. Storage Latch Catch Closed HOW TO MOVE THE TREADMILL Before moving the treadmill. Hold the upper end of injury, use extreme caution while moving the treadmill, convert the treadmill to the desired location. Hold the treadmill...
... TO FOLD AND MOVE THE TREADMILL HOW TO FOLD THE TREADMILL FOR STORAGE 1 Before folding the treadmill, unplug the power cord. To decrease the possibility of injury, bend your legs and keep your right hand as shown. Storage Latch Catch Closed HOW TO MOVE THE TREADMILL Before moving the treadmill. Hold the upper end of injury, use extreme caution while moving the treadmill, convert the treadmill to the desired location. Hold the treadmill...
English Manual
Page 12
...). If the power cord is needed, call toll-free 1-800-4-MY-HOME® (1-800-469-4663). Remove the key from the console and UNPLUG THE POWER CORD. Check the batteries in . b. Make sure that applies, and follow the steps listed. Re-attach the hood, and run , please call toll-free 1-800-4-MY-HOME® (1-800-469-4663). b. PROBLEM: The displays of drained batteries. Remove the key from the console. Carefully remove the hood. Find the...
...). If the power cord is needed, call toll-free 1-800-4-MY-HOME® (1-800-469-4663). Remove the key from the console and UNPLUG THE POWER CORD. Check the batteries in . b. Make sure that applies, and follow the steps listed. Re-attach the hood, and run , please call toll-free 1-800-4-MY-HOME® (1-800-469-4663). b. PROBLEM: The displays of drained batteries. Remove the key from the console. Carefully remove the hood. Find the...
English Manual
Page 13
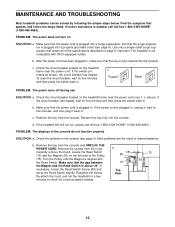
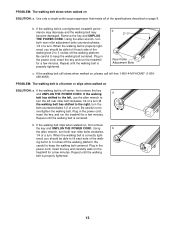
... the walking belt 2 to lift each side of a turn . Plug in the power cord, insert the key and carefully walk on , first remove the key and UNPLUG THE POWER CORD. If the walking belt is off the walking platform. Using the allen wrench, turn both rear roller bolts clockwise, 1/4 of the walk- When the walking belt is centered. Plug in the power cord, insert the key, and run the treadmill for a few minutes. Repeat until the walking belt is properly tightened...
... the walking belt 2 to lift each side of a turn . Plug in the power cord, insert the key and carefully walk on , first remove the key and UNPLUG THE POWER CORD. If the walking belt is off the walking platform. Using the allen wrench, turn both rear roller bolts clockwise, 1/4 of the walk- When the walking belt is centered. Plug in the power cord, insert the key, and run the treadmill for a few minutes. Repeat until the walking belt is properly tightened...

English Manual
Page 14
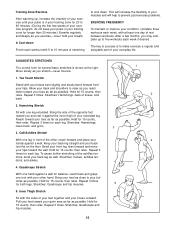
The chart below shows recommended heart rates for exercise. 14 For aerobic exercise, adjust the speed and incline of your training zone. Next, find the three numbers at the top of the treadmill until your heart rate is high performance athletic conditioning, set the speed control on your body begin to use stored fat calories for energy. The three numbers are your training zone. Fat Burning To burn fat effectively, you...
The chart below shows recommended heart rates for exercise. 14 For aerobic exercise, adjust the speed and incline of your training zone. Next, find the three numbers at the top of the treadmill until your heart rate is high performance athletic conditioning, set the speed control on your body begin to use stored fat calories for energy. The three numbers are your training zone. Fat Burning To burn fat effectively, you...
English Manual
Page 15
... of your exercise until your pulse is in your training zone for each leg. After a few months, you may complete up , increase the intensity of the other hand. Move slowly as you reach down . Hold for 15 counts, then relax. Repeat 3 times for 20 to 60 minutes. (During the first few weeks of your exercise program, do...
... of your exercise until your pulse is in your training zone for each leg. After a few months, you may complete up , increase the intensity of the other hand. Move slowly as you reach down . Hold for 15 counts, then relax. Repeat 3 times for 20 to 60 minutes. (During the first few weeks of your exercise program, do...
English Manual
Page 16
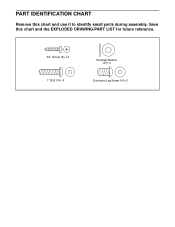
PART IDENTIFICATION CHART Remove this chart and the EXPLODED DRAWING/PART LIST for future reference. 3/4" Screw (5)-12 1" Bolt (16)-4 Handrail Washer (40)-4 Extension Leg Screw (14)-2 Save this chart and use it to identify small parts during assembly.
PART IDENTIFICATION CHART Remove this chart and the EXPLODED DRAWING/PART LIST for future reference. 3/4" Screw (5)-12 1" Bolt (16)-4 Handrail Washer (40)-4 Extension Leg Screw (14)-2 Save this chart and use it to identify small parts during assembly.
English Manual
Page 17
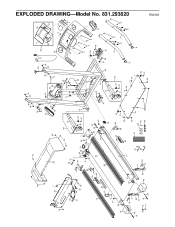
... Screw Key/Clip Hole Plug Incline Leg Handrail Endcap Wire Cover Console Battery Cover Reed Switch Extension Leg Screw Extension Leg 1" Bolt Cage Nut Motor Belt Motor Tension Bolt Motor Tension Washer Tension Star Washer Motor Pivot Nut Motor/Pulley/Flywheel/Fan Pulley/Flywheel/Fan Motor Motor Pivot Bolt 8" Cable Tie Screw Hood Hood Shield 1" Tek Screw Isolator Fastener Base Pad Motor Belly Pan Controller Frame Pivot Bolt Frame Pivot Washer Upright/Base Belt Guide Screw Roller Washer/Handrail Washer Wheel Bolt Wheel Frame Nut/Wheel Nut Extension Leg Assembly Circuit Breaker Grommet Power Cord...
... Screw Key/Clip Hole Plug Incline Leg Handrail Endcap Wire Cover Console Battery Cover Reed Switch Extension Leg Screw Extension Leg 1" Bolt Cage Nut Motor Belt Motor Tension Bolt Motor Tension Washer Tension Star Washer Motor Pivot Nut Motor/Pulley/Flywheel/Fan Pulley/Flywheel/Fan Motor Motor Pivot Bolt 8" Cable Tie Screw Hood Hood Shield 1" Tek Screw Isolator Fastener Base Pad Motor Belly Pan Controller Frame Pivot Bolt Frame Pivot Washer Upright/Base Belt Guide Screw Roller Washer/Handrail Washer Wheel Bolt Wheel Frame Nut/Wheel Nut Extension Leg Assembly Circuit Breaker Grommet Power Cord...
English Manual
Page 18
EXPLODED DRAWING-Model No. 831.293020 28 7 30 28 28 28 29 36 37 40 16 16 40 66 11 53 6 49* 5 18 22 40 16 40 85 ...
EXPLODED DRAWING-Model No. 831.293020 28 7 30 28 28 28 29 36 37 40 16 16 40 66 11 53 6 49* 5 18 22 40 16 40 85 ...

English Manual
Page 19
.... FULL 90 DAY WARRANTY For 90 days from state to defect in material or workmanship in USA © 2003 Sears, Roebuck and Co. Sears, Roebuck and Co., Dept. 817WA, Hoffman Estates, IL 60179 Part No. 191273 R0203A Printed in this Sears Treadmill Exerciser, contact the nearest Sears Service Center throughout the United States and Sears will repair or replace the Treadmill Exerciser, free of purchase...
.... FULL 90 DAY WARRANTY For 90 days from state to defect in material or workmanship in USA © 2003 Sears, Roebuck and Co. Sears, Roebuck and Co., Dept. 817WA, Hoffman Estates, IL 60179 Part No. 191273 R0203A Printed in this Sears Treadmill Exerciser, contact the nearest Sears Service Center throughout the United States and Sears will repair or replace the Treadmill Exerciser, free of purchase...


