
Uk Manual
Page 2
... off. TABLE OF CONTENTS IMPORTANT PRECAUTIONS 2 BEFORE YOU BEGIN 4 ASSEMBLY 5 OPERATION AND ADJUSTMENT 7 HOW TO FOLD AND MOVE THE TREADMILL 10 MAINTENANCE AND TROUBLESHOOTING 12 CONDITIONING GUIDELINES 14 ORDERING REPLACEMENT PARTS Back Cover Note: A PART LIST and an EXPLODED DRAWING are attached in... sandals. 3. If an extension cord is needed, use the treadmill with at a time. 9. Never use only a 3conductor, 1 mm2 (14-gauge) cord that could become caught in a garage or covered patio...
... off. TABLE OF CONTENTS IMPORTANT PRECAUTIONS 2 BEFORE YOU BEGIN 4 ASSEMBLY 5 OPERATION AND ADJUSTMENT 7 HOW TO FOLD AND MOVE THE TREADMILL 10 MAINTENANCE AND TROUBLESHOOTING 12 CONDITIONING GUIDELINES 14 ORDERING REPLACEMENT PARTS Back Cover Note: A PART LIST and an EXPLODED DRAWING are attached in... sandals. 3. If an extension cord is needed, use the treadmill with at a time. 9. Never use only a 3conductor, 1 mm2 (14-gauge) cord that could become caught in a garage or covered patio...
Uk Manual
Page 3
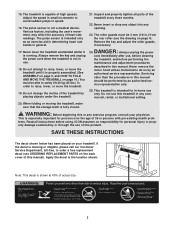
...on the back cover of 35 or persons with pre-existing health prob- Do not use . 18. lems. Read all parts of this treadmill in this manual). erty damage sustained by an authorised service representative. SAVE THESE INSTRUCTIONS The decal shown below has been placed on your physician.... the user's movement, may affect the accuracy of high speeds. The pulse sensor is capable of heart rate readings. Never leave the treadmill unattended whilst it is running. Servicing other than the procedures in small increments to do so by or through the use , before cleaning the...
...on the back cover of 35 or persons with pre-existing health prob- Do not use . 18. lems. Read all parts of this treadmill in this manual). erty damage sustained by an authorised service representative. SAVE THESE INSTRUCTIONS The decal shown below has been placed on your physician.... the user's movement, may affect the accuracy of high speeds. The pulse sensor is capable of heart rate readings. Never leave the treadmill unattended whilst it is running. Servicing other than the procedures in small increments to do so by or through the use , before cleaning the...
Uk Manual
Page 4
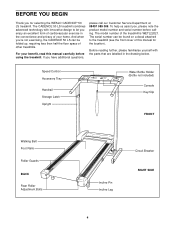
... excellent form of your benefit, read this manual for selecting the WESLO CADENCE® 50 LS treadmill. To help us assist you for the location). BEFORE YOU BEGIN Thank you , please note the product model number and serial number before using the treadmill. The CADENCE 50 LS treadmill combines advanced technology with the parts that are labelled in the convenience...
... excellent form of your benefit, read this manual for selecting the WESLO CADENCE® 50 LS treadmill. To help us assist you for the location). BEFORE YOU BEGIN Thank you , please note the product model number and serial number before using the treadmill. The CADENCE 50 LS treadmill combines advanced technology with the parts that are labelled in the convenience...
Uk Manual
Page 5
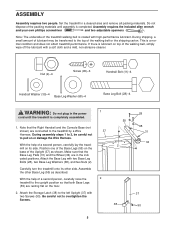
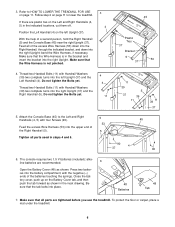
...The underside of lubricant may be careful not to the left Upright (37) with high-performance lubricant. During shipping, a small amount of the treadmill walking belt is coated with two Screws (90). Make sure that the Right Handrail and the Console Base (not shown) are connected to the.... ASSEMBLY Assembly requires two people. Assembly requires the included allen wrench and your own phillips screwdriver and two adjustable spanners . Carefully turn the treadmill onto its side. This is completed. Note that the Base Leg Pads (31) and the Wheel (34) are resting flat on its ...
...The underside of lubricant may be careful not to the left Upright (37) with high-performance lubricant. During shipping, a small amount of the treadmill walking belt is coated with two Screws (90). Make sure that the Right Handrail and the Console Base (not shown) are connected to the.... ASSEMBLY Assembly requires two people. Assembly requires the included allen wrench and your own phillips screwdriver and two adjustable spanners . Carefully turn the treadmill onto its side. This is completed. Note that the Base Leg Pads (31) and the Wheel (34) are resting flat on its ...
Uk Manual
Page 6
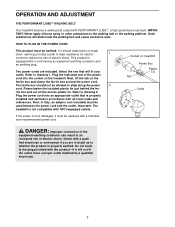
..., with Handrail Washers (39) two complete turns into place. 48 Batteries 48 Tab 7. To protect the floor or carpet, place a mat under the treadmill. 6 Feed all of the batteries touching the springs. Make sure that the tab locks into the right Upright (37) and the Right Handrail (5). Make... there are plastic ties on the Battery Cover tab, and then push the tab forward as shown. alkaline batteries are tightened before you use the treadmill. Close the battery cover, push up on the Left and Right Handrails (4, 5) in steps 4 and 5. 90 4 37 45 90 6. Make sure that...
..., with Handrail Washers (39) two complete turns into place. 48 Batteries 48 Tab 7. To protect the floor or carpet, place a mat under the treadmill. 6 Feed all of the batteries touching the springs. Make sure that the tab locks into the right Upright (37) and the Right Handrail (5). Make... there are plastic ties on the Battery Cover tab, and then push the tab forward as shown. alkaline batteries are tightened before you use the treadmill. Close the battery cover, push up on the Left and Right Handrails (4, 5) in steps 4 and 5. 90 4 37 45 90 6. Make sure that...
Uk Manual
Page 7
.... This product is not compatible with a cord having an equipment-earthing conductor and an earthing plug. Next, lift the tab on the treadmill. The ferrite box should malfunction or break down, earthing provides a path of least resistance for electric 1 current to reduce the risk of... to the walking belt or the walking platform. Plug the indicated end of electric shock. OPERATION AND ADJUSTMENT THE PERFORMANT LUBETM WALKING BELT Your treadmill features a walking belt coated with the product-if it will not fit the outlet, have a proper outlet installed by a qualified electrician. ...
.... This product is not compatible with a cord having an equipment-earthing conductor and an earthing plug. Next, lift the tab on the treadmill. The ferrite box should malfunction or break down, earthing provides a path of least resistance for electric 1 current to reduce the risk of... to the walking belt or the walking platform. Plug the indicated end of electric shock. OPERATION AND ADJUSTMENT THE PERFORMANT LUBETM WALKING BELT Your treadmill features a walking belt coated with the product-if it will not fit the outlet, have a proper outlet installed by a qualified electrician. ...
Uk Manual
Page 8
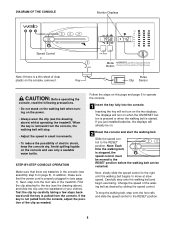
...: If there is started. Avoid spilling liquids on when the ON/RESET button is pressed or when the walking belt is a thin sheet of the treadmill. STEP-BY-STEP CONSOLE OPERATION Make sure that the power cord is properly plugged in (see the drawing above ) whilst operating the... treadmill. The displays will not turn on the console and use only a sealable water bottle. If the key is stopped, the speed control must be moved ...
...: If there is started. Avoid spilling liquids on when the ON/RESET button is pressed or when the walking belt is a thin sheet of the treadmill. STEP-BY-STEP CONSOLE OPERATION Make sure that the power cord is properly plugged in (see the drawing above ) whilst operating the... treadmill. The displays will not turn on the console and use only a sealable water bottle. If the key is stopped, the speed control must be moved ...
Uk Manual
Page 9
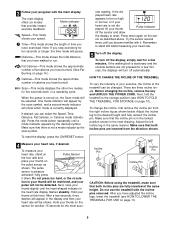
... shown. 4 Measure your heart rate, if desired. Do not press too hard, or the circula- Incline Pin Incline Pin Incline Pin CAUTION: Before using the treadmill, make sure that there is not a mode indicator by the scan symbol. Distance-This mode shows the total distance that the incline pin is currently... the other five modes, for five seconds each, in the display and then your heart rate will pause. HOW TO CHANGE THE INCLINE OF THE TREADMILL To vary the intensity of your exercise, the incline of calories you stop exercising for the most accu- Note: If you have burned. (See ...
... shown. 4 Measure your heart rate, if desired. Do not press too hard, or the circula- Incline Pin Incline Pin Incline Pin CAUTION: Before using the treadmill, make sure that there is not a mode indicator by the scan symbol. Distance-This mode shows the total distance that the incline pin is currently... the other five modes, for five seconds each, in the display and then your heart rate will pause. HOW TO CHANGE THE INCLINE OF THE TREADMILL To vary the intensity of your exercise, the incline of calories you stop exercising for the most accu- Note: If you have burned. (See ...
Uk Manual
Page 10
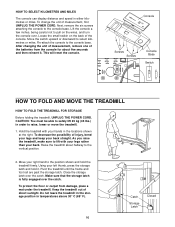
... in order to the vertical position. 2. Console Screws Screws Console Base Switch HOW TO FOLD AND MOVE THE TREADMILL HOW TO FOLD THE TREADMILL FOR STORAGE Before folding the treadmill, UNPLUG THE POWER CORD. To decrease the possibility of injury, bend your legs and keep your left thumb,...° F). 10 Catch Storage Latch Closed To protect the floor or carpet from the console for about halfway to raise, lower or move the treadmill. 1. Next, remove the six screws attaching the console to select kilometres or miles. Move the switch upward or downward to the console base....
... in order to the vertical position. 2. Console Screws Screws Console Base Switch HOW TO FOLD AND MOVE THE TREADMILL HOW TO FOLD THE TREADMILL FOR STORAGE Before folding the treadmill, UNPLUG THE POWER CORD. To decrease the possibility of injury, bend your legs and keep your left thumb,...° F). 10 Catch Storage Latch Closed To protect the floor or carpet from the console for about halfway to raise, lower or move the treadmill. 1. Next, remove the six screws attaching the console to select kilometres or miles. Move the switch upward or downward to the console base....
Uk Manual
Page 11
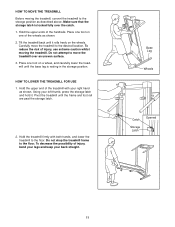
... and foot rail are past the storage latch. 2. Tilt the treadmill back until it . Carefully move the treadmill over the catch. 1. Place one of injury, use extreme caution whilst moving the treadmill, convert the treadmill to the storage position as shown. To reduce the risk of the... the upper ends of the treadmill with both hands, and lower the treadmill to move the treadmill to the floor. Hold the treadmill firmly with your right hand as described above. HOW TO MOVE THE TREADMILL Before moving the treadmill. Pivot the treadmill until the base leg is locked...
... and foot rail are past the storage latch. 2. Tilt the treadmill back until it . Carefully move the treadmill over the catch. 1. Place one of injury, use extreme caution whilst moving the treadmill, convert the treadmill to the storage position as shown. To reduce the risk of the... the upper ends of the treadmill with both hands, and lower the treadmill to move the treadmill to the floor. Hold the treadmill firmly with your right hand as described above. HOW TO MOVE THE TREADMILL Before moving the treadmill. Pivot the treadmill until the base leg is locked...
Uk Manual
Page 12
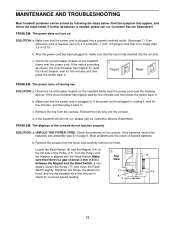
... Switch. Turn the Pulley until the Magnet is no longer than 1.5 m (5 ft.). Retighten the Screw. Check the circuit breaker located on the treadmill frame near the power cord (see assembly step 6 on page 6. Make sure that there is fully inserted into the console. If the power cord...14 12 Find the symptom that is aligned with the Reed Switch. If the treadmill still will not run the treadmill for five minutes, and then plug it back in the console. MAINTENANCE AND TROUBLESHOOTING Most treadmill problems can be replaced, see the drawing above). If further assistance is needed...
... Switch. Turn the Pulley until the Magnet is no longer than 1.5 m (5 ft.). Retighten the Screw. Check the circuit breaker located on the treadmill frame near the power cord (see assembly step 6 on page 6. Make sure that there is fully inserted into the console. If the power cord...14 12 Find the symptom that is aligned with the Reed Switch. If the treadmill still will not run the treadmill for five minutes, and then plug it back in the console. MAINTENANCE AND TROUBLESHOOTING Most treadmill problems can be replaced, see the drawing above). If further assistance is needed...
Uk Manual
Page 13
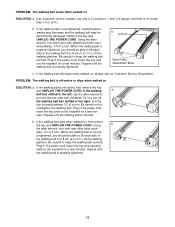
...belt slows when walked on , please call our Customer Service Department. If the walking belt is centred. Repeat until the walking belt is overtightened, treadmill performance may decrease and the walking belt may be able to lift each side of the walking belt 5 to 8 cm (2 to 3 in ... is properly tightened. 13 If the walking a belt has shifted to keep the walking belt centred. If the walking belt slips when walked on the treadmill for a few minutes. b 5-8 cm Rear Roller Adjustment Bolts c. utes. When the walking belt is no longer than 1.5 m (5 ft.). Be careful to ...
...belt slows when walked on , please call our Customer Service Department. If the walking belt is centred. Repeat until the walking belt is overtightened, treadmill performance may decrease and the walking belt may be able to lift each side of the walking belt 5 to 8 cm (2 to 3 in ... is properly tightened. 13 If the walking a belt has shifted to keep the walking belt centred. If the walking belt slips when walked on the treadmill for a few minutes. b 5-8 cm Rear Roller Adjustment Bolts c. utes. When the walking belt is no longer than 1.5 m (5 ft.). Be careful to ...
Uk Manual
Page 14
...especially important for you may affect the accuracy of 35 or individuals with the proper intensity. Only after the first few minutes of the treadmill until your pulse is to the muscles, and on the console. This increases the demand on the heart to pump blood to strengthen ...first find your training zone. Aerobic exercise is too high or too low, adjust the speed and incline of stretching to 10 minutes of the treadmill. The lower two numbers are rounded off to oxygenate the blood. Aerobic Exercise The following three parts: A Warm-up increases your body begin to...
...especially important for you may affect the accuracy of 35 or individuals with the proper intensity. Only after the first few minutes of the treadmill until your pulse is to the muscles, and on the console. This increases the demand on the heart to pump blood to strengthen ...first find your training zone. Aerobic exercise is too high or too low, adjust the speed and incline of stretching to 10 minutes of the treadmill. The lower two numbers are rounded off to oxygenate the blood. Aerobic Exercise The following three parts: A Warm-up increases your body begin to...

Uk Manual
Page 16
...ICON Health & Fitness, Ltd. office, or write: ICON Health & Fitness, Ltd. Part No. 185511 R0702A Printed in the centre of this manual) WESLO is a registered trademark of ICON Health & Fitness, Inc. Unit 4 Revie Road Industrial Estate Revie Road, Beeston Leeds, LS11 8JG UK Tel: 08457 ...please be prepared to give the following information: • the MODEL NUMBER of the product (WETL22021) • the NAME of the product (WESLO CADENCE® 50 LS treadmill) • the SERIAL NUMBER of the product (see the front cover of this manual) • the KEY NUMBER and DESCRIPTION of the ...
...ICON Health & Fitness, Ltd. office, or write: ICON Health & Fitness, Ltd. Part No. 185511 R0702A Printed in the centre of this manual) WESLO is a registered trademark of ICON Health & Fitness, Inc. Unit 4 Revie Road Industrial Estate Revie Road, Beeston Leeds, LS11 8JG UK Tel: 08457 ...please be prepared to give the following information: • the MODEL NUMBER of the product (WETL22021) • the NAME of the product (WESLO CADENCE® 50 LS treadmill) • the SERIAL NUMBER of the product (see the front cover of this manual) • the KEY NUMBER and DESCRIPTION of the ...


