
Uk Manual
Page 1
... write: ICON Health & Fitness, Ltd. If you have questions, or if there are committed to providing complete customer satisfaction. Serial Number Decal QUESTIONS? Unit 4 Revie Road Industrial Estate Revie Road Beeston Leeds, LS11 8JG UK [email protected] CAUTION Read all precautions and instructions in the space above for future reference. WETL22021 Serial No. Save this equipment. USER'S MANUAL Visit...
... write: ICON Health & Fitness, Ltd. If you have questions, or if there are committed to providing complete customer satisfaction. Serial Number Decal QUESTIONS? Unit 4 Revie Road Industrial Estate Revie Road Beeston Leeds, LS11 8JG UK [email protected] CAUTION Read all precautions and instructions in the space above for future reference. WETL22021 Serial No. Save this equipment. USER'S MANUAL Visit...
Uk Manual
Page 2
....). 8. Wear appropriate exercise clothes when using the treadmill. 2 Always hold the handrails whilst using the treadmill. TABLE OF CONTENTS IMPORTANT PRECAUTIONS 2 BEFORE YOU BEGIN 4 ASSEMBLY 5 OPERATION AND ADJUSTMENT 7 HOW TO FOLD AND MOVE THE TREADMILL 10 MAINTENANCE AND TROUBLESHOOTING 12 CONDITIONING GUIDELINES 14 ORDERING REPLACEMENT PARTS Back Cover Note: A PART LIST and an EXPLODED DRAWING are standing on the walking belt. Athletic support clothes are adequately informed of the owner to persons...
....). 8. Wear appropriate exercise clothes when using the treadmill. 2 Always hold the handrails whilst using the treadmill. TABLE OF CONTENTS IMPORTANT PRECAUTIONS 2 BEFORE YOU BEGIN 4 ASSEMBLY 5 OPERATION AND ADJUSTMENT 7 HOW TO FOLD AND MOVE THE TREADMILL 10 MAINTENANCE AND TROUBLESHOOTING 12 CONDITIONING GUIDELINES 14 ORDERING REPLACEMENT PARTS Back Cover Note: A PART LIST and an EXPLODED DRAWING are standing on the walking belt. Athletic support clothes are adequately informed of the owner to persons...
Uk Manual
Page 3
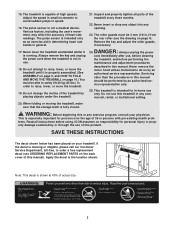
... any opening. 23. Always remove the key and unplug the power cord when the treadmill is properly assembled. (See ASSEMBLY on page 5, and HOW TO FOLD AND MOVE THE TREADMILL on the back cover of high speeds. Remove the key and adjust the roller guards, if necessary. Always unplug the power cord immediately after use . 18. Never remove the motor hood unless instructed to avoid sudden jumps in general. 17. WARNING: Before beginning this manual.
... any opening. 23. Always remove the key and unplug the power cord when the treadmill is properly assembled. (See ASSEMBLY on page 5, and HOW TO FOLD AND MOVE THE TREADMILL on the back cover of high speeds. Remove the key and adjust the roller guards, if necessary. Always unplug the power cord immediately after use . 18. Never remove the motor hood unless instructed to avoid sudden jumps in general. 17. WARNING: Before beginning this manual.
Uk Manual
Page 4
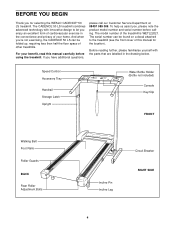
... yourself with innovative design to the treadmill (see the front cover of this manual carefully before calling. Speed Control Accessory Tray Handrail Storage Latch Upright Water Bottle Holder (Bottle not included) Console Key/Clip FRONT Walking Belt Foot Rails Roller Guards BACK Rear Roller Adjustment Bolts Incline Pin Incline Leg Circuit Breaker RIGHT SIDE 4 For your home. BEFORE YOU BEGIN Thank you 're not exercising, the CADENCE 50 LS can be folded up, requiring less than half...
... yourself with innovative design to the treadmill (see the front cover of this manual carefully before calling. Speed Control Accessory Tray Handrail Storage Latch Upright Water Bottle Holder (Bottle not included) Console Key/Clip FRONT Walking Belt Foot Rails Roller Guards BACK Rear Roller Adjustment Bolts Incline Pin Incline Leg Circuit Breaker RIGHT SIDE 4 For your home. BEFORE YOU BEGIN Thank you 're not exercising, the CADENCE 50 LS can be folded up, requiring less than half...
Uk Manual
Page 5
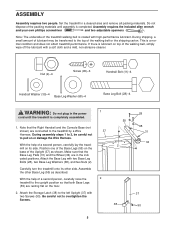
...) on the base of the treadmill walking belt is lubricant on or damage the Wire Harness. Note that the Base Leg Pads (31) and the Wheel (34) are connected to the left Upright (37) with two Base Leg Bolts (28), two Base Leg Washers (68), and two Nuts (2). Carefully turn the treadmill onto its side. Set the treadmill in the power cord until assembly is a normal condition and...
...) on the base of the treadmill walking belt is lubricant on or damage the Wire Harness. Note that the Base Leg Pads (31) and the Wheel (34) are connected to the left Upright (37) with two Base Leg Bolts (28), two Base Leg Washers (68), and two Nuts (2). Carefully turn the treadmill onto its side. Set the treadmill in the power cord until assembly is a normal condition and...
Uk Manual
Page 6
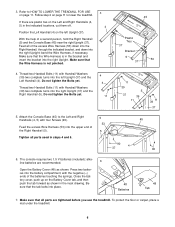
..., and down into the battery compartment, with four Screws (90). 53 Feed the excess Wire Harness (53) into the left Upright (37). Do not tighten the Bolts yet. Refer to lower the treadmill. Follow step 2 on page 11 to HOW TO LOWER THE TREADMILL FOR USE on the Battery Cover tab, and then push the tab forward as shown. Attach the Console Base (45) to the...
..., and down into the battery compartment, with four Screws (90). 53 Feed the excess Wire Harness (53) into the left Upright (37). Do not tighten the Bolts yet. Refer to lower the treadmill. Follow step 2 on page 11 to HOW TO LOWER THE TREADMILL FOR USE on the Battery Cover tab, and then push the tab forward as shown. Attach the Console Base (45) to the...
Uk Manual
Page 7
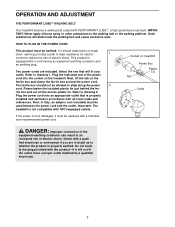
..., earthing provides a path of least resistance for electric 1 current to slide along the power 2 cord. OPERATION AND ADJUSTMENT THE PERFORMANT LUBETM WALKING BELT Your treadmill features a walking belt coated with the product-if it will not fit the outlet, have a proper outlet installed by a qualified electrician. 7 HOW TO PLUG IN THE POWER CORD This product must be replaced with a cord having an equipment-earthing conductor and...
..., earthing provides a path of least resistance for electric 1 current to slide along the power 2 cord. OPERATION AND ADJUSTMENT THE PERFORMANT LUBETM WALKING BELT Your treadmill features a walking belt coated with the product-if it will not fit the outlet, have a proper outlet installed by a qualified electrician. 7 HOW TO PLUG IN THE POWER CORD This product must be replaced with a cord having an equipment-earthing conductor and...
Uk Manual
Page 8
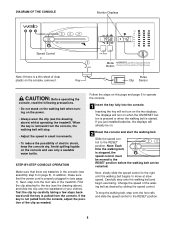
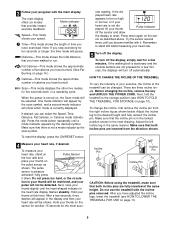
... power cord is properly plugged in (see the drawing above ) whilst operating the treadmill. If you just installed batteries, the displays will stop the walking belt, step onto the foot rails and slide the speed control to the RESET position. 8 Next, slowly slide the speed control to the key (see page 7). Key Mode Button Pulse Clip Sensor CAUTION: Before operating the console, read the following precautions. • Do not stand on the walking belt when turning...
... power cord is properly plugged in (see the drawing above ) whilst operating the treadmill. If you just installed batteries, the displays will stop the walking belt, step onto the foot rails and slide the speed control to the RESET position. 8 Next, slowly slide the speed control to the key (see page 7). Key Mode Button Pulse Clip Sensor CAUTION: Before operating the console, read the following precautions. • Do not stand on the walking belt when turning...
Uk Manual
Page 9
..., or if your heart rate is in the locked position shown in the heart rate display flashes steadily. Press down . Before changing the incline, remove the key and UNPLUG THE POWER CORD. Incline Pin Incline Pin Incline Pin CAUTION: Before using the treadmill, make sure that you stop exercising for the most accu- Note: If you have exercised. When the power is pressure activated-fully press it . Press the mode button repeatedly until the heart-shaped indicator in the...
..., or if your heart rate is in the locked position shown in the heart rate display flashes steadily. Press down . Before changing the incline, remove the key and UNPLUG THE POWER CORD. Incline Pin Incline Pin Incline Pin CAUTION: Before using the treadmill, make sure that you stop exercising for the most accu- Note: If you have exercised. When the power is pressure activated-fully press it . Press the mode button repeatedly until the heart-shaped indicator in the...
Uk Manual
Page 10
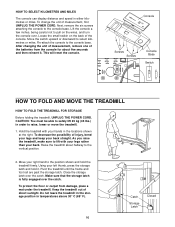
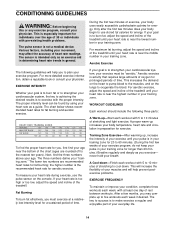
... FOLD AND MOVE THE TREADMILL HOW TO FOLD THE TREADMILL FOR STORAGE Before folding the treadmill, UNPLUG THE POWER CORD. Hold the treadmill with your legs rather than your right hand to raise, lower or move the treadmill. 1. As you raise the treadmill, make sure to the vertical position. 2. Pivot the treadmill until the frame and foot rail are past the storage latch. Locate the small switch on the wires, and turn the console...
... FOLD AND MOVE THE TREADMILL HOW TO FOLD THE TREADMILL FOR STORAGE Before folding the treadmill, UNPLUG THE POWER CORD. Hold the treadmill with your legs rather than your right hand to raise, lower or move the treadmill. 1. As you raise the treadmill, make sure to the vertical position. 2. Pivot the treadmill until the frame and foot rail are past the storage latch. Locate the small switch on the wires, and turn the console...
Uk Manual
Page 11
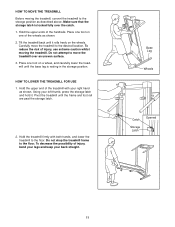
... caution whilst moving the treadmill, convert the treadmill to the desired location. Do not attempt to move the treadmill to the storage position as described above. HOW TO LOWER THE TREADMILL FOR USE 1. Pivot the treadmill until the base leg is locked fully over an uneven surface. 3. Base Leg Wheels Catch Opened Storage Latch 11 Tilt the treadmill back until it . Make sure that the storage latch is resting...
... caution whilst moving the treadmill, convert the treadmill to the desired location. Do not attempt to move the treadmill to the storage position as described above. HOW TO LOWER THE TREADMILL FOR USE 1. Pivot the treadmill until the base leg is locked fully over an uneven surface. 3. Base Leg Wheels Catch Opened Storage Latch 11 Tilt the treadmill back until it . Make sure that the storage latch is resting...
Uk Manual
Page 12
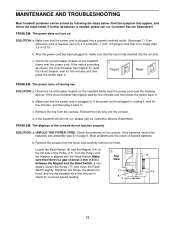
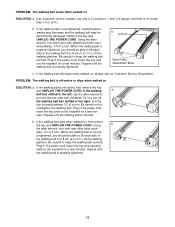
... the Screw (77) and move the Reed Switch slightly. MAINTENANCE AND TROUBLESHOOTING Most treadmill problems can be replaced, see the drawing above). b. PROBLEM: The displays of drained batteries. Remove the key from the hood, and carefully remove the hood. c Tripped Reset PROBLEM: The power turns off during use only a 3-conductor, 1 mm2 (14-gauge) cord that applies, and follow the steps listed. UNPLUG THE POWER CORD. Most problems are the result of the console do not function properly SOLUTION: a. Turn the Pulley...
... the Screw (77) and move the Reed Switch slightly. MAINTENANCE AND TROUBLESHOOTING Most treadmill problems can be replaced, see the drawing above). b. PROBLEM: The displays of drained batteries. Remove the key from the hood, and carefully remove the hood. c Tripped Reset PROBLEM: The power turns off during use only a 3-conductor, 1 mm2 (14-gauge) cord that applies, and follow the steps listed. UNPLUG THE POWER CORD. Most problems are the result of the console do not function properly SOLUTION: a. Turn the Pulley...
Uk Manual
Page 13
... walking belt 5 to 8 cm (2 to the left rear roller bolt clockwise 1/2 of a turn . b. When the walking belt is properly tightened. If the walking a belt has shifted to 3 in the power cord, insert the key and run the treadmill for a few min- Plug in .) off the walking platform. If the walking belt slips when walked on SOLUTION: a. Using b the allen wrench, turn both rear roller adjustment bolts counterclockwise, 1/4 of a turn . Using the allen wrench, turn . If the walking belt is properly tightened. 13 ly tightened...
... walking belt 5 to 8 cm (2 to the left rear roller bolt clockwise 1/2 of a turn . b. When the walking belt is properly tightened. If the walking a belt has shifted to 3 in the power cord, insert the key and run the treadmill for a few min- Plug in .) off the walking platform. If the walking belt slips when walked on SOLUTION: a. Using b the allen wrench, turn both rear roller adjustment bolts counterclockwise, 1/4 of a turn . Using the allen wrench, turn . If the walking belt is properly tightened. 13 ly tightened...
Uk Manual
Page 14
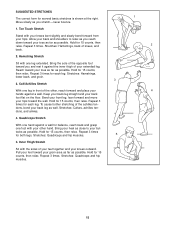
... number in your training zone for 20 to make exercise a regular and enjoyable part of exercise, your training zone. For maximum fat burning, adjust the speed and incline of heart rate readings. The chart below shows recommended heart rates for aerobic exercise. For aerobic exercise, adjust the speed and incline of the treadmill. If your heart rate is too high or too low, adjust the speed and incline of the treadmill until your heart rate is in your body uses...
... number in your training zone for 20 to make exercise a regular and enjoyable part of exercise, your training zone. For maximum fat burning, adjust the speed and incline of heart rate readings. The chart below shows recommended heart rates for aerobic exercise. For aerobic exercise, adjust the speed and incline of the treadmill. If your heart rate is too high or too low, adjust the speed and incline of the treadmill until your heart rate is in your body uses...
Uk Manual
Page 15
...thigh of the achilles tendons, bend your hips toward the wall. Hold for 15 counts, then relax. Bend your front leg, lean forward and move your back leg as possible. To cause further stretching of your but- tocks as you reach down toward your groin area as far as ...1 2 4 15 SUGGESTED STRETCHES The correct form for 15 counts, then relax. Stretches: Hamstrings, back of the other hand. Bring the sole of your feet together and your toes as far as possible. Stretches: Hamstrings, lower back, and groin. 3 3. Keep your back leg straight and your hips. Hold for 15 ...
...thigh of the achilles tendons, bend your hips toward the wall. Hold for 15 counts, then relax. Bend your front leg, lean forward and move your back leg as possible. To cause further stretching of your but- tocks as you reach down toward your groin area as far as ...1 2 4 15 SUGGESTED STRETCHES The correct form for 15 counts, then relax. Stretches: Hamstrings, back of the other hand. Bring the sole of your feet together and your toes as far as possible. Stretches: Hamstrings, lower back, and groin. 3 3. Keep your back leg straight and your hips. Hold for 15 ...
Uk Manual
Page 16
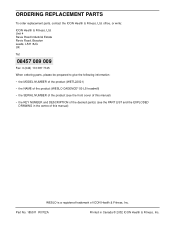
... 387 7125 When ordering parts, please be prepared to give the following information: • the MODEL NUMBER of the product (WETL22021) • the NAME of the product (WESLO CADENCE® 50 LS treadmill) • the SERIAL NUMBER of the product (see the front cover of this manual) • the KEY NUMBER and DESCRIPTION of ICON Health & Fitness, Inc. ORDERING REPLACEMENT PARTS To order replacement parts, contact the ICON Health & Fitness, Ltd. office, or write: ICON Health & Fitness, Ltd.
... 387 7125 When ordering parts, please be prepared to give the following information: • the MODEL NUMBER of the product (WETL22021) • the NAME of the product (WESLO CADENCE® 50 LS treadmill) • the SERIAL NUMBER of the product (see the front cover of this manual) • the KEY NUMBER and DESCRIPTION of ICON Health & Fitness, Inc. ORDERING REPLACEMENT PARTS To order replacement parts, contact the ICON Health & Fitness, Ltd. office, or write: ICON Health & Fitness, Ltd.
Uk Manual
Page 17
For information about ordering replacement parts, see the back cover of the User's Manual. 34 Note: Specifications are subject to change without notice. REMOVE THIS EXPLODED DRAWING AND PART LIST FROM THE MANUAL Save this EXPLODED DRAWING and PART LIST for future reference.
For information about ordering replacement parts, see the back cover of the User's Manual. 34 Note: Specifications are subject to change without notice. REMOVE THIS EXPLODED DRAWING AND PART LIST FROM THE MANUAL Save this EXPLODED DRAWING and PART LIST for future reference.
Uk Manual
Page 18
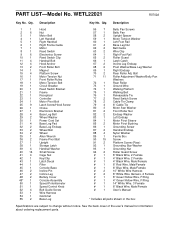
... Switch Clip Handrail Bolt Hood Anchor Front Roller Bolt Magnet Platform Screw Motor Tension Nut Front Roller/Pulley Motor Tension Bolt Circuit Breaker Reed Switch Bracket Frame Receptical Controller Motor Pivot Bolt Latch Screw/Hood Screw Choke Electronics Bracket Base Leg Bolt Wheel Washer Power Cord Set Base Leg Pad Base Leg Endcap Wheel Bolt Wheel Allen Wrench Frame Pivot Bolt Upright Storage Latch Handrail Washer Small Screw Cage Nut Key/Clip Latch Decal Filter Console Base Incline Pin Incline Leg Battery Cover Console Assembly Speed Potentiometer Speed Control Knob Belt Guide Screw Wire...
... Switch Clip Handrail Bolt Hood Anchor Front Roller Bolt Magnet Platform Screw Motor Tension Nut Front Roller/Pulley Motor Tension Bolt Circuit Breaker Reed Switch Bracket Frame Receptical Controller Motor Pivot Bolt Latch Screw/Hood Screw Choke Electronics Bracket Base Leg Bolt Wheel Washer Power Cord Set Base Leg Pad Base Leg Endcap Wheel Bolt Wheel Allen Wrench Frame Pivot Bolt Upright Storage Latch Handrail Washer Small Screw Cage Nut Key/Clip Latch Decal Filter Console Base Incline Pin Incline Leg Battery Cover Console Assembly Speed Potentiometer Speed Control Knob Belt Guide Screw Wire...
Uk Manual
Page 19
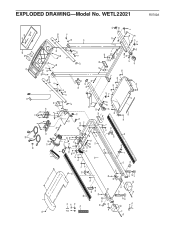
... 43 57 56 11 39 90 53 90 5 41 39 11 87 40 58 86 2 92 93 53 54 56 2 29 61 34 33 51 50 90 11 39 37 36 32 2 55 31 68 3 31 28 3 R0702A EXPLODED DRAWING...
... 43 57 56 11 39 90 53 90 5 41 39 11 87 40 58 86 2 92 93 53 54 56 2 29 61 34 33 51 50 90 11 39 37 36 32 2 55 31 68 3 31 28 3 R0702A EXPLODED DRAWING...


