

Uk Manual
Page 2
TABLE OF CONTENTS IMPORTANT PRECAUTIONS 3 BEFORE YOU BEGIN 5 ASSEMBLY 6 OPERATION AND ADJUSTMENT 10 HOW TO FOLD AND MOVE THE TREADMILL 13 MAINTENANCE AND TROUBLESHOOTING 15 CONDITIONING GUIDELINES 17 ORDERING REPLACEMENT PARTS Back Cover Note: An EXPLODED DRAWING and a PART LIST are attached in the centre of ICON Health & Fitness, Inc. 2 WESLO is a registered trademark of this manual.
TABLE OF CONTENTS IMPORTANT PRECAUTIONS 3 BEFORE YOU BEGIN 5 ASSEMBLY 6 OPERATION AND ADJUSTMENT 10 HOW TO FOLD AND MOVE THE TREADMILL 13 MAINTENANCE AND TROUBLESHOOTING 15 CONDITIONING GUIDELINES 17 ORDERING REPLACEMENT PARTS Back Cover Note: An EXPLODED DRAWING and a PART LIST are attached in the centre of ICON Health & Fitness, Inc. 2 WESLO is a registered trademark of this manual.

Uk Manual
Page 3
... sandals. 10. Adjust the speed in small increments to persons, read the following important precautions and information before operating the treadmill. 1. Athletic support clothes are used or where oxygen is turned off. When connecting the power cord (see page 10), plug the power cord into... any surface that could become caught in the treadmill. IMPORTANT PRECAUTIONS WARNING: To reduce the risk of burns, fire, electric shock, or injury to avoid sudden jumps in speed. 6. If an extension cord...
... sandals. 10. Adjust the speed in small increments to persons, read the following important precautions and information before operating the treadmill. 1. Athletic support clothes are used or where oxygen is turned off. When connecting the power cord (see page 10), plug the power cord into... any surface that could become caught in the treadmill. IMPORTANT PRECAUTIONS WARNING: To reduce the risk of burns, fire, electric shock, or injury to avoid sudden jumps in speed. 6. If an extension cord...
Uk Manual
Page 4
...-existing health problems. Read all instructions before performing the main- Apply the replacement decal in any exercise program, consult your treadmill. SAVE THESE INSTRUCTIONS The decal shown has been placed on the back cover of this manual. scribed in this or any... Servicing other than the procedures in this product. Always unplug the power cord immediately after use of this treadmill in the location shown. 4 This treadmill is especially important for personal injury or property damage sustained by an authorised service representative only. 23. WARNING:...
...-existing health problems. Read all instructions before performing the main- Apply the replacement decal in any exercise program, consult your treadmill. SAVE THESE INSTRUCTIONS The decal shown has been placed on the back cover of this manual. scribed in this or any... Servicing other than the procedures in this product. Always unplug the power cord immediately after use of this treadmill in the location shown. 4 This treadmill is especially important for personal injury or property damage sustained by an authorised service representative only. 23. WARNING:...
Uk Manual
Page 5
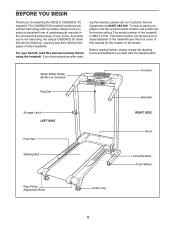
...calling. BEFORE YOU BEGIN Thank you for the location of the decal). The CADENCE 50 treadmill combines advanced technology with the labelled parts. ing this manual for selecting the WESLO CADENCE® 50 treadmill. Water Bottle Holder (Bottle not included) Console Key/Clip Handrail Storage Latch ... please review the drawing below and familiarise yourself with innovative design to the treadmill (see the front cover of the treadmill is WETL10131. And when you're not exercising, the unique CADENCE 50 treadmill can be folded up, requiring less than half the floor space of your...
...calling. BEFORE YOU BEGIN Thank you for the location of the decal). The CADENCE 50 treadmill combines advanced technology with the labelled parts. ing this manual for selecting the WESLO CADENCE® 50 treadmill. Water Bottle Holder (Bottle not included) Console Key/Clip Handrail Storage Latch ... please review the drawing below and familiarise yourself with innovative design to the treadmill (see the front cover of the treadmill is WETL10131. And when you're not exercising, the unique CADENCE 50 treadmill can be folded up, requiring less than half the floor space of your...
Uk Manual
Page 6
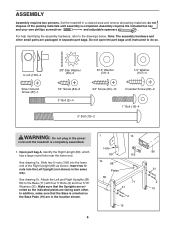
... . Do not open the part bags until instructed to the Base (71) with four 3" Bolts (2) and four 5/16" Washers (31). See drawing 1a. Set the treadmill in the same way. Identify the Right Upright (89), which has a large round hole near the lower end. Insert two Unuts into the lower end... of the packing materials until the treadmill is oriented so the Base Pads (19) are packaged in the location shown. 1 1a Hole 89 105 1b 88 Plates 89 71 31 2 19 6 89...
... . Do not open the part bags until instructed to the Base (71) with four 3" Bolts (2) and four 5/16" Washers (31). See drawing 1a. Set the treadmill in the same way. Identify the Right Upright (89), which has a large round hole near the lower end. Insert two Unuts into the lower end... of the packing materials until the treadmill is oriented so the Base Pads (19) are packaged in the location shown. 1 1a Hole 89 105 1b 88 Plates 89 71 31 2 19 6 89...
Uk Manual
Page 7
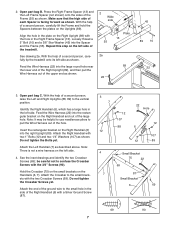
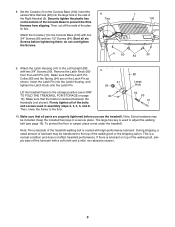
... (22) into the right Upright (89). Open part bag C. See the inset drawings and identify the two Crossbar Screws (69); With the help of the treadmill. With the help of a second person, carefully lift the Frame and hold the Spacers between the plates on the left side of a second person, carefully... tip the treadmill onto its left side. Feed the Wire Harness (22) into the Spacer and the Frame (55). Press the Right Frame Spacer (13) and the Left...
... (22) into the right Upright (89). Open part bag C. See the inset drawings and identify the two Crossbar Screws (69); With the help of the treadmill. With the help of a second person, carefully lift the Frame and hold the Spacers between the plates on the left side of a second person, carefully... tip the treadmill onto its left side. Feed the Wire Harness (22) into the Spacer and the Frame (55). Press the Right Frame Spacer (13) and the Left...
Uk Manual
Page 9
... Pin Collar (93) and the Spring (94) are properly tightened before tightening them; To protect the floor or carpet, place a mat under the treadmill. Insert the excess Wire Harness (22) into the Latch Housing, and tighten the Latch Knob onto the Latch Pin. do not overtighten the Screws. ...9. Set the Console (1) on the Latch Pin as shown. tic ties. Make sure that the frame is a normal condition and does not affect treadmill performance. Lift the treadmill frame to the Console Base (100) with a soft cloth and a mild, non-abrasive cleaner. 9 Then, lower the frame to the Left ...
... Pin Collar (93) and the Spring (94) are properly tightened before tightening them; To protect the floor or carpet, place a mat under the treadmill. Insert the excess Wire Harness (22) into the Latch Housing, and tighten the Latch Knob onto the Latch Pin. do not overtighten the Screws. ...9. Set the Console (1) on the Latch Pin as shown. tic ties. Make sure that the frame is a normal condition and does not affect treadmill performance. Lift the treadmill frame to the Console Base (100) with a soft cloth and a mild, non-abrasive cleaner. 9 Then, lower the frame to the Left ...
Uk Manual
Page 10
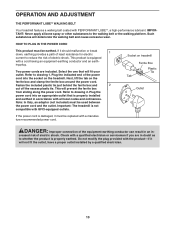
...earthing conductor can result in an in accordance with all local codes and ordinances. If it will fit your outlet. Socket on treadmill Ferrite Box Plastic Tie Tab Outlet If the power cord is properly earthed. Two power cords are in doubt as to whether ...and the outlet. Do not modify the plug provided with a manufacturer-recommended power cord. Next, lift the tab on the treadmill. Important: The treadmill is equipped with PERFORMANT LUBETM, a high-performance lubricant. Check with GFCI-equipped outlets. OPERATION AND ADJUSTMENT THE PERFORMANT LUBETM WALKING BELT...
...earthing conductor can result in an in accordance with all local codes and ordinances. If it will fit your outlet. Socket on treadmill Ferrite Box Plastic Tie Tab Outlet If the power cord is properly earthed. Two power cords are in doubt as to whether ...and the outlet. Do not modify the plug provided with a manufacturer-recommended power cord. Next, lift the tab on the treadmill. Important: The treadmill is equipped with PERFORMANT LUBETM, a high-performance lubricant. Check with GFCI-equipped outlets. OPERATION AND ADJUSTMENT THE PERFORMANT LUBETM WALKING BELT...
Uk Manual
Page 11
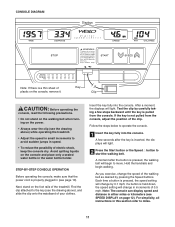
... pulled from the console. As you exercise, change the speed of your clothes. For simplicity, all instructions in (see the drawing above ) while operating the treadmill. • Adjust the speed in small increments to move. Hold the handrails and begin to avoid sudden jumps in the water bottle holder. Key Clip... belt when turning on the foot rails of plastic on the console, remove it. CONSOLE DIAGRAM Displays Note: If there is a thin sheet of the treadmill.
... pulled from the console. As you exercise, change the speed of your clothes. For simplicity, all instructions in (see the drawing above ) while operating the treadmill. • Adjust the speed in small increments to move. Hold the handrails and begin to avoid sudden jumps in the water bottle holder. Key Clip... belt when turning on the foot rails of plastic on the console, remove it. CONSOLE DIAGRAM Displays Note: If there is a thin sheet of the treadmill.
Uk Manual
Page 12
... change the incline, first pull one number to one of four numbers on the housing will flash. Adjust the other every few minutes that the treadmill is the highest. Step onto the foot rails, press the Stop button, and remove the key from one of the incline legs Arrow Fat Calories.../Calories display-This display Mode Indicator shows the approximate numbers of measurement. Next, fold the treadmill to a different position and press in on page 14). 12 Note: The console can be changed. CAUTION: Before using the...
... change the incline, first pull one number to one of four numbers on the housing will flash. Adjust the other every few minutes that the treadmill is the highest. Step onto the foot rails, press the Stop button, and remove the key from one of the incline legs Arrow Fat Calories.../Calories display-This display Mode Indicator shows the approximate numbers of measurement. Next, fold the treadmill to a different position and press in on page 14). 12 Note: The console can be changed. CAUTION: Before using the...
Uk Manual
Page 13
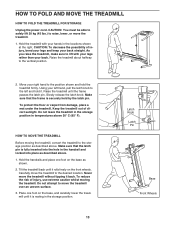
... your back straight. Hold the handrails and place one foot on the base as shown. 2. Place one foot on the base, and carefully lower the treadmill until it back. Make sure that the latch pin is securely held by the latch pin. Make sure that the frame is fully inserted into...
... your back straight. Hold the handrails and place one foot on the base as shown. 2. Place one foot on the base, and carefully lower the treadmill until it back. Make sure that the latch pin is securely held by the latch pin. Make sure that the frame is fully inserted into...
Uk Manual
Page 14
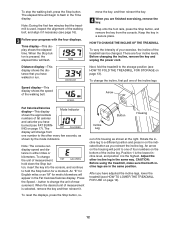
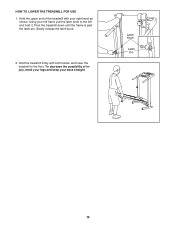
Hold the treadmill firmly with your right hand as shown. Using your back straight. Slowly release the latch knob. 2. Hold the upper end of injury, bend your legs and keep your left and hold it. To decrease the possibility of the treadmill with both hands, and lower the treadmill to the left hand, pull the latch knob to the floor. Pivot the treadmill down until the frame is past the latch pin. HOW TO LOWER THE TREADMILL FOR USE 1. Latch Knob Latch Pin 14
Hold the treadmill firmly with your right hand as shown. Using your back straight. Slowly release the latch knob. 2. Hold the upper end of injury, bend your legs and keep your left and hold it. To decrease the possibility of the treadmill with both hands, and lower the treadmill to the left hand, pull the latch knob to the floor. Pivot the treadmill down until the frame is past the latch pin. HOW TO LOWER THE TREADMILL FOR USE 1. Latch Knob Latch Pin 14
Uk Manual
Page 15
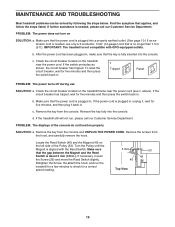
... below. Make sure that the key is not compatible with the Reed Switch. b. Reinsert the key fully into the console. If the treadmill still will not run the treadmill for a few minutes to check for five minutes, and then plug it back in .). Retighten the Screw. After the power cord has...five minutes and then press the switch back in , unplug it, wait for a correct speed reading. 3 mm 46 53 49 Top View 15 IMPORTANT: The treadmill is fully inserted into the console. If the switch protrudes as shown, the circuit breaker has tripped. Remove the screws from the hood, and carefully...
... below. Make sure that the key is not compatible with the Reed Switch. b. Reinsert the key fully into the console. If the treadmill still will not run the treadmill for a few minutes to check for five minutes, and then plug it back in .). Retighten the Screw. After the power cord has...five minutes and then press the switch back in , unplug it, wait for a correct speed reading. 3 mm 46 53 49 Top View 15 IMPORTANT: The treadmill is fully inserted into the console. If the switch protrudes as shown, the circuit breaker has tripped. Remove the screws from the hood, and carefully...
Uk Manual
Page 16
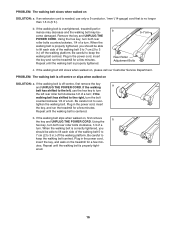
... tightened, you should be able to lift each side of the walking belt 5 to 7 cm (2 to 3 in.) off -centre or slips when walked on the treadmill for a few min- Be careful to keep the walking belt centred. Plug in the power cord, insert the key, and run the... treadmill for a few minutes. If the walking belt is properly tight- Remove the key and UNPLUG THE POWER CORD. b 5-7 cm Rear Roller Adjustment Bolts c. tighten the ...
... tightened, you should be able to lift each side of the walking belt 5 to 7 cm (2 to 3 in.) off -centre or slips when walked on the treadmill for a few min- Be careful to keep the walking belt centred. Plug in the power cord, insert the key, and run the... treadmill for a few minutes. If the walking belt is properly tight- Remove the key and UNPLUG THE POWER CORD. b 5-7 cm Rear Roller Adjustment Bolts c. tighten the ...
Uk Manual
Page 17
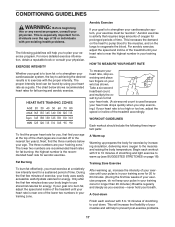
... to prevent post-exercise problems. 17 WORKOUT GUIDELINES To find the proper heart rate for you must exercise at the top of the treadmill until your heart rate is to strengthen your cardiovascular system, your "training zone." The lower two numbers are your exercise must be ... with the proper intensity. the highest number is the recommended heart rate for a sustained period of the treadmill accordingly. Only after the first few weeks of the treadmill until your training zone. Each workout should include the following guidelines will help you exercise-never hold your ...
... to prevent post-exercise problems. 17 WORKOUT GUIDELINES To find the proper heart rate for you must exercise at the top of the treadmill until your heart rate is to strengthen your cardiovascular system, your "training zone." The lower two numbers are your exercise must be ... with the proper intensity. the highest number is the recommended heart rate for a sustained period of the treadmill accordingly. Only after the first few weeks of the treadmill until your training zone. Each workout should include the following guidelines will help you exercise-never hold your ...

Uk Manual
Page 20
... ordering parts, please be prepared to give the following information: • the MODEL NUMBER of the product (WETL10131) • the NAME of the product (WESLO® CADENCE 50 treadmill) • the SERIAL NUMBER of the product (see the front cover of this manual) • the KEY NUMBER and DESCRIPTION of the part(s) (see...
... ordering parts, please be prepared to give the following information: • the MODEL NUMBER of the product (WETL10131) • the NAME of the product (WESLO® CADENCE 50 treadmill) • the SERIAL NUMBER of the product (see the front cover of this manual) • the KEY NUMBER and DESCRIPTION of the part(s) (see...


