
English Manual
Page 2
... treadmill in the treadmill. Never allow more than one person on the walking belt. Athletic support clothes are adequately informed of this manual. No other appliance should not be on any surface that meets all warnings and precautions. 2. To purchase a surge suppressor, see your local WESLO ...12. Use only a single-outlet surge suppressor that blocks air openings. Keep the treadmill indoors, away from heated surfaces. 14. The treadmill should be used or where oxygen is damaged, the walking belt may change speed, accelerate, or stop unexpectedly, which may result in damage ...
... treadmill in the treadmill. Never allow more than one person on the walking belt. Athletic support clothes are adequately informed of this manual. No other appliance should not be on any surface that meets all warnings and precautions. 2. To purchase a surge suppressor, see your local WESLO ...12. Use only a single-outlet surge suppressor that blocks air openings. Keep the treadmill indoors, away from heated surfaces. 14. The treadmill should be used or where oxygen is damaged, the walking belt may change speed, accelerate, or stop unexpectedly, which may result in damage ...
English Manual
Page 4
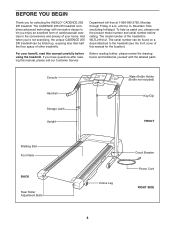
...of this manual carefully before calling. For your home. The model number of your benefit, read this manual for selecting the WESLO® CADENCE 255 DR treadmill. The serial number can be found on a decal attached to let you have questions after reading this manual, please call...form of cardiovascular exercise in the convenience and privacy of the treadmill is WLTL21104.2. Mountain Time (excluding holidays). Console Handrail Storage Latch Upright Water Bottle Holder (Bottle not included) Key/Clip FRONT Walking Belt Foot Rails BACK Rear Roller Adjustment Bolts Incline Leg ...
...of this manual carefully before calling. For your home. The model number of your benefit, read this manual for selecting the WESLO® CADENCE 255 DR treadmill. The serial number can be found on a decal attached to let you have questions after reading this manual, please call...form of cardiovascular exercise in the convenience and privacy of the treadmill is WLTL21104.2. Mountain Time (excluding holidays). Console Handrail Storage Latch Upright Water Bottle Holder (Bottle not included) Key/Clip FRONT Walking Belt Foot Rails BACK Rear Roller Adjustment Bolts Incline Leg ...
English Manual
Page 5
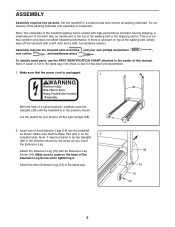
...15) with a soft cloth and a mild, non-abrasive cleaner. If there is unplugged. 1 38 With the help of the walking belt or the shipping carton. Set the treadmill in the center of the walking belt, simply wipe off the right Upright (38). 2. Note: It may be helpful to tip the Uprights (38) in..., and needlenose pliers . Make sure that the Base Pad (33) is not in the direction shown by the arrow as shown. Insert one of the treadmill walking belt is in the same way. 38 14 15 33 5 Make sure to the top of a second person, carefully raise the Uprights (38) until ...
...15) with a soft cloth and a mild, non-abrasive cleaner. If there is unplugged. 1 38 With the help of the walking belt or the shipping carton. Set the treadmill in the center of the walking belt, simply wipe off the right Upright (38). 2. Note: It may be helpful to tip the Uprights (38) in..., and needlenose pliers . Make sure that the Base Pad (33) is not in the direction shown by the arrow as shown. Insert one of the treadmill walking belt is in the same way. 38 14 15 33 5 Make sure to the top of a second person, carefully raise the Uprights (38) until ...
English Manual
Page 7
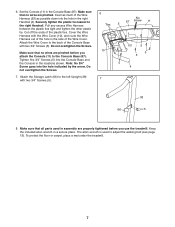
...the Screws. 7. 6. Note: No 3/4" Screw goes into the hole in the Console Base (87). Attach the Storage Latch (66) to adjust the walking belt (see page 13). Set the Console (11) in the right Handrail (4). Keep the included allen wrench in assembly are properly tightened before you use... the treadmill. To protect the floor or carpet, place a mat under the treadmill. 7 Make sure that all parts used to the left Upright (38) with two 3/4" Screws (5). Securely tighten the...
...the Screws. 7. 6. Note: No 3/4" Screw goes into the hole in the Console Base (87). Attach the Storage Latch (66) to adjust the walking belt (see page 13). Set the Console (11) in the right Handrail (4). Keep the included allen wrench in assembly are properly tightened before you use... the treadmill. To protect the floor or carpet, place a mat under the treadmill. 7 Make sure that all parts used to the left Upright (38) with two 3/4" Screws (5). Securely tighten the...
English Manual
Page 8
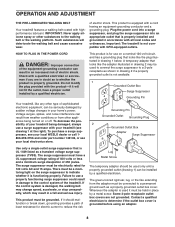
... can result from weather conditions or from the adapter must have a proper outlet installed by a metal screw. pressor, see your local WESLO dealer or call 1- 866-699-3756 and order part number 146148, or see drawing 1 at the right). There must be a ...a permanent ground such as to a 2-pole receptacle as a transient voltage surge suppressor (TVSS). OPERATION AND ADJUSTMENT THE PRE-LUBRICATED WALKING BELT Your treadmill features a walking belt coated with highperformance lubricant. If it must be used it should malfunction or break down, grounding provides a path of 450 ...
... can result from weather conditions or from the adapter must have a proper outlet installed by a metal screw. pressor, see your local WESLO dealer or call 1- 866-699-3756 and order part number 146148, or see drawing 1 at the right). There must be a ...a permanent ground such as to a 2-pole receptacle as a transient voltage surge suppressor (TVSS). OPERATION AND ADJUSTMENT THE PRE-LUBRICATED WALKING BELT Your treadmill features a walking belt coated with highperformance lubricant. If it must be used it should malfunction or break down, grounding provides a path of 450 ...
English Manual
Page 9
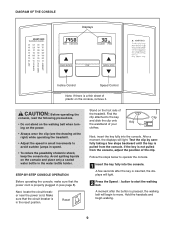
...key is inserted, the displays will light. 2 Press the Speed L button to start the walking belt. Hold the handrails and begin to the key, Clip and slide the clip onto Key the waistband of the treadmill. Next, locate the circuit breaker near the power cord. After a moment, the displays will... begin walking. 9 A few steps backward until the key is properly plugged in (see the drawing at the...
...key is inserted, the displays will light. 2 Press the Speed L button to start the walking belt. Hold the handrails and begin to the key, Clip and slide the clip onto Key the waistband of the treadmill. Next, locate the circuit breaker near the power cord. After a moment, the displays will... begin walking. 9 A few steps backward until the key is properly plugged in (see the drawing at the...
English Manual
Page 10
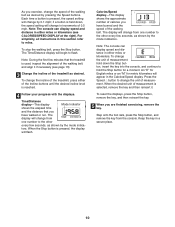
... can display speed and distance in a secure place. 10 Note: During the first few minutes that you have burned and the speed of the treadmill as desired. When the Stop button is held down the Stop button, insert the key into the console, and continue to miles. When the...button. To reset the displays, press the Stop button, remove the key, and then reinsert the key. 5 When you have walked or run. To change the incline of the treadmill, press either miles or kilometers. Time/Distance display-This display Mode Indicator shows the elapsed time and the distance that the...
... can display speed and distance in a secure place. 10 Note: During the first few minutes that you have burned and the speed of the treadmill as desired. When the Stop button is held down the Stop button, insert the key into the console, and continue to miles. When the...button. To reset the displays, press the Stop button, remove the key, and then reinsert the key. 5 When you have walked or run. To change the incline of the treadmill, press either miles or kilometers. Time/Distance display-This display Mode Indicator shows the elapsed time and the distance that the...
English Manual
Page 13
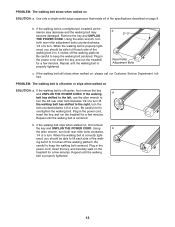
.... Plug in the power cord, insert the key, and run the treadmill for a few minutes. if the walking belt has shifted to keep the walking belt centered. b. If the walking belt slips when walked on page 8. When the walking belt is off the walking platform. Be careful to the right, turn the bolt counterclockwise 1/2 of the specifications...
.... Plug in the power cord, insert the key, and run the treadmill for a few minutes. if the walking belt has shifted to keep the walking belt centered. b. If the walking belt slips when walked on page 8. When the walking belt is off the walking platform. Be careful to the right, turn the bolt counterclockwise 1/2 of the specifications...
English Manual
Page 16
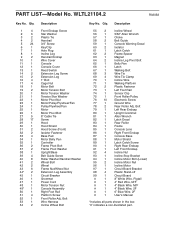
..." Allen Wrench Choke Belt Guide Console Warning Decal Isolator Latch Catch Frame Spacer Magnet Incline Leg Pivot Bolt Belly Pan Latch Walking Belt Wire Tie Wire Tie Clamp Incline Wire Walking Platform Plastic Fastener Left Foot Rail Sensor Clip Front Roller/Pulley Electronic Screw Ground Wire Rear Roller Adj. WLTL21104.2 R0205A Key...
..." Allen Wrench Choke Belt Guide Console Warning Decal Isolator Latch Catch Frame Spacer Magnet Incline Leg Pivot Bolt Belly Pan Latch Walking Belt Wire Tie Wire Tie Clamp Incline Wire Walking Platform Plastic Fastener Left Foot Rail Sensor Clip Front Roller/Pulley Electronic Screw Ground Wire Rear Roller Adj. WLTL21104.2 R0205A Key...


