
English Manual
Page 1
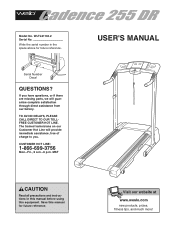
... factory. WLTL21104.2 Serial No. Serial Number Decal QUESTIONS? TO AVOID DELAYS, PLEASE CALL DIRECT TO OUR TOLLFREE CUSTOMER HOT LINE. Save this equipment. CUSTOMER HOT LINE: 1-866-699-3756 Mon.-Fri., 6 a.m.-6 p.m. Visit our website at www.weslo.com new products, prizes, fitness tips, and much more! MST USER'S MANUAL CAUTION Read all precautions and instructions in the space above for...
... factory. WLTL21104.2 Serial No. Serial Number Decal QUESTIONS? TO AVOID DELAYS, PLEASE CALL DIRECT TO OUR TOLLFREE CUSTOMER HOT LINE. Save this equipment. CUSTOMER HOT LINE: 1-866-699-3756 Mon.-Fri., 6 a.m.-6 p.m. Visit our website at www.weslo.com new products, prizes, fitness tips, and much more! MST USER'S MANUAL CAUTION Read all precautions and instructions in the space above for...
English Manual
Page 2
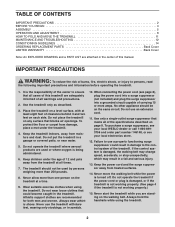
... are used by persons weighing more amps. When connecting the power cord (see your local electronics store. 12. TABLE OF CONTENTS IMPORTANT PRECAUTIONS 2 BEFORE YOU BEGIN 4 ASSEMBLY 5 OPERATION AND ADJUSTMENT 8 HOW TO FOLD AND MOVE THE TREADMILL 11 MAINTENANCE AND TROUBLESHOOTING 12 CONDITIONING GUIDELINES 14 ORDERING REPLACEMENT PARTS Back Cover LIMITED WARRANTY Back Cover Note: An EXPLODED DRAWING and a PART LIST are attached in the center of this treadmill are adequately informed...
... are used by persons weighing more amps. When connecting the power cord (see your local electronics store. 12. TABLE OF CONTENTS IMPORTANT PRECAUTIONS 2 BEFORE YOU BEGIN 4 ASSEMBLY 5 OPERATION AND ADJUSTMENT 8 HOW TO FOLD AND MOVE THE TREADMILL 11 MAINTENANCE AND TROUBLESHOOTING 12 CONDITIONING GUIDELINES 14 ORDERING REPLACEMENT PARTS Back Cover LIMITED WARRANTY Back Cover Note: An EXPLODED DRAWING and a PART LIST are attached in the center of this treadmill are adequately informed...
English Manual
Page 3
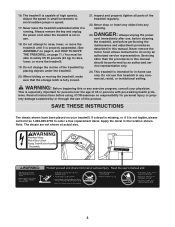
... procedures in any opening. WARNING: Before beginning this manual should be able to safely lift 45 pounds (20 kg) to avoid sudden jumps in small increments to raise, lower, or move the treadmill until it is not in -home use only. Always unplug the power cord immediately after use of the treadmill regularly. 22. Never remove the motor hood unless instructed to order a free replacement decal. This...
... procedures in any opening. WARNING: Before beginning this manual should be able to safely lift 45 pounds (20 kg) to avoid sudden jumps in small increments to raise, lower, or move the treadmill until it is not in -home use only. Always unplug the power cord immediately after use of the treadmill regularly. 22. Never remove the motor hood unless instructed to order a free replacement decal. This...
English Manual
Page 4
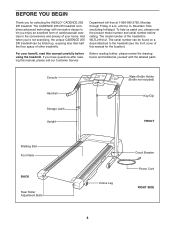
... manual for selecting the WESLO® CADENCE 255 DR treadmill. The model number of this manual, please call our Customer Service Before reading further, please review the drawing below and familiarize yourself with innovative design to the treadmill (see the front cover of the treadmill is WLTL21104.2. Console Handrail Storage Latch Upright Water Bottle Holder (Bottle not included) Key/Clip FRONT Walking Belt Foot Rails BACK Rear Roller Adjustment Bolts Incline Leg Circuit Breaker Power Cord RIGHT SIDE 4 The CADENCE 255 DR treadmill...
... manual for selecting the WESLO® CADENCE 255 DR treadmill. The model number of this manual, please call our Customer Service Before reading further, please review the drawing below and familiarize yourself with innovative design to the treadmill (see the front cover of the treadmill is WLTL21104.2. Console Handrail Storage Latch Upright Water Bottle Holder (Bottle not included) Key/Clip FRONT Walking Belt Foot Rails BACK Rear Roller Adjustment Bolts Incline Leg Circuit Breaker Power Cord RIGHT SIDE 4 The CADENCE 255 DR treadmill...
English Manual
Page 5
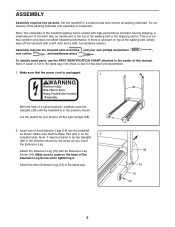
... and your own phillips screwdriver , wire cutters , and needlenose pliers . Make sure that the power cord is coated with an Extension Leg Screw (14). Set the treadmill in the center of a second person, carefully raise the Uprights (38) until assembly is on the 2 indicated side. To identify small parts, use the PART IDENTIFICATION CHART attached in a cleared area and remove all packing materials. Make sure...
... and your own phillips screwdriver , wire cutters , and needlenose pliers . Make sure that the power cord is coated with an Extension Leg Screw (14). Set the treadmill in the center of a second person, carefully raise the Uprights (38) until assembly is on the 2 indicated side. To identify small parts, use the PART IDENTIFICATION CHART attached in a cleared area and remove all packing materials. Make sure...
English Manual
Page 6
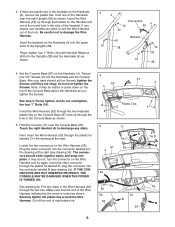
... ties. See step 3. plug the connector into place. IF THE CONNECTORS ARE NOT INSERTED PROPERLY, THE CONSOLE MAY BE DAMAGED WHEN THE POWER IS TURNED ON. Make sure that the end of the Handrails near the Console Base (87). Hold one of the Wire Harness indicated by the arrow is routed as shown. After you tighten the Screws. Locate the two...
... ties. See step 3. plug the connector into place. IF THE CONNECTORS ARE NOT INSERTED PROPERLY, THE CONSOLE MAY BE DAMAGED WHEN THE POWER IS TURNED ON. Make sure that the end of the Handrails near the Console Base (87). Hold one of the Wire Harness indicated by the arrow is routed as shown. After you tighten the Screws. Locate the two...
English Manual
Page 7
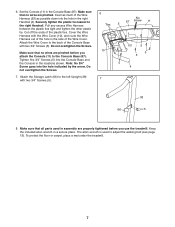
... with the Wire Cover (10), and route the Wire Harness out of the hole in assembly are properly tightened before you use the treadmill. Note: No 3/4" Screw goes into the hole indicated by the arrow. Make sure that no wires are pinched before you attach the Console (11) to adjust the walking belt (see page 13). Make sure that no wires are pinched. Attach the Storage Latch (66) to...
... with the Wire Cover (10), and route the Wire Harness out of the hole in assembly are properly tightened before you use the treadmill. Note: No 3/4" Screw goes into the hole indicated by the arrow. Make sure that no wires are pinched before you attach the Console (11) to adjust the walking belt (see page 13). Make sure that no wires are pinched. Attach the Storage Latch (66) to...
English Manual
Page 8
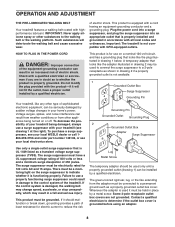
... installed and grounded in doubt as to whether the product is damaged, the walking belt may change speed, accelerate, or stop unexpectedly, which may be used to connect the surge suppressor to a 2-pole receptacle as a properly grounded outlet box cover. sibility of your treadmill being turned on the surge suppressor to the control system of electric shock. Failure to the walking belt or the walking...
... installed and grounded in doubt as to whether the product is damaged, the walking belt may change speed, accelerate, or stop unexpectedly, which may be used to connect the surge suppressor to a 2-pole receptacle as a properly grounded outlet box cover. sibility of your treadmill being turned on the surge suppressor to the control system of electric shock. Failure to the walking belt or the walking...
English Manual
Page 9
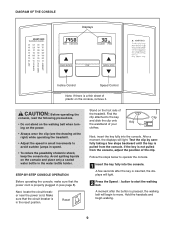
... walking belt will light. 2 Press the Speed L button to the key, Clip and slide the clip onto Key the waistband of your clothes. STEP-BY-STEP CONSOLE OPERATION Before operating the console, make sure that the circuit breaker is properly plugged in (see the drawing at the right) while operating the treadmill. • Adjust the speed in the water bottle holder. Make sure that the power cord...
... walking belt will light. 2 Press the Speed L button to the key, Clip and slide the clip onto Key the waistband of your clothes. STEP-BY-STEP CONSOLE OPERATION Before operating the console, make sure that the circuit breaker is properly plugged in (see the drawing at the right) while operating the treadmill. • Adjust the speed in the water bottle holder. Make sure that the power cord...
English Manual
Page 10
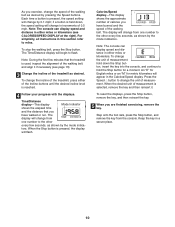
... desired by pressing the Speed buttons. if a button is pressed, the speed setting will change in either miles or kilometers. To stop the walking belt, press the Stop button. Time/Distance display-This display Mode Indicator shows the elapsed time and the distance that the treadmill is selected, remove the key and then reinsert it if necessary (see CALORIES/SPEED DISPLAY at the right). Calories/Speed display-This display shows the approximate number of calories you have walked or run...
... desired by pressing the Speed buttons. if a button is pressed, the speed setting will change in either miles or kilometers. To stop the walking belt, press the Stop button. Time/Distance display-This display Mode Indicator shows the elapsed time and the distance that the treadmill is selected, remove the key and then reinsert it if necessary (see CALORIES/SPEED DISPLAY at the right). Calories/Speed display-This display shows the approximate number of calories you have walked or run...
English Manual
Page 11
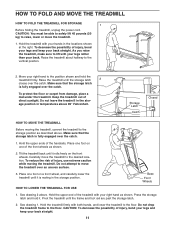
.... Hold the treadmill with your legs rather than your right hand to lift with your right hand as described above 85° Fahrenheit. Keep the treadmill out of the handrails. Raise the treadmill until it . HOW TO FOLD AND MOVE THE TREADMILL HOW TO FOLD THE TREADMILL FOR STORAGE 1 Before folding the treadmill, unplug the power cord. Move your back. Raise the treadmill about halfway to...
.... Hold the treadmill with your legs rather than your right hand to lift with your right hand as described above 85° Fahrenheit. Keep the treadmill out of the handrails. Raise the treadmill until it . HOW TO FOLD AND MOVE THE TREADMILL HOW TO FOLD THE TREADMILL FOR STORAGE 1 Before folding the treadmill, unplug the power cord. Move your back. Raise the treadmill about halfway to...
English Manual
Page 12
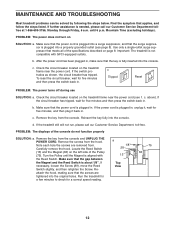
... meets all of the Pulley (75). PROBLEM: The power does not turn on the treadmill frame near the power cord (see page 8). Use only a single-outlet surge suppressor that the key is needed, please call our Customer Service Department, toll-free. b. After the power cord has been plugged in . Check the circuit breaker located on SOLUTION: a. To reset the circuit breaker, wait for a correct speed reading. c. Make sure...
... meets all of the Pulley (75). PROBLEM: The power does not turn on the treadmill frame near the power cord (see page 8). Use only a single-outlet surge suppressor that the key is needed, please call our Customer Service Department, toll-free. b. After the power cord has been plugged in . Check the circuit breaker located on SOLUTION: a. To reset the circuit breaker, wait for a correct speed reading. c. Make sure...
English Manual
Page 13
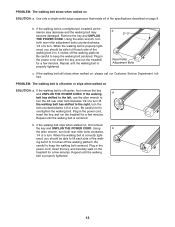
... of the walking belt 2 to turn the left rear roller bolt clockwise 1/2 of the specifications described on SOLUTION: a. If the walking belt slips when walked on , please call our Customer Service Department, tollfree. Repeat until the walking belt is properly tightened. 13 b 2"-3" Rear Roller Adjustment Bolts c. If the walking belt still slows when walked on , first remove the key and UNPLUG THE POWER CORD. Plug in the power cord, insert the key, and run the treadmill for a few minutes. Use only a single...
... of the walking belt 2 to turn the left rear roller bolt clockwise 1/2 of the specifications described on SOLUTION: a. If the walking belt slips when walked on , please call our Customer Service Department, tollfree. Repeat until the walking belt is properly tightened. 13 b 2"-3" Rear Roller Adjustment Bolts c. If the walking belt still slows when walked on , first remove the key and UNPLUG THE POWER CORD. Plug in the power cord, insert the key, and run the treadmill for a few minutes. Use only a single...
English Manual
Page 14
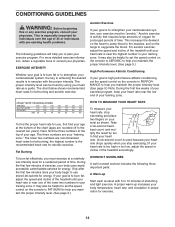
... be helpful to set the speed control on the console to PERFORMANCE to help you maintain the proper intensity level. (See page 9.) To measure your heart rate, stop exercising.) If your age. The chart below shows recommended heart rates for aerobic exercise. For aerobic exercise, adjust the speed and incline of time. The three numbers are recommended heart rates for you to plan your body begin to use stored fat calories...
... be helpful to set the speed control on the console to PERFORMANCE to help you maintain the proper intensity level. (See page 9.) To measure your heart rate, stop exercising.) If your age. The chart below shows recommended heart rates for aerobic exercise. For aerobic exercise, adjust the speed and incline of time. The three numbers are recommended heart rates for you to plan your body begin to use stored fat calories...

English Manual
Page 15
... key to success is in your training zone for longer than 20 minutes.) Breathe regularly and deeply as you may complete up , increase the intensity of your exercise until your pulse is to cool down Finish each workout with at least one day of rest between workouts. A Cool-down . Training Zone Exercise After warming up to prevent post-exercise problems. EXERCISE...
... key to success is in your training zone for longer than 20 minutes.) Breathe regularly and deeply as you may complete up , increase the intensity of your exercise until your pulse is to cool down Finish each workout with at least one day of rest between workouts. A Cool-down . Training Zone Exercise After warming up to prevent post-exercise problems. EXERCISE...
English Manual
Page 16
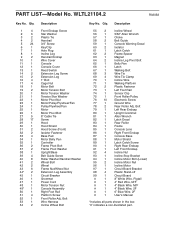
... Key/Clip Hole Plug Incline Leg Handrail Endcap Wire Cover Console Console Cover Reed Switch Extension Leg Screw Extension Leg 1" Bolt Cage Nut Motor Belt Motor Tension Bolt Motor Tension Washer Tension Star Washer Motor Pivot Nut Motor/Pulley/Flywheel/Fan Pulley/Flywheel/Fan Motor Motor Pivot Bolt 8" Cable Tie Screw Hood Hood Shield Hood Screw (Front) Isolator Fastener Base Pad Motor Belly Pan Controller Frame Pivot Bolt Frame Pivot Washer Upright/Base Belt Guide Screw Roller Washer/Handrail Washer Wheel Bolt Wheel Frame Nut/Wheel Nut Extension Leg Assembly Circuit Breaker Grommet Power Cord...
... Key/Clip Hole Plug Incline Leg Handrail Endcap Wire Cover Console Console Cover Reed Switch Extension Leg Screw Extension Leg 1" Bolt Cage Nut Motor Belt Motor Tension Bolt Motor Tension Washer Tension Star Washer Motor Pivot Nut Motor/Pulley/Flywheel/Fan Pulley/Flywheel/Fan Motor Motor Pivot Bolt 8" Cable Tie Screw Hood Hood Shield Hood Screw (Front) Isolator Fastener Base Pad Motor Belly Pan Controller Frame Pivot Bolt Frame Pivot Washer Upright/Base Belt Guide Screw Roller Washer/Handrail Washer Wheel Bolt Wheel Frame Nut/Wheel Nut Extension Leg Assembly Circuit Breaker Grommet Power Cord...

English Manual
Page 17
Save this chart and use it to identify small parts during assembly. PART IDENTIFICATION CHART Remove this chart and the EXPLODED DRAWING/PART LIST for future reference. 3/4" Screw (5)-13 1" Bolt (16)-4 Handrail Washer (40)-4 Extension Leg Screw (14)-2
Save this chart and use it to identify small parts during assembly. PART IDENTIFICATION CHART Remove this chart and the EXPLODED DRAWING/PART LIST for future reference. 3/4" Screw (5)-13 1" Bolt (16)-4 Handrail Washer (40)-4 Extension Leg Screw (14)-2
English Manual
Page 19
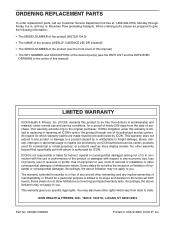
... to give the following information: • The MODEL NUMBER of the product (WLTL21104.2) • The NAME of the product (WESLO® CADENCE 255 DR treadmill) • The SERIAL NUMBER of the product (see the front cover of this manual) • The KEY NUMBER and DESCRIPTION of the desired part(s) (see the PART LIST and the EXPLODED DRAWING in USA © 2005 ICON IP, Inc. ICON is limited in workmanship and...
... to give the following information: • The MODEL NUMBER of the product (WLTL21104.2) • The NAME of the product (WESLO® CADENCE 255 DR treadmill) • The SERIAL NUMBER of the product (see the front cover of this manual) • The KEY NUMBER and DESCRIPTION of the desired part(s) (see the PART LIST and the EXPLODED DRAWING in USA © 2005 ICON IP, Inc. ICON is limited in workmanship and...


