

English Manual
Page 1
.... TO AVOID DELAYS, PLEASE CALL DIRECT TO OUR TOLLFREE CUSTOMER HOT LINE. Save this equipment. MST CAUTION Read all precautions and instructions in this manual before using this manual for future reference. Model No. Serial Number Decal USER'S MANUAL QUESTIONS? If you . Visit our website at www.weslo.com new products, prizes, fitness tips, and much more! WLTL19015 Serial No. CUSTOMER HOT LINE...
.... TO AVOID DELAYS, PLEASE CALL DIRECT TO OUR TOLLFREE CUSTOMER HOT LINE. Save this equipment. MST CAUTION Read all precautions and instructions in this manual before using this manual for future reference. Model No. Serial Number Decal USER'S MANUAL QUESTIONS? If you . Visit our website at www.weslo.com new products, prizes, fitness tips, and much more! WLTL19015 Serial No. CUSTOMER HOT LINE...
English Manual
Page 2
... part number 146148. 5. Keep children under the treadmill. 4. Do not wear loose clothes that meets all times. 7. TABLE OF CONTENTS IMPORTANT PRECAUTIONS 2 BEFORE YOU BEGIN 4 ASSEMBLY 5 OPERATION AND ADJUSTMENT 7 HOW TO FOLD AND MOVE THE TREADMILL 10 MAINTENANCE AND TROUBLESHOOTING 12 CONDITIONING GUIDELINES 14 ORDERING REPLACEMENT PARTS Back Cover LIMITED WARRANTY Back Cover Note: A PART IDENTIFICATION CHART, an EXPLODED DRAWING, and a PART LIST are attached in a fall and serious injury. 13. Use...
... part number 146148. 5. Keep children under the treadmill. 4. Do not wear loose clothes that meets all times. 7. TABLE OF CONTENTS IMPORTANT PRECAUTIONS 2 BEFORE YOU BEGIN 4 ASSEMBLY 5 OPERATION AND ADJUSTMENT 7 HOW TO FOLD AND MOVE THE TREADMILL 10 MAINTENANCE AND TROUBLESHOOTING 12 CONDITIONING GUIDELINES 14 ORDERING REPLACEMENT PARTS Back Cover LIMITED WARRANTY Back Cover Note: A PART IDENTIFICATION CHART, an EXPLODED DRAWING, and a PART LIST are attached in a fall and serious injury. 13. Use...
English Manual
Page 3
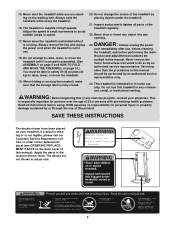
... walking belt. 15. Never remove the motor hood unless instructed to order a free replacement ¥Unplug Treadmill before using the treadmill. 16. Do not change the incline of the treadmill regularly. 22. This is intended for persons over the age of 35 or persons with pre-existing health problems. Read all parts of the treadmill by or through the use . 18. Inspect and properly tighten all instructions before Assembly decal (see ORDERING REPLACE- /Disassembly...
... walking belt. 15. Never remove the motor hood unless instructed to order a free replacement ¥Unplug Treadmill before using the treadmill. 16. Do not change the incline of the treadmill regularly. 22. This is intended for persons over the age of 35 or persons with pre-existing health problems. Read all parts of the treadmill by or through the use . 18. Inspect and properly tighten all instructions before Assembly decal (see ORDERING REPLACE- /Disassembly...
English Manual
Page 4
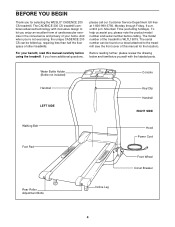
... SIDE Console Key/Clip Handrail RIGHT SIDE Walking Belt Foot Pad Hood Power Cord Front Wheel Circuit Breaker Rear Roller Adjustment Bolts Incline Leg 4 until 6 p.m. The model number of this manual carefully before calling. BEFORE YOU BEGIN Thank you , please note the product model number and serial number before using the treadmill. Mountain Time (excluding holidays). The serial number can be found on a decal attached to let you have additional questions, Before reading further, please review...
... SIDE Console Key/Clip Handrail RIGHT SIDE Walking Belt Foot Pad Hood Power Cord Front Wheel Circuit Breaker Rear Roller Adjustment Bolts Incline Leg 4 until 6 p.m. The model number of this manual carefully before calling. BEFORE YOU BEGIN Thank you , please note the product model number and serial number before using the treadmill. Mountain Time (excluding holidays). The serial number can be found on a decal attached to let you have additional questions, Before reading further, please review...
English Manual
Page 5
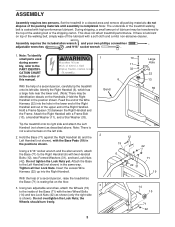
... is lubricant on the floor. 3 3. Identify the Right Handrail (6), which has a large hole near the lower end. (Note: There may be identification decals on the left side. Tighten all packing materials; ASSEMBLY Assembly requires two persons. Note: There is resting flat on top of the treadmill walking belt is completed. Attach the Right Handrail with two Handrail 6 Bolts (12), two Formed...
... is lubricant on the floor. 3 3. Identify the Right Handrail (6), which has a large hole near the lower end. (Note: There may be identification decals on the left side. Tighten all packing materials; ASSEMBLY Assembly requires two persons. Note: There is resting flat on top of the treadmill walking belt is completed. Attach the Right Handrail with two Handrail 6 Bolts (12), two Formed...

English Manual
Page 6
... end. 5. Then, tighten the three Screws. The allen wrench is clear of a second person, raise the Frame (55) to the Frame with Handrail Washers (11) into the Console Plate and the Handrails. Attach the Console Plate to adjust the walking belt (see drawing 4a above). Remove the tape from the connectors at the end of the Battery Cover (8) into the hole...
... end. 5. Then, tighten the three Screws. The allen wrench is clear of a second person, raise the Frame (55) to the Frame with Handrail Washers (11) into the Console Plate and the Handrails. Attach the Console Plate to adjust the walking belt (see drawing 4a above). Remove the tape from the connectors at the end of the Battery Cover (8) into the hole...
English Manual
Page 7
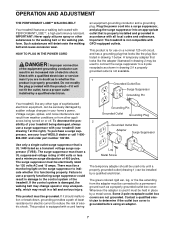
... outlet installed by sudden voltage changes in your treadmill being turned on a nominal 120-volt circuit, and has a grounding plug that is not compatible with PERFORMANT LUBETM, a high-performance lubricant. If the control system is grounded before using an adapter. 7 Whenever the adapter is used to connect the surge suppressor to determine if the outlet box cover is damaged, the walking belt may change speed or stop unexpectedly...
... outlet installed by sudden voltage changes in your treadmill being turned on a nominal 120-volt circuit, and has a grounding plug that is not compatible with PERFORMANT LUBETM, a high-performance lubricant. If the control system is grounded before using an adapter. 7 Whenever the adapter is used to connect the surge suppressor to determine if the outlet box cover is damaged, the walking belt may change speed or stop unexpectedly...
English Manual
Page 8
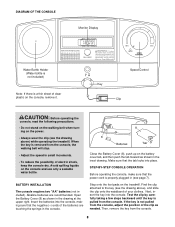
... treadmill. Avoid spilling liquids on the treadmill. Alkaline batteries are touching the springs in the console. 8 8 Batteries Tab Close the Battery Cover (8), push up on the console, remove it. Then, remove the key from the console. When the key is removed from the console, adjust the position of the clip as needed. BATTERY INSTALLATION The console requires two "AA" batteries (not included). STEP-BY-STEP CONSOLE OPERATION Before operating the console, make sure that the power cord...
... treadmill. Avoid spilling liquids on the treadmill. Alkaline batteries are touching the springs in the console. 8 8 Batteries Tab Close the Battery Cover (8), push up on the console, remove it. Then, remove the key from the console. When the key is removed from the console, adjust the position of the clip as needed. BATTERY INSTALLATION The console requires two "AA" batteries (not included). STEP-BY-STEP CONSOLE OPERATION Before operating the console, make sure that the power cord...
English Manual
Page 9
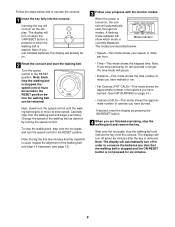
... the RESET position. When the power is removed. Turn the speed control to conserve the batteries any time that the treadmill is not pressed for ten seconds or longer, the time mode will automatically turn the speed control to the RESET position before the walking belt can be on the display. Next, slowly turn on . 2 Reset the console and start the walking belt. The modes are finished exercising, stop the walking belt, step onto the foot pads and turn off...
... the RESET position. When the power is removed. Turn the speed control to conserve the batteries any time that the treadmill is not pressed for ten seconds or longer, the time mode will automatically turn the speed control to the RESET position before the walking belt can be on the display. Next, slowly turn on . 2 Reset the console and start the walking belt. The modes are finished exercising, stop the walking belt, step onto the foot pads and turn off...
English Manual
Page 10
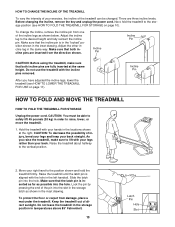
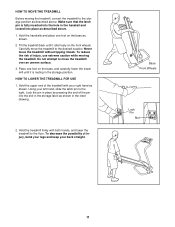
... the incline pin. Before changing the incline, remove the key and unplug the power cord. Incline Pin HOW TO FOLD AND MOVE THE TREADMILL HOW TO FOLD THE TREADMILL FOR STORAGE Unplug the power cord. CAUTION: You must be changed. As you have adjusted the incline legs, lower the treadmill (see HOW TO FOLD THE TREADMILL FOR STORAGE on page 11). Raise the treadmill about halfway to lift with your back straight. Lock the pin by pressing the end of direct...
... the incline pin. Before changing the incline, remove the key and unplug the power cord. Incline Pin HOW TO FOLD AND MOVE THE TREADMILL HOW TO FOLD THE TREADMILL FOR STORAGE Unplug the power cord. CAUTION: You must be changed. As you have adjusted the incline legs, lower the treadmill (see HOW TO FOLD THE TREADMILL FOR STORAGE on page 11). Raise the treadmill about halfway to lift with your back straight. Lock the pin by pressing the end of direct...
English Manual
Page 11
... move the treadmill to the desired location. Make sure that the latch pin is resting in the inset drawing. 2. HOW TO LOWER THE TREADMILL FOR USE 1. Place one foot on the front wheels. HOW TO MOVE THE TREADMILL Before moving the treadmill. Never move the treadmill without tipping it rolls freely on the base as shown. 2. To reduce the risk of injury, bend your legs...
... move the treadmill to the desired location. Make sure that the latch pin is resting in the inset drawing. 2. HOW TO LOWER THE TREADMILL FOR USE 1. Place one foot on the front wheels. HOW TO MOVE THE TREADMILL Before moving the treadmill. Never move the treadmill without tipping it rolls freely on the base as shown. 2. To reduce the risk of injury, bend your legs...
English Manual
Page 12
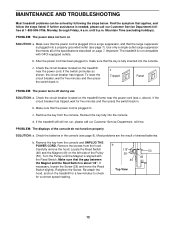
... steps listed. Find the symptom that the power cord is needed, please call our Customer Service Department, toll-free. c Tripped Reset PROBLEM: The power turns off during use SOLUTION: a. If further assistance is plugged in the console (see c. Remove the key from the console and UNPLUG THE POWER CORD. Check the circuit breaker located on the treadmill frame near the power cord. Check the circuit breaker located on the treadmill near the power cord (see page 8). MAINTENANCE AND TROUBLESHOOTING...
... steps listed. Find the symptom that the power cord is needed, please call our Customer Service Department, toll-free. c Tripped Reset PROBLEM: The power turns off during use SOLUTION: a. If further assistance is plugged in the console (see c. Remove the key from the console and UNPLUG THE POWER CORD. Check the circuit breaker located on the treadmill frame near the power cord. Check the circuit breaker located on the treadmill near the power cord (see page 8). MAINTENANCE AND TROUBLESHOOTING...
English Manual
Page 13
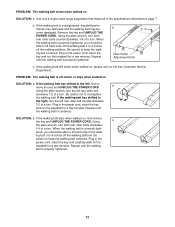
... walking belt still slows when walked on , first remove the key and UNPLUG THE POWER CORD. a Using the allen wrench, turn the left , first remove the key and UNPLUG THE POWER CORD. Plug in the power cord, insert the key and run the treadmill for a few minutes. SOLUTION: a. If the walking belt slips when walked on , please call our toll-free Customer Service Department. Using b the allen wrench, turn both rear roller bolts counterclockwise, 1/4 of a turn . When the walking belt is properly tightened. Plug...
... walking belt still slows when walked on , first remove the key and UNPLUG THE POWER CORD. a Using the allen wrench, turn the left , first remove the key and UNPLUG THE POWER CORD. Plug in the power cord, insert the key and run the treadmill for a few minutes. SOLUTION: a. If the walking belt slips when walked on , please call our toll-free Customer Service Department. Using b the allen wrench, turn both rear roller bolts counterclockwise, 1/4 of a turn . When the walking belt is properly tightened. Plug...
English Manual
Page 14
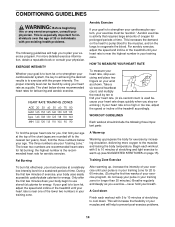
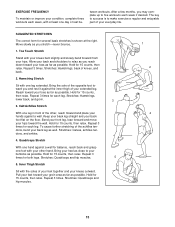
... to use stored fat calories for aerobic exercise. The three numbers are your physician. A Warm-up Warming up , increase the intensity of your age. Begin each workout with the proper intensity. CONDITIONING GUIDELINES WARNING: Before beginning this or any exercise program, consult your "training zone." Aerobic exercise is the recommended heart rate for energy. For aerobic exercise, adjust the speed and incline of the treadmill...
... to use stored fat calories for aerobic exercise. The three numbers are your physician. A Warm-up Warming up , increase the intensity of your age. Begin each workout with the proper intensity. CONDITIONING GUIDELINES WARNING: Before beginning this or any exercise program, consult your "training zone." Aerobic exercise is the recommended heart rate for energy. For aerobic exercise, adjust the speed and incline of the treadmill...
English Manual
Page 15
...one day of your back leg as possible. Bring your buttocks as possible. Stretches: Hamstrings, lower back, and groin. 3 3. Stretches: Quadriceps and hip muscles. 1 2 4 15 Repeat 3 times. SUGGESTED STRETCHES The correct form for balance, reach back and grasp one leg extended. Allow your back and...and your hips. ward you may complete up to make exercise a regular and enjoyable part of rest be- After a few months, you and rest it against a wall for several basic stretches is to five workouts each leg. Hamstring Stretch Sit with the soles of knees, and ...
...one day of your back leg as possible. Bring your buttocks as possible. Stretches: Hamstrings, lower back, and groin. 3 3. Stretches: Quadriceps and hip muscles. 1 2 4 15 Repeat 3 times. SUGGESTED STRETCHES The correct form for balance, reach back and grasp one leg extended. Allow your back and...and your hips. ward you may complete up to make exercise a regular and enjoyable part of rest be- After a few months, you and rest it against a wall for several basic stretches is to five workouts each leg. Hamstring Stretch Sit with the soles of knees, and ...

English Manual
Page 16
Console Bolt (9)-2 Screw (5)-3 Formed Washer (31)-4 Handrail Bolt (12)-4 Star Washer (33)-2 Handrail Washer (11)-4 Wheel Bolt (14)-2 Frame Bolt (10)-2 Lock Nut (42)-6 PART IDENTIFICATION CHART Remove this chart and the EXPLODED DRAWING/PART LIST for future reference. Save this chart and use it to identify small parts during assembly.
Console Bolt (9)-2 Screw (5)-3 Formed Washer (31)-4 Handrail Bolt (12)-4 Star Washer (33)-2 Handrail Washer (11)-4 Wheel Bolt (14)-2 Frame Bolt (10)-2 Lock Nut (42)-6 PART IDENTIFICATION CHART Remove this chart and the EXPLODED DRAWING/PART LIST for future reference. Save this chart and use it to identify small parts during assembly.

English Manual
Page 17
...72 1 73 2 74 1 # 1 # 1 # 1 Storage Latch Wheel Nut Motor Assembly Power Cord Large Warning Decal Reed Switch Wire Tie Clamp Reed Switch Clip Magnet Belt Roller Adj. Bolt Platform Screw Front Roller/Pulley Foot Pad (Right) Frame Walking Belt Walking Platform Incline Pin Ground Screw Ground Wire 8" Cable Tie Power Cord Grommet Incline Leg Incline Leg Washer Incline Leg Endcap Roller Adj. Washer Frame Endcap Endcap Screw Latch Pin Cage Nut Base Rear Roller Frame U-nut Warning Decal 8" White Wire, Male/Female 4" Black Wire, Male/Flag User's Manual * Includes all parts shown in the box...
...72 1 73 2 74 1 # 1 # 1 # 1 Storage Latch Wheel Nut Motor Assembly Power Cord Large Warning Decal Reed Switch Wire Tie Clamp Reed Switch Clip Magnet Belt Roller Adj. Bolt Platform Screw Front Roller/Pulley Foot Pad (Right) Frame Walking Belt Walking Platform Incline Pin Ground Screw Ground Wire 8" Cable Tie Power Cord Grommet Incline Leg Incline Leg Washer Incline Leg Endcap Roller Adj. Washer Frame Endcap Endcap Screw Latch Pin Cage Nut Base Rear Roller Frame U-nut Warning Decal 8" White Wire, Male/Female 4" Black Wire, Male/Flag User's Manual * Includes all parts shown in the box...

English Manual
Page 18
9 40 39 38 5 43* 35 36 26 46 27 69 41 26 37 5 58 21 68 51 66 67 52 72 63 64 65 51 66 67 68 50 48 28 49 73 53 73 52 52 54 56 57 55 59 28 24 27 26 60 58 29 63 64 65 47 61 34 5 32 20 45 1 2 3 54 5 74 5 70 5 11 5 11 8 9 7 10 6 23 24 25 44 30 20 62 11 33 31 17 19 5 13 12 42 19 5 16 13 15 14 18 22 33 11 10 12 14 15 16 71 19 5 42 19 5 31 17 R1203A EXPLODED DRAWING-Model No. WLTL19015
9 40 39 38 5 43* 35 36 26 46 27 69 41 26 37 5 58 21 68 51 66 67 52 72 63 64 65 51 66 67 68 50 48 28 49 73 53 73 52 52 54 56 57 55 59 28 24 27 26 60 58 29 63 64 65 47 61 34 5 32 20 45 1 2 3 54 5 74 5 70 5 11 5 11 8 9 7 10 6 23 24 25 44 30 20 62 11 33 31 17 19 5 13 12 42 19 5 16 13 15 14 18 22 33 11 10 12 14 15 16 71 19 5 42 19 5 31 17 R1203A EXPLODED DRAWING-Model No. WLTL19015
English Manual
Page 19
until 6 p.m. products used as store display models. Accordingly, the above limitation may not apply to you. You may not apply to you specific legal rights. LIMITED WARRANTY ICON Health & Fitness, Inc. (ICON), warrants this manual) WESLO is authorized by ICON. Some states do not allow limitations on how long an implied warranty lasts. All repairs for a period of ninety (90) days from state to replacing or repairing, at 1-800-999...
until 6 p.m. products used as store display models. Accordingly, the above limitation may not apply to you. You may not apply to you specific legal rights. LIMITED WARRANTY ICON Health & Fitness, Inc. (ICON), warrants this manual) WESLO is authorized by ICON. Some states do not allow limitations on how long an implied warranty lasts. All repairs for a period of ninety (90) days from state to replacing or repairing, at 1-800-999...


