
Instruction Manual
Page 1
Serial Number Decal QUESTIONS? Keep this equipment. USER'S MANUAL Visit our website at www.iconeurope.com WLEVEL1976.0 Serial No. As a manufacturer, we are missing or damaged parts, please call: 08457 089 009 Or write: ICON Health & Fitness, Ltd. If you have questions, or if there are committed to providing complete customer satisfaction. Model No. Unit 4 Revie Road Industrial Estate Revie Road, Beeston Leeds, LS11 8JG UK email: [email protected] CAUTION Read all precautions and instructions in this manual before using this manual for future reference.
Serial Number Decal QUESTIONS? Keep this equipment. USER'S MANUAL Visit our website at www.iconeurope.com WLEVEL1976.0 Serial No. As a manufacturer, we are missing or damaged parts, please call: 08457 089 009 Or write: ICON Health & Fitness, Ltd. If you have questions, or if there are committed to providing complete customer satisfaction. Model No. Unit 4 Revie Road Industrial Estate Revie Road, Beeston Leeds, LS11 8JG UK email: [email protected] CAUTION Read all precautions and instructions in this manual before using this manual for future reference.
Instruction Manual
Page 2
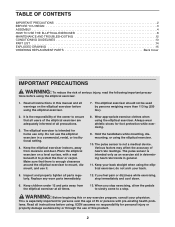
... BEGIN 3 ASSEMBLY 4 HOW TO USE THE ELLIPTICAL EXERCISER 8 MAINTENANCE AND TROUBLESHOOTING 12 CONDITIONING GUIDELINES 13 PART LIST 14 EXPLODED DRAWING 15 ORDERING REPLACEMENT PARTS Back Cover IMPORTANT PRECAUTIONS WARNING: To reduce the risk of 35 or persons with a mat beneath it . 8. Make sure that all warnings on a level surface, with pre-existing health problems. Read all instructions before using. Always wear athletic shoes for home use of...
... BEGIN 3 ASSEMBLY 4 HOW TO USE THE ELLIPTICAL EXERCISER 8 MAINTENANCE AND TROUBLESHOOTING 12 CONDITIONING GUIDELINES 13 PART LIST 14 EXPLODED DRAWING 15 ORDERING REPLACEMENT PARTS Back Cover IMPORTANT PRECAUTIONS WARNING: To reduce the risk of 35 or persons with a mat beneath it . 8. Make sure that all warnings on a level surface, with pre-existing health problems. Read all instructions before using. Always wear athletic shoes for home use of...
Instruction Manual
Page 3
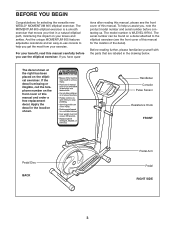
... the impact on the elliptical exerciser. If the decal is WLEVEL1976.0. The MOMENTUM 605 elliptical exerciser is a smooth exerciser that are labeled in the location shown. If you use console to the elliptical exerciser (see the front cover of this manual carefully before contacting us. To help you get the most from your knees and ankles. Handlebar Console Pulse Sensor Resistance Knob FRONT Pedal Disc BACK Pedal Arm Pedal RIGHT SIDE 3 BEFORE YOU...
... the impact on the elliptical exerciser. If the decal is WLEVEL1976.0. The MOMENTUM 605 elliptical exerciser is a smooth exerciser that are labeled in the location shown. If you use console to the elliptical exerciser (see the front cover of this manual carefully before contacting us. To help you get the most from your knees and ankles. Handlebar Console Pulse Sensor Resistance Knob FRONT Pedal Disc BACK Pedal Arm Pedal RIGHT SIDE 3 BEFORE YOU...
Instruction Manual
Page 4
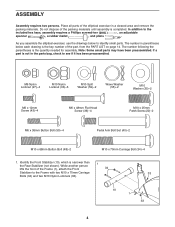
... quantity needed for assembly. Place all parts of the packing materials until assembly is completed. As you assemble the elliptical exerciser, use the drawings below each drawing is not in the parts bag, check to the Frame with two M10 x 70mm Carriage 33 Bolts (34) and two M10 Nylon Locknuts (33). 10 1 33 4 If a part is the key number of the Frame (1), attach the...
... quantity needed for assembly. Place all parts of the packing materials until assembly is completed. As you assemble the elliptical exerciser, use the drawings below each drawing is not in the parts bag, check to the Frame with two M10 x 70mm Carriage 33 Bolts (34) and two M10 Nylon Locknuts (33). 10 1 33 4 If a part is the key number of the Frame (1), attach the...
Instruction Manual
Page 5
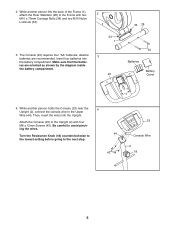
... Batteries Battery Cover 4. Insert four batteries into the Upright. ies are recommended. Then, insert the wires into the battery compartment. While another person lifts the back of the Frame (1), attach the Rear Stabilizer (28) to the Upper Wire (44). Attach the Console (23) to the next step. 43 23 Console Wire 2 18 5 2. Be careful to avoid pinching the wires. 44 Turn the Resistance Knob (18) counterclockwise to the lowest setting...
... Batteries Battery Cover 4. Insert four batteries into the Upright. ies are recommended. Then, insert the wires into the battery compartment. While another person lifts the back of the Frame (1), attach the Rear Stabilizer (28) to the Upper Wire (44). Attach the Console (23) to the next step. 43 23 Console Wire 2 18 5 2. Be careful to avoid pinching the wires. 44 Turn the Resistance Knob (18) counterclockwise to the lowest setting...
Instruction Manual
Page 6
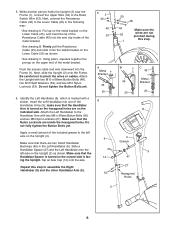
5. Do not tighten the Button Bolts yet. 6. make sure that the Handlebar Spacer is turned so the curved side is marked with a sticker. Attach the Left Handlebar to the Lower Cable (20) in the Left Handlebar (6). Tap an Axle Cap (14) onto the axle. Next, connect the Resistance Cable (45) to the Handlebar Arm with two M10 x 68mm Button Bolts (48), two M10 Split...
5. Do not tighten the Button Bolts yet. 6. make sure that the Handlebar Spacer is turned so the curved side is marked with a sticker. Attach the Left Handlebar to the Lower Cable (20) in the Left Handlebar (6). Tap an Axle Cap (14) onto the axle. Next, connect the Resistance Cable (45) to the Handlebar Arm with two M10 x 68mm Button Bolts (48), two M10 Split...
Instruction Manual
Page 7
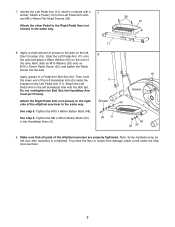
... Left Pedal Arm with the Bolt Set. Make sure that all parts of the elliptical exerciser in the same way. Identify the Left Pedal Arm (11), which is completed. Attach a Pedal (13) to the right Grease 40 side of the elliptical exerciser are properly tightened. Attach the Left Pedal Arm to the Right Pedal Arm (not shown) in the Handlebar Arms (5). 40 11 55 22 35 9. Tighten the M10 x 68mm Button Bolts (48). See step...
... Left Pedal Arm with the Bolt Set. Make sure that all parts of the elliptical exerciser in the same way. Identify the Left Pedal Arm (11), which is completed. Attach a Pedal (13) to the right Grease 40 side of the elliptical exerciser are properly tightened. Attach the Left Pedal Arm to the Right Pedal Arm (not shown) in the Handlebar Arms (5). 40 11 55 22 35 9. Tighten the M10 x 68mm Button Bolts (48). See step...
Instruction Manual
Page 8
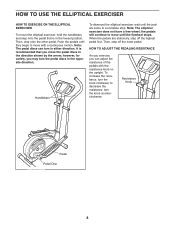
..., step off the lower pedal. to a complete stop. however, for variety, you can turn the pedal discs in either direction. To increase the resistance, turn the knob counterclockwise. Then, step onto the other pedal. the pedals will continue to move until the pedals come to decrease the resistance, turn the knob clockwise; HOW TO USE THE ELLIPTICAL EXERCISER HOW TO EXERCISE ON THE ELLIPTICAL EXERCISER To mount the elliptical exerciser, hold the handlebars and step onto the pedal...
..., step off the lower pedal. to a complete stop. however, for variety, you can turn the pedal discs in either direction. To increase the resistance, turn the knob counterclockwise. Then, step onto the other pedal. the pedals will continue to move until the pedals come to decrease the resistance, turn the knob clockwise; HOW TO USE THE ELLIPTICAL EXERCISER HOW TO EXERCISE ON THE ELLIPTICAL EXERCISER To mount the elliptical exerciser, hold the handlebars and step onto the pedal...
Instruction Manual
Page 9
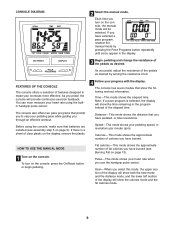
... workout information: Time-This mode shows the elapsed time. Speed-This mode shows your heart rate using the console, make your pedaling pace while guiding you use the handgrip pulse sensor. Fat calories-This mode shows the approximate number of the pedals as desired. Scan-When you pedal, the console will be selected. HOW TO USE THE MANUAL MODE 1 Turn on page 13). To turn on page 5). The console also offers two pace programs that batteries are installed...
... workout information: Time-This mode shows the elapsed time. Speed-This mode shows your heart rate using the console, make your pedaling pace while guiding you use the handgrip pulse sensor. Fat calories-This mode shows the approximate number of the pedals as desired. Scan-When you pedal, the console will be selected. HOW TO USE THE MANUAL MODE 1 Turn on page 13). To turn on page 5). The console also offers two pace programs that batteries are installed...
Instruction Manual
Page 10
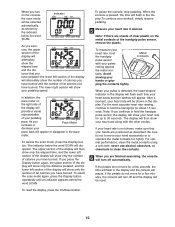
... turn on the console, the scan mode will alternately show the elapsed time and the distance that your pedaling pace. If you press the Display button again, the upper section of the display will show only the number of the handgrip pulse sensor, remove the plastic. Note: If there are finished exercising, the console will appear. the lower left section of the display will show only the distance pedaled...
... turn on the console, the scan mode will alternately show the elapsed time and the distance that your pedaling pace. If you press the Display button again, the upper section of the display will show only the number of the handgrip pulse sensor, remove the plastic. Note: If there are finished exercising, the console will appear. the lower left section of the display will show only the distance pedaled...
Instruction Manual
Page 11
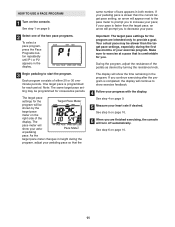
... your heart rate if desired. Your actual pace may be shown by turning the resistance knob. See step 4 on the right side of your pace. HOW TO USE A PACE PROGRAM 1 Turn on page 10. 11 During the program, adjust the resistance of bars appears in the display. 3 Begin pedaling to increase your progress with the display. Make sure to exercise at a pace that the same number of the pedals...
... your heart rate if desired. Your actual pace may be shown by turning the resistance knob. See step 4 on the right side of your pace. HOW TO USE A PACE PROGRAM 1 Turn on page 10. 11 During the program, adjust the resistance of bars appears in the display. 3 Begin pedaling to increase your progress with the display. Make sure to exercise at a pace that the same number of the pedals...
Instruction Manual
Page 12
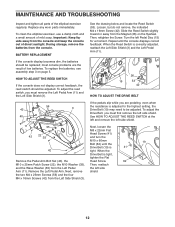
.... most console problems are pedaling, even when the resistance is correctly adjusted, reattach the Left Side Shield (3) and the Left Pedal Arm (11). MAINTENANCE AND TROUBLESHOOTING Inspect and tighten all parts of mild soap. Repeat until the Drive Belt (19) is tight, tighten the Flat Head Screw. 62 Then, reattach the left side shield. When the Reed Switch is adjusted to the highest setting, the Drive Belt (19) may need to be replaced;
.... most console problems are pedaling, even when the resistance is correctly adjusted, reattach the Left Side Shield (3) and the Left Pedal Arm (11). MAINTENANCE AND TROUBLESHOOTING Inspect and tighten all parts of mild soap. Repeat until the Drive Belt (19) is tight, tighten the Flat Head Screw. 62 Then, reattach the left side shield. When the Reed Switch is adjusted to the highest setting, the Drive Belt (19) may need to be replaced;
Instruction Manual
Page 13
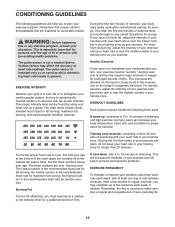
... by using your heart rate as you exercise. Training zone exercise, consisting of 20 to 30 minutes of exercising with pre-existing health problems. The pulse sensor is near the middle number in preparation for a sustained period of time. This will increase the flexibility of your muscles and will help to prevent post-exercise problems. EXERCISE FREQUENCY To maintain or improve your condition, plan three workouts...
... by using your heart rate as you exercise. Training zone exercise, consisting of 20 to 30 minutes of exercising with pre-existing health problems. The pulse sensor is near the middle number in preparation for a sustained period of time. This will increase the flexibility of your muscles and will help to prevent post-exercise problems. EXERCISE FREQUENCY To maintain or improve your condition, plan three workouts...
Instruction Manual
Page 14
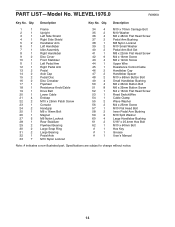
... Key No. Qty. Description 1 1 Frame 2 1 Upright 3 1 Left Side Shield 4 1 Right Side Shield 5 2 Handlebar Arm 6 1 Left Handlebar 7 1 Idler Assembly 8 1 Right Handlebar 9 2 Disc Cover 10 1 Front Stabilizer 11 1 Left Pedal Arm 12 1 Right Pedal Arm 13 2 Pedal 14 2 Axle Cap 15 2 Pedal Disc 16 2 Disc Crossbar 17 1 Flywheel 18 1 Resistance Knob/Cable 19 1 Drive Belt 20 1 Lower Cable 21 4 Endcap 22 2 M10 x 25mm Patch Screw 23 1 Console 24 2 Handgrip 25 1 M6 x 16mm Bolt...
... Key No. Qty. Description 1 1 Frame 2 1 Upright 3 1 Left Side Shield 4 1 Right Side Shield 5 2 Handlebar Arm 6 1 Left Handlebar 7 1 Idler Assembly 8 1 Right Handlebar 9 2 Disc Cover 10 1 Front Stabilizer 11 1 Left Pedal Arm 12 1 Right Pedal Arm 13 2 Pedal 14 2 Axle Cap 15 2 Pedal Disc 16 2 Disc Crossbar 17 1 Flywheel 18 1 Resistance Knob/Cable 19 1 Drive Belt 20 1 Lower Cable 21 4 Endcap 22 2 M10 x 25mm Patch Screw 23 1 Console 24 2 Handgrip 25 1 M6 x 16mm Bolt...
Instruction Manual
Page 15
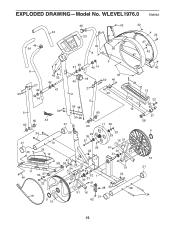
WLEVEL1976.0 R0806A 24 46 24 46 23 42 8 42 56 42 4 25 27 42 49 47 3 49 14 6 43 52 49 27 18 45 42 50 40 36 49 47 27 50 2 40 14 5 5 59 48 33 60 12 60 44 60 59 48 21 60 17 39 34 21 40 10 36 13 20 29 39 57 33 29 16 51 26 51 33 30 61 31 11 40 55 37 35 22 42 58 53 33 51 54 41 32 1 61 30 31 51 7 38 33 19 9 15 51 16 21 62 51 33 28 42 13 22 35 55 37 58 9 15 21 34 15 EXPLODED DRAWING-Model No.
WLEVEL1976.0 R0806A 24 46 24 46 23 42 8 42 56 42 4 25 27 42 49 47 3 49 14 6 43 52 49 27 18 45 42 50 40 36 49 47 27 50 2 40 14 5 5 59 48 33 60 12 60 44 60 59 48 21 60 17 39 34 21 40 10 36 13 20 29 39 57 33 29 16 51 26 51 33 30 61 31 11 40 55 37 35 22 42 58 53 33 51 54 41 32 1 61 30 31 51 7 38 33 19 9 15 51 16 21 62 51 33 28 42 13 22 35 55 37 58 9 15 21 34 15 EXPLODED DRAWING-Model No.
Instruction Manual
Page 16
ORDERING REPLACEMENT PARTS To order replacement parts, contact the ICON Health & Fitness, Ltd. Part No. 242744 R0806A Printed in China © 2006 ICON IP, Inc. Customer Service Department Unit 4, Revie Road ...information: • the MODEL NUMBER of the product (WLEVEL1976.0) • the NAME of the product (WESLO MOMENTUM 605 elliptical exerciser) • the SERIAL NUMBER of the product (see the front cover of this manual) • the KEY NUMBER and DESCRIPTION of the part(s) (see pages 14 and 15) WESLO is a registered trademark of ICON IP, Inc. office, or write: ICON Health & Fitness...
ORDERING REPLACEMENT PARTS To order replacement parts, contact the ICON Health & Fitness, Ltd. Part No. 242744 R0806A Printed in China © 2006 ICON IP, Inc. Customer Service Department Unit 4, Revie Road ...information: • the MODEL NUMBER of the product (WLEVEL1976.0) • the NAME of the product (WESLO MOMENTUM 605 elliptical exerciser) • the SERIAL NUMBER of the product (see the front cover of this manual) • the KEY NUMBER and DESCRIPTION of the part(s) (see pages 14 and 15) WESLO is a registered trademark of ICON IP, Inc. office, or write: ICON Health & Fitness...


