
English Manual
Page 2
... with great force. 5. tions before using the home gym. 3. If you are exercising, stop immediately and begin cooling down. 8. Make sure the cables remain on the pulleys at any worn parts immediately. 6. The home gym is especially important for home use of this or any exercise program, consult... and a PART IDENTIFICATION CHART are on all of the pulleys. 12. Replace any time while exercising, stop immediately and make sure the cables are attached in the center of this manual and in this manual. Remove the PART LIST/EXPLODED DRAWING and the PART IDENTIFICATION CHART before ...
... with great force. 5. tions before using the home gym. 3. If you are exercising, stop immediately and begin cooling down. 8. Make sure the cables remain on the pulleys at any worn parts immediately. 6. The home gym is especially important for home use of this or any exercise program, consult... and a PART IDENTIFICATION CHART are on all of the pulleys. 12. Replace any time while exercising, stop immediately and make sure the cables are attached in the center of this manual and in this manual. Remove the PART LIST/EXPLODED DRAWING and the PART IDENTIFICATION CHART before ...
English Manual
Page 4
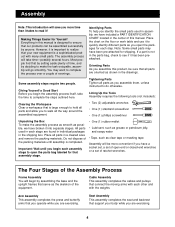
... parts are found in individual packages in a cleared area and remove the packing materials. Do not dispose of this product, be assembled successfully by anyone. Cable Assembly This assembly completes the cables and pulleys that all the way around the assembled equipment.
... parts are found in individual packages in a cleared area and remove the packing materials. Do not dispose of this product, be assembled successfully by anyone. Cable Assembly This assembly completes the cables and pulleys that all the way around the assembled equipment.
English Manual
Page 9
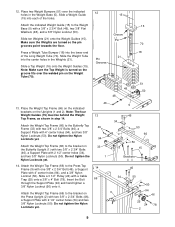
... shown in the Weight Base (5). Attach the Weight Top Frame (66) to the bracket on the Press Upright (2) with two 3/8" x 2 3/4" Bolts (46), a Support Plate with a Cable Trap (25) onto a 3/8" x 4" Bolt (78). Attach the Weight Top Frame (66) to the Butterfly Top Frame (33) with two 3/8" x 2 3/4" Bolts (46), a Support Plate with 2 1/2" center...
... shown in the Weight Base (5). Attach the Weight Top Frame (66) to the bracket on the Press Upright (2) with two 3/8" x 2 3/4" Bolts (46), a Support Plate with a Cable Trap (25) onto a 3/8" x 4" Bolt (78). Attach the Weight Top Frame (66) to the Butterfly Top Frame (33) with two 3/8" x 2 3/4" Bolts (46), a Support Plate with 2 1/2" center...
English Manual
Page 11
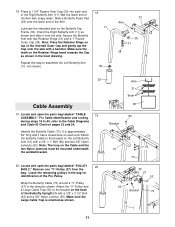
... a Butterfly Foam Pad (29) onto the lower end of the Pro Pulley. Lubricate the indicated axle on pages 23 and 24. Secure...) and a 3/8" Nylon Locknut (50). Remove one "V"-Pulley (27) from the bag. Attach the "V"-Pulley and a Large Cable Trap (32) to the bracket on each end of the inverted Outer Cap and gently tap the Cap onto the axle with two...3/8" x 1" Bolt (84) and two 3/8" Nylon Jamnuts (63). Locate and open the parts bag labeled "CABLE 19 ASSEMBLY." For Cable identification and routing during steps 19 to 49, refer to assemble the Left Butterfly Arm (10, not shown). 18...
... a Butterfly Foam Pad (29) onto the lower end of the Pro Pulley. Lubricate the indicated axle on pages 23 and 24. Secure...) and a 3/8" Nylon Locknut (50). Remove one "V"-Pulley (27) from the bag. Attach the "V"-Pulley and a Large Cable Trap (32) to the bracket on each end of the inverted Outer Cap and gently tap the Cap onto the axle with two...3/8" x 1" Bolt (84) and two 3/8" Nylon Jamnuts (63). Locate and open the parts bag labeled "CABLE 19 ASSEMBLY." For Cable identification and routing during steps 19 to 49, refer to assemble the Left Butterfly Arm (10, not shown). 18...
English Manual
Page 12
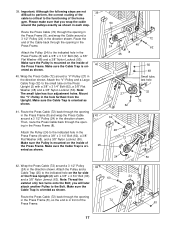
...(11) with a 3/8" x 1 3/4" Bolt (57) and a 3/8" Nylon Locknut (50). Note: The loop on the back of the Cable with a 3/8" x 2 1/2" Bolt (53) and a 3/8" Nylon Locknut (50). Wrap the Butterfly Cable (73) around a 3 1/2" Pulley (24) in the direction shown. Make sure the Small Pulley Bracket is oriented as shown. 57 22.... ed underneath the welded bracket. 11 1 84 Bracket 63 73 24. Make sure the Cable is approximately 224" 24 long, and it has a ball on one end and a threaded shaft on the Upright. 47 Pin 74 24 63 ...
...(11) with a 3/8" x 1 3/4" Bolt (57) and a 3/8" Nylon Locknut (50). Note: The loop on the back of the Cable with a 3/8" x 2 1/2" Bolt (53) and a 3/8" Nylon Locknut (50). Wrap the Butterfly Cable (73) around a 3 1/2" Pulley (24) in the direction shown. Make sure the Small Pulley Bracket is oriented as shown. 57 22.... ed underneath the welded bracket. 11 1 84 Bracket 63 73 24. Make sure the Cable is approximately 224" 24 long, and it has a ball on one end and a threaded shaft on the Upright. 47 Pin 74 24 63 ...
English Manual
Page 13
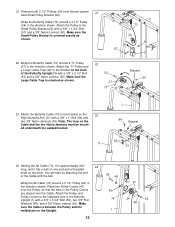
... Pulley Bracket is oriented as shown. 25 24 50 23 74 50 22 57 24 74 74 54 24 25 4 50 13 Wrap the Ab Cable (74) around a 3 1/2" Pulley (24) in the two Adjustable Pulley Plates (23) with a 3/8" x 2" Bolt (54) and a 3/8" Nylon Locknut (50). Attach the Pulley and... a Cable Trap (25) to the top hole in 27 the direction shown. Make sure the Cable Trap is oriented as shown. 25 54 26. Make sure the Cable Trap and the Pulley Plates are oriented as shown. 27. Wrap the Ab...
... Pulley Bracket is oriented as shown. 25 24 50 23 74 50 22 57 24 74 74 54 24 25 4 50 13 Wrap the Ab Cable (74) around a 3 1/2" Pulley (24) in the two Adjustable Pulley Plates (23) with a 3/8" x 2" Bolt (54) and a 3/8" Nylon Locknut (50). Attach the Pulley and... a Cable Trap (25) to the top hole in 27 the direction shown. Make sure the Cable Trap is oriented as shown. 25 54 26. Make sure the Cable Trap and the Pulley Plates are oriented as shown. 27. Wrap the Ab...
English Manual
Page 14
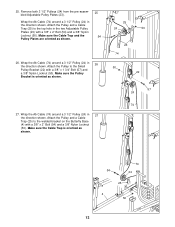
... "U"-Bracket (97) to a "U"Bracket (97) with a 3/8" x 1 3/4" Bolt (57) and a 3/8" Nylon Locknut (50). it should be threaded only two turns onto the end of the Ab Cable (74) to the hole in the inset drawing. 63 24 74 25 95 24 5 50 Bracket 74 End of the Ab... Cable (74) under the 3 1/2" Pulley (24) that is routed in the direction shown. 4 Note: For clarity, this and the following drawings show some parts removed. 29. ...
... "U"-Bracket (97) to a "U"Bracket (97) with a 3/8" x 1 3/4" Bolt (57) and a 3/8" Nylon Locknut (50). it should be threaded only two turns onto the end of the Ab Cable (74) to the hole in the inset drawing. 63 24 74 25 95 24 5 50 Bracket 74 End of the Ab... Cable (74) under the 3 1/2" Pulley (24) that is routed in the direction shown. 4 Note: For clarity, this and the following drawings show some parts removed. 29. ...
English Manual
Page 15
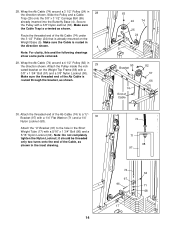
...in the Adjustable Pulley Plates (23) with a 3/8" x 2" Bolt (54) and a 3/8" Nylon Locknut (50). Route the Low Pulley Cable (75) under a Pro Pulley (26) as shown. 23 50 25 24 75 34. Attach the Pulley and a Cable Trap (25) to the 3/8" x 4 3/4" Bolt (60) with a 3/8" x 4 3/4" Bolt (60) and a 3/8" Nylon ...to the indicated hole in step 32. Make sure the Cable Trap is oriented as shown. 31 54 26 25 Cable Guide 75 4 50 32. Attach the Pro Pulley and a Cable Trap (25) to the bracket on the other. Wrap the Low Pulley Cable (75) around a 3 1/2" 32 Pulley (24)...
...in the Adjustable Pulley Plates (23) with a 3/8" x 2" Bolt (54) and a 3/8" Nylon Locknut (50). Route the Low Pulley Cable (75) under a Pro Pulley (26) as shown. 23 50 25 24 75 34. Attach the Pulley and a Cable Trap (25) to the 3/8" x 4 3/4" Bolt (60) with a 3/8" x 4 3/4" Bolt (60) and a 3/8" Nylon ...to the indicated hole in step 32. Make sure the Cable Trap is oriented as shown. 31 54 26 25 Cable Guide 75 4 50 32. Attach the Pro Pulley and a Cable Trap (25) to the bracket on the other. Wrap the Low Pulley Cable (75) around a 3 1/2" 32 Pulley (24)...

English Manual
Page 16
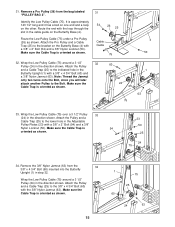
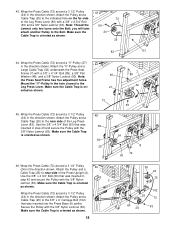
Remove a Pro Pulley (26) from the bag labeled "PULLEY BAG 2". 36 Identify the Press Cable (72). Make sure the Cable is already mounted on the other. Make sure the Cable Trap is approximately 389 1/2" long and it has a ball on one end and a threaded shaft on the Top Frame (9). 9 9 26... a 3 1/2" Pulley (24) in the direction shown. 35. It is oriented as shown. 38 50 48 16 72 2 25 24 72 59 Wrap the Press Cable (72) around a Pro Pulley (26) in the direction shown. Attach the Pulley to the indicated hole in the Press Upright (2) with a 3/8" x 3 1/2" Bolt (56), a 3/8" ...
Remove a Pro Pulley (26) from the bag labeled "PULLEY BAG 2". 36 Identify the Press Cable (72). Make sure the Cable is already mounted on the other. Make sure the Cable Trap is approximately 389 1/2" long and it has a ball on one end and a threaded shaft on the Top Frame (9). 9 9 26... a 3 1/2" Pulley (24) in the direction shown. 35. It is oriented as shown. 38 50 48 16 72 2 25 24 72 59 Wrap the Press Cable (72) around a Pro Pulley (26) in the direction shown. Attach the Pulley to the indicated hole in the Press Upright (2) with a 3/8" x 3 1/2" Bolt (56), a 3/8" ...
English Manual
Page 17
... (2) with a 3/8" x 3 1/4" Bolt (62), a 3/8" Flat Washer (48) and a 3/8" Nylon Locknut (50). Attach the "V"-Pulley and a Large Cable Trap (32) to perform, the correct routing of the Press Frame. Make sure the Cable Trap is critical to the indicated hole in the direction shown. Note: The small tube has four adjustment... side of the home gym. Note: Thread the 60 Jamnut only two turns onto the Bolt; you wrap the cable around the pulleys exactly as shown. 40. Make sure the Cable Trap is oriented as shown. 41 25 50 72 24 48 62 8 25 50 2 48 Small tube, last...
... (2) with a 3/8" x 3 1/4" Bolt (62), a 3/8" Flat Washer (48) and a 3/8" Nylon Locknut (50). Attach the "V"-Pulley and a Large Cable Trap (32) to perform, the correct routing of the Press Frame. Make sure the Cable Trap is critical to the indicated hole in the direction shown. Note: The small tube has four adjustment... side of the home gym. Note: Thread the 60 Jamnut only two turns onto the Bolt; you wrap the cable around the pulleys exactly as shown. 40. Make sure the Cable Trap is oriented as shown. 41 25 50 72 24 48 62 8 25 50 2 48 Small tube, last...
English Manual
Page 18
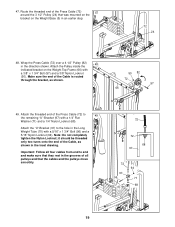
... (85), a 3/8" Flat Washer (48), and a 3/8" Nylon Locknut (50). Use the 3/8" x 4 3/4" Bolt (60) that was inserted into the Press Base (6) earlier. Make sure the Cable Trap is oriented as shown. 7 85 32 72 45. you will later attach another Pulley to near side of the Leg Press Lever (83) with... that was inserted in step 43 and secure the Pulley with the 3/8" Nylon Locknut (50). Wrap the Press Cable (72) around a 3 1/2" Pulley 46 (24) in the direction shown. Wrap the Press Cable (72) around a 3 1/2" Pulley (24) in the direction shown. Note: 48 the Press Seat Frame ...
... (85), a 3/8" Flat Washer (48), and a 3/8" Nylon Locknut (50). Use the 3/8" x 4 3/4" Bolt (60) that was inserted into the Press Base (6) earlier. Make sure the Cable Trap is oriented as shown. 7 85 32 72 45. you will later attach another Pulley to near side of the Leg Press Lever (83) with... that was inserted in step 43 and secure the Pulley with the 3/8" Nylon Locknut (50). Wrap the Press Cable (72) around a 3 1/2" Pulley 46 (24) in the direction shown. Wrap the Press Cable (72) around a 3 1/2" Pulley (24) in the direction shown. Note: 48 the Press Seat Frame ...
English Manual
Page 19
... indicated bracket on the Weight Base (5) in an earlier step. 72 24 5 48. it should be threaded only two turns onto the end of the Cable, as shown. 50 82 72 57 66 49. Attach the "U"-Bracket (97) to the hole in the grooves of the Press... Cable (72) 47 around the 3 1/2" Pulley (24) that the cables and the pulleys move smoothly. 72 72 68 97 72 97 96 70 64 71 68 19 47. Important: Follow all four...
... indicated bracket on the Weight Base (5) in an earlier step. 72 24 5 48. it should be threaded only two turns onto the end of the Cable, as shown. 50 82 72 57 66 49. Attach the "U"-Bracket (97) to the hole in the grooves of the Press... Cable (72) 47 around the 3 1/2" Pulley (24) that the cables and the pulleys move smoothly. 72 72 68 97 72 97 96 70 64 71 68 19 47. Important: Follow all four...
English Manual
Page 22
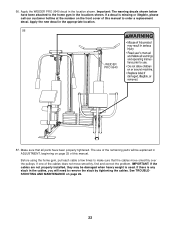
... properly installed, they may be explained in ADJUSTMENT, beginning on page 25 of the cables does not move smoothly over the pulleys. If there is any slack in the appropriate location. 56 WEIDER PRO 9940 57. If one of this manual to order a replacement decal. See TROUBLESHOOTING AND... remove the slack by tightening the cables. If a decal is used. 56. Important: The warning decals shown below have been properly tightened. The use of this manual. Make sure that the cables move smoothly, find and correct the problem. Apply the WEIDER PRO 9940 decal in the locations shown.
... properly installed, they may be explained in ADJUSTMENT, beginning on page 25 of the cables does not move smoothly over the pulleys. If there is any slack in the appropriate location. 56 WEIDER PRO 9940 57. If one of this manual to order a replacement decal. See TROUBLESHOOTING AND... remove the slack by tightening the cables. If a decal is used. 56. Important: The warning decals shown below have been properly tightened. The use of this manual. Make sure that the cables move smoothly, find and correct the problem. Apply the WEIDER PRO 9940 decal in the locations shown.
English Manual
Page 23
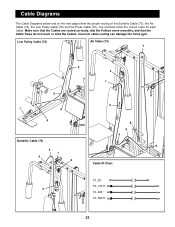
Low Pulley Cable (75) Ab Cable (74) 7 3 3 1 2 2 1 4 5 8 5 4 Butterfly Cable (73) 6 4 1 5 2 Cable ID Chart 73, 52" 75, 143.5" 3 74, 224" 72, 389.5" 23 Incorrect cable routing can damage the home gym. Make sure that the Cables are routed correctly, that the Pulleys move smoothly, and that the Cable Traps do not touch or bind the Cables. Cable Diagrams The Cable Diagrams below and on the next page show the correct route for each Cable. The numbers show the proper routing of the Butterfly Cable (73), the Ab Cable (74), the Low Pulley Cable (75) and the Press Cable (72).
Low Pulley Cable (75) Ab Cable (74) 7 3 3 1 2 2 1 4 5 8 5 4 Butterfly Cable (73) 6 4 1 5 2 Cable ID Chart 73, 52" 75, 143.5" 3 74, 224" 72, 389.5" 23 Incorrect cable routing can damage the home gym. Make sure that the Cables are routed correctly, that the Pulleys move smoothly, and that the Cable Traps do not touch or bind the Cables. Cable Diagrams The Cable Diagrams below and on the next page show the correct route for each Cable. The numbers show the proper routing of the Butterfly Cable (73), the Ab Cable (74), the Low Pulley Cable (75) and the Press Cable (72).
English Manual
Page 25
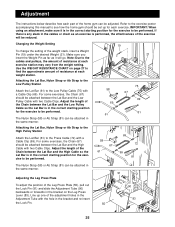
... Press Lever (83). Adjust the length of the Chain between the Lat Bar and the High Cable with two Cable Clips. Attaching the Lat Bar, Nylon Strap or Ab Strap to the Low Pulley Station Attach the..., the Chain (67) should be set up one of the adjustment holes in the Adjustment Tube with a Cable Clip (69). The Nylon Strap (58) or Ab Strap (81) can be adjusted. Adjust the length ...of the Chain between the Lat Bar and the Low Pulley Cable with two Cable Clips. Refer to the exercise poster accompanying this manual to see how the home gym should be...
... Press Lever (83). Adjust the length of the Chain between the Lat Bar and the High Cable with two Cable Clips. Attaching the Lat Bar, Nylon Strap or Ab Strap to the Low Pulley Station Attach the..., the Chain (67) should be set up one of the adjustment holes in the Adjustment Tube with a Cable Clip (69). The Nylon Strap (58) or Ab Strap (81) can be adjusted. Adjust the length ...of the Chain between the Lat Bar and the Low Pulley Cable with two Cable Clips. Refer to the exercise poster accompanying this manual to see how the home gym should be...
English Manual
Page 26
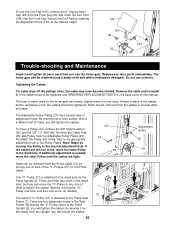
...moving the "V"- 7 Pulley one hole, and then one of this manual. The home gym can be tightened. Tightening the Cables If a cable slips off the pulleys often, the cable may have several different ways: The Adjustable Pulley Plates (23) have become twisted. If there is first used on the...ORDERING REPLACEMENT PARTS on the Press Upright (2). If additional adjustment is needed . 72 27 27 The second "V"-Pulley (27) is felt, the cables should be cleaned using a damp cloth and mild non-abrasive detergent. Slack can be removed from the Front Leg (20) and insert the ...
...moving the "V"- 7 Pulley one hole, and then one of this manual. The home gym can be tightened. Tightening the Cables If a cable slips off the pulleys often, the cable may have several different ways: The Adjustable Pulley Plates (23) have become twisted. If there is first used on the...ORDERING REPLACEMENT PARTS on the Press Upright (2). If additional adjustment is needed . 72 27 27 The second "V"-Pulley (27) is felt, the cables should be cleaned using a damp cloth and mild non-abrasive detergent. Slack can be removed from the Front Leg (20) and insert the ...
English Manual
Page 27
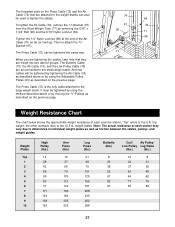
... Pulley/ Low Pulley Leg Raise (lbs.) (lbs.) 10 8 24 21 37 35 50 48 64 62 77 76 90 89 27 To tighten the Ab Cable (74), remove the "U"-Bracket (97) from the Short Weight Tube (17) by using the method described above or by removing the 5/16" x 1 3/4" Bolt (96) and... weight resistance at each station may vary due to the weight stacks can be tightened by tightening the Ab Cable (74) as described on the previous page. The Press Cable (72) is the only cable attached to the 12.5 lb. the other numbers refer to the large weight stack. "Top" refers to the...
... Pulley/ Low Pulley Leg Raise (lbs.) (lbs.) 10 8 24 21 37 35 50 48 64 62 77 76 90 89 27 To tighten the Ab Cable (74), remove the "U"-Bracket (97) from the Short Weight Tube (17) by using the method described above or by removing the 5/16" x 1 3/4" Bolt (96) and... weight resistance at each station may vary due to the weight stacks can be tightened by tightening the Ab Cable (74) as described on the previous page. The Press Cable (72) is the only cable attached to the 12.5 lb. the other numbers refer to the large weight stack. "Top" refers to the...
English Manual
Page 30
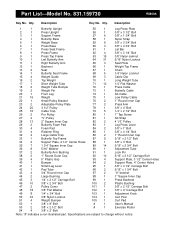
... 1 Small Pulley Bracket 76 2 1" Round Inner Cap 23 2 Adjustable Pulley Plate 77 2 Press Arm 24 20 3 1/2" Pulley 78 1 3/8" x 4" Bolt 25 16 Cable Trap 79 5 1/4" x 2 1/2" Bolt 26 2 Pro Pulley 80 1 1" Tap Screw 27 4 "V"-Pulley 81 1 Ab Strap 28 13 2" Square Inner Cap 82 2 4 1/2" Pulley 29 2 Butterfly Foam Pad 83 1 Leg Press Lever 30...
... 1 Small Pulley Bracket 76 2 1" Round Inner Cap 23 2 Adjustable Pulley Plate 77 2 Press Arm 24 20 3 1/2" Pulley 78 1 3/8" x 4" Bolt 25 16 Cable Trap 79 5 1/4" x 2 1/2" Bolt 26 2 Pro Pulley 80 1 1" Tap Screw 27 4 "V"-Pulley 81 1 Ab Strap 28 13 2" Square Inner Cap 82 2 4 1/2" Pulley 29 2 Butterfly Foam Pad 83 1 Leg Press Lever 30...


