
English Manual
Page 2
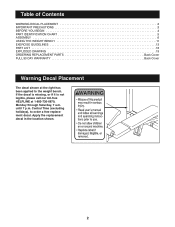
.... Table of Contents WARNING DECAL PLACEMENT 2 IMPORTANT PRECAUTIONS 3 BEFORE YOU BEGIN 4 PART IDENTIFICATION CHART 5 ASSEMBLY 6 USING THE WEIGHT BENCH 11 EXERCISE GUIDELINES 13 PART LIST 18 EXPLODED DRAWING 19 ORDERING REPLACEMENT PARTS Back Cover FULL 90 DAY WARRANTY Back Cover Warning Decal Placement ...
.... Table of Contents WARNING DECAL PLACEMENT 2 IMPORTANT PRECAUTIONS 3 BEFORE YOU BEGIN 4 PART IDENTIFICATION CHART 5 ASSEMBLY 6 USING THE WEIGHT BENCH 11 EXERCISE GUIDELINES 13 PART LIST 18 EXPLODED DRAWING 19 ORDERING REPLACEMENT PARTS Back Cover FULL 90 DAY WARRANTY Back Cover Warning Decal Placement ...
English Manual
Page 3
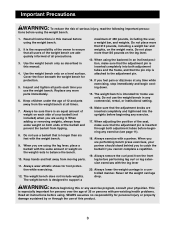
... no responsibility for personal injury or property damage sustained by or through both adjustment tubes before beginning any exercise. 17. When using the weight bench. 1. Always remove the curl post from moving parts. 11. WARNING: Before beginning this manual before using the backrest in an ...injury, read the following important precau- Important Precautions WARNING: To reduce the risk of the barbell and prevent the barbell from the weight bench at any time while exercising, stop immediately and begin cooling down. 15. When you feel pain or dizziness at all instructions...
... no responsibility for personal injury or property damage sustained by or through both adjustment tubes before beginning any exercise. 17. When using the weight bench. 1. Always remove the curl post from moving parts. 11. WARNING: Before beginning this manual before using the backrest in an ...injury, read the following important precau- Important Precautions WARNING: To reduce the risk of the barbell and prevent the barbell from the weight bench at any time while exercising, stop immediately and begin cooling down. 15. When you feel pain or dizziness at all instructions...
English Manual
Page 4
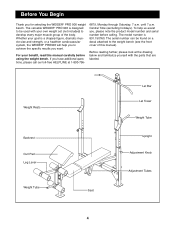
... have additional questions, please call our toll-free HELPLINE at the drawing below and familiarize yourself with your own weight set (not included) to the weight bench (see the front cover of the body. Before You Begin Thank you , please note the product model...goal is a shapely figure, dramatic muscle size and strength, or a healthier cardiovascular system, the WEIDER¨ PRO900 will help us assist you for selecting the WEIDER¨ PRO 900 weight bench. The versatile WEIDER¨ PRO 900 is 831.150760. The serial number can be used with the parts that are labeled. Before...
... have additional questions, please call our toll-free HELPLINE at the drawing below and familiarize yourself with your own weight set (not included) to the weight bench (see the front cover of the body. Before You Begin Thank you , please note the product model...goal is a shapely figure, dramatic muscle size and strength, or a healthier cardiovascular system, the WEIDER¨ PRO900 will help us assist you for selecting the WEIDER¨ PRO 900 weight bench. The versatile WEIDER¨ PRO 900 is 831.150760. The serial number can be used with the parts that are labeled. Before...
English Manual
Page 6
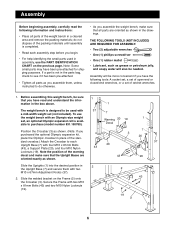
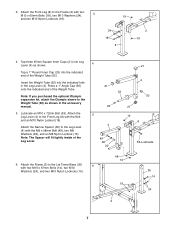
...(1) phillips screwdriver ¥ One (1) rubber mallet ¥ Lubricant, such as shown. (Note: If you assemble them with an Olympic-size weight set, an optional Olympic expansion kit is available to do not dispose of the packing materials until assembly is designed to each assembly step before... information and instructions: ¥ Place all parts as you purchased the optional Olympic expansion kit, place the Olympic crossbar in assembly, use the weight bench with two M10 x 67mm Adjustment Knobs (37). 2. do otherwise. ¥ As you have read the following tools: A socket set...
...(1) phillips screwdriver ¥ One (1) rubber mallet ¥ Lubricant, such as shown. (Note: If you assemble them with an Olympic-size weight set, an optional Olympic expansion kit is available to do not dispose of the packing materials until assembly is designed to each assembly step before... information and instructions: ¥ Place all parts as you purchased the optional Olympic expansion kit, place the Olympic crossbar in assembly, use the weight bench with two M10 x 67mm Adjustment Knobs (37). 2. do otherwise. ¥ As you have read the following tools: A socket set...
English Manual
Page 7
...and two M10 Nylon Locknuts (19). 48 13 19 35 14 24 2 7 Insert the Weight Tube (52) into Leg Lever (4) as shown in the Leg Lever (4). Note: The Spacer will fit tightly inside of... the Weight Tube (52). Note: If you purchased the optional Olympic expansion kit, attach the Olympic sleeve to...Lat Tower Base (35) 6 with the Bolt and an M10 Nylon Locknut (19). Attach the Frame (2) to the Weight Tube (52) as shown. Tap three 45mm Square Inner Caps (21) into the indicated hole in the accessory manual...
...and two M10 Nylon Locknuts (19). 48 13 19 35 14 24 2 7 Insert the Weight Tube (52) into Leg Lever (4) as shown in the Leg Lever (4). Note: The Spacer will fit tightly inside of... the Weight Tube (52). Note: If you purchased the optional Olympic expansion kit, attach the Olympic sleeve to...Lat Tower Base (35) 6 with the Bolt and an M10 Nylon Locknut (19). Attach the Frame (2) to the Weight Tube (52) as shown. Tap three 45mm Square Inner Caps (21) into the indicated hole in the accessory manual...
English Manual
Page 9
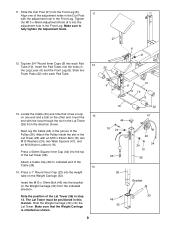
Make sure to indicated end of the Lat Tower (26). Locate the Cable (34) and note that the Weight Carriage is oriented as shown. 9 10 4 8 9 10 9 10 22 44 18 24 33 47 29 24 34 19 26 26 Bracket 23 46 32 Press a ...) with the adjustment hole in the Front Leg. Attach the Pulley inside the slot in the Lat Tower (26) from the indicated direction. Slide the Weight Carriage (32) onto the Lat Tower. Slide the Curl Post (27) into the bracket on the...
Make sure to indicated end of the Lat Tower (26). Locate the Cable (34) and note that the Weight Carriage is oriented as shown. 9 10 4 8 9 10 9 10 22 44 18 24 33 47 29 24 34 19 26 26 Bracket 23 46 32 Press a ...) with the adjustment hole in the Front Leg. Attach the Pulley inside the slot in the Lat Tower (26) from the indicated direction. Slide the Weight Carriage (32) onto the Lat Tower. Slide the Curl Post (27) into the bracket on the...
English Manual
Page 10
... parts are properly tightened before you use of the Cable (34) to the Cable Clip (33) and place the Lat Bar in USING THE WEIGHT BENCH on the Weight Carriage (32) with two M10 x 65mm Bolts (18), four M10 Washers (24), and two M10 Nylon Locknuts (19). 26 46 32 13 Lip... 26 34 19 54 39 24 19 18 35 17. The use the weight bench. Secure the Lat Tower with an M10 Nylon Locknut (19). Attach the Lat Bar (36) to the 15 M19 x 19mm Bolt (46) in the...
... parts are properly tightened before you use of the Cable (34) to the Cable Clip (33) and place the Lat Bar in USING THE WEIGHT BENCH on the Weight Carriage (32) with two M10 x 65mm Bolts (18), four M10 Washers (24), and two M10 Nylon Locknuts (19). 26 46 32 13 Lip... 26 34 19 54 39 24 19 18 35 17. The use the weight bench. Secure the Lat Tower with an M10 Nylon Locknut (19). Attach the Lat Bar (36) to the 15 M19 x 19mm Bolt (46) in the...
English Manual
Page 11
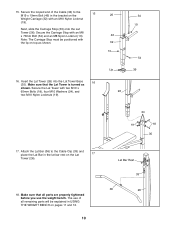
...13 for important exercise information and refer to the accompanying exercise poster to the Adjustment Pin. Refer also to the exercise information accompanying your own weight set (not included). Note: If you use the Backrest (6) in a declined position, a level position, or either of two inclined ...the Pin Clip (57) to see the correct form for additional exercises. Do not use the Leg Lever (4), slide the desired weights (not included) onto the Weight Tube (52). To adjust the Backrest (6) to a declined position, remove the Adjustment Pin (40), lower the Backrest until it...
...13 for important exercise information and refer to the accompanying exercise poster to the Adjustment Pin. Refer also to the exercise information accompanying your own weight set (not included). Note: If you use the Backrest (6) in a declined position, a level position, or either of two inclined ...the Pin Clip (57) to see the correct form for additional exercises. Do not use the Leg Lever (4), slide the desired weights (not included) onto the Weight Tube (52). To adjust the Backrest (6) to a declined position, remove the Adjustment Pin (40), lower the Backrest until it...
English Manual
Page 12
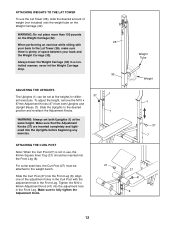
...Post (27) must be inserted into the adjustment hole in use the Lat Tower (26), slide the desired amount of weight (not included) onto the weight tube on the Weight Carriage (32). 26 When performing an exercise while sitting with the adjustment hole in a controlled manner; never let the...Make sure that the Adjustment Knobs (37) are inserted completely and tightened into the Front Leg (8). Weight Tube Weight 1 37 7 27 41 8 12 Always lower the Weight Carriage (32) in the Front Leg. ATTACHING WEIGHTS TO THE LAT TOWER To use , the 45mm Square Inner Cap (21) should be 21 ...
...Post (27) must be inserted into the adjustment hole in use the Lat Tower (26), slide the desired amount of weight (not included) onto the weight tube on the Weight Carriage (32). 26 When performing an exercise while sitting with the adjustment hole in a controlled manner; never let the...Make sure that the Adjustment Knobs (37) are inserted completely and tightened into the Front Leg (8). Weight Tube Weight 1 37 7 27 41 8 12 Always lower the Weight Carriage (32) in the Front Leg. ATTACHING WEIGHTS TO THE LAT TOWER To use , the 45mm Square Inner Cap (21) should be 21 ...
English Manual
Page 13
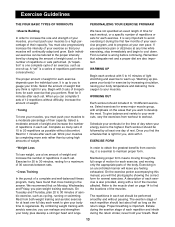
... should be followed by increasing circulation, raising your breath. Exercise for 20 to the proper intensity level by using high amounts of weight. On Tuesday and Thursday, plan 20 to find the locations of the muscles. Each individual exercise can be tailored to 30 minutes... user. Proper breathing is wrong before continuing. never hold your body temperature and delivering more sets rather than by changing the amount of weight used, or the number of repetitions or sets performed. (A ÒrepetitionÓ is the answer. You must also progressively increase the...
... should be followed by increasing circulation, raising your breath. Exercise for 20 to the proper intensity level by using high amounts of weight. On Tuesday and Thursday, plan 20 to find the locations of the muscles. Each individual exercise can be tailored to 30 minutes... user. Proper breathing is wrong before continuing. never hold your body temperature and delivering more sets rather than by changing the amount of weight used, or the number of repetitions or sets performed. (A ÒrepetitionÓ is the answer. You must also progressively increase the...
English Manual
Page 14
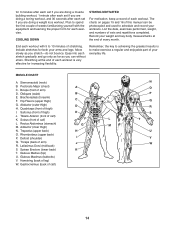
...and learning the proper form for each exercise. Pectoralis Major (chest) AA C. Abductor (outer thigh) DD H. Ease into each set if you are doing a weight loss workout. Obliques (waist) BB E. Gluteus Medius (hip) U. Biceps (front of calf) K. Quadriceps (front of sets and repetitions completed. for 3 ...on pages 15 and 16 of calf) NN OO PP QQ RR SS T T U U V V WW 14 List the date, exercises performed, weight, and numbers of thigh) I. Record your arms and legs. Move slowly as you can be photocopied and used to schedule and record your workouts. ...
...and learning the proper form for each exercise. Pectoralis Major (chest) AA C. Abductor (outer thigh) DD H. Ease into each set if you are doing a weight loss workout. Obliques (waist) BB E. Gluteus Medius (hip) U. Biceps (front of calf) K. Quadriceps (front of sets and repetitions completed. for 3 ...on pages 15 and 16 of calf) NN OO PP QQ RR SS T T U U V V WW 14 List the date, exercises performed, weight, and numbers of thigh) I. Record your arms and legs. Move slowly as you can be photocopied and used to schedule and record your workouts. ...
English Manual
Page 15
MONDAY Date: / / EXERCISE WEIGHT SETS REPS TUESDAY Date: / / AEROBIC EXERCISE WEDNESDAY Date: / / EXERCISE WEIGHT SETS REPS THURSDAY Date: / / AEROBIC EXERCISE FRIDAY Date: / / EXERCISE WEIGHT SETS REPS Make photocopies of this page for scheduling and recording your workouts. 15
MONDAY Date: / / EXERCISE WEIGHT SETS REPS TUESDAY Date: / / AEROBIC EXERCISE WEDNESDAY Date: / / EXERCISE WEIGHT SETS REPS THURSDAY Date: / / AEROBIC EXERCISE FRIDAY Date: / / EXERCISE WEIGHT SETS REPS Make photocopies of this page for scheduling and recording your workouts. 15

English Manual
Page 16
MONDAY Date: / / EXERCISE WEIGHT SETS REPS TUESDAY Date: / / AEROBIC EXERCISE WEDNESDAY Date: / / EXERCISE WEIGHT SETS REPS THURSDAY Date: / / AEROBIC EXERCISE FRIDAY Date: / / EXERCISE WEIGHT SETS REPS Make photocopies of this page for scheduling and recording your workouts. 16
MONDAY Date: / / EXERCISE WEIGHT SETS REPS TUESDAY Date: / / AEROBIC EXERCISE WEDNESDAY Date: / / EXERCISE WEIGHT SETS REPS THURSDAY Date: / / AEROBIC EXERCISE FRIDAY Date: / / EXERCISE WEIGHT SETS REPS Make photocopies of this page for scheduling and recording your workouts. 16
English Manual
Page 18
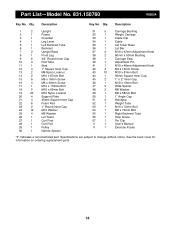
...Washer 25 4 M6 Washer 26 1 Lat Tower 27 1 Curl Post 28 1 Curl Pad 29 1 Pulley 30 1 Narrow Spacer 31 5 Carriage Bushing 32 1 Weight Carriage 33 1 Cable Clip 34 1 Cable 35 1 Lat Tower Base 36 1 Lat Bar 37 2 M10 x 67mm Adjustment Knob 38 2 60mm x 50mm ...211; Inner Cap 46 1 M10 x 19mm Bolt 47 2 Wide Spacer 48 2 M8 Washer 49 1 M8 x 58mm Bolt 50 1 1Ó Angle Cap 51 2 Handgrip 52 1 Weight Tube 53 1 M10 x 72mm Bolt 54 1 M8 x 70mm Bolt 55 1 Right Backrest Tube 56 1 Stop Screw 57 1 Pin Clip # 1 UserÕs Manual # 1 ...
...Washer 25 4 M6 Washer 26 1 Lat Tower 27 1 Curl Post 28 1 Curl Pad 29 1 Pulley 30 1 Narrow Spacer 31 5 Carriage Bushing 32 1 Weight Carriage 33 1 Cable Clip 34 1 Cable 35 1 Lat Tower Base 36 1 Lat Bar 37 2 M10 x 67mm Adjustment Knob 38 2 60mm x 50mm ...211; Inner Cap 46 1 M10 x 19mm Bolt 47 2 Wide Spacer 48 2 M8 Washer 49 1 M8 x 58mm Bolt 50 1 1Ó Angle Cap 51 2 Handgrip 52 1 Weight Tube 53 1 M10 x 72mm Bolt 54 1 M8 x 70mm Bolt 55 1 Right Backrest Tube 56 1 Stop Screw 57 1 Pin Clip # 1 UserÕs Manual # 1 ...
English Manual
Page 20
...toll-free numbers listed at the left. When requesting help assembling or operating the WEIDER¨ PRO 900 ¥ a part is used commercially or for immediate purchase or special order when you visit your WEIDER¨ PRO 900 are available for rental purposes. This warranty gives you specific legal rights, and ...by telephone, call the following information: ¥ The MODEL NUMBER of the product (831.150760) ¥ The NAME of the product (WEIDER¨ PRO 900 weight bench) ¥ The PART NUMBER of the PART (see the PART LIST and the EXPLODED DRAWING on pages 18 and 19 of the decal...
...toll-free numbers listed at the left. When requesting help assembling or operating the WEIDER¨ PRO 900 ¥ a part is used commercially or for immediate purchase or special order when you visit your WEIDER¨ PRO 900 are available for rental purposes. This warranty gives you specific legal rights, and ...by telephone, call the following information: ¥ The MODEL NUMBER of the product (831.150760) ¥ The NAME of the product (WEIDER¨ PRO 900 weight bench) ¥ The PART NUMBER of the PART (see the PART LIST and the EXPLODED DRAWING on pages 18 and 19 of the decal...


