

English Manual
Page 11
... 34 81 75 45 18 91 38 34 75 81 70 75 34 45 3 71 19 45 38 70 62 56 20. Attach the Pulley to the CABLE DIAGRAMS and CABLE ID CHART on the Center Top Frame (14) with a 3/8" x 1 3/4" Bolt (66) and a 3/8" Nylon Locknut (70). 70 14 38 45 66 11... Attach the Pulley at the rear hole, inside the Top Frame with a 3/8" x 2 3/4" Bolt (81), two 3/8" Washers (75), two 1/2" Spacers (34), and a 3/8" Nylon Locknut (70). 18. Wrap...
... 34 81 75 45 18 91 38 34 75 81 70 75 34 45 3 71 19 45 38 70 62 56 20. Attach the Pulley to the CABLE DIAGRAMS and CABLE ID CHART on the Center Top Frame (14) with a 3/8" x 1 3/4" Bolt (66) and a 3/8" Nylon Locknut (70). 70 14 38 45 66 11... Attach the Pulley at the rear hole, inside the Top Frame with a 3/8" x 2 3/4" Bolt (81), two 3/8" Washers (75), two 1/2" Spacers (34), and a 3/8" Nylon Locknut (70). 18. Wrap...
English Manual
Page 20
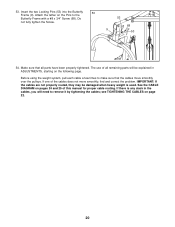
... been properly tightened. If there is used. see TIGHTENING THE CABLES on pages 24 and 25 of the cables does not move smoothly over the pulleys. Insert the two Locking Pins (53) into the Butterfly 53 Frame (9). Do not fully tighten the Screw. 53 68 9 53 54. See the CABLE... DIAGRAM on page 22. 20 Attach the tether on the following page. Make sure that the cables move smoothly, find and correct the problem. Before using ...
... been properly tightened. If there is used. see TIGHTENING THE CABLES on pages 24 and 25 of the cables does not move smoothly over the pulleys. Insert the two Locking Pins (53) into the Butterfly 53 Frame (9). Do not fully tighten the Screw. 53 68 9 53 54. See the CABLE... DIAGRAM on page 22. 20 Attach the tether on the following page. Make sure that the cables move smoothly, find and correct the problem. Before using ...


