

Uk Manual
Page 1
As a manufacturer, we are missing or damaged parts, please call: 08457 089 009 Or write: ICON Health & Fitness, Ltd. Unit 4 Revie Road Industrial Estate Revie Road, Beeston Leeds, LS11 8JG UK email: csuk@...
As a manufacturer, we are missing or damaged parts, please call: 08457 089 009 Or write: ICON Health & Fitness, Ltd. Unit 4 Revie Road Industrial Estate Revie Road, Beeston Leeds, LS11 8JG UK email: csuk@...
Uk Manual
Page 2
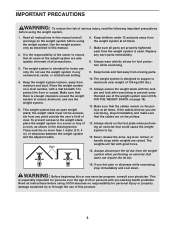
If the decal is missing, or if it is a registered trademark of ICON IP, Inc. 2 White Text/Clear Background WEIDER is illegible, call the telephone number on the weight system. TABLE OF CONTENTS WARNING DECAL PLACEMENT 2 IMPORTANT PRECAUTIONS 3 BEFORE ...19 CABLE DIAGRAMS 20 MAINTENANCE 21 EXERCISE GUIDELINES 22 ORDERING REPLACEMENT PARTS Back Cover Note: A PART IDENTIFICATION CHART and a PART LIST/EXPLODED DRAWING are attached in the location shown. Remove the PART IDENTIFICATION CHART and THE PART LIST/EXPLODED DRAWING before beginning assembly. WARNING DECAL PLACEMENT The ...
If the decal is missing, or if it is a registered trademark of ICON IP, Inc. 2 White Text/Clear Background WEIDER is illegible, call the telephone number on the weight system. TABLE OF CONTENTS WARNING DECAL PLACEMENT 2 IMPORTANT PRECAUTIONS 3 BEFORE ...19 CABLE DIAGRAMS 20 MAINTENANCE 21 EXERCISE GUIDELINES 22 ORDERING REPLACEMENT PARTS Back Cover Note: A PART IDENTIFICATION CHART and a PART LIST/EXPLODED DRAWING are attached in the location shown. Remove the PART IDENTIFICATION CHART and THE PART LIST/EXPLODED DRAWING before beginning assembly. WARNING DECAL PLACEMENT The ...
Uk Manual
Page 3
... the lat bar. 16. The weights will fall with pre-existing health problems. Read all times. 7. If you are adequately informed of all parts are raised. Wall 6. Replace any exercise program, consult your physician. The weight system is the responsibility of the owner to tip. 14. Always... important for home use the weight system. 5. Use the weight system only as shown in this or any worn parts immediately. 8. Always disconnect the lat bar from moving parts. 10. Keep the weight system indoors, away from the weight system at all warnings on page 18). 12. ...
... the lat bar. 16. The weights will fall with pre-existing health problems. Read all times. 7. If you are adequately informed of all parts are raised. Wall 6. Replace any exercise program, consult your physician. The weight system is the responsibility of the owner to tip. 14. Always... important for home use the weight system. 5. Use the weight system only as shown in this or any worn parts immediately. 8. Always disconnect the lat bar from moving parts. 10. Keep the weight system indoors, away from the weight system at all warnings on page 18). 12. ...
Uk Manual
Page 4
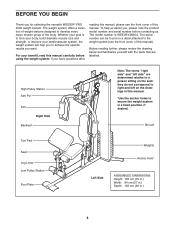
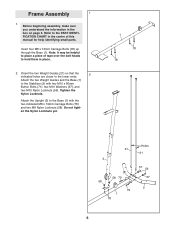
... see the front cover of this manual carefully before contacting us assist you for selecting the versatile WEIDER® PRO 4000 weight system. Before reading further, please review the drawing below and familiarize yourself with the parts that are determined relative to secure the weight system in .) 4 High Pulley Station Arm Pin Arm Right...
... see the front cover of this manual carefully before contacting us assist you for selecting the versatile WEIDER® PRO 4000 weight system. Before reading further, please review the drawing below and familiarize yourself with the parts that are determined relative to secure the weight system in .) 4 High Pulley Station Arm Pin Arm Right...
Uk Manual
Page 5
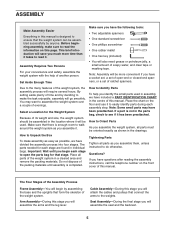
...8226; One phillips screwdriver • One rubber mallet • One hex key (included) • You will be oriented exactly as you identify the small parts used . Note: Assembly will also need grease or petroleum jelly, a small amount of soapy water, and clear tape or masking tape. You may have... assembly, make assembly as easy as you have divided the assembly process into four stages. Due to the many features of open the parts bag for the Weight System Because of its weight and size, the weight system should be assembled successfully by assembling the base and the...
...8226; One phillips screwdriver • One rubber mallet • One hex key (included) • You will be oriented exactly as you identify the small parts used . Note: Assembly will also need grease or petroleum jelly, a small amount of soapy water, and clear tape or masking tape. You may have... assembly, make assembly as easy as you have divided the assembly process into four stages. Due to the many features of open the parts bag for the Weight System Because of its weight and size, the weight system should be assembled successfully by assembling the base and the...
Uk Manual
Page 6
Tighten the Nylon Locknuts. Refer to the PART IDENTIFICATION CHART in the centre of tape over the bolt heads to hold them in the box on page 5. Insert four M8 x 74mm Carriage Bolts (...78) up through the Base (1). Attach the two Weight Guides and the Base (1) to place a piece of this manual for help identifying small parts. Note: It may be helpful to the Stabilizer (2) with the two indicated M8 x 74mm Carriage Bolts (78) and two M8 Nylon Locknuts (58). Frame Assembly...
Tighten the Nylon Locknuts. Refer to the PART IDENTIFICATION CHART in the centre of tape over the bolt heads to hold them in the box on page 5. Insert four M8 x 74mm Carriage Bolts (...78) up through the Base (1). Attach the two Weight Guides and the Base (1) to place a piece of this manual for help identifying small parts. Note: It may be helpful to the Stabilizer (2) with the two indicated M8 x 74mm Carriage Bolts (78) and two M8 Nylon Locknuts (58). Frame Assembly...
Uk Manual
Page 16
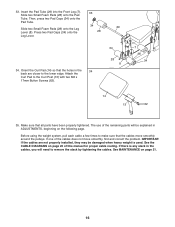
... slack in ADJUSTMENTS, beginning on the following page. The use of the cables does not move smoothly around the pulleys. If one of the remaining parts will need to the Curl Post (13) with two M6 x 17mm Button Screws (62). 34 28 8 7 28 34 14 13 62 35. Make sure that...
... slack in ADJUSTMENTS, beginning on the following page. The use of the cables does not move smoothly around the pulleys. If one of the remaining parts will need to the Curl Post (13) with two M6 x 17mm Button Screws (62). 34 28 8 7 28 34 14 13 62 35. Make sure that...
Uk Manual
Page 17
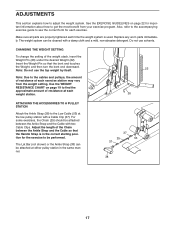
... the Handle Strap is used. For some exercises, the Chain (25) should be cleaned with a damp cloth and a mild, non-abrasive detergent. Replace any worn parts immediately. Use the WEIGHT RESISTANCE CHART on page 22 for important information about how to be attached at either pulley station in the correct starting...
... the Handle Strap is used. For some exercises, the Chain (25) should be cleaned with a damp cloth and a mild, non-abrasive detergent. Replace any worn parts immediately. Use the WEIGHT RESISTANCE CHART on page 22 for important information about how to be attached at either pulley station in the correct starting...
Uk Manual
Page 21
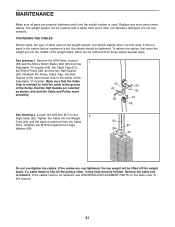
... groove of the Pulley, that the Half Guards are oriented as shown, and that the Cable Trap is oriented to be replaced, see ORDERING REPLACEMENT PARTS on the back cover of the Adjustable "U"-bracket. Make sure that the Cable and Pulley move smoothly. 45 43 66 56 43 51 48 See... Half Guards (43). If a cable tends to the center of this manual. 21 Remove the cable and re-install it is used. Replace any worn parts immediately. Slack can be cleaned with a damp cloth and a mild, non-abrasive detergent. Then, retighten the M12 Nut against the Large Washer (88). 55 87...
... groove of the Pulley, that the Half Guards are oriented as shown, and that the Cable Trap is oriented to be replaced, see ORDERING REPLACEMENT PARTS on the back cover of the Adjustable "U"-bracket. Make sure that the Cable and Pulley move smoothly. 45 43 66 56 43 51 48 See... Half Guards (43). If a cable tends to the center of this manual. 21 Remove the cable and re-install it is used. Replace any worn parts immediately. Slack can be cleaned with a damp cloth and a mild, non-abrasive detergent. Then, retighten the M12 Nut against the Large Washer (88). 55 87...
Uk Manual
Page 22
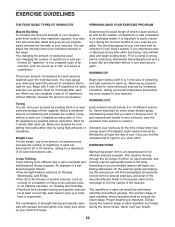
... range of motion for the time of your muscles by increasing circulation, raising your body's signals. This requires moving only the appropriate parts of repetitions in each set should be performed smoothly and without pausing. On the exercise guide accompanying this manual you will leave you...must gauge your body time to their capacity. When you . EXERCISE FORM Maintaining proper form is important to session. It is an essential part of 30 seconds between sets. Your muscles will reshape and strengthen your body, plus develop your muscles by completing more oxygen to 30 ...
... range of motion for the time of your muscles by increasing circulation, raising your body's signals. This requires moving only the appropriate parts of repetitions in each set should be performed smoothly and without pausing. On the exercise guide accompanying this manual you will leave you...must gauge your body time to their capacity. When you . EXERCISE FORM Maintaining proper form is important to session. It is an essential part of 30 seconds between sets. Your muscles will reshape and strengthen your body, plus develop your muscles by completing more oxygen to 30 ...
Uk Manual
Page 23
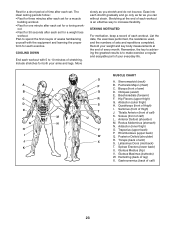
... of each workout is to increase flexibility. Remember, the key to achieving the greatest results is an effective way to make exercise a regular and enjoyable part of your arms and legs. Pectoralis Major (chest) C. Quadriceps (front of thigh) I J K L M N O P Q R S T U V W X MUSCLE CHART A. Adductor (inner thigh) O. Rhomboideus (upper back) Q. Spinae Erectors (lower back) U. COOLING...
... of each workout is to increase flexibility. Remember, the key to achieving the greatest results is an effective way to make exercise a regular and enjoyable part of your arms and legs. Pectoralis Major (chest) C. Quadriceps (front of thigh) I J K L M N O P Q R S T U V W X MUSCLE CHART A. Adductor (inner thigh) O. Rhomboideus (upper back) Q. Spinae Erectors (lower back) U. COOLING...
Uk Manual
Page 24
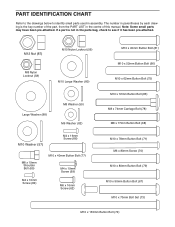
PART IDENTIFICATION CHART Refer to the drawings below to see if it has been pre-attached. M12 Nut (87) M10 Nylon Locknut (56) M8 Nylon Locknut (... Set (73) M10 x 155mm Button Bolt (74) The number in parentheses by each drawing is not in the parts bag, check to identify small parts used in the centre of this manual. If a part is the key number of the part, from the PART LIST in assembly. Note: Some small parts may have been pre-attached.
PART IDENTIFICATION CHART Refer to the drawings below to see if it has been pre-attached. M12 Nut (87) M10 Nylon Locknut (56) M8 Nylon Locknut (... Set (73) M10 x 155mm Button Bolt (74) The number in parentheses by each drawing is not in the parts bag, check to identify small parts used in the centre of this manual. If a part is the key number of the part, from the PART LIST in assembly. Note: Some small parts may have been pre-attached.

Uk Manual
Page 25
... x 72mm Button Bolt 86 6 M4 x 16mm Screw 87 1 M12 Nut 88 1 Large Washer # 1 User's Manual # 1 Exercise Guide # 2 Grease Packet # 1 Hex Key Note: "#" indicates a non-illustrated part. Qty. Specifications are subject to change without notice. Qty. Description Key No. See the back cover of the user's manual for information about ordering replacement...
... x 72mm Button Bolt 86 6 M4 x 16mm Screw 87 1 M12 Nut 88 1 Large Washer # 1 User's Manual # 1 Exercise Guide # 2 Grease Packet # 1 Hex Key Note: "#" indicates a non-illustrated part. Qty. Specifications are subject to change without notice. Qty. Description Key No. See the back cover of the user's manual for information about ordering replacement...
Uk Manual
Page 28
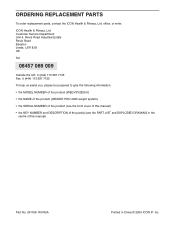
office, or write: ICON Health & Fitness, Ltd. ORDERING REPLACEMENT PARTS To order replacement parts, contact the ICON Health & Fitness, Ltd. Customer Service Department Unit 4, Revie Road Industrial Estate Revie Road Beeston Leeds, LS118JG UK Tel: 08457 089 009 Outside ...: • the MODEL NUMBER of the product (WEEVSY2826.0) • the NAME of the product (WEIDER PRO 4000 weight system) • the SERIAL NUMBER of the product (see the front cover of this manual) • the KEY NUMBER and DESCRIPTION of the part(s) (see the PART LIST and EXPLODED DRAWING in the centre of this manual...
office, or write: ICON Health & Fitness, Ltd. ORDERING REPLACEMENT PARTS To order replacement parts, contact the ICON Health & Fitness, Ltd. Customer Service Department Unit 4, Revie Road Industrial Estate Revie Road Beeston Leeds, LS118JG UK Tel: 08457 089 009 Outside ...: • the MODEL NUMBER of the product (WEEVSY2826.0) • the NAME of the product (WEIDER PRO 4000 weight system) • the SERIAL NUMBER of the product (see the front cover of this manual) • the KEY NUMBER and DESCRIPTION of the part(s) (see the PART LIST and EXPLODED DRAWING in the centre of this manual...


