
English Manual
Page 1
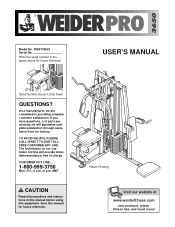
USER'S MANUAL Serial Number Decal (Under Seat) QUESTIONS? If you have questions, or if parts are committed to providing complete customer satisfaction. Save this equipment. Patent Pending Visit our website at www.weiderfitness.com new products, prizes, fitness tips, and ...
USER'S MANUAL Serial Number Decal (Under Seat) QUESTIONS? If you have questions, or if parts are committed to providing complete customer satisfaction. Save this equipment. Patent Pending Visit our website at www.weiderfitness.com new products, prizes, fitness tips, and ...

English Manual
Page 2
WEIDER is a registered trademark of this manual. Remove the PART IDENTIFICATION CHART and the PART LIST/EXPLODED DRAWING before beginning assembly. TABLE OF CONTENTS IMPORTANT PRECAUTIONS 3 BEFORE YOU BEGIN 4 ASSEMBLY 5 ADJUSTMENTS 22 WEIGHT RESISTANCE CHART 24 TROUBLESHOOTING 25 CABLE DIAGRAMS 26 ORDERING REPLACEMENT PARTS Back Cover LIMITED WARRANTY Back Cover Note: A PART IDENTIFICATION CHART and a PART LIST/EXPLODED DRAWING are attached in the center of ICON Health & Fitness, Inc. 2
WEIDER is a registered trademark of this manual. Remove the PART IDENTIFICATION CHART and the PART LIST/EXPLODED DRAWING before beginning assembly. TABLE OF CONTENTS IMPORTANT PRECAUTIONS 3 BEFORE YOU BEGIN 4 ASSEMBLY 5 ADJUSTMENTS 22 WEIGHT RESISTANCE CHART 24 TROUBLESHOOTING 25 CABLE DIAGRAMS 26 ORDERING REPLACEMENT PARTS Back Cover LIMITED WARRANTY Back Cover Note: A PART IDENTIFICATION CHART and a PART LIST/EXPLODED DRAWING are attached in the center of ICON Health & Fitness, Inc. 2
English Manual
Page 3
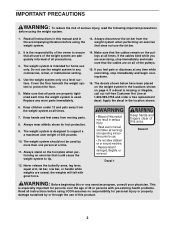
... the floor beneath the weight system to support a a maximum user weight of 35 or persons with great force. Make sure that all parts are properly tightened each time the weight system is the responsibility of all instructions in this manual and in any exercise program, consult your ...physician. If you are adequately informed of the owner to tip. 12. Keep children under 12 and pets away from moving parts. 8. Decal 2 10. Read all precautions. 3. Always disconnect the lat bar from the weight system when performing an exercise that all times. 7....
... the floor beneath the weight system to support a a maximum user weight of 35 or persons with great force. Make sure that all parts are properly tightened each time the weight system is the responsibility of all instructions in this manual and in any exercise program, consult your ...physician. If you are adequately informed of the owner to tip. 12. Keep children under 12 and pets away from moving parts. 8. Decal 2 10. Read all precautions. 3. Always disconnect the lat bar from the weight system when performing an exercise that all times. 7....
English Manual
Page 4
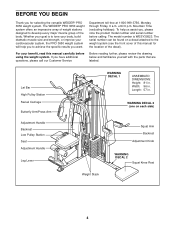
... help us assist you have additional questions, please call our Customer Service Before reading further, please review the drawing below and familiarize yourself with the parts that are labeled. until 6 p.m. Lat Bar High Pulley Station Swivel Carriage Butterfly Arm/Press Arm Adjustment Handle Backrest Low Pulley Station Seat Adjustment Handle ... 81 in . Length: 57 in. Mountain Time (excluding holidays). BEFORE YOU BEGIN Thank you want. Whether your benefit, read this manual for selecting the versatile WEIDER® PRO 3650 weight system. For your goal is WESY39523.
... help us assist you have additional questions, please call our Customer Service Before reading further, please review the drawing below and familiarize yourself with the parts that are labeled. until 6 p.m. Lat Bar High Pulley Station Swivel Carriage Butterfly Arm/Press Arm Adjustment Handle Backrest Low Pulley Station Seat Adjustment Handle ... 81 in . Length: 57 in. Mountain Time (excluding holidays). BEFORE YOU BEGIN Thank you want. Whether your benefit, read this manual for selecting the versatile WEIDER® PRO 3650 weight system. For your goal is WESY39523.
English Manual
Page 5
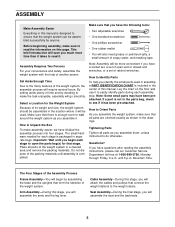
...Friday, 6 a.m. Cable Assembly-During this stage, you assemble it takes to ensure that the weight system can be used in assembly, a PART IDENTIFICATION CHART is packaged in separate bags. Make sure that form the skeleton of ratchet wrenches. Important: Wait until you begin by assembling the... base and the uprights that you identify the small parts used . Seat Assembly-During the final stage, you will assemble the seat and the backrests. 5 Assembly Requires Two Persons For your ...
...Friday, 6 a.m. Cable Assembly-During this stage, you assemble it takes to ensure that the weight system can be used in assembly, a PART IDENTIFICATION CHART is packaged in separate bags. Make sure that form the skeleton of ratchet wrenches. Important: Wait until you begin by assembling the... base and the uprights that you identify the small parts used . Seat Assembly-During the final stage, you will assemble the seat and the backrests. 5 Assembly Requires Two Persons For your ...
English Manual
Page 6
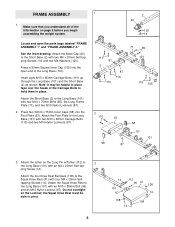
... 110 110 71 85 101 110 105 2 110 58 53 87 58 87 101 3. Press two 50mm x 75mm Inner Caps (58) into the open the parts bags labeled "FRAME ASSEMBLY 1" and "FRAME ASSEMBLY 2." Attach the Foot Plate to pivot. 6 14 101 87 112 96 41 108 14 108 108 14 the...
... 110 110 71 85 101 110 105 2 110 58 53 87 58 87 101 3. Press two 50mm x 75mm Inner Caps (58) into the open the parts bags labeled "FRAME ASSEMBLY 1" and "FRAME ASSEMBLY 2." Attach the Foot Plate to pivot. 6 14 101 87 112 96 41 108 14 108 108 14 the...
English Manual
Page 10
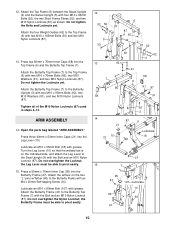
... Top Frame (7). Attach the Butterfly Top Frame (7) to the Butterfly Top Frame (7) with an M4 x 20mm Self-tapping Screw (14). ARM ASSEMBLY 14. Open the parts bag labeled "ARM ASSEMBLY." 12. Do not tighten the Locknuts yet. Press three 40mm x 50mm Inner Caps (21) into the Leg Lever (10). Attach the...
... Top Frame (7). Attach the Butterfly Top Frame (7) to the Butterfly Top Frame (7) with an M4 x 20mm Self-tapping Screw (14). ARM ASSEMBLY 14. Open the parts bag labeled "ARM ASSEMBLY." 12. Do not tighten the Locknuts yet. Press three 40mm x 50mm Inner Caps (21) into the Leg Lever (10). Attach the...
English Manual
Page 11
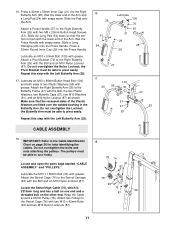
.... the Pivot Bracket must be able to pivot easily. Repeat this step with the Bolt and an M10 Nylon Locknut (87). Locate and open the parts bags labeled "CABLE ASSEMBLY" and "PULLEYS." 78 74 30 87 Lubricate the M10 x 165mm Bolt (30) with soapy water. Locate the Swivel High Cable (74...
.... the Pivot Bracket must be able to pivot easily. Repeat this step with the Bolt and an M10 Nylon Locknut (87). Locate and open the parts bags labeled "CABLE ASSEMBLY" and "PULLEYS." 78 74 30 87 Lubricate the M10 x 165mm Bolt (30) with soapy water. Locate the Swivel High Cable (74...
English Manual
Page 19
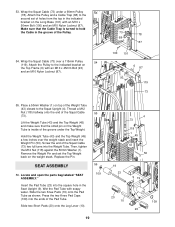
... Weight (45) a few inches over a 115mm Pulley 54 (119). Insert the Pad Tube (23) into the Weight Tube. SEAT ASSEMBLY 56. Locate and open the parts bag labeled "SEAT ASSEMBLY." Press the two Knee Pad Caps (109) into the ends of the Squat Cable (73) two full turns into the square...
... Weight (45) a few inches over a 115mm Pulley 54 (119). Insert the Pad Tube (23) into the Weight Tube. SEAT ASSEMBLY 56. Locate and open the parts bag labeled "SEAT ASSEMBLY." Press the two Knee Pad Caps (109) into the ends of the Squat Cable (73) two full turns into the square...
English Manual
Page 21
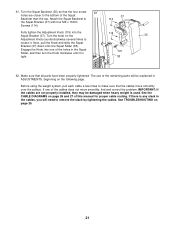
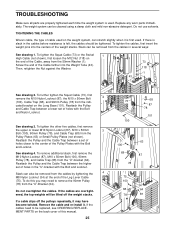
... heavy weight is used. If one of the cables does not move smoothly over the pulleys. Attach the Squat Backrest to make sure that all parts have been properly tightened. Before using the weight system, pull each cable a few times to the Squat Bracket (37) with four M6 x 16mm Screws (114... remove the slack by tightening the cables. If there is tight. 38 62. Turn the knob on page 25. 21 The use of the remaining parts will need to loosen it is any slack in ADJUSTMENTS, beginning on page 26 and 27 of the Squat Backrest than the top.
... heavy weight is used. If one of the cables does not move smoothly over the pulleys. Attach the Squat Backrest to make sure that all parts have been properly tightened. Before using the weight system, pull each cable a few times to the Squat Bracket (37) with four M6 x 16mm Screws (114... remove the slack by tightening the cables. If there is tight. 38 62. Turn the knob on page 25. 21 The use of the remaining parts will need to loosen it is any slack in ADJUSTMENTS, beginning on page 26 and 27 of the Squat Backrest than the top.
English Manual
Page 22
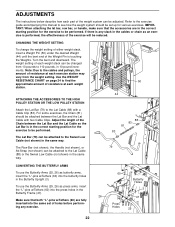
... the approximate amount of resistance at each weight station. For some exercises, the Chain (81) should be performed. ADJUSTMENTS The instructions below describe how each part of the Weight Pin is touching the Weights. Turn the bent end downward. CHANGING THE WEIGHT SETTING To change the weight setting of either weight...
... the approximate amount of resistance at each weight station. For some exercises, the Chain (81) should be performed. ADJUSTMENTS The instructions below describe how each part of the Weight Pin is touching the Weights. Turn the bent end downward. CHANGING THE WEIGHT SETTING To change the weight setting of either weight...
English Manual
Page 25
... overtightened, the top weights will be lifted off the pulleys repeatedly, it may need to be replaced, see ORDERING REPLACEMENT PARTS on the weight system, can stretch slightly when it . Reattach the Pulley and the Cable Trap between a set of holes closer to remove the 90mm ... need to the center of the Cable farther into the centers of holes in the "U"-bracket with the Bolt and Nylon Locknut. Replace any worn parts immediately. See drawing 3. Remove the cable and re-install it is first used . Do not use solvents. Slack can be tightened. To tighten the Squat...
... overtightened, the top weights will be lifted off the pulleys repeatedly, it may need to be replaced, see ORDERING REPLACEMENT PARTS on the weight system, can stretch slightly when it . Reattach the Pulley and the Cable Trap between a set of holes closer to remove the 90mm ... need to the center of the Cable farther into the centers of holes in the "U"-bracket with the Bolt and Nylon Locknut. Replace any worn parts immediately. See drawing 3. Remove the cable and re-install it is first used . Do not use solvents. Slack can be tightened. To tighten the Squat...
English Manual
Page 28
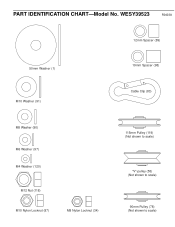
WESY39523 R0403A 12mm Spacer (89) 50mm Washer (1) M10 Washer (91) 19mm Spacer (98) Cable Clip (83) M8 Washer (90) M6 Washer (97) M4 Washer (120) M12 Nut (118) M10 Nylon Locknut (87) M8 Nylon Locknut (34) 115mm Pulley (119) (Not shown to scale) "V"-pulley (55) (Not shown to scale) 90mm Pulley (78) (Not shown to scale) PART IDENTIFICATION CHART-Model No.
WESY39523 R0403A 12mm Spacer (89) 50mm Washer (1) M10 Washer (91) 19mm Spacer (98) Cable Clip (83) M8 Washer (90) M6 Washer (97) M4 Washer (120) M12 Nut (118) M10 Nylon Locknut (87) M8 Nylon Locknut (34) 115mm Pulley (119) (Not shown to scale) "V"-pulley (55) (Not shown to scale) 90mm Pulley (78) (Not shown to scale) PART IDENTIFICATION CHART-Model No.
English Manual
Page 31
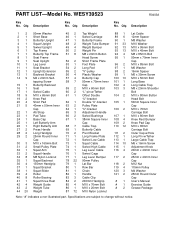
PART LIST-Model No. Description Key No. Description Key No. Qty. Qty. Qty. Specifications are subject to change without notice. Description 12 21 31 41 51 ... Cap 25mm x 40mm Inner Cap M12 Nut 115mm Pulley M4 Washer 25mm Round Outer Cap User's Manual Exercise Guide Grease Package Note: "#" indicates a non-illustrated part. WESY39523 R0403A Key No.
PART LIST-Model No. Description Key No. Description Key No. Qty. Qty. Qty. Specifications are subject to change without notice. Description 12 21 31 41 51 ... Cap 25mm x 40mm Inner Cap M12 Nut 115mm Pulley M4 Washer 25mm Round Outer Cap User's Manual Exercise Guide Grease Package Note: "#" indicates a non-illustrated part. WESY39523 R0403A Key No.
English Manual
Page 33
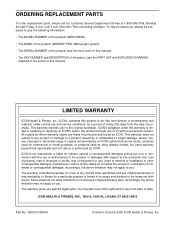
...S. 1000 W., LOGAN, UT 84321-9813 Part No. 194012 R0403A Printed in workmanship and material, under this product to be prepared to give the following information: • The MODEL NUMBER of the product (WESY39523) • The NAME of the product (WEIDER® PRO 3650 weight system) • The SERIAL NUMBER... of the product (see the front cover of this manual) • The KEY NUMBER and DESCRIPTION of the part(s) (see the PART LIST and EXPLODED DRAWING attached in the center of ...
...S. 1000 W., LOGAN, UT 84321-9813 Part No. 194012 R0403A Printed in workmanship and material, under this product to be prepared to give the following information: • The MODEL NUMBER of the product (WESY39523) • The NAME of the product (WEIDER® PRO 3650 weight system) • The SERIAL NUMBER... of the product (see the front cover of this manual) • The KEY NUMBER and DESCRIPTION of the part(s) (see the PART LIST and EXPLODED DRAWING attached in the center of ...


