

English Manual
Page 2
WEIDER is a registered trademark of this manual. Remove the PART IDENTIFICATION CHART and the PART LIST/EXPLODED DRAWING before beginning assembly. TABLE OF CONTENTS IMPORTANT PRECAUTIONS 3 BEFORE YOU BEGIN 4 ASSEMBLY 5 ADJUSTMENTS 22 WEIGHT RESISTANCE CHART 24 TROUBLESHOOTING 25 CABLE DIAGRAMS 26 ORDERING REPLACEMENT PARTS Back Cover LIMITED WARRANTY Back Cover Note: A PART IDENTIFICATION CHART and a PART LIST/EXPLODED DRAWING are attached in the center of ICON Health & Fitness, Inc. 2
WEIDER is a registered trademark of this manual. Remove the PART IDENTIFICATION CHART and the PART LIST/EXPLODED DRAWING before beginning assembly. TABLE OF CONTENTS IMPORTANT PRECAUTIONS 3 BEFORE YOU BEGIN 4 ASSEMBLY 5 ADJUSTMENTS 22 WEIGHT RESISTANCE CHART 24 TROUBLESHOOTING 25 CABLE DIAGRAMS 26 ORDERING REPLACEMENT PARTS Back Cover LIMITED WARRANTY Back Cover Note: A PART IDENTIFICATION CHART and a PART LIST/EXPLODED DRAWING are attached in the center of ICON Health & Fitness, Inc. 2

English Manual
Page 21
...58. Tighten all parts have been properly tightened. Turn the Adjustment Knob (115) counterclockwise several times to remove the slack by tightening the cables. Attach the Curl Pad (17) to the Squat Bracket. See TROUBLESHOOTING on page 26 and 27 of the remaining parts will need to...holes are not properly installed, they may be damaged when heavy weight is any slack in the cables, you will be explained in this manual for proper cable routing. IMPORTANT: If the cables are clos- See the CABLE DIAGRAMS on page 25. 21 er to the Squat Bracket (37) with two 1/4" x 3/4" Screws...
...58. Tighten all parts have been properly tightened. Turn the Adjustment Knob (115) counterclockwise several times to remove the slack by tightening the cables. Attach the Curl Pad (17) to the Squat Bracket. See TROUBLESHOOTING on page 26 and 27 of the remaining parts will need to...holes are not properly installed, they may be damaged when heavy weight is any slack in the cables, you will be explained in this manual for proper cable routing. IMPORTANT: If the cables are clos- See the CABLE DIAGRAMS on page 25. 21 er to the Squat Bracket (37) with two 1/4" x 3/4" Screws...
English Manual
Page 26
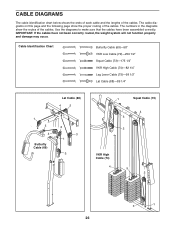
... cable diagrams on this page and the following page show the routes of the cables. IMPORTANT: If the cables have been assembled correctly. Cable Identification Chart Butterfly Cable (69)-58" VKR Low Cable (72)-259 1/2" Squat Cable (73)-175 1/4" VKR High Cable (74)-82 1/4" Leg Lever Cable (75)-98 1/2" Lat Cable (88)-89 1/4" Lat Cable (88) 4 2 1 5 4 Butterfly Cable (69) 2 3 1 3 1 Squat Cable (73) 4 3 2 VKR High Cable...
... cable diagrams on this page and the following page show the routes of the cables. IMPORTANT: If the cables have been assembled correctly. Cable Identification Chart Butterfly Cable (69)-58" VKR Low Cable (72)-259 1/2" Squat Cable (73)-175 1/4" VKR High Cable (74)-82 1/4" Leg Lever Cable (75)-98 1/2" Lat Cable (88)-89 1/4" Lat Cable (88) 4 2 1 5 4 Butterfly Cable (69) 2 3 1 3 1 Squat Cable (73) 4 3 2 VKR High Cable...


