
English Manual
Page 2
TABLE OF CONTENTS WARNING DECAL PLACEMENT 3 IMPORTANT PRECAUTIONS 4 BEFORE YOU BEGIN 5 ASSEMBLY 6 ADJUSTMENTS 16 CONSOLE OPERATION 21 TROUBLESHOOTING 23 EXERCISE GUIDELINES 24 ORDERING REPLACEMENT PARTS Back Cover LIMITED WARRANTY Back Cover Note: A PART IDENTIFICATION CHART and a PART LIST/EXPLODED DRAWING are attached in the center of ICON IP, Inc. 2 Remove the PART IDENTIFICATION CHART and PART LIST/EXPLODED DRAWING before beginning assembly. WEIDER is a registered trademark of this manual.
TABLE OF CONTENTS WARNING DECAL PLACEMENT 3 IMPORTANT PRECAUTIONS 4 BEFORE YOU BEGIN 5 ASSEMBLY 6 ADJUSTMENTS 16 CONSOLE OPERATION 21 TROUBLESHOOTING 23 EXERCISE GUIDELINES 24 ORDERING REPLACEMENT PARTS Back Cover LIMITED WARRANTY Back Cover Note: A PART IDENTIFICATION CHART and a PART LIST/EXPLODED DRAWING are attached in the center of ICON IP, Inc. 2 Remove the PART IDENTIFICATION CHART and PART LIST/EXPLODED DRAWING before beginning assembly. WEIDER is a registered trademark of this manual.
English Manual
Page 23
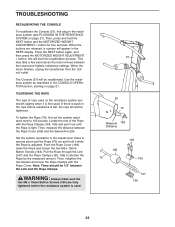
... resistance level to the lowest level. WARNING: Always make sure the two M5 x 16mm Button Screws (164) are released, a number will start the recalibration process. TROUBLESHOOTING RECALIBRATING THE CONSOLE To recalibrate the Console (21), first plug in the CONSOLE OPERATION section, starting on page 21. Then, press and hold it while...
... resistance level to the lowest level. WARNING: Always make sure the two M5 x 16mm Button Screws (164) are released, a number will start the recalibration process. TROUBLESHOOTING RECALIBRATING THE CONSOLE To recalibrate the Console (21), first plug in the CONSOLE OPERATION section, starting on page 21. Then, press and hold it while...