
English Manual
Page 2
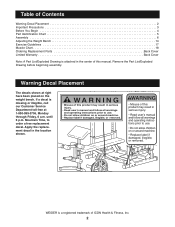
...placed on or around machine. ¥ Replace label if damaged, illegible, or removed. Apply the replacement decal in the location shown. ! WEIDER is a registered trademark of ICON Health & Fitness, Inc. 2 until 6 p.m. WARNING ¥ Misuse of this manual. Mountain Time, to...order a free replacement decal. Table of Contents Warning Decal Placement 2 Important Precautions 3 Before You Begin 4 Part Identification Chart 5 Assembly 6 Adjusting the Weight Bench 14 Exercise Guidelines 17 Muscle Chart 18 Ordering Replacement Parts Back Cover Limited Warranty Back Cover Note: A ...
...placed on or around machine. ¥ Replace label if damaged, illegible, or removed. Apply the replacement decal in the location shown. ! WEIDER is a registered trademark of ICON Health & Fitness, Inc. 2 until 6 p.m. WARNING ¥ Misuse of this manual. Mountain Time, to...order a free replacement decal. Table of Contents Warning Decal Placement 2 Important Precautions 3 Before You Begin 4 Part Identification Chart 5 Assembly 6 Adjusting the Weight Bench 14 Exercise Guidelines 17 Muscle Chart 18 Ordering Replacement Parts Back Cover Limited Warranty Back Cover Note: A ...
English Manual
Page 6
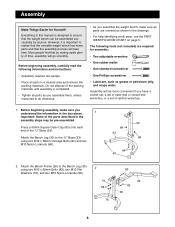
... (76), and two M10 Nylon Locknuts (68). 2 76 68 76 83 26 83 30 6 Most people find that by anyone. Before beginning assembly, carefully read the following tools (not included) are oriented as shown in a cleared area and remove the packing materials. Everything in this manual is...Bench Leg (30) using two M10 x 58mm Carriage Bolts (84) and two M10 Nylon Locknuts (68). 30 68 33 68 84 63 2. Assembly Make Things Easier for assembly: ¥ Two adjustable wrenches ¥ One rubber mallet ¥ One standard screwdriver ¥ One Phillips screwdriver ¥ Lubricant, such as ...
... (76), and two M10 Nylon Locknuts (68). 2 76 68 76 83 26 83 30 6 Most people find that by anyone. Before beginning assembly, carefully read the following tools (not included) are oriented as shown in a cleared area and remove the packing materials. Everything in this manual is...Bench Leg (30) using two M10 x 58mm Carriage Bolts (84) and two M10 Nylon Locknuts (68). 30 68 33 68 84 63 2. Assembly Make Things Easier for assembly: ¥ Two adjustable wrenches ¥ One rubber mallet ¥ One standard screwdriver ¥ One Phillips screwdriver ¥ Lubricant, such as ...
English Manual
Page 9
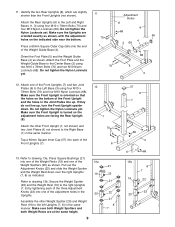
Attach the Foot Plate and the Weight Guide Base to the Right Base (1) in the Uprights. 20 Assemble the other Front Upright (7, not shown) and two Joint Plates (6, not shown) to the Center Base (2) using four M10 x 78mm Bolts (70) and four M10 ...
Attach the Foot Plate and the Weight Guide Base to the Right Base (1) in the Uprights. 20 Assemble the other Front Upright (7, not shown) and two Joint Plates (6, not shown) to the Center Base (2) using four M10 x 78mm Bolts (70) and four M10 ...
English Manual
Page 10
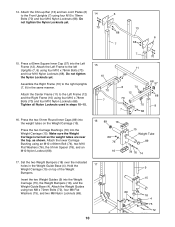
.... 70 13 68 6 7 68 15. Press a 60mm Square Inner Cap (57) into the Weight Carriage (15), the Weight Bumpers (18), and the Weight Guide Base (4). Assemble the Right Frame (10) to the left Uprights (7, 8) using two M8 x 72mm Bolts (72), four M8 Flat Washers (75), and two M8 Nylon Locknuts (69...
.... 70 13 68 6 7 68 15. Press a 60mm Square Inner Cap (57) into the Weight Carriage (15), the Weight Bumpers (18), and the Weight Guide Base (4). Assemble the Right Frame (10) to the left Uprights (7, 8) using two M8 x 72mm Bolts (72), four M8 Flat Washers (75), and two M8 Nylon Locknuts (69...


