
User Manual
Page 2
Inspect and tighten all instructions before beginning assembly. If the cables bind while you use the let bar. 11. Nevci telecie u,c press alul.7, ieg ieVer, :at the center of this product. 2 The weights .... 10. This is especially important for personal injury or property damage sustained by or through the use . TABLE OF CONTENTS IMPORTANT PRECAUTIONS BEFORE YOU BEGIN ASSEMBLY ADJUSTMENT TROUBLE-SHOOTING AND MAINTENANCE CABLE DIAGRAM ORDERING REPLACEMENT PARTS LIMITED WARRANTY 2 3 4 15 18 19 Back Cover Back Cover Note: A PART IDENTIFICATION CHART and a PARTS...
Inspect and tighten all instructions before beginning assembly. If the cables bind while you use the let bar. 11. Nevci telecie u,c press alul.7, ieg ieVer, :at the center of this product. 2 The weights .... 10. This is especially important for personal injury or property damage sustained by or through the use . TABLE OF CONTENTS IMPORTANT PRECAUTIONS BEFORE YOU BEGIN ASSEMBLY ADJUSTMENT TROUBLE-SHOOTING AND MAINTENANCE CABLE DIAGRAM ORDERING REPLACEMENT PARTS LIMITED WARRANTY 2 3 4 15 18 19 Back Cover Back Cover Note: A PART IDENTIFICATION CHART and a PARTS...
User Manual
Page 3
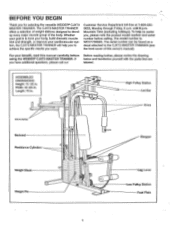
...achieve the specific results you want. ASSEMBLED DIMENSIONS: Height: 75 1/2 in . Backrest Resistance Cylinders Weight Stack Weight Pin ° 0 0\ sh• Stepper Leg Lever Low Pulley Station Foot Plate For your cardiovascular system, the CJXT3 MASTER TRAINER will help us assist you to tone... this manual carefully before calling. If below and familiarize yourself with the parts that are you for selecting the versatile WEIDER° CJXT3 MASTER TRAINER. Customer Service Department toll-free at 1-800-2250653, Monday through Friday, 6 a.m. Whether your goal is WESY700920....
...achieve the specific results you want. ASSEMBLED DIMENSIONS: Height: 75 1/2 in . Backrest Resistance Cylinders Weight Stack Weight Pin ° 0 0\ sh• Stepper Leg Lever Low Pulley Station Foot Plate For your cardiovascular system, the CJXT3 MASTER TRAINER will help us assist you to tone... this manual carefully before calling. If below and familiarize yourself with the parts that are you for selecting the versatile WEIDER° CJXT3 MASTER TRAINER. Customer Service Department toll-free at 1-800-2250653, Monday through Friday, 6 a.m. Whether your goal is WESY700920....
User Manual
Page 4
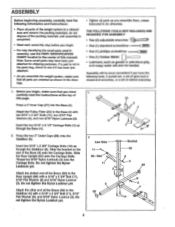
...with a 5/16" x 2 3/4" Bolt (11), 5/16" Flat Washer (8), and 5/16" Nylon Locknut (3). do otherwise. THE FOLLOWING TOOLS (NOT INCLUDED) ARE REQUIRED FOR ASSEMBLY: • Two (2) adjustable wrenches • One (1) standard screwdriver • One (1) phIllips screwdriver • One (1) Rubber Mallet • Lubricant, such as you have ...Attach the slotted end of this page. Attach the Pulley Plate (20) to see if it has been preattached. • As you assemble the weight system, make sure that all parts are oriented as shown in the drawings. • Tighten all parts of the weight ...
...with a 5/16" x 2 3/4" Bolt (11), 5/16" Flat Washer (8), and 5/16" Nylon Locknut (3). do otherwise. THE FOLLOWING TOOLS (NOT INCLUDED) ARE REQUIRED FOR ASSEMBLY: • Two (2) adjustable wrenches • One (1) standard screwdriver • One (1) phIllips screwdriver • One (1) Rubber Mallet • Lubricant, such as you have ...Attach the slotted end of this page. Attach the Pulley Plate (20) to see if it has been preattached. • As you assemble the weight system, make sure that all parts are oriented as shown in the drawings. • Tighten all parts of the weight ...
User Manual
Page 8
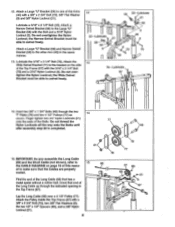
... Top Frame (67) with the Bolt and a 5/16" Nylon Locknut (3). Do not thread the Nylon Locknuts all the way onto the Bolts until o 48 after assembly step 22 is completed. 0 A (610 78 21 0 77 78 15. Lay the Long Cable (66) over a 4 1/2" Pulley (77). I , 46 9 56 4 3 11 •...33-Lubricate 21 58__ft..• 0-( - 3 -r3•I Insert two 3/8" x 1 3/4" Bolts (48) through the Indicated opening in the same manner. 13. IMPORTANT: As you assemble the Long Cable (66) and the Short Cable (not shown), refer to the bracket on page 19 of the Long Cable up through the two...
... Top Frame (67) with the Bolt and a 5/16" Nylon Locknut (3). Do not thread the Nylon Locknuts all the way onto the Bolts until o 48 after assembly step 22 is completed. 0 A (610 78 21 0 77 78 15. Lay the Long Cable (66) over a 4 1/2" Pulley (77). I , 46 9 56 4 3 11 •...33-Lubricate 21 58__ft..• 0-( - 3 -r3•I Insert two 3/8" x 1 3/4" Bolts (48) through the Indicated opening in the same manner. 13. IMPORTANT: As you assemble the Long Cable (66) and the Short Cable (not shown), refer to the bracket on page 19 of the Long Cable up through the two...

User Manual
Page 19
Use the diagram to make sure that the two cables are assembled correctly. CABLE DIAGRAM The cable diagram below shows the proper routing of the Long Cable (66). 2 4 8-Top Frame 7 3 6 0 5 Long Cable (66) High Pulley Station D Weight Tube • Short Cable (23) Low Pulley Station 19 the numbers show the routing of the Short Cable (23); The letters show the routing of the Short Cable (23) and the Long Cable (66).
Use the diagram to make sure that the two cables are assembled correctly. CABLE DIAGRAM The cable diagram below shows the proper routing of the Long Cable (66). 2 4 8-Top Frame 7 3 6 0 5 Long Cable (66) High Pulley Station D Weight Tube • Short Cable (23) Low Pulley Station 19 the numbers show the routing of the Short Cable (23); The letters show the routing of the Short Cable (23) and the Long Cable (66).
User Manual
Page 21
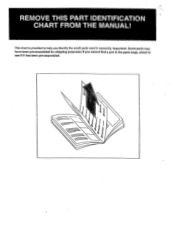
important: Some parts may have been pre-assembled for shipping purposes; If you cannot find a part in the parts bags, check to help you identify the small parts used in assembly. This chart is provided to see if it has been pre-assembled. REMOVE THIS PART IDENTIFICATION CHART FROM THE MANUAL!
important: Some parts may have been pre-assembled for shipping purposes; If you cannot find a part in the parts bags, check to help you identify the small parts used in assembly. This chart is provided to see if it has been pre-assembled. REMOVE THIS PART IDENTIFICATION CHART FROM THE MANUAL!


