
User Manual
Page 1
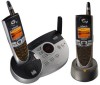
Introduction EXPAND YOUR i 5853, i 5866 OR i 5867 SYSTEMS. YOUR BASE WILL WORK WITH UP TO 8 HANDSETS!!! IMPORTANT: The i 5807 is designed to familiarize you with the i 5853, i 5866 or i 5867 systems. You must have one of these Base Units in order to your i 5853, i 5866 or i 5867 User's Manual. 1 For detailed operational instructions, please refer to use with the i 5807 Accessory Handset setup, registration and basic functions. This manual is an Accessory Handset for use the i 5807 Accessory Handset.
Introduction EXPAND YOUR i 5853, i 5866 OR i 5867 SYSTEMS. YOUR BASE WILL WORK WITH UP TO 8 HANDSETS!!! IMPORTANT: The i 5807 is designed to familiarize you with the i 5853, i 5866 or i 5867 systems. You must have one of these Base Units in order to your i 5853, i 5866 or i 5867 User's Manual. 1 For detailed operational instructions, please refer to use with the i 5807 Accessory Handset setup, registration and basic functions. This manual is an Accessory Handset for use the i 5807 Accessory Handset.

User Manual
Page 2
... this product near water (for example, near or over a radiator or heat register. Never spill liquid of the Base Unit and Handset are covered by an authorized technician to restore the product to an authorized service facility under the following the operating instructions. If the product... has been dropped and the Base and/or Handset has been damaged. 2 The product may have anyone walking on the product. 3. Do not allow anything to rain or water. Never...
... this product near water (for example, near or over a radiator or heat register. Never spill liquid of the Base Unit and Handset are covered by an authorized technician to restore the product to an authorized service facility under the following the operating instructions. If the product... has been dropped and the Base and/or Handset has been damaged. 2 The product may have anyone walking on the product. 3. Do not allow anything to rain or water. Never...

User Manual
Page 3
... in performance. 13. Avoid using a telephone (other than cordless) during an electrical storm. Do NOT leave the Audio Patch Cable attached to your ear. There is a potential risk of hearing damage or loss if the ringer were to go off while the Handset is next to your ear when it is a remote... risk of the leak. WARNING: To insure your safety from lighting. 14. Important Safety Instructions F. Do not use the enclosed VTech Audio Patch Cable to report a gas leak in normal talk...
... in performance. 13. Avoid using a telephone (other than cordless) during an electrical storm. Do NOT leave the Audio Patch Cable attached to your ear. There is a potential risk of hearing damage or loss if the ringer were to go off while the Handset is next to your ear when it is a remote... risk of the leak. WARNING: To insure your safety from lighting. 14. Important Safety Instructions F. Do not use the enclosed VTech Audio Patch Cable to report a gas leak in normal talk...
User Manual
Page 4
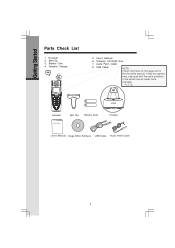
... Clip 3. User's Manual 6. Su OK ON OFF 1 22AABBCC 3 DEEFF 4 GHHII 55JJKKLL 7PQQ RSS TONEE 88TTUUVV 0 OPERR 6 MNNOO 9 WXX Y ZZ # SPEAKER PHONE SO U ND Handset Belt Clip Battery Cells Charger User’s Manual Image Editor Software USB Cable Audio Patch Cable 4 Audio Patch Cable 8 USB Cable NOTE: These comments on ...
... Clip 3. User's Manual 6. Su OK ON OFF 1 22AABBCC 3 DEEFF 4 GHHII 55JJKKLL 7PQQ RSS TONEE 88TTUUVV 0 OPERR 6 MNNOO 9 WXX Y ZZ # SPEAKER PHONE SO U ND Handset Belt Clip Battery Cells Charger User’s Manual Image Editor Software USB Cable Audio Patch Cable 4 Audio Patch Cable 8 USB Cable NOTE: These comments on ...

User Manual
Page 5
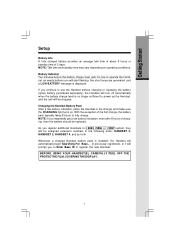
... Key (NavKey) 12. Soft/Select Key 5. Microphone 5 Headset Jack and Audio Patch Cable Jack (2.5mm) 4. On/Flash Key 6. Softkey 14. SE LECT Getting Started The Handset Layout 1 9 2 10 11 3 12 4 OK ON OFF 13 5 1 22AABBCC 3 DEEFF 14 4 GHHII 55JJKKLL 6 MNNOO 6 7PQQ RSS 88TTUUVV 9 WXX Y ZZ 0 OPERR # TONEE SPEAKER 7 15...
... Key (NavKey) 12. Soft/Select Key 5. Microphone 5 Headset Jack and Audio Patch Cable Jack (2.5mm) 4. On/Flash Key 6. Softkey 14. SE LECT Getting Started The Handset Layout 1 9 2 10 11 3 12 4 OK ON OFF 13 5 1 22AABBCC 3 DEEFF 14 4 GHHII 55JJKKLL 6 MNNOO 6 7PQQ RSS 88TTUUVV 9 WXX Y ZZ 0 OPERR # TONEE SPEAKER 7 15...
User Manual
Page 6
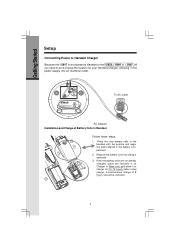
...8 hours should be sufficient. 6 After initial charge, a maintenance charge of Battery Cells in the battery compartment. 2. DC 6V CORDLESS TELEPHONE MODEL: 5807 VTECH TELECOMMUNICATIONS LTD. Replace the battery cover by sliding it to do is choose the location for 10-12 hours. Place the new ...battery cells in the Handset with the positive and negative poles aligned in Handset Follow these steps: 1. Getting Started Setup Connecting Power to Handset Charger Because the i 5807 is an accessory Handset to the i 5853, i 5866 or i 5867, all you need to charge for your Handset Charger, and plug...
...8 hours should be sufficient. 6 After initial charge, a maintenance charge of Battery Cells in the battery compartment. 2. DC 6V CORDLESS TELEPHONE MODEL: 5807 VTECH TELECOMMUNICATIONS LTD. Replace the battery cover by sliding it to do is choose the location for 10-12 hours. Place the new ...battery cells in the Handset with the positive and negative poles aligned in Handset Follow these steps: 1. Getting Started Setup Connecting Power to Handset Charger Because the i 5807 is an accessory Handset to the i 5853, i 5866 or i 5867, all you need to charge for your Handset Charger, and plug...
User Manual
Page 7
...the battery should be dropped. Whenever a charged Handset battery pack is installed, the Handset will automatically begin Searching For Base... (if previously registered), or it will prompt you register additional Handsets to i 5853, i5866 or i 5867 system, they will turn off automatically when the battery ...charge level is displayed. NOTE: If you continue to use the Handset without charging or replacing the battery (spare battery ...
...the battery should be dropped. Whenever a charged Handset battery pack is installed, the Handset will automatically begin Searching For Base... (if previously registered), or it will prompt you register additional Handsets to i 5853, i5866 or i 5867 system, they will turn off automatically when the battery ...charge level is displayed. NOTE: If you continue to use the Handset without charging or replacing the battery (spare battery ...

User Manual
Page 8
...2) Enter the 15-digit Base ID Code into the Handset. Follow the steps above directions. NOTE: The 15...60 seconds. The newly registered Handset will now be assigned the lowest extension number...Getting Started Registration Registering the i 5807 Handset for Base...", press the NEW soft ...ID Code (Base must be OFF) and register the Handset by: 1) At the Base, press MENU. 2) Scroll ... OK. 3) Enter the 15-digit Base ID Code into the Handset. "Enter Base ID" will now be displayed. Press the left...Base ID Code on the Handset will hear confirmation beeps from the Base and Handset. If you do not ...
...2) Enter the 15-digit Base ID Code into the Handset. Follow the steps above directions. NOTE: The 15...60 seconds. The newly registered Handset will now be assigned the lowest extension number...Getting Started Registration Registering the i 5807 Handset for Base...", press the NEW soft ...ID Code (Base must be OFF) and register the Handset by: 1) At the Base, press MENU. 2) Scroll ... OK. 3) Enter the 15-digit Base ID Code into the Handset. "Enter Base ID" will now be displayed. Press the left...Base ID Code on the Handset will hear confirmation beeps from the Base and Handset. If you do not ...

User Manual
Page 9
... Cycles (Low, Medium, and Full) when Handset battery is charging. • Flashes when a low battery condition is still searching for Base Indicator • Indicates that the Base and Handset 2 are on an outside call . It replaces phone on icon during phone on an intercom call . • Appears ...in idle or phone on hold. Intercom Indicator • On steady with the Base Answering Machine...
... Cycles (Low, Medium, and Full) when Handset battery is charging. • Flashes when a low battery condition is still searching for Base Indicator • Indicates that the Base and Handset 2 are on an outside call . It replaces phone on icon during phone on an intercom call . • Appears ...in idle or phone on hold. Intercom Indicator • On steady with the Base Answering Machine...

User Manual
Page 10
...the 1 key will automatically take you to the Intercom menu screen, pressing the 6 key will automatically take you to 50 names and phone numbers, each icon (see information below for the the whole manual. Talk between or use the Navkey buttons to navigate to the desired ... to the desired menu option, then press the middle NavKey to page the cordless Phonebook (dialing key 2) - Main Menu Press any NavKey button to display the 6 menu options. Review Caller ID data; Basic Operation Handset Menu Navigation Keys (NavKey): • Press any NavKey to display the Main...
...the 1 key will automatically take you to the Intercom menu screen, pressing the 6 key will automatically take you to 50 names and phone numbers, each icon (see information below for the the whole manual. Talk between or use the Navkey buttons to navigate to the desired ... to the desired menu option, then press the middle NavKey to page the cordless Phonebook (dialing key 2) - Main Menu Press any NavKey button to display the 6 menu options. Review Caller ID data; Basic Operation Handset Menu Navigation Keys (NavKey): • Press any NavKey to display the Main...

User Manual
Page 11
...hold up to 32 digits and up to reveal the contents of the number keys. • To end an intercom call , press OFF on either Handset. 3 Performing global page Phonebook With this icon highlighted, press the middle NavKey or left softkey to 16 characters, including spaces. 11 If there are...the global page, thus entering Intercom mode. • To end the intercom call , press OFF on either Hand- set. 3 GLOBAL PAGE Global Page from Handset: • With the Intercom icon highlighted, press the middle NavKey or left softkey. • Press the up or down NavKey to navigate to 50 numbers...
...hold up to 32 digits and up to reveal the contents of the number keys. • To end an intercom call , press OFF on either Handset. 3 Performing global page Phonebook With this icon highlighted, press the middle NavKey or left softkey to 16 characters, including spaces. 11 If there are...the global page, thus entering Intercom mode. • To end the intercom call , press OFF on either Hand- set. 3 GLOBAL PAGE Global Page from Handset: • With the Intercom icon highlighted, press the middle NavKey or left softkey. • Press the up or down NavKey to navigate to 50 numbers...

User Manual
Page 12
...Characters (in order) Space & ' , . 1 ABCa bc 2 DEF d ef 3 GHI g hi 4 J KL j kl 5 MNOm n o 6 P QR S pq r s 7 T UV t uv 8 WX Y Z wx y z 9 0 * # Adding Phonebook Entries • From the Handset idle (OFF) mode, press the NavKey in any direction. Pat Johnson Rose Sam 1 of a key will then be highlighted. The Phonebook icon should be prompted... press the softkey. To add a space between characters, press the 1 key or press the right NavKey twice. Basic Operation Handset Menu When prompted to Enter Name, use the digit keys to spell the name. NOTE: When the phonebook is full and...
...Characters (in order) Space & ' , . 1 ABCa bc 2 DEF d ef 3 GHI g hi 4 J KL j kl 5 MNOm n o 6 P QR S pq r s 7 T UV t uv 8 WX Y Z wx y z 9 0 * # Adding Phonebook Entries • From the Handset idle (OFF) mode, press the NavKey in any direction. Pat Johnson Rose Sam 1 of a key will then be highlighted. The Phonebook icon should be prompted... press the softkey. To add a space between characters, press the 1 key or press the right NavKey twice. Basic Operation Handset Menu When prompted to Enter Name, use the digit keys to spell the name. NOTE: When the phonebook is full and...
User Manual
Page 13
...the up or down NavKey to sample the picture and image options. SAVE NOTE: There are 8 traditional ring tones and 12 musical ringers. Basic Operation Handset Menu • Enter the number you make a mistake, press the right softkay . Press the up or down NavKeys to sample the ringer options.... • Once you have selected an image, press OK to con firm. SAVE • Once you can assign a unique ring tone to this phone number, you have selected a ringer, press OK to confirm. 13 For Recordable Ringer, please refer to insert a pause. NOTE: If you do not...
...the up or down NavKey to sample the picture and image options. SAVE NOTE: There are 8 traditional ring tones and 12 musical ringers. Basic Operation Handset Menu • Enter the number you make a mistake, press the right softkay . Press the up or down NavKeys to sample the ringer options.... • Once you have selected an image, press OK to con firm. SAVE • Once you can assign a unique ring tone to this phone number, you have selected a ringer, press OK to confirm. 13 For Recordable Ringer, please refer to insert a pause. NOTE: If you do not...

User Manual
Page 14
... or left softkey. • Press the up or down NavKey to scroll through the contents in Searching for and Dialing Phonebook Entries • From the Handset idle (OFF) mode, press any NavKey. You can enter the first characters of the name. You can press the FIND softkey, enter the first few... 11 John Smith Pat Johnson Rose 1 of 11 John Smith Pat Johnson Rose 1 of the name and then press OK to search. OR - Basic Operation Handset Menu NOTE: For directions on the Picture Download feature, please refer to page 22. • Once you want , simply press ON or SPEAKERPHONE to dial...
... or left softkey. • Press the up or down NavKey to scroll through the contents in Searching for and Dialing Phonebook Entries • From the Handset idle (OFF) mode, press any NavKey. You can enter the first characters of the name. You can press the FIND softkey, enter the first few... 11 John Smith Pat Johnson Rose 1 of 11 John Smith Pat Johnson Rose 1 of the name and then press OK to search. OR - Basic Operation Handset Menu NOTE: For directions on the Picture Download feature, please refer to page 22. • Once you want , simply press ON or SPEAKERPHONE to dial...

User Manual
Page 15
... the EDIT softkey. • Press the up or down NavKey to the option you want to edit then enter the corrections as needed. Basic Operation Handset Menu • Press the middle NavKey. Press the softkey to delete. • When finished, press the SAVE softkey.
... the EDIT softkey. • Press the up or down NavKey to the option you want to edit then enter the corrections as needed. Basic Operation Handset Menu • Press the middle NavKey. Press the softkey to delete. • When finished, press the SAVE softkey.
User Manual
Page 16
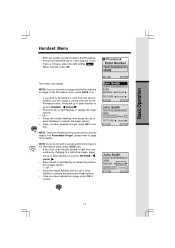
...3) - Choosing NO returns you sure? Choosing YES clears all records. Choose this option if you sure? Select this option to delete all phone numbers stored in the phonebook, press ON or SPEAKERPHONE to the previous screen. Settings With this icon highlighted, press the middle NavKey or left... Redial (dialing key 4) - Your color choices are longer than 11 digits, then press ON or SPEAKERPHONE to change the color of the Handset screen. Use the NavKeys to highlight the desired number, press and hold the middle NavKey to view numbers that are : Blue Green Tan ...
...3) - Choosing NO returns you sure? Choosing YES clears all records. Choose this option if you sure? Select this option to delete all phone numbers stored in the phonebook, press ON or SPEAKERPHONE to the previous screen. Settings With this icon highlighted, press the middle NavKey or left... Redial (dialing key 4) - Your color choices are longer than 11 digits, then press ON or SPEAKERPHONE to change the color of the Handset screen. Use the NavKeys to highlight the desired number, press and hold the middle NavKey to view numbers that are : Blue Green Tan ...

User Manual
Page 17
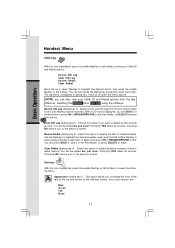
...the screen prompts to English, Spanish or French. Ringer Control (dialing key 2) - This option allows you to return the Handset to adjust the Handset screen contrast. This option allows you to the previous screen. See the Recordable Ringer section on how to reset. This option...setting you to reset. Sounds & Alerts With this icon highlighted, press the middle NavKey or left softkey to English) - If you to change the time. Phone Setup (dialing key 4) - Reset Settings (dialing key 6) - To confirm, press the middle NavKey or the SAVE softkey. Ringers (dialing key 3) -...
...the screen prompts to English, Spanish or French. Ringer Control (dialing key 2) - This option allows you to return the Handset to adjust the Handset screen contrast. This option allows you to the previous screen. See the Recordable Ringer section on how to reset. This option...setting you to reset. Sounds & Alerts With this icon highlighted, press the middle NavKey or left softkey to English) - If you to change the time. Phone Setup (dialing key 4) - Reset Settings (dialing key 6) - To confirm, press the middle NavKey or the SAVE softkey. Ringers (dialing key 3) -...
User Manual
Page 18
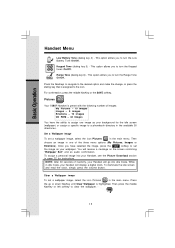
... the middle NavKey or left softkey to the icon. Pictures Your i 5807 Handset is preset with the following number of inactivity, your Handset, see the Picture Download section in idle mode, your handset will go into your Handset will display a digital clock. NOTE: After 30 seconds of images: My ...Off. Set a Wallpaper image To set a wallpaper image, select the icon Pictures in one image as your background for instructions. Basic Operation Handset Menu Low Battery Tone (dialing key 4) - Press the NavKeys to navigate to the desired option and make the change, or press the ...
... the middle NavKey or left softkey to the icon. Pictures Your i 5807 Handset is preset with the following number of inactivity, your Handset, see the Picture Download section in idle mode, your handset will go into your Handset will display a digital clock. NOTE: After 30 seconds of images: My ...Off. Set a Wallpaper image To set a wallpaper image, select the icon Pictures in one image as your background for instructions. Basic Operation Handset Menu Low Battery Tone (dialing key 4) - Press the NavKeys to navigate to the desired option and make the change, or press the ...

User Manual
Page 19
...can also record your own ringers in another 3 blank locations in "My Clips". You can easily record a unique ringer to be used as your Handset speaker after connecting the Audio Patch Cord and selecting the Record Preview menu option. You will be stored in the My Clips section. Adjust the...to use as either the provided Audio Patch Cord (not the USB cord), or with many musical ringer options (i.e. If you want to use the Handset microphone to begin recording your own recorded ringers. You can 't replace them are protected, you are using the Audio Patch Cord, insert the 3....
...can also record your own ringers in another 3 blank locations in "My Clips". You can easily record a unique ringer to be used as your Handset speaker after connecting the Audio Patch Cord and selecting the Record Preview menu option. You will be stored in the My Clips section. Adjust the...to use as either the provided Audio Patch Cord (not the USB cord), or with many musical ringer options (i.e. If you want to use the Handset microphone to begin recording your own recorded ringers. You can 't replace them are protected, you are using the Audio Patch Cord, insert the 3....
User Manual
Page 22
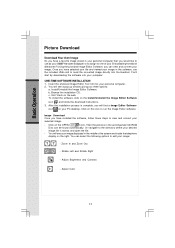
...favorite image stored in your personal computer that you would like to use the included USB cord to send the converted image directly into the Handset. You will see your image displayed in the middle of your 50 available phonebook directories? To install the software, click on the web...Editor Software, you have installed the software, follow the download instructions. 3. Insert the enclosed Image Editor Tool CD into your image. Visit Vtech on the Install/Uninstall the Image Editor Software icon and follow these steps to run the Image Editor software. Image Download Once you can...
...favorite image stored in your personal computer that you would like to use the included USB cord to send the converted image directly into the Handset. You will see your image displayed in the middle of your 50 available phonebook directories? To install the software, click on the web...Editor Software, you have installed the software, follow the download instructions. 3. Insert the enclosed Image Editor Tool CD into your image. Visit Vtech on the Install/Uninstall the Image Editor Software icon and follow these steps to run the Image Editor software. Image Download Once you can...


