User Manual
Page 4
One VTech® Sit-To-Stand™ Activity Walker activity panel - Instructions & Activities GETTING STARTED BATTERY INSTALLATION 1. Make sure the unit is recommended for your child's safety. Two legs - One walker base - Use a coin or screwdriver to avoid leakage. • Do not mix old and new batteries. 3 One instruction manual WARNING: All packing materials, such as tape, plastic sheets, wire ties...
One VTech® Sit-To-Stand™ Activity Walker activity panel - Instructions & Activities GETTING STARTED BATTERY INSTALLATION 1. Make sure the unit is recommended for your child's safety. Two legs - One walker base - Use a coin or screwdriver to avoid leakage. • Do not mix old and new batteries. 3 One instruction manual WARNING: All packing materials, such as tape, plastic sheets, wire ties...
User Manual
Page 5
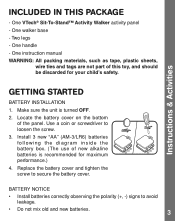
With the VTech® Sit-To-Stand™ Activity Walker safety comes first: To ensure your child's safety, the assembly of this product is an adult activity, not a child's activity. ASSEMBLY INSTRUCTIONS 1. Please ensure the legs are fully inserted and secured in fire. • Do not attempt to... recommended are to avoid injury. Please ensure that the legs, handle and activity panel are securely locked into the holes on the base according to the symbols located on the floor. 2. Instructions & Activities • Do not mix batteries of different types: alkaline, standard (carbonzinc...
With the VTech® Sit-To-Stand™ Activity Walker safety comes first: To ensure your child's safety, the assembly of this product is an adult activity, not a child's activity. ASSEMBLY INSTRUCTIONS 1. Please ensure the legs are fully inserted and secured in fire. • Do not attempt to... recommended are to avoid injury. Please ensure that the legs, handle and activity panel are securely locked into the holes on the base according to the symbols located on the floor. 2. Instructions & Activities • Do not mix batteries of different types: alkaline, standard (carbonzinc...
User Manual
Page 6
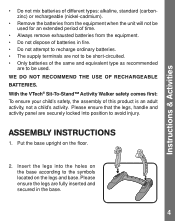
3. To remove the activity panel, locate the release buttons on the bottom of the activity panel. Insert the walker legs into the holes on to the top of the unit. 5 Instructions & Activities Sitting Mode Walker Mode PRODUCT STORAGE 1. Push the release buttons towards the center of legs. 4. Attach the activity panel facing you for the Sitting Mode or the upright position for the Walker Mode. Attach and lock the handle securely on the bottom of the activity panel.
3. To remove the activity panel, locate the release buttons on the bottom of the activity panel. Insert the walker legs into the holes on to the top of the unit. 5 Instructions & Activities Sitting Mode Walker Mode PRODUCT STORAGE 1. Push the release buttons towards the center of legs. 4. Attach the activity panel facing you for the Sitting Mode or the upright position for the Walker Mode. Attach and lock the handle securely on the bottom of the activity panel.
User Manual
Page 7
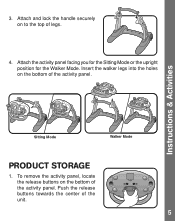
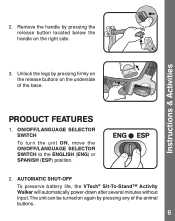
... on again by pressing the release button located below the handle on the right side. 3. AUTOMATIC SHUT-OFF To preserve battery life, the VTech® Sit-To-Stand™ Activity Walker will automatically power-down after several minutes without input.The unit can be turned on the underside of the animal buttons. 6 ON/OFF/LANGUAGE... the ON/OFF/LANGUAGE SELECTOR SWITCH to the ENGLISH (ENG) or SPANISH (ESP) position. 2. PRODUCT FEATURES 1. Remove the handle by pressing any of the base. Instructions & Activities 2.
... on again by pressing the release button located below the handle on the right side. 3. AUTOMATIC SHUT-OFF To preserve battery life, the VTech® Sit-To-Stand™ Activity Walker will automatically power-down after several minutes without input.The unit can be turned on the underside of the animal buttons. 6 ON/OFF/LANGUAGE... the ON/OFF/LANGUAGE SELECTOR SWITCH to the ENGLISH (ENG) or SPANISH (ESP) position. 2. PRODUCT FEATURES 1. Remove the handle by pressing any of the base. Instructions & Activities 2.

User Manual
Page 8
Instructions & Activities Sitting Mode Carry-along Mode, and Walker Mode. Remember to be sure that the demo tab located on the base of play by moving the activity panel. Walker Mode 5. WHEEL LOCK Slide the wheel lock switch on the bottom cabinet has been removed. Change the mode of play include Sitting Mode, Carry-along Mode 4. DEMO TAB...
Instructions & Activities Sitting Mode Carry-along Mode, and Walker Mode. Remember to be sure that the demo tab located on the base of play by moving the activity panel. Walker Mode 5. WHEEL LOCK Slide the wheel lock switch on the bottom cabinet has been removed. Change the mode of play include Sitting Mode, Carry-along Mode 4. DEMO TAB...
User Manual
Page 9
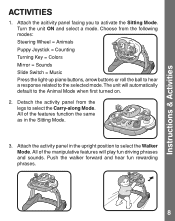
Attach the activity panel in the Sitting Mode. 3. Choose from the legs to select the Carry-along Mode. Push the walker forward and hear fun rewarding phrases. 8 Detach the activity panel from the following modes: Steering Wheel = Animals Puppy Joystick = Counting Turning Key = Colors Mirror ... = Music Press the light-up piano buttons, arrow buttons or roll the ball to hear a response related to select the Walker Mode. Instructions & Activities ACTIVITIES 1. Turn the unit ON and select a mode. Attach the acitivity panel facing you to the Animal Mode when first turned on...
Attach the activity panel in the Sitting Mode. 3. Choose from the legs to select the Carry-along Mode. Push the walker forward and hear fun rewarding phrases. 8 Detach the activity panel from the following modes: Steering Wheel = Animals Puppy Joystick = Counting Turning Key = Colors Mirror ... = Music Press the light-up piano buttons, arrow buttons or roll the ball to hear a response related to select the Walker Mode. Instructions & Activities ACTIVITIES 1. Turn the unit ON and select a mode. Attach the acitivity panel facing you to the Animal Mode when first turned on...
User Manual
Page 12
Other Info FCC Notice: This equipment has been tested and found to comply with the instructions, may cause harmful interference to radio communications. If this equipment does cause harmful interference to radio or television reception, which the receiver is connected • ...
Other Info FCC Notice: This equipment has been tested and found to comply with the instructions, may cause harmful interference to radio communications. If this equipment does cause harmful interference to radio or television reception, which the receiver is connected • ...

