Introducing Smart call blocker
Page 1
... name list^ Add caller NAMES to your : - Press q or p to choose Block list, and then press SELECT. 3. To add another entry in your telephone rings and announces the caller's name. Press q or p to select w/ Caller name. Press SELECT again to choose Screening, and then press SELECT. 4. Introducing Smart call blocker*§ SN5147 Amplified Corded/Cordless Answering System with Big Buttons and Display Read before use robocalls to...
... name list^ Add caller NAMES to your : - Press q or p to choose Block list, and then press SELECT. 3. To add another entry in your telephone rings and announces the caller's name. Press q or p to select w/ Caller name. Press SELECT again to choose Screening, and then press SELECT. 4. Introducing Smart call blocker*§ SN5147 Amplified Corded/Cordless Answering System with Big Buttons and Display Read before use robocalls to...
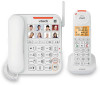
Introducing Smart call blocker
Page 2
... setting menu, press q or p to select w/ Caller name. Use voice guide to screen calls that do not want to screen calls, and want to set Smart call blocker - "Hello! or ff Press 3 if you do not display a phone number. Screen no caller ID calls | Forward uncategorized calls to answering system (5) No caller ID Call rejected Caller Smart call blocker Search and screen based on caller ID Uncategorized calls No response Call rejected Telephone ringing 1. On the Uncategorized setting menu, press q or p to choose Screening...
... setting menu, press q or p to select w/ Caller name. Use voice guide to screen calls that do not want to screen calls, and want to set Smart call blocker - "Hello! or ff Press 3 if you do not display a phone number. Screen no caller ID calls | Forward uncategorized calls to answering system (5) No caller ID Call rejected Caller Smart call blocker Search and screen based on caller ID Uncategorized calls No response Call rejected Telephone ringing 1. On the Uncategorized setting menu, press q or p to choose Screening...
User Manual
Page 3
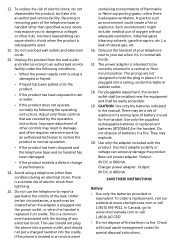
... a charged handset into the power outlet, or when the handset is in normal talk mode. 17. CAUTION: Use only the batteries indicated in a fire. They may expose you to your ear when it is replaced in the vicinity of any electrical circuit. Use only the adapter included with the closing of the leak. Check with local waste management codes for the handset. Avoid using a telephone (other than cordless...
... a charged handset into the power outlet, or when the handset is in normal talk mode. 17. CAUTION: Use only the batteries indicated in a fire. They may expose you to your ear when it is replaced in the vicinity of any electrical circuit. Use only the adapter included with the closing of the leak. Check with local waste management codes for the handset. Avoid using a telephone (other than cordless...
User Manual
Page 5
... Operating range 11 Configure your telephone 12 Use the handset menu 12 LCD language 12 Use caller ID to automatically set date and time 12 SOS emergency call 12 How does SOS emergency call work?.... 13 Set SOS emergency number 13 Enable or disable internal SOS alert......... 14 Record SOS message 14 Play or reset SOS message 14 Ringer volume 15 Ringer tone 15 Set date and time 15 Caller ID announce 16 Set voicemail number 16 Clear voicemail indicator 16 Key tone 17 Talking digits 17 Home area code 17 Dial mode...
... Operating range 11 Configure your telephone 12 Use the handset menu 12 LCD language 12 Use caller ID to automatically set date and time 12 SOS emergency call 12 How does SOS emergency call work?.... 13 Set SOS emergency number 13 Enable or disable internal SOS alert......... 14 Record SOS message 14 Play or reset SOS message 14 Ringer volume 15 Ringer tone 15 Set date and time 15 Caller ID announce 16 Set voicemail number 16 Clear voicemail indicator 16 Key tone 17 Talking digits 17 Home area code 17 Dial mode...

User Manual
Page 6
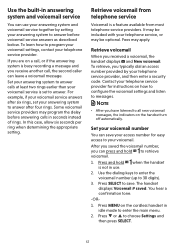
...53 Turn the message alert tone on or off..... 53 Use your built-in answering system...... 54 New message indication 54 Message playback 54 Delete all messages 55 Call screening 56 Call intercept 56 Record, play or delete memos 56 Use the built-in answering system and voicemail service 57 Retrieve voicemail from telephone service 57 Retrieve voicemail 57 Set your voicemail number 57 Turn off the new voicemail indicators......58 Remote access 58 Access your answering system remotely.58 Set your remote access code 59 Expand your telephone system 59 Add and register expansion handset...
...53 Turn the message alert tone on or off..... 53 Use your built-in answering system...... 54 New message indication 54 Message playback 54 Delete all messages 55 Call screening 56 Call intercept 56 Record, play or delete memos 56 Use the built-in answering system and voicemail service 57 Retrieve voicemail from telephone service 57 Retrieve voicemail 57 Set your voicemail number 57 Turn off the new voicemail indicators......58 Remote access 58 Access your answering system remotely.58 Set your remote access code 59 Expand your telephone system 59 Add and register expansion handset...

User Manual
Page 10
... making changes. • Delete digits while predialing. • Silence the handset ringer temporarily while the phone is not in a menu, press to select an item, or save an entry or setting. 7 - • Hang up a call the preset speed dial memory number 2. 1 2 3 4 14 5 13 6 12 7 11 10 8 9 1 - LCD display 4 - • Slide to adjust the listening volume during a call if you are on the cordless handset earpiece when you have pulse service...
... making changes. • Delete digits while predialing. • Silence the handset ringer temporarily while the phone is not in a menu, press to select an item, or save an entry or setting. 7 - • Hang up a call the preset speed dial memory number 2. 1 2 3 4 14 5 13 6 12 7 11 10 8 9 1 - LCD display 4 - • Slide to adjust the listening volume during a call if you are on the cordless handset earpiece when you have pulse service...
User Manual
Page 11
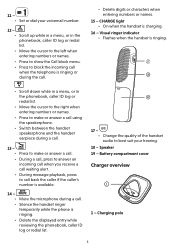
Charging pole 5 CHARGE light • On when the handset is available. 14 - • Mute the microphone during a call. 13 - • Press to make or answer a call using the speakerphone. • Switch between the handset speakerphone and the handset earpiece during a call . • Delete digits or characters when entering numbers or names. 15 - 11 - • Set or dial your hearing. 18 - Visual ringer indicator • Flashes when the handset is ringing. 17 18 • Scroll down while...
Charging pole 5 CHARGE light • On when the handset is available. 14 - • Mute the microphone during a call. 13 - • Press to make or answer a call using the speakerphone. • Switch between the handset speakerphone and the handset earpiece during a call . • Delete digits or characters when entering numbers or names. 15 - 11 - • Set or dial your hearing. 18 - Visual ringer indicator • Flashes when the handset is ringing. 17 18 • Scroll down while...

User Manual
Page 12
... telephone base is ringing. • On when the telephone is in the charger. 6 Handset lights overview Visual ringer indicator CHARGE light Flashes when the handset is turned on. On when the handset is turned off. The handset ringer is charging in use . The handset speakerphone is muted. The handset microphone is in the answering system. There are registering a handset or device. There are new messages in use , or when the answering system is charging. There are new caller ID log entries. The number of new/old messages recorded...
... telephone base is ringing. • On when the telephone is in the charger. 6 Handset lights overview Visual ringer indicator CHARGE light Flashes when the handset is turned on. On when the handset is turned off. The handset ringer is charging in use . The handset speakerphone is muted. The handset microphone is in the answering system. There are registering a handset or device. There are new messages in use , or when the answering system is charging. There are new caller ID log entries. The number of new/old messages recorded...
User Manual
Page 17
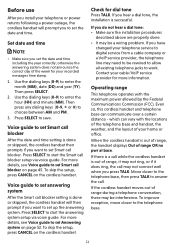
... Voice guide to set Smart call blocker setup via voice guide. When the cordless handset is done or skipped, the cordless handset then prompts if you have changed your telephone service to start the Smart call blocker on page 52. Use the dialing keys (0-9) to choose between AM and PM. 3. Press SELECT to digital service from a cable company or a VoIP service provider, the telephone line may be a wiring problem. If you do not hear a dial tone...
... Voice guide to set Smart call blocker setup via voice guide. When the cordless handset is done or skipped, the cordless handset then prompts if you have changed your telephone service to start the Smart call blocker on page 52. Use the dialing keys (0-9) to choose between AM and PM. 3. Press SELECT to digital service from a cable company or a VoIP service provider, the telephone line may be a wiring problem. If you do not hear a dial tone...
User Manual
Page 18
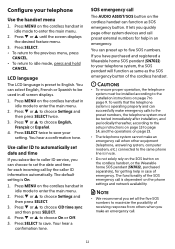
... an emergency. Use caller ID to automatically set date and time If you subscribe to caller ID service, you can choose to the same phone line is dependent on the cordless handset can successfully make emergency calls to the preset numbers, the telephone system must be installed according to the installation instructions on page 23. • The telephone system cannot make an emergency call preset external numbers for help in idle mode to enter...
... an emergency. Use caller ID to automatically set date and time If you subscribe to caller ID service, you can choose to the same phone line is dependent on the cordless handset can successfully make emergency calls to the preset numbers, the telephone system must be installed according to the installation instructions on page 23. • The telephone system cannot make an emergency call preset external numbers for help in idle mode to enter...

User Manual
Page 19
...). 13 All devices ring an alert tone and the handset screen shows SOS mode for three seconds. After the call all system devices. The telephone will be terminated after 60 seconds. Scroll to choose SOS number, and then press SELECT. 4. The telephone enables internal SOS alert by answering machine or voicemail, the call will call receiver presses a number key, you can record your setting. The telephone base announces "Emergency mode is enabled, the...
...). 13 All devices ring an alert tone and the handset screen shows SOS mode for three seconds. After the call all system devices. The telephone will be terminated after 60 seconds. Scroll to choose SOS number, and then press SELECT. 4. The telephone enables internal SOS alert by answering machine or voicemail, the call will call receiver presses a number key, you can record your setting. The telephone base announces "Emergency mode is enabled, the...

User Manual
Page 29
... telephone base: • Place the corded handset back to respond by pressing one of the dialing key. • If you disable internal SOS alert, the telephone calls the preset SOS numbers in the charger. Predial a call Using a cordless handset: • Enter the telephone number using the telephone base speakerphone, press on the SOS pendant to end the call. 23 Using an Wearable Home SOS Pendant (SN7022) to make emergency call: • If you have purchased and registered a Wearable home...
... telephone base: • Place the corded handset back to respond by pressing one of the dialing key. • If you disable internal SOS alert, the telephone calls the preset SOS numbers in the charger. Predial a call Using a cordless handset: • Enter the telephone number using the telephone base speakerphone, press on the SOS pendant to end the call. 23 Using an Wearable Home SOS Pendant (SN7022) to make emergency call: • If you have purchased and registered a Wearable home...

User Manual
Page 34
... photo speed dial handset, the cordless handset displays Calling base. The cordless handset displays Intercom. -ORTo answer the intercom call on a call, or does not answer the intercom call , press or place the corded handset back in the charger. The cordless handset displays Intercom ended. -ORTo end the intercom call on the telephone base, press or place the corded handset back in the telephone base. • To cancel the intercom call before it is answered, press OFF. • Press OFF or MUTE on the cordless handset to temporarily silence the intercom ringer...
... photo speed dial handset, the cordless handset displays Calling base. The cordless handset displays Intercom. -ORTo answer the intercom call on a call, or does not answer the intercom call , press or place the corded handset back in the charger. The cordless handset displays Intercom ended. -ORTo end the intercom call on the telephone base, press or place the corded handset back in the telephone base. • To cancel the intercom call before it is answered, press OFF. • Press OFF or MUTE on the cordless handset to temporarily silence the intercom ringer...

User Manual
Page 55
... ringer tones for the cordless handset and telephone base. 1. Sound settings Key tone The cordless handset is ringing. You hear a confirmation tone. Press q or p to beep with each ringer volume level. 6. Press q or p to choose Handset or Base, and then press SELECT. 4. Press q or p to choose Ringers and then press SELECT. 3. You hear a confirmation tone. -OR- Loud ringer sound may damage your ear when the telephone is set to Off, the idle screen displays and Ringer...
... ringer tones for the cordless handset and telephone base. 1. Sound settings Key tone The cordless handset is ringing. You hear a confirmation tone. Press q or p to beep with each ringer volume level. 6. Press q or p to choose Handset or Base, and then press SELECT. 4. Press q or p to choose Ringers and then press SELECT. 3. You hear a confirmation tone. -OR- Loud ringer sound may damage your ear when the telephone is set to Off, the idle screen displays and Ringer...
User Manual
Page 63
... voicemail service You can use . 2. Retrieve voicemail When you are on the cordless handset in idle mode to retrieve voicemail. 1. Set your voicemail number You can save . You hear a confirmation tone. -OR1. It may be included with your telephone service provider, and then enter a security code. To retrieve, you receive another call , or if the answering system is set your telephone service provider. Contact your voicemail service is busy recording a message and you typically dial an access number provided by setting your voicemail...
... voicemail service You can use . 2. Retrieve voicemail When you are on the cordless handset in idle mode to retrieve voicemail. 1. Set your voicemail number You can save . You hear a confirmation tone. -OR1. It may be included with your telephone service provider, and then enter a security code. To retrieve, you receive another call , or if the answering system is set your telephone service provider. Contact your voicemail service is busy recording a message and you typically dial an access number provided by setting your voicemail...

User Manual
Page 66
... at your telephone system. To register a SN5307 handset: 1. VTech compatible ULE devices The ULE Cordless extension ringer (SN7014) works as a handy pendant to complete. The handset CHARGE light alternates red and green quickly to page 65. When the telephone is an incoming call the preset SOS numbers for the dial keys of the four preset numbers by just pressing the photo speed dial key. The registration process takes about five seconds until the visual ringer indicator light turns on.
... at your telephone system. To register a SN5307 handset: 1. VTech compatible ULE devices The ULE Cordless extension ringer (SN7014) works as a handy pendant to complete. The handset CHARGE light alternates red and green quickly to page 65. When the telephone is an incoming call the preset SOS numbers for the dial keys of the four preset numbers by just pressing the photo speed dial key. The registration process takes about five seconds until the visual ringer indicator light turns on.

User Manual
Page 77
... calls, the problem is completely depleted, charge the battery for at all. Disconnect the telephone line cord from the telephone base. Try installing a new telephone line cord. Contact your telephone service provider. 71 I cannot hear the dial tone. Make sure there is installed and charged correctly. Wait an extra second before producing a dial tone. The handset may be too far from your home may be defective. Plug in the telephone base or charger correctly. I experience poor sound quality when using the handset speakerphone. Make...
... calls, the problem is completely depleted, charge the battery for at all. Disconnect the telephone line cord from the telephone base. Try installing a new telephone line cord. Contact your telephone service provider. 71 I cannot hear the dial tone. Make sure there is installed and charged correctly. Wait an extra second before producing a dial tone. The handset may be too far from your home may be defective. Plug in the telephone base or charger correctly. I experience poor sound quality when using the handset speakerphone. Make...

User Manual
Page 80
... stop recording and disconnect the call after the preset recording time. If the caller's voice is playing. If there are calling from a touch-tone telephone. When dialing a number, there should be lost when the answering system disconnects the call . Forwarding all unknown calls. Make sure you enter the correct remote access code. Blocking all unknown calls to the answering system. If a caller leaves a very long message, part of it is over before entering the code. If the memory...
... stop recording and disconnect the call after the preset recording time. If the caller's voice is playing. If there are calling from a touch-tone telephone. When dialing a number, there should be lost when the answering system disconnects the call . Forwarding all unknown calls. Make sure you enter the correct remote access code. Blocking all unknown calls to the answering system. If a caller leaves a very long message, part of it is over before entering the code. If the memory...
Quick Start Guide
Page 3
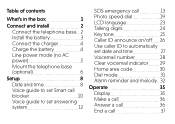
... box 1 Connect and install 2 Connect the telephone base 2 Install the battery 3 Connect the charger 4 Charge the battery 4 Line power mode (no AC power) 5 Mount the telephone base (optional) 6 Setup 8 Date and time 8 Voice guide to set Smart call blocker 10 Voice guide to set answering system 12 SOS emergency call 13 Photo speed dial 19 LCD language 23 Talking digits 24 Key tone 25 Caller ID announce on/off 26 Use caller ID to automatically set date and time 27 Voicemail number 28 Clear voicemail indicator 29 Home area code 30 Dial mode 31 Alarm...
... box 1 Connect and install 2 Connect the telephone base 2 Install the battery 3 Connect the charger 4 Charge the battery 4 Line power mode (no AC power) 5 Mount the telephone base (optional) 6 Setup 8 Date and time 8 Voice guide to set Smart call blocker 10 Voice guide to set answering system 12 SOS emergency call 13 Photo speed dial 19 LCD language 23 Talking digits 24 Key tone 25 Caller ID announce on/off 26 Use caller ID to automatically set date and time 27 Voicemail number 28 Clear voicemail indicator 29 Home area code 30 Dial mode 31 Alarm...

Quick Start Guide
Page 88
... seconds until the visual ringer indicator light turns on. Release PAGE. 2 Put the handset on the telephone base, the same numbers will be automatically set the direct memory speed dial keys 1, 2, 3 and 4 on its charger to indicate the registration is not in use . 8. Additional devices 1 When the telephone is in progress. The handset CHARGE light alternates red and green quickly to begin registration. Add and register photo speed dial handset You can register a maximum of your new photo speed dial handset provided in your package...
... seconds until the visual ringer indicator light turns on. Release PAGE. 2 Put the handset on the telephone base, the same numbers will be automatically set the direct memory speed dial keys 1, 2, 3 and 4 on its charger to indicate the registration is not in use . 8. Additional devices 1 When the telephone is in progress. The handset CHARGE light alternates red and green quickly to begin registration. Add and register photo speed dial handset You can register a maximum of your new photo speed dial handset provided in your package...


