User Manual
Page 4
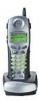
Handset Charger 3. Handset Charger Wall Mounting Handset Charger Bracket Belt Clip Battery Pack User's Manual 3 Battery Pack To purchase replacement batteries, visit us on the web at 1-800-595-9511. NOTE: Use only VTech batteries (part number 89-1324-00-00). Belt Clip 5. Charger Wall Mounting Bracket 4. Handset 2. User's Manual 6. In Canada, call VTech Communications, Inc. Parts Check List 1. at www.vtechphones.com or call VTech Telecommunications Canada Ltd. at 1-800-267-7377.
Handset Charger 3. Handset Charger Wall Mounting Handset Charger Bracket Belt Clip Battery Pack User's Manual 3 Battery Pack To purchase replacement batteries, visit us on the web at 1-800-595-9511. NOTE: Use only VTech batteries (part number 89-1324-00-00). Belt Clip 5. Charger Wall Mounting Bracket 4. Handset 2. User's Manual 6. In Canada, call VTech Communications, Inc. Parts Check List 1. at www.vtechphones.com or call VTech Telecommunications Canada Ltd. at 1-800-267-7377.

User Manual
Page 6
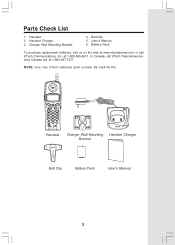
...After the initial charge, a maintenance charge of Battery Pack 1. Be sure to place the handset in use to insure maximum daily performance. 6. Average talk time on the indentation and sliding downward. 2. CAUTION: Use only the VTech power supply provided with the positive and negative... poles aligned in the power supply into an electrical outlet. Place the new battery pack in the handset with your handset charger and plug in the battery compartment. 3. Replace the battery pack cover by pressing on...
...After the initial charge, a maintenance charge of Battery Pack 1. Be sure to place the handset in use to insure maximum daily performance. 6. Average talk time on the indentation and sliding downward. 2. CAUTION: Use only the VTech power supply provided with the positive and negative... poles aligned in the power supply into an electrical outlet. Place the new battery pack in the handset with your handset charger and plug in the battery compartment. 3. Replace the battery pack cover by pressing on...
User Manual
Page 7
... in order to prevent an accidental short of battery pack in a fire, it should charge the battery for a long period of time, remove the battery to the bottom of the handset charger. 2. The LCD displays PHONE and shows a call timer, and you first receive your cordless telephone is in place. 3. Do not dispose of the...
... in order to prevent an accidental short of battery pack in a fire, it should charge the battery for a long period of time, remove the battery to the bottom of the handset charger. 2. The LCD displays PHONE and shows a call timer, and you first receive your cordless telephone is in place. 3. Do not dispose of the...

User Manual
Page 8
After charging the battery, the screen will blank for a second or two, and then show : Where X is an accessory handsets for the first time: 1. If you make a mistake, press the DELETE key to complete the registration process. 4. To register your IP 8100-2/8100-3 base. ENTER ... are entered incorrectly press the DELETE key to erase a character(s) and carefully re-enter the correct base ID code. If the base accepts the new handset, after the SEL key is pressed. Once a valid base ID code has been entered, the display will display: . The 15-digit base ID code may...
After charging the battery, the screen will blank for a second or two, and then show : Where X is an accessory handsets for the first time: 1. If you make a mistake, press the DELETE key to complete the registration process. 4. To register your IP 8100-2/8100-3 base. ENTER ... are entered incorrectly press the DELETE key to erase a character(s) and carefully re-enter the correct base ID code. If the base accepts the new handset, after the SEL key is pressed. Once a valid base ID code has been entered, the display will display: . The 15-digit base ID code may...
User Manual
Page 9
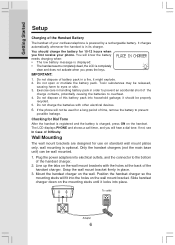
Basic Operation Handset Indicators Handset Icons Icon MUTE Description • Turns on when the microphone is on when the ringer is muted. • Low battery indicator and charging indicator. Handset LEDs LED SPEAKER Description • LED is muted. NEW • Turns on when there are new call log entries. • Turns on when in handsfree mode. 8
Basic Operation Handset Indicators Handset Icons Icon MUTE Description • Turns on when the microphone is on when the ringer is muted. • Low battery indicator and charging indicator. Handset LEDs LED SPEAKER Description • LED is muted. NEW • Turns on when there are new call log entries. • Turns on when in handsfree mode. 8
User Manual
Page 12
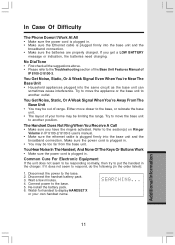
...firmly into the base unit and the broadband connection. Refer to the base, or relocate the base unit. • The layout of your own handset name. Re-install the battery pack. 6. Disconnect the power to the base. 5. Either move closer to the section(s) on Ringer Volume in the order listed): 1. Disconnect... the handset battery pack. 3. In Case Of Difficulty The Phone Doesn't Work At All • Make sure the power cord is plugged in . • You may ...
...firmly into the base unit and the broadband connection. Refer to the base, or relocate the base unit. • The layout of your own handset name. Re-install the battery pack. 6. Disconnect the power to the base. 5. Either move closer to the section(s) on Ringer Volume in the order listed): 1. Disconnect... the handset battery pack. 3. In Case Of Difficulty The Phone Doesn't Work At All • Make sure the power cord is plugged in . • You may ...
User Manual
Page 17
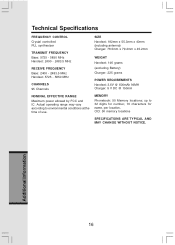
... TRANSMIT FREQUENCY Base: 5725 - 5850 MHz Handset: 2400 - 2483.5 MHz RECEIVE FREQUENCY Base: 2400 - 2483.5 MHz Handset: 5725 - 5850 MHz CHANNELS 95 Channels SIZE Handset: 182mm x 55.3mm x 40mm (including antenna) Charger: 76.5mm x 79.4mm x 45.2mm WEIGHT Handset: 146 grams (excluding Battery) Charger: 225 grams POWER REQUIREMENTS Handset: 3.6V @ 600mAh NiMH Charger: 9 V DC @ 150mA...
... TRANSMIT FREQUENCY Base: 5725 - 5850 MHz Handset: 2400 - 2483.5 MHz RECEIVE FREQUENCY Base: 2400 - 2483.5 MHz Handset: 5725 - 5850 MHz CHANNELS 95 Channels SIZE Handset: 182mm x 55.3mm x 40mm (including antenna) Charger: 76.5mm x 79.4mm x 45.2mm WEIGHT Handset: 146 grams (excluding Battery) Charger: 225 grams POWER REQUIREMENTS Handset: 3.6V @ 600mAh NiMH Charger: 9 V DC @ 150mA...
User Manual
Page 18
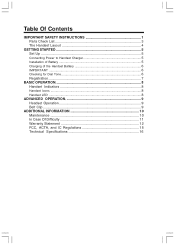
Table Of Contents IMPORTANT SAFETY INSTRUCTIONS 1 Parts Check List 3 The Handset Layout 4 GETTING STARTED 5 Set Up ...5 Connecting Power to Handset Charger 5 Installation of Battery 5 Charging of the Handset Battery 6 IMPORTANT ...6 Checking for Dial Tone 6 Registration 7 BASIC OPERATION 8 Handset Indicators 8 Handset Icons ...8 Handset LED ...8 ADVANCED OPERATION 9 Headset Operation 9 Belt Clip ...9 ADDITIONAL INFORMATION 10 Maintenance 10 In Case Of Difficulty 11 Warranty Statement 12 FCC, ACTA, and IC Regulations 15 Technical Specifications 16
Table Of Contents IMPORTANT SAFETY INSTRUCTIONS 1 Parts Check List 3 The Handset Layout 4 GETTING STARTED 5 Set Up ...5 Connecting Power to Handset Charger 5 Installation of Battery 5 Charging of the Handset Battery 6 IMPORTANT ...6 Checking for Dial Tone 6 Registration 7 BASIC OPERATION 8 Handset Indicators 8 Handset Icons ...8 Handset LED ...8 ADVANCED OPERATION 9 Headset Operation 9 Belt Clip ...9 ADDITIONAL INFORMATION 10 Maintenance 10 In Case Of Difficulty 11 Warranty Statement 12 FCC, ACTA, and IC Regulations 15 Technical Specifications 16


