
VBR334 Quick Start Guide
Page 13
... utilize either repair or replace the Product at the number below. VIZIO Technical Support will provide instructions for ninety (90) days from warranty service or replacement, whichever is within the warranty period, VIZIO will either the original carton box and shipping material or packaging that affords an equal degree of VIZIO's commitment to service excellence. THERE ARE NO EXPRESS WARRANTIES OTHER THAN THOSE LISTED OR DESCRIBED...
... utilize either repair or replace the Product at the number below. VIZIO Technical Support will provide instructions for ninety (90) days from warranty service or replacement, whichever is within the warranty period, VIZIO will either the original carton box and shipping material or packaging that affords an equal degree of VIZIO's commitment to service excellence. THERE ARE NO EXPRESS WARRANTIES OTHER THAN THOSE LISTED OR DESCRIBED...
XVT553SV User Manual
Page 3
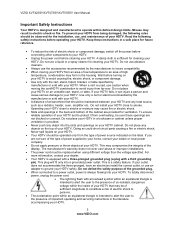
... or component damage, switch off the power before connecting other components to your HDTV. Unplug the power cord before turning on your HDTV. The manufacturer's warranty does not cover user abuse or improper installations. The power cord must be observed for future reference. To reduce the risk of power supplied to ground your HDTV. To prevent your HDTV. To totally disconnect power, unplug the power cord. The lightning flash...
... or component damage, switch off the power before connecting other components to your HDTV. Unplug the power cord before turning on your HDTV. The manufacturer's warranty does not cover user abuse or improper installations. The power cord must be observed for future reference. To reduce the risk of power supplied to ground your HDTV. To prevent your HDTV. To totally disconnect power, unplug the power cord. The lightning flash...

XVT553SV User Manual
Page 4
... service your dealer. Incorrect polarities may cause fire or electric shock. Do not install your HDTV during lightning. Overloading can damage the remote control or injure the operator. If any way. If repair is dropped or damaged in this case may cause fire or electric shock. Follow instructions for an extended period of time, unplug the power cord...
... service your dealer. Incorrect polarities may cause fire or electric shock. Do not install your HDTV during lightning. Overloading can damage the remote control or injure the operator. If any way. If repair is dropped or damaged in this case may cause fire or electric shock. Follow instructions for an extended period of time, unplug the power cord...

XVT553SV User Manual
Page 8
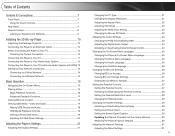
......36 Zoom 2 ...36 CC (Closed Caption) Menu ...37 Analog Closed Caption ...37 Digital Closed Caption ...37 Digital CC Style...37 Sleep Timer Menu ...37 TV Settings Menu ...37 Input Source...37 Picture ...38 Reset Picture Mode ...39 Audio ...40 Advanced Audio...40 Tuner...41 Name Input ...42 Device Setup...43 Parental Controls ...43 Menu Language ...45 Time & Local Settings ...45 PIP Menu...46 PIP Mode ...46 Source...46 Position ...46 Size ...46 Audio ...46 Network Menu ...47 Wired Connection ...47 Manual Setup...47 Wireless Connection ...47 Bluetooth Menu...48 Help Menu ...49 System Info ...49...
......36 Zoom 2 ...36 CC (Closed Caption) Menu ...37 Analog Closed Caption ...37 Digital Closed Caption ...37 Digital CC Style...37 Sleep Timer Menu ...37 TV Settings Menu ...37 Input Source...37 Picture ...38 Reset Picture Mode ...39 Audio ...40 Advanced Audio...40 Tuner...41 Name Input ...42 Device Setup...43 Parental Controls ...43 Menu Language ...45 Time & Local Settings ...45 PIP Menu...46 PIP Mode ...46 Source...46 Position ...46 Size ...46 Audio ...46 Network Menu ...47 Wired Connection ...47 Manual Setup...47 Wireless Connection ...47 Bluetooth Menu...48 Help Menu ...49 System Info ...49...

XVT553SV User Manual
Page 11
... the Internet connection using the initial Setup App or the Network Menu in the HDTV Settings App. Set up your Internet connection. Install your HDTV on a flat surface to avoid tipping. For proper ventilation, you must not be compromised. To take full advantage of your TV, you can connect your TV to mount your HDTV on your HDTV. The 3- VIZIO offers professional installation services including home networking. o Use the included power cord...
... the Internet connection using the initial Setup App or the Network Menu in the HDTV Settings App. Set up your Internet connection. Install your HDTV on a flat surface to avoid tipping. For proper ventilation, you must not be compromised. To take full advantage of your TV, you can connect your TV to mount your HDTV on your HDTV. The 3- VIZIO offers professional installation services including home networking. o Use the included power cord...

XVT553SV User Manual
Page 13
...; To open a channel list. Jag Wheel Control The Jag wheel on the side of the same functions you might see as buttons on and orange when powered off. POWER 'VIZIO' LIGHT-The VIZIO name lights white when powered on other TVs, including volume, power, input source, and channel change your HDTV performs all of your HDTV settings. 12 www.VIZIO.com VIZIO XVT423SV/XVT473SV/XVT553SV User Manual Chapter 2 Basic Controls and Connections Front Panel 1. Choose the channel with the...
...; To open a channel list. Jag Wheel Control The Jag wheel on the side of the same functions you might see as buttons on and orange when powered off. POWER 'VIZIO' LIGHT-The VIZIO name lights white when powered on other TVs, including volume, power, input source, and channel change your HDTV performs all of your HDTV settings. 12 www.VIZIO.com VIZIO XVT423SV/XVT473SV/XVT553SV User Manual Chapter 2 Basic Controls and Connections Front Panel 1. Choose the channel with the...
XVT553SV User Manual
Page 15
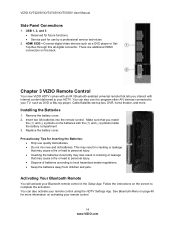
... battery cover. Precautionary Tips for more . VIZIO XVT423SV/XVT473SV/XVT553SV User Manual Side Panel Connections 1. Remove the battery cover. 2. See Bluetooth Menu on activating your Bluetooth remote control in cracking or leakage that you interact with the (+) and (-) symbols inside the battery compartment 3. HDMI SIDE-Connect digital video devices such as DVD or Blu-ray player, Cable/Satellite set-top box, DVR, home theater, and more information on...
... battery cover. Precautionary Tips for more . VIZIO XVT423SV/XVT473SV/XVT553SV User Manual Side Panel Connections 1. Remove the battery cover. 2. See Bluetooth Menu on activating your Bluetooth remote control in cracking or leakage that you interact with the (+) and (-) symbols inside the battery compartment 3. HDMI SIDE-Connect digital video devices such as DVD or Blu-ray player, Cable/Satellite set-top box, DVR, home theater, and more information on...
XVT553SV User Manual
Page 20
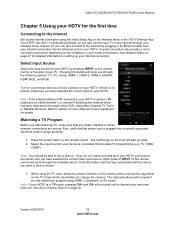
..., Cable Box, External TV Tuner or Satellite Receiver. When using the TV input, press the channel buttons on the remote control or press the Jag wheel on the remote control will light up white. 2. Watching a TV Program Before you have selected the correct input on the back of INPUT on the TV to launch the Quick Menu to the Internet by pressing INPUT on your HDTV. Note: If your HDTV is plugged into the Ethernet port...
..., Cable Box, External TV Tuner or Satellite Receiver. When using the TV input, press the channel buttons on the remote control or press the Jag wheel on the remote control will light up white. 2. Watching a TV Program Before you have selected the correct input on the back of INPUT on the TV to launch the Quick Menu to the Internet by pressing INPUT on your HDTV. Note: If your HDTV is plugged into the Ethernet port...
XVT553SV User Manual
Page 31
... users may need additional help setting up your network, please refer to the user manual for you can sometimes deliver a more consistent connection depending on the conditions in your home environment. b. If you need to access the Internet. Your HDTV also has 802.11n singleband wireless, so you . 30 www.VIZIO.com VIZIO XVT423SV/XVT473SV/XVT553SV User Manual Ethernet Connection The Ethernet function on your HDTV is used to manually adjust the network settings...
... users may need additional help setting up your network, please refer to the user manual for you can sometimes deliver a more consistent connection depending on the conditions in your home environment. b. If you need to access the Internet. Your HDTV also has 802.11n singleband wireless, so you . 30 www.VIZIO.com VIZIO XVT423SV/XVT473SV/XVT553SV User Manual Ethernet Connection The Ethernet function on your HDTV is used to manually adjust the network settings...
XVT553SV User Manual
Page 48
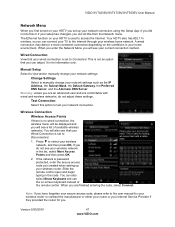
... settings. Manual Setup Select to view and/or manually change your network settings such as the IP Address, the Subnet Mask, the Default Gateway, the Preferred DNS Server, and the Alternate DNS Server. Change Settings Select to manually change your network settings. Wireless Connection Wireless Access Points If there is no wired connection, the wireless menu will be displayed and you will see your current connection method. If the network is password protected, enter the secure access code...
... settings. Manual Setup Select to view and/or manually change your network settings such as the IP Address, the Subnet Mask, the Default Gateway, the Preferred DNS Server, and the Alternate DNS Server. Change Settings Select to manually change your network settings. Wireless Connection Wireless Access Points If there is no wired connection, the wireless menu will be displayed and you will see your current connection method. If the network is password protected, enter the secure access code...

XVT553SV User Manual
Page 54
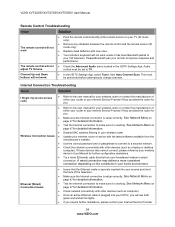
.... Bluetooth Troubleshooting Issue Solution Unable to pair the VIZIO Universal Remote Control to the TV Insure that device's remote. Attempt the pairing procedure again. Press the green button while in the remote using an antenna, the signal strength of the channel may change. Make sure your antenna is not responsible for service relating to expose your VUR10's keyboard. VIZIO Internet Apps Troubleshooting Issue Solution The installed apps are not working correctly ...
.... Bluetooth Troubleshooting Issue Solution Unable to pair the VIZIO Universal Remote Control to the TV Insure that device's remote. Attempt the pairing procedure again. Press the green button while in the remote using an antenna, the signal strength of the channel may change. Make sure your antenna is not responsible for service relating to expose your VUR10's keyboard. VIZIO Internet Apps Troubleshooting Issue Solution The installed apps are not working correctly ...
XVT553SV User Manual
Page 55
... remote control will not Check the Advanced Audio menu located in your wireless router. control must be set to change channels. Update your wireless router or device with the latest software available from your HDTV, you will see both green and amber link lights. If you . Make sure the Internet connection is working . Audio adjust TV Volume. Channel Up and Down buttons will not work. In the HDTV Settings App, select Tuner, then Auto Channel Scan. A wired connection...
... remote control will not Check the Advanced Audio menu located in your wireless router. control must be set to change channels. Update your wireless router or device with the latest software available from your HDTV, you will see both green and amber link lights. If you . Make sure the Internet connection is working . Audio adjust TV Volume. Channel Up and Down buttons will not work. In the HDTV Settings App, select Tuner, then Auto Channel Scan. A wired connection...
XVT553SV User Manual
Page 63
... 877 MY VIZIO (877.698.4946) from the same customer location. Replacement parts and units are warranted for the remaining portion of the original warranty or for parts or labor during the warranty period. Units with unreadable or removed serial numbers, "image burn-in", and routine maintenance are not limited to cosmetic damage, normal wear and tear, misuse, signal issues, power surges, and...
... 877 MY VIZIO (877.698.4946) from the same customer location. Replacement parts and units are warranted for the remaining portion of the original warranty or for parts or labor during the warranty period. Units with unreadable or removed serial numbers, "image burn-in", and routine maintenance are not limited to cosmetic damage, normal wear and tear, misuse, signal issues, power surges, and...
XVT553SV User Manual
Page 64
... Panel 12 Jag Wheel 12 Daylight Savings setting 45 Device Setup 17 Device Setup 43 DTV Transition 5 DVD Player Connecting 25 DVI Cable Box 23 Satellite Box 23 EPG 20 Equalizer Settings 41 Ethernet (wired) Settings 47 Ethernet Connection 30 Firmware Updates 34 Getting Started 18 Grounding 4 GUIDE Button 20 HDMI 22 HDTV Location 10 Help Menu Reset All Settings 49 Setup Wizard 49 System Info 49 Help Menu 49 Home Network Connection 30 INFO Button 21, 31 Input Source Choosing 19 Input Source...
... Panel 12 Jag Wheel 12 Daylight Savings setting 45 Device Setup 17 Device Setup 43 DTV Transition 5 DVD Player Connecting 25 DVI Cable Box 23 Satellite Box 23 EPG 20 Equalizer Settings 41 Ethernet (wired) Settings 47 Ethernet Connection 30 Firmware Updates 34 Getting Started 18 Grounding 4 GUIDE Button 20 HDMI 22 HDTV Location 10 Help Menu Reset All Settings 49 Setup Wizard 49 System Info 49 Help Menu 49 Home Network Connection 30 INFO Button 21, 31 Input Source Choosing 19 Input Source...
XVT553SV User Manual
Page 65
... 15 Universal 17 VIA buttons 32 VIA Functions 16 Reset All TV Settings 49 Factory Default 49 Picture Settings 39 RGB 22 Safety Instructions 2 Satellite Box Connecting 23 Search for channels 41 Setting Up 10 Settings Menu Audio 40, 42 Menu Language 45 Parental Controls Menu 43 Setup Wizard 18 Sharpness 38 Sidebar 21, 31 Skip Channel 42 Software Updates 34 Specifications 57 System Information 49 Technical Support 55 Time Zone setting 45 Tint 38 Troubleshooting 50 Tuner Menu Add Analog Channel 42 Analog...
... 15 Universal 17 VIA buttons 32 VIA Functions 16 Reset All TV Settings 49 Factory Default 49 Picture Settings 39 RGB 22 Safety Instructions 2 Satellite Box Connecting 23 Search for channels 41 Setting Up 10 Settings Menu Audio 40, 42 Menu Language 45 Parental Controls Menu 43 Setup Wizard 18 Sharpness 38 Sidebar 21, 31 Skip Channel 42 Software Updates 34 Specifications 57 System Information 49 Technical Support 55 Time Zone setting 45 Tint 38 Troubleshooting 50 Tuner Menu Add Analog Channel 42 Analog...
VBR334 User Manual
Page 5
... Network Connection 14 Connecting to A Wired Network 14 Connecting to a Wireless Network 14 Basic Operation 15 Navigating the On-Screen Menu 15 Playing a Disc 15 Basic Playback Functions 16 Advanced Playback Functions 17 Viewing BD-Live Content 17 Viewing USB Media - Video and Audio 17 Playing USB Photos and Audio 18 USB Media Playback Controls 19 Viewing a Photo Slide Show 19 Adjusting the Slide Show Settings 20 Adjusting the Player's Settings 21 Adjusting the Display Settings 21 Changing the TV Type 21 Changing the Display Resolution...
... Network Connection 14 Connecting to A Wired Network 14 Connecting to a Wireless Network 14 Basic Operation 15 Navigating the On-Screen Menu 15 Playing a Disc 15 Basic Playback Functions 16 Advanced Playback Functions 17 Viewing BD-Live Content 17 Viewing USB Media - Video and Audio 17 Playing USB Photos and Audio 18 USB Media Playback Controls 19 Viewing a Photo Slide Show 19 Adjusting the Slide Show Settings 20 Adjusting the Player's Settings 21 Adjusting the Display Settings 21 Changing the TV Type 21 Changing the Display Resolution...
VBR334 User Manual
Page 7
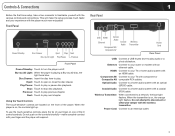
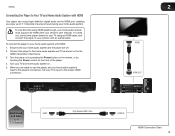
... experience with an HDMI cable. Do not push on , the orange light flashes. USB HDMI Ethernet Optical Audio Coaxial Audio Component AV / Composite AV Wireless Transmitter Power Cord Rear Panel USB: Connect a USB thumb drive to play or pause disc playback. Do not attempt to disconnect or otherwise tamper with a coaxial (RCA) cable. Play/Pause: Touch to play . Next: Touch to play audio or a photo slideshow. HDMI: Connect to your finger on , the controls light up. When the...
... experience with an HDMI cable. Do not push on , the orange light flashes. USB HDMI Ethernet Optical Audio Coaxial Audio Component AV / Composite AV Wireless Transmitter Power Cord Rear Panel USB: Connect a USB thumb drive to play or pause disc playback. Do not attempt to disconnect or otherwise tamper with a coaxial (RCA) cable. Play/Pause: Touch to play . Next: Touch to play audio or a photo slideshow. HDMI: Connect to your finger on , the controls light up. When the...
VBR334 User Manual
Page 13
... player. 4. Set your home audio system with an optical cable. To connect the player to your TV's input to the proper HDMI connection. 2 HDMI HDMI OUT Best Sound HDMI and Video Up to 7.1 Channels High Speed HDMI Cable HDMI IN HDMI Connection Chart 13 To view 3D while using HDMI passthrough, your home audio receiver must support 3D HDMI (See your TV and home audio system on the front of surround sound using your receiver with HDMI: 1. Turn the player on by pressing the Power button on the remote...
... player. 4. Set your home audio system with an optical cable. To connect the player to your TV's input to the proper HDMI connection. 2 HDMI HDMI OUT Best Sound HDMI and Video Up to 7.1 Channels High Speed HDMI Cable HDMI IN HDMI Connection Chart 13 To view 3D while using HDMI passthrough, your home audio receiver must support 3D HDMI (See your TV and home audio system on the front of surround sound using your receiver with HDMI: 1. Turn the player on by pressing the Power button on the remote...
VBR334 User Manual
Page 30
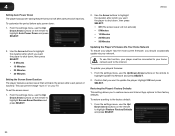
... Arrow buttons on the remote to the internet. Highlight OK and press SELECT. Restoring the Player's Factory Defaults This setting allows you should occasionally update via your home network and to highlight Update Via Network and press SELECT. 2. To set period of inactivity. To use the Up/Down Arrow buttons on the remote to your network. From the settings menu, use this function, your player must be connected to highlight Screen Saver...
... Arrow buttons on the remote to the internet. Highlight OK and press SELECT. Restoring the Player's Factory Defaults This setting allows you should occasionally update via your home network and to highlight Update Via Network and press SELECT. 2. To set period of inactivity. To use the Up/Down Arrow buttons on the remote to your network. From the settings menu, use this function, your player must be connected to highlight Screen Saver...
VBR334 User Manual
Page 40
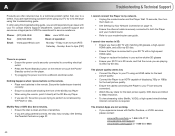
... Power/ Standby control on page 14. • Ensure the ethernet cable is required. Wait 10 seconds, then turn them back on. • See Setting Up Your Network Connection on the player. • Try plugging the power cord into a different electrical outlet. Nothing happens when I cannot connect the Player to your 3D TV with a high-speed HDMI cable. • Charge or replace the battery in the remote. Troubleshooting & Technical Support I press buttons...
... Power/ Standby control on page 14. • Ensure the ethernet cable is required. Wait 10 seconds, then turn them back on. • See Setting Up Your Network Connection on the player. • Try plugging the power cord into a different electrical outlet. Nothing happens when I cannot connect the Player to your 3D TV with a high-speed HDMI cable. • Charge or replace the battery in the remote. Troubleshooting & Technical Support I press buttons...


