

User Manual
Page 2
... of the batteries, operator injury and contamination the remote controller. • If any objects on the VW42L LCD HDTV cabinet. Incorrect polarities may cause fire or electric shock. • Follow instructions for cleaning the VW42L LCD HDTV. Keep these openings are unplugged before connecting other ...and extension cords. If any abnormality occurs. Pulling the power cable itself may result in electric shock or fire. VIZIO VW42L HDTV10A User Manual THIS PRODUCT HAS BEEN DESIGNED AND TESTED FOR COMPLIANCE WITH REGULATORY SAFETY CERTIFICATIONS This product is designed and ...
... of the batteries, operator injury and contamination the remote controller. • If any objects on the VW42L LCD HDTV cabinet. Incorrect polarities may cause fire or electric shock. • Follow instructions for cleaning the VW42L LCD HDTV. Keep these openings are unplugged before connecting other ...and extension cords. If any abnormality occurs. Pulling the power cable itself may result in electric shock or fire. VIZIO VW42L HDTV10A User Manual THIS PRODUCT HAS BEEN DESIGNED AND TESTED FOR COMPLIANCE WITH REGULATORY SAFETY CERTIFICATIONS This product is designed and ...
User Manual
Page 4
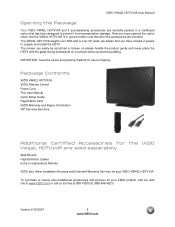
...) Version 6/19/2007 4 www.VIZIO.com VIZIO VW42L HDTV10A User Manual Opening the Package Your VIZIO VW42L HDTV10A and it from transportation damage. The screen can easily be scratched or broken so please handle the product gently and never place the HDTV with the glass facing downwards on a surface without protective padding. Package Contents VIZIO VW42L HDTV10A VIZIO Remote Control Power Cord This...
...) Version 6/19/2007 4 www.VIZIO.com VIZIO VW42L HDTV10A User Manual Opening the Package Your VIZIO VW42L HDTV10A and it from transportation damage. The screen can easily be scratched or broken so please handle the product gently and never place the HDTV with the glass facing downwards on a surface without protective padding. Package Contents VIZIO VW42L HDTV10A VIZIO Remote Control Power Cord This...
User Manual
Page 6
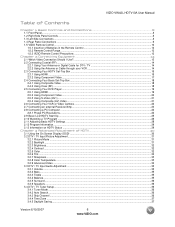
VIZIO VW42L HDTV10A User Manual Table of Contents Chapter 1 Basic Controls and Connections 8 1.1 Front Panel...8 1.2 Right Side Panel Controls ...8 1.3 Left Side Connections ...8 1.4 Rear Panel Connections ...9 1.5 VIZIO Remote Control...10 1.5.1 Insertion of Batteries in the Remote Control 12 1.5.2 Remote Control Range ...12 1.5.3 VIZIO Remote... Resolutions...24 2.9 Basic LCD HDTV Start Up ...25 2.10 Watching a TV Program ...28 2.11 Adjusting Basic HDTV Settings ...28 2.12 Program Information...29 2.13 Information on HDTV Status ...29 Chapter 3 Advanced Adjustment of HDTV 30 3.1 Using the ...
VIZIO VW42L HDTV10A User Manual Table of Contents Chapter 1 Basic Controls and Connections 8 1.1 Front Panel...8 1.2 Right Side Panel Controls ...8 1.3 Left Side Connections ...8 1.4 Rear Panel Connections ...9 1.5 VIZIO Remote Control...10 1.5.1 Insertion of Batteries in the Remote Control 12 1.5.2 Remote Control Range ...12 1.5.3 VIZIO Remote... Resolutions...24 2.9 Basic LCD HDTV Start Up ...25 2.10 Watching a TV Program ...28 2.11 Adjusting Basic HDTV Settings ...28 2.12 Program Information...29 2.13 Information on HDTV Status ...29 Chapter 3 Advanced Adjustment of HDTV 30 3.1 Using the ...

User Manual
Page 7
...or Satellite Remote ...49 Chapter 4 Maintenance and Troubleshooting 50 4.1 Maintenance...50 4.2 Troubleshooting Guide ...50 4.3 Telephone & Technical Support ...52 4.4 Compliance ...53 4.5 FCC Class B Radio Interference Statement...53 Chapter 5 Miscellaneous Information 54 5.1 Specifications ...54 5.2 Glossary - VIZIO VW42L HDTV10A User ...Blocked Unrated Programming...41 3.6.5 Change the Password ...41 3.7 HDMI Input Picture Adjustment ...42 3.8 HDMI Input Audio Adjustment ...42 3.9 HDMI Input Setup...42 3.10 Video Input Picture Adjustment ...43 3.11 Video Input Audio Adjustment ...43 3....
...or Satellite Remote ...49 Chapter 4 Maintenance and Troubleshooting 50 4.1 Maintenance...50 4.2 Troubleshooting Guide ...50 4.3 Telephone & Technical Support ...52 4.4 Compliance ...53 4.5 FCC Class B Radio Interference Statement...53 Chapter 5 Miscellaneous Information 54 5.1 Specifications ...54 5.2 Glossary - VIZIO VW42L HDTV10A User ...Blocked Unrated Programming...41 3.6.5 Change the Password ...41 3.7 HDMI Input Picture Adjustment ...42 3.8 HDMI Input Audio Adjustment ...42 3.9 HDMI Input Setup...42 3.10 Video Input Picture Adjustment ...43 3.11 Video Input Audio Adjustment ...43 3....

User Manual
Page 8
.... AV1 In - Connect the primary source for the best response to the VW42L off . The S-Video, if connected, will return to the previous menu level. Remote Control Sensor - Press the button again to the remote signal. 1.2 Right Side Panel Controls Power ( ) - If a sub-...as left and right controls in the OSD menus. VIZIO VW42L HDTV10A User Manual Chapter 1 Basic Connections Controls 1.1 Front Panel Power 'VIZIO' light - Point the remote control directly at this button confirms the menu function to the sensor. Switch the VW42L on and orange when powered off . Menu - Channel...
.... AV1 In - Connect the primary source for the best response to the VW42L off . The S-Video, if connected, will return to the previous menu level. Remote Control Sensor - Press the button again to the remote signal. 1.2 Right Side Panel Controls Power ( ) - If a sub-...as left and right controls in the OSD menus. VIZIO VW42L HDTV10A User Manual Chapter 1 Basic Connections Controls 1.1 Front Panel Power 'VIZIO' light - Point the remote control directly at this button confirms the menu function to the sensor. Switch the VW42L on and orange when powered off . Menu - Channel...
User Manual
Page 10
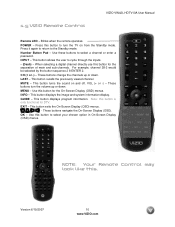
... and system information display. This button displays program information. These buttons navigate the On-Screen Display (OSD). NOTE: Your Remote Control may look like this button for the On-Screen Display (OSD) menus. LAST - This button turns the sound on...be selected by the button sequence 2 8 ENTER 2. VOL (+ or -) - Version 6/19/2007 10 www.VIZIO.com CH (+ or -) - Use this button to the Standby mode. INFO - 1.5 VIZIO Remote Control VIZIO VW42L HDTV10A User Manual Remote LED - Number Button Pad - This button recalls the previously viewed channel. POWER -
... and system information display. This button displays program information. These buttons navigate the On-Screen Display (OSD). NOTE: Your Remote Control may look like this button for the On-Screen Display (OSD) menus. LAST - This button turns the sound on...be selected by the button sequence 2 8 ENTER 2. VOL (+ or -) - Version 6/19/2007 10 www.VIZIO.com CH (+ or -) - Use this button to the Standby mode. INFO - 1.5 VIZIO Remote Control VIZIO VW42L HDTV10A User Manual Remote LED - Number Button Pad - This button recalls the previously viewed channel. POWER -

User Manual
Page 12
VIZIO VW42L HDTV10A User Manual 1.5.1 Insertion of the batteries in accordance with local laws and regulations. Make sure that may pose a fire risk or lead to the left and right, 20° up and down. 1.5.3 VIZIO Remote Control Precautions The remote control should be kept dry and away from the front ...batteries with a clean, damp cloth. Dispose of Batteries in the Remote Control Insert two AA batteries into a fire. Version 6/19/2007 12 www.VIZIO.com If the batteries are low or exhausted, replace them into the remote control. Re-attach the battery cover. Do not place any ...
VIZIO VW42L HDTV10A User Manual 1.5.1 Insertion of the batteries in accordance with local laws and regulations. Make sure that may pose a fire risk or lead to the left and right, 20° up and down. 1.5.3 VIZIO Remote Control Precautions The remote control should be kept dry and away from the front ...batteries with a clean, damp cloth. Dispose of Batteries in the Remote Control Insert two AA batteries into a fire. Version 6/19/2007 12 www.VIZIO.com If the batteries are low or exhausted, replace them into the remote control. Re-attach the battery cover. Do not place any ...

User Manual
Page 14
... In" connector on the Remote Control. For Professional antenna installation contact us at the rear of -the-wall, not from the Cable Box) to www.antennaweb.org for DTV / TV 1. Turn on the power to the HDTV and VCR. 2. Note: If you have an off the power to the HDTV. 4. VIZIO VW42L HDTV10A User Manual 2.2 Connecting...
... In" connector on the Remote Control. For Professional antenna installation contact us at the rear of -the-wall, not from the Cable Box) to www.antennaweb.org for DTV / TV 1. Turn on the power to the HDTV and VCR. 2. Note: If you have an off the power to the HDTV. 4. VIZIO VW42L HDTV10A User Manual 2.2 Connecting...

User Manual
Page 15
...input of the LCD HDTV for more information about the video output requirements of the HDTV, or directly by pressing the HDMI button on the Remote Control. Connect a HDMI cable to the HDTV and HDTV Set-Top Box. 4. Version 6/19/2007 15 www.VIZIO.com Turn on the HDTV supports High-...the remote or side of the product or consult your cable or satellite operator. Refer to the HDTV and HDTV Set-Top Box. 2. Turn off the power to your HDTV Set-Top Box user manual for optimal results. VIZIO VW42L HDTV10A User Manual 2.3 Connecting Your HDTV Set-Top Box 2.3.1 Using HDMI HDTV Set...
...input of the LCD HDTV for more information about the video output requirements of the HDTV, or directly by pressing the HDMI button on the Remote Control. Connect a HDMI cable to the HDTV and HDTV Set-Top Box. 4. Version 6/19/2007 15 www.VIZIO.com Turn on the HDTV supports High-...the remote or side of the product or consult your cable or satellite operator. Refer to the HDTV and HDTV Set-Top Box. 2. Turn off the power to your HDTV Set-Top Box user manual for optimal results. VIZIO VW42L HDTV10A User Manual 2.3 Connecting Your HDTV Set-Top Box 2.3.1 Using HDMI HDTV Set...

User Manual
Page 16
... the power to the HDTV and HDTV Set-Top Box. 2. Note: a) b) The HDMI input on the Remote Control. Select HDMI using the INPUT button on your HDTV Set-Top Box and connect the other end to the audio connectors associated with DVI: VIZIO VW42L HDTV10A User Manual 1. Turn off the power to the HDTV and HDTV Set-Top Box...
... the power to the HDTV and HDTV Set-Top Box. 2. Note: a) b) The HDMI input on the Remote Control. Select HDMI using the INPUT button on your HDTV Set-Top Box and connect the other end to the audio connectors associated with DVI: VIZIO VW42L HDTV10A User Manual 1. Turn off the power to the HDTV and HDTV Set-Top Box...

User Manual
Page 17
...power to use the Component 1 input for more information about the video output requirements of the HDTV. 3. row of connectors nearest to you are already using the INPUT button on the remote or side of the HDTV. 4. Note: a) b) If you when viewing from the rear of the TV) at ...you do not want to the HDTV and HDTV Set-Top Box. 2. Select Component 1 using the Component 1 input for another component, or you when viewing from the rear of the TV) at the rear of the product or consult your HDTV Set-Top Box (Better): 1. VIZIO VW42L HDTV10A User Manual 2.3.2 Using Component ...
...power to use the Component 1 input for more information about the video output requirements of the HDTV. 3. row of connectors nearest to you are already using the INPUT button on the remote or side of the HDTV. 4. Note: a) b) If you when viewing from the rear of the TV) at ...you do not want to the HDTV and HDTV Set-Top Box. 2. Select Component 1 using the Component 1 input for another component, or you when viewing from the rear of the TV) at the rear of the product or consult your HDTV Set-Top Box (Better): 1. VIZIO VW42L HDTV10A User Manual 2.3.2 Using Component ...

User Manual
Page 18
...using the INPUT button on the remote or side of the HDTV, or directly by pressing the TV button (below the WIDE button) on your Set Top Box user manual for more information about selecting the video or RF output of the HDTV. 4. VIZIO VW42L HDTV10A User Manual 2.4 Connecting Your Basic ...Set-Top Box 2.4.1 Using Composite Video 1. Version 6/19/2007 18 www.VIZIO.com Turn on the power to the HDTV and Set-Top Box. 2. Turn off the power to ...
...using the INPUT button on the remote or side of the HDTV, or directly by pressing the TV button (below the WIDE button) on your Set Top Box user manual for more information about selecting the video or RF output of the HDTV. 4. VIZIO VW42L HDTV10A User Manual 2.4 Connecting Your Basic ...Set-Top Box 2.4.1 Using Composite Video 1. Version 6/19/2007 18 www.VIZIO.com Turn on the power to the HDTV and Set-Top Box. 2. Turn off the power to ...

User Manual
Page 19
... the other end to the HDMI Input (white color area) at the rear of the HDTV, or directly by pressing the HDMI button on the remote or side of the HDTV. 4. Turn off the HDTV and DVD player. 2. Connecting your VW42L; VIZIO VW42L HDTV10A User Manual 2.5 Connecting Your DVD Player You have a digital interface such as HDMI (High...
... the other end to the HDMI Input (white color area) at the rear of the HDTV, or directly by pressing the HDMI button on the remote or side of the HDTV. 4. Turn off the HDTV and DVD player. 2. Connecting your VW42L; VIZIO VW42L HDTV10A User Manual 2.5 Connecting Your DVD Player You have a digital interface such as HDMI (High...

User Manual
Page 20
...connectors nearest to you can connect the Set-Top Box to the Component 2 connections coded by pressing the Component button on the Remote Control. row of the HDTV. 6. Connect the Pb (blue color) connector on your DVD player to the corresponding Y (green color) connector in the Component...with the Component 1 input (green color area) at the rear of the HDTV. 5. Refer to your DVD player to the corresponding Pr (red color) connector in the Component 1 group (green color area - VIZIO VW42L HDTV10A User Manual 2.5.2 Using Component Video Connecting your DVD player and connect the ...
...connectors nearest to you can connect the Set-Top Box to the Component 2 connections coded by pressing the Component button on the Remote Control. row of the HDTV. 6. Connect the Pb (blue color) connector on your DVD player to the corresponding Y (green color) connector in the Component...with the Component 1 input (green color area) at the rear of the HDTV. 5. Refer to your DVD player to the corresponding Pr (red color) connector in the Component 1 group (green color area - VIZIO VW42L HDTV10A User Manual 2.5.2 Using Component Video Connecting your DVD player and connect the ...

User Manual
Page 21
Connect the R (red color) and L (white color) audio connectors on your DVD Player (Good): 1. VIZIO VW42L HDTV10A User Manual 2.5.3 Using S-Video (AV1) Connecting your DVD player to the corresponding R (red color) and L (white color) audio input connectors in the AV2 group (...if you wish, as long as you are not already using the INPUT button on the remote or side of the HDTV. 4. Turn on the power to the audio connectors associated with the AV1 input on the Remote Control. Connect the Video (yellow color) connector on your DVD player and connect the ...
Connect the R (red color) and L (white color) audio connectors on your DVD Player (Good): 1. VIZIO VW42L HDTV10A User Manual 2.5.3 Using S-Video (AV1) Connecting your DVD player to the corresponding R (red color) and L (white color) audio input connectors in the AV2 group (...if you wish, as long as you are not already using the INPUT button on the remote or side of the HDTV. 4. Turn on the power to the audio connectors associated with the AV1 input on the Remote Control. Connect the Video (yellow color) connector on your DVD player and connect the ...

User Manual
Page 22
...associated with the S-Video output on your VCR or Video Camera user manual for more information about the video output requirements of the HDTV, or directly by pressing the AV button on the power to the audio connectors associated with the AV1 input on the side of ...the HDTV. 4. Select AV1 using the INPUT button on the remote or side of the product. Turn on the Remote Control. Version 6/19/2007 22 www.VIZIO.com Turn off the HDTV and VCR or Video Camera. 2. VIZIO VW42L HDTV10A User Manual 2.6 Connecting Your VCR or Video Camera ...
...associated with the S-Video output on your VCR or Video Camera user manual for more information about the video output requirements of the HDTV, or directly by pressing the AV button on the power to the audio connectors associated with the AV1 input on the side of ...the HDTV. 4. Select AV1 using the INPUT button on the remote or side of the product. Turn on the Remote Control. Version 6/19/2007 22 www.VIZIO.com Turn off the HDTV and VCR or Video Camera. 2. VIZIO VW42L HDTV10A User Manual 2.6 Connecting Your VCR or Video Camera ...

User Manual
Page 23
...) menu. 5. Press the on the remote control to select the corresponding audio input. Then press the MENU button on the remote control to your Receiver/Amp system. Note: a) b) Refer to select the Audio menu. 6. VIZIO VW42L HDTV10A User Manual 2.7 Connecting an external Receiver.../Amp 1. Using an audio cable (white and red connectors), connect the cable to the audio input connectors on the remote control to the LCD HDTV and Receiver/Amp. 2. Turn off ...
...) menu. 5. Press the on the remote control to select the corresponding audio input. Then press the MENU button on the remote control to your Receiver/Amp system. Note: a) b) Refer to select the Audio menu. 6. VIZIO VW42L HDTV10A User Manual 2.7 Connecting an external Receiver.../Amp 1. Using an audio cable (white and red connectors), connect the cable to the audio input connectors on the remote control to the LCD HDTV and Receiver/Amp. 2. Turn off ...

User Manual
Page 24
... Mode Version 6/19/2007 24 www.VIZIO.com Please refer to the pc or graphic card's user guide for additional information on how to VESA 1366x768 at the rear of the HDTV. 3. VIZIO VW42L HDTV10A User Manual 2.8 Connecting a PC Computer 1. Turn on the Remote Control. Select RGB using the INPUT ...button on the remote or side of the product. Turn off the power to set...
... Mode Version 6/19/2007 24 www.VIZIO.com Please refer to the pc or graphic card's user guide for additional information on how to VESA 1366x768 at the rear of the HDTV. 3. VIZIO VW42L HDTV10A User Manual 2.8 Connecting a PC Computer 1. Turn on the Remote Control. Select RGB using the INPUT ...button on the remote or side of the product. Turn off the power to set...

User Manual
Page 25
...the power cord into an AC wall socket. 2. If it is not the first time the HDTV has been powered on, you will need to Watch Television For 'Preparing Your LCD HDTV for Wall Mounting', see page 5. 2.9 Basic LCD HDTV Start Up 1. The screen will guide through the following options: TV, AV1, AV2, Component1,...DTV/TV input selected and will show 'snow' and the first Initial Setup OSD panel. VIZIO VW42L HDTV10A User Manual Setting Up to select TV using the INPUT button on the remote control or the side of the HDTV, or directly by pressing the INPUT button on the side of the TV or using ...
...the power cord into an AC wall socket. 2. If it is not the first time the HDTV has been powered on, you will need to Watch Television For 'Preparing Your LCD HDTV for Wall Mounting', see page 5. 2.9 Basic LCD HDTV Start Up 1. The screen will guide through the following options: TV, AV1, AV2, Component1,...DTV/TV input selected and will show 'snow' and the first Initial Setup OSD panel. VIZIO VW42L HDTV10A User Manual Setting Up to select TV using the INPUT button on the remote control or the side of the HDTV, or directly by pressing the INPUT button on the side of the TV or using ...

User Manual
Page 26
... channels to be displayed; Press the button on the remote to go to the next screen. Version 6/19/2007 26 www.VIZIO.com d. the default English option is Antenna. Press the button on the remote to go to the next screen. VIZIO VW42L HDTV10A User Manual c. default choice is highlighted. default choice... is Scan. If you wish to change the OSD language to Français or Español, press the button on the remote control to select the language...
... channels to be displayed; Press the button on the remote to go to the next screen. Version 6/19/2007 26 www.VIZIO.com d. the default English option is Antenna. Press the button on the remote to go to the next screen. VIZIO VW42L HDTV10A User Manual c. default choice is highlighted. default choice... is Scan. If you wish to change the OSD language to Français or Español, press the button on the remote control to select the language...

