

VSB207 Quick Start Guide
Page 2
... Sound Bar AC/DC Adapters are unplugged before moving your Sound Bar from the type of your Sound Bar changes substantially Overloading can damage the remote control or injure the operator. • If any of electric shock, do not touch the connector with wet hands. • Insert the... remote control battery in the literature accompanying your Sound Bar. • Do not overload power strips and extension cords. This will not be used for ventilation. Continuous ...
... Sound Bar AC/DC Adapters are unplugged before moving your Sound Bar from the type of your Sound Bar changes substantially Overloading can damage the remote control or injure the operator. • If any of electric shock, do not touch the connector with wet hands. • Insert the... remote control battery in the literature accompanying your Sound Bar. • Do not overload power strips and extension cords. This will not be used for ventilation. Continuous ...
VSB207 Quick Start Guide
Page 3
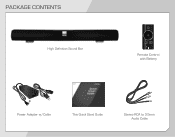
PACKAGE CONTENTS High Definition Sound Bar Sub - Sub + Input SRS Remote Control with Battery Power Adapter w/Cable This Quick Start Guide Stereo RCA to 3.5mm Audio Cable
PACKAGE CONTENTS High Definition Sound Bar Sub - Sub + Input SRS Remote Control with Battery Power Adapter w/Cable This Quick Start Guide Stereo RCA to 3.5mm Audio Cable
VSB207 Quick Start Guide
Page 13
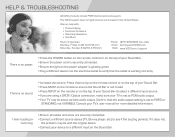
..., not VARIABLE. Sunday: 8 AM TO 4 PM (PST) Phone: (877) 698-4946 (TOLL-FREE) Email: techsupport@VIZIO.com Web: www.VIZIO.com/support There is no sound. • Increase the volume. Consult your Sound Bar. • Press MUTE on the remote to ensure the Sound Bar is not muted. • Press INPUT on the... source device (TV, Blu-ray player, etc) to a different input on the Sound Bar. There is no power. • Press the POWER button on the remote control or on the top of your Sound Bar. • Ensure the power cord is securely connected. • Ensure the light on the top of your...
..., not VARIABLE. Sunday: 8 AM TO 4 PM (PST) Phone: (877) 698-4946 (TOLL-FREE) Email: techsupport@VIZIO.com Web: www.VIZIO.com/support There is no sound. • Increase the volume. Consult your Sound Bar. • Press MUTE on the remote to ensure the Sound Bar is not muted. • Press INPUT on the... source device (TV, Blu-ray player, etc) to a different input on the Sound Bar. There is no power. • Press the POWER button on the remote control or on the top of your Sound Bar. • Ensure the power cord is securely connected. • Ensure the light on the top of your...
VSB207 Data Sheet
Page 2
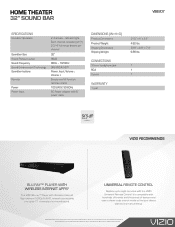
... Shipping Weight CONNECTIONS 3.5mm headphone jack RCA Coaxial WARRANTY 1 year 31.5" x 4" x 2.8" 4.62 lbs. 33.9" x 6.8" x 7.4" 6.98 lbs 1 1 1 VIZIO RECOMMENDS BLU-RAY™ PLAYER WITH WIRELESS INTERNET APPS® The VIZIO Blu-ray™ Player with the VIZIO Universal Remote Control. HOME THEATER 32" SOUND BAR VSB207 SPECIFICATIONS Soundbar Speakers Soundbar Size Sound Pressure Level Sound Frequency...
... Shipping Weight CONNECTIONS 3.5mm headphone jack RCA Coaxial WARRANTY 1 year 31.5" x 4" x 2.8" 4.62 lbs. 33.9" x 6.8" x 7.4" 6.98 lbs 1 1 1 VIZIO RECOMMENDS BLU-RAY™ PLAYER WITH WIRELESS INTERNET APPS® The VIZIO Blu-ray™ Player with the VIZIO Universal Remote Control. HOME THEATER 32" SOUND BAR VSB207 SPECIFICATIONS Soundbar Speakers Soundbar Size Sound Pressure Level Sound Frequency...
E320i-A0 User Manual
Page 5
... that the power cord and any abnormality occurs. Incorrect polarities may result in this case may cause the batteries to leak which can damage the remote control or injure the operator. The power cord fails or frays. - Your TV is intended to alert the user to the presence of uninsulated DANGEROUS VOLTAGE...
... that the power cord and any abnormality occurs. Incorrect polarities may result in this case may cause the batteries to leak which can damage the remote control or injure the operator. The power cord fails or frays. - Your TV is intended to alert the user to the presence of uninsulated DANGEROUS VOLTAGE...
E320i-A0 User Manual
Page 7
... the Package Contents 3 Installing the TV 3 Installing the TV Stand 3 Installing the TV on a Wall 5 Controls and Connections 6 Rear Panel 6 Side Panel 7 Front Panel 8 Remote Control 9 Replacing the Batteries 10 Connecting Your Devices 11 Connecting A Device 11 Connecting an audio device 12 Connecting to ... for Channels 26 Adding New Channels 27 Skipping Channels 28 Changing the Audio Language 28 Using the Parental Controls 29 Accessing the Parental Controls Menu 29 Enabling or Disabling Program Ratings 29 Locking and Unlocking Channels 29 Blocking and Unblocking Content by...
... the Package Contents 3 Installing the TV 3 Installing the TV Stand 3 Installing the TV on a Wall 5 Controls and Connections 6 Rear Panel 6 Side Panel 7 Front Panel 8 Remote Control 9 Replacing the Batteries 10 Connecting Your Devices 11 Connecting A Device 11 Connecting an audio device 12 Connecting to ... for Channels 26 Adding New Channels 27 Skipping Channels 28 Changing the Audio Language 28 Using the Parental Controls 29 Accessing the Parental Controls Menu 29 Enabling or Disabling Program Ratings 29 Locking and Unlocking Channels 29 Blocking and Unblocking Content by...
E320i-A0 User Manual
Page 9
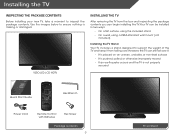
... TV. VIZIO LED LCD HDTV Installing the TV After removing the TV from falling over if: • It is placed on Stand Installing the TV Inspecting the Package Contents Before installing your new TV, take a moment to ensure nothing is not properly secured Quick Start Guide Hex Wrench Power Cord Remote Control with...
... TV. VIZIO LED LCD HDTV Installing the TV After removing the TV from falling over if: • It is placed on Stand Installing the TV Inspecting the Package Contents Before installing your new TV, take a moment to ensure nothing is not properly secured Quick Start Guide Hex Wrench Power Cord Remote Control with...
E320i-A0 User Manual
Page 15
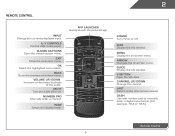
... channel. Closed Captions Open the closed caption menu. Volume Up/Down Increase or decrease loudness of the audio. 2 Remote Control Input Change the currently-displayed input. A/V Controls Control USB media player. Back Go to the previous on . Mute Turn the audio off . Info Display the info window...Manually enter a channel. Guide Display the info window. Last Return to manually enter a digital sub-channel. (For example, 18-4 or 18-5.) Remote Control 9 Ok Select the highlighted menu option. Power Turn TV on -screen menu. Arrow Navigate the on or off or on -screen menu. V ...
... channel. Closed Captions Open the closed caption menu. Volume Up/Down Increase or decrease loudness of the audio. 2 Remote Control Input Change the currently-displayed input. A/V Controls Control USB media player. Back Go to the previous on . Mute Turn the audio off . Info Display the info window...Manually enter a channel. Guide Display the info window. Last Return to manually enter a digital sub-channel. (For example, 18-4 or 18-5.) Remote Control 9 Ok Select the highlighted menu option. Power Turn TV on -screen menu. Arrow Navigate the on or off or on -screen menu. V ...
E320i-A0 User Manual
Page 16
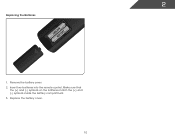
Insert two batteries into the remote control. Replace the battery cover. 10 2 Replacing the Batteries 1. Make sure that the (+) and (-) symbols on the batteries match the (+) and (-) symbols inside the battery compartment. 3. Remove the battery cover. 2.
Insert two batteries into the remote control. Replace the battery cover. 10 2 Replacing the Batteries 1. Make sure that the (+) and (-) symbols on the batteries match the (+) and (-) symbols inside the battery compartment. 3. Remove the battery cover. 2.
E320i-A0 User Manual
Page 25
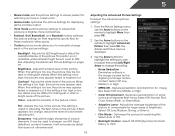
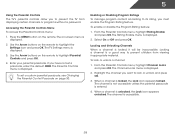
...sharpness of image motion content. Adjusting the Advanced Picture Settings To adjust the advanced picture settings: 1. Use the Arrow buttons on the remote to highlight Advanced Picture, then press OK.The Advanced Picture menu is set to manually change the setting: • Noise Reduction Diminishes...page 19. Also try these modes for large areas of the picture settings: Backlight - Brightness - Select Auto or Off. • Backlight Control - Adjusts the average brightness of the picture to compensate for other sports. • Custom picture mode allows you wish to adjust, then press...
...sharpness of image motion content. Adjusting the Advanced Picture Settings To adjust the advanced picture settings: 1. Use the Arrow buttons on the remote to highlight Advanced Picture, then press OK.The Advanced Picture menu is set to manually change the setting: • Noise Reduction Diminishes...page 19. Also try these modes for large areas of the picture settings: Backlight - Brightness - Select Auto or Off. • Backlight Control - Adjusts the average brightness of the picture to compensate for other sports. • Custom picture mode allows you wish to adjust, then press...
E320i-A0 User Manual
Page 29
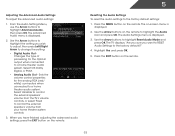
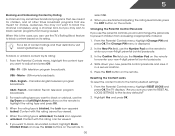
... speakers' volume from the TV's volume controls, or select Fixed to a home theater audio system. When you have finished adjusting the advanced audio settings, press the EXIT button on the remote. Press the MENU button on the remote. 5 Resetting the Audio Settings To reset...Press the EXIT button on the remote to the factory default settings: 1. Select Off, Dolby Digital, or PCM. • Analog Audio Out - Sets the volume control properties for the Optical output when connected to control the external speakers' volume from your home theater system controls. 3. The Advanced Audio menu...
... speakers' volume from the TV's volume controls, or select Fixed to a home theater audio system. When you have finished adjusting the advanced audio settings, press the EXIT button on the remote. Press the MENU button on the remote. 5 Resetting the Audio Settings To reset...Press the EXIT button on the remote to the factory default settings: 1. Select Off, Dolby Digital, or PCM. • Analog Audio Out - Sets the volume control properties for the Optical output when connected to control the external speakers' volume from your home theater system controls. 3. The Advanced Audio menu...
E320i-A0 User Manual
Page 32
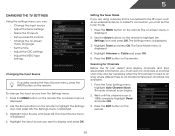
...Cable and press OK. 5. Wait until the channel scan is displayed. 3. Highlight Input Source and press OK. Use the Arrow buttons on the remote. Highlight the input source you want to -air broadcast television channels are using a device that is displayed. 2. Highlight Tuner and press OK. ... the Tuner settings • Name the TV inputs • Set up parental controls • Change the on-screen menu language • Set the time • Adjust the CEC settings • Adjust the VIZIO logo settings Changing the Input Source To quickly access the Input Source menu, press...
...Cable and press OK. 5. Wait until the channel scan is displayed. 3. Highlight Input Source and press OK. Use the Arrow buttons on the remote. Highlight the input source you want to -air broadcast television channels are using a device that is displayed. 2. Highlight Tuner and press OK. ... the Tuner settings • Name the TV inputs • Set up parental controls • Change the on-screen menu language • Set the time • Adjust the CEC settings • Adjust the VIZIO logo settings Changing the Input Source To quickly access the Input Source menu, press...
E320i-A0 User Manual
Page 34
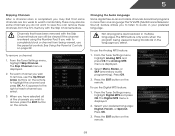
...Changing the Audio Language Some digital free-to remove, press the EXIT button on the remote. The Analog MTS menu is displayed. 2. To use the Analog MTS feature: 1. See Using the Parental Controls on the remote. The Skip Channel menu is displayed. 2. To use the Digital MTS feature: 1....remove a channel: 1. You can remove these channels from being viewed, use the Up/Down Arrow buttons on the remote. 28 An X appears to remove, use the parental controls. Channels that some channels you to listen to audio in more than one language.The TV's MTS (Multichannel Television Sound...
...Changing the Audio Language Some digital free-to remove, press the EXIT button on the remote. The Analog MTS menu is displayed. 2. To use the Analog MTS feature: 1. See Using the Parental Controls on the remote. The Skip Channel menu is displayed. 2. To use the Digital MTS feature: 1....remove a channel: 1. You can remove these channels from being viewed, use the Up/Down Arrow buttons on the remote. 28 An X appears to remove, use the parental controls. Channels that some channels you to listen to audio in more than one language.The TV's MTS (Multichannel Television Sound...
E320i-A0 User Manual
Page 35
...Program Rating feature. When a channel is locked, it will be inaccessible. Press the MENU button on the remote to highlight the Settings icon and press OK. The on the remote to highlight Parental Controls and press OK. 4. The TV Settings menu is displayed. 2. Use the Arrow buttons on the... remote. From the Parental Controls menu, highlight Rating Enable and press OK. The Rating Enable menu is a good way...
...Program Rating feature. When a channel is locked, it will be inaccessible. Press the MENU button on the remote to highlight the Settings icon and press OK. The on the remote to highlight Parental Controls and press OK. 4. The TV Settings menu is displayed. 2. Use the Arrow buttons on the... remote. From the Parental Controls menu, highlight Rating Enable and press OK. The Rating Enable menu is a good way...
E320i-A0 User Manual
Page 36
... icon appears locked. In the New Pin field, use the Up/Down and Left/Right Arrow buttons on the remote to highlight the rating type and press OK. 3. From the Parental Controls menu, highlight RESET LOCKS and press OK. The TV displays, "Are you sure you may wish to enter... a channel lock, but you want to block or unblock, use the Number Pad on the remote. CAN - 5 Blocking and Unblocking Content by its rating. When this rating cannot be viewed. 5. From the Parental Controls menu, highlight the content type you want to adjust and press OK: USA - USA television ...
... icon appears locked. In the New Pin field, use the Up/Down and Left/Right Arrow buttons on the remote to highlight the rating type and press OK. 3. From the Parental Controls menu, highlight RESET LOCKS and press OK. The TV displays, "Are you sure you may wish to enter... a channel lock, but you want to block or unblock, use the Number Pad on the remote. CAN - 5 Blocking and Unblocking Content by its rating. When this rating cannot be viewed. 5. From the Parental Controls menu, highlight the content type you want to adjust and press OK: USA - USA television ...

E320i-A0 User Manual
Page 38
...Settings The CEC function on the remote to control HDMI-connected devices with the included remote without any additional programming. Press the MENU button on -screen menu is displayed. 2. The on the remote. Use the Arrow buttons on your ZIP code using the TV's remote control. • Device Discovery - ...Highlight Time Zone and press OK. Use the Arrow buttons on the remote to highlight the Settings icon and press OK. The ...
...Settings The CEC function on the remote to control HDMI-connected devices with the included remote without any additional programming. Press the MENU button on -screen menu is displayed. 2. The on the remote. Use the Arrow buttons on your ZIP code using the TV's remote control. • Device Discovery - ...Highlight Time Zone and press OK. Use the Arrow buttons on the remote to highlight the Settings icon and press OK. The ...

E320i-A0 User Manual
Page 50
...8226; Adust the Color and Tint settings in the Picture menu. There is no sound. • Press Volume Up on the remote control. • Press the MUTE button on the remote to ensure mute is no image on the screen. • Ensure all cables are securely attached to the TV. • ...Picture Settings on page 21 • Check all devices are connected correctly. A The TV displays "No Signal." • Press the INPUT button on the remote control to select a different input source. • If you are using an antenna, the signal strength of the channel may be low. See Scanning for channels...
...8226; Adust the Color and Tint settings in the Picture menu. There is no sound. • Press Volume Up on the remote control. • Press the MUTE button on the remote to ensure mute is no image on the screen. • Ensure all cables are securely attached to the TV. • ...Picture Settings on page 21 • Check all devices are connected correctly. A The TV displays "No Signal." • Press the INPUT button on the remote control to select a different input source. • If you are using an antenna, the signal strength of the channel may be low. See Scanning for channels...

E320i-A0 Data Sheet
Page 2
... Player with access to change without Stand 12.50 lbs Shipping Dimensions 32.99" x 20.47" x 5.91" Shipping Weight 18.30 lbs VIZIO RECOMMENDS HIGH SPEED HDMI® CABLE This all rights reserved. HOME THEATER SOUND BAR WITH WIRELESS SUBWOOFER With a wireless subwoofer that fits nearly anywhere...slim design. 32" CLASS LED SMART TV TV SPECIFICATIONS Screen Size Diagonal Viewable TV Type Smart TV Built-in WiFi Refresh Rate Maximum Resolution Remote Control Type Ambient Light Sensor Energy Star Qualified Power Wall Mount & Screw Size 32" Class 31.5" LED Yes Yes 60Hz 720p XRT112 Yes ENERGY...
... Player with access to change without Stand 12.50 lbs Shipping Dimensions 32.99" x 20.47" x 5.91" Shipping Weight 18.30 lbs VIZIO RECOMMENDS HIGH SPEED HDMI® CABLE This all rights reserved. HOME THEATER SOUND BAR WITH WIRELESS SUBWOOFER With a wireless subwoofer that fits nearly anywhere...slim design. 32" CLASS LED SMART TV TV SPECIFICATIONS Screen Size Diagonal Viewable TV Type Smart TV Built-in WiFi Refresh Rate Maximum Resolution Remote Control Type Ambient Light Sensor Energy Star Qualified Power Wall Mount & Screw Size 32" Class 31.5" LED Yes Yes 60Hz 720p XRT112 Yes ENERGY...

E320i-A0 Quick Start Guide
Page 2
... will not be used for an extended period of time, unplug the power cord. • To reduce risk of the marked voltage can damage the remote control or injure the operator. If any other voltage than the voltage specified. Do not expose your TV yourself. For more information, contact your dealer. •...
... will not be used for an extended period of time, unplug the power cord. • To reduce risk of the marked voltage can damage the remote control or injure the operator. If any other voltage than the voltage specified. Do not expose your TV yourself. For more information, contact your dealer. •...

E320i-A0 Quick Start Guide
Page 4
PACKAGE CONTENTS VIZIO LED HDTV Hex Wrench Remote Control with Batteries This Quick Start Guide Hex Screw HELP VIZIO REDUCE PAPER WASTE. DOWNLOAD THE FULL USER MANUAL AT VIZIO.COM/SUPPORT
PACKAGE CONTENTS VIZIO LED HDTV Hex Wrench Remote Control with Batteries This Quick Start Guide Hex Screw HELP VIZIO REDUCE PAPER WASTE. DOWNLOAD THE FULL USER MANUAL AT VIZIO.COM/SUPPORT

