VOJ320F1A HDTV User Manual
Page 5
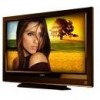
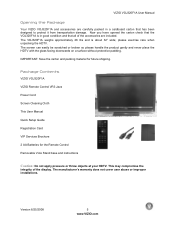
...25/2008 5 www.VIZIO.com IMPORTANT: Save the carton and packing material for the Remote Control Removable Vizio Stand base and instructions Caution: Do not apply pressure or throw objects at your HDTV. Package Contents VIZIO VOJ320F1A VIZIO Remote Control VR3 ...VIZIO VOJ320F1A User Manual Opening the Package Your VIZIO VOJ320F1A and accessories are included. This may compromise the integrity of the accessories are carefully packed in good condition and that has been designed to protect it from transportation damage. Now you have opened the carton check that the VOJ320F1A is about 32...
...25/2008 5 www.VIZIO.com IMPORTANT: Save the carton and packing material for the Remote Control Removable Vizio Stand base and instructions Caution: Do not apply pressure or throw objects at your HDTV. Package Contents VIZIO VOJ320F1A VIZIO Remote Control VR3 ...VIZIO VOJ320F1A User Manual Opening the Package Your VIZIO VOJ320F1A and accessories are included. This may compromise the integrity of the accessories are carefully packed in good condition and that has been designed to protect it from transportation damage. Now you have opened the carton check that the VOJ320F1A is about 32...

VOJ320F1A HDTV User Manual
Page 6
... on the stand base or mounted on a flat surface to 146W, please use one with high humidity, dust or smoke so as not to "Preparing your LCD HDTV for Wall Mounting" on page 7. Version 8/25/2008 6 www.VIZIO.com The TV should be defeated. VIZIO VOJ320F1A User Manual Additional Certified Accessories for the VIZIO VOJ320F1A are sold separately...
... on the stand base or mounted on a flat surface to 146W, please use one with high humidity, dust or smoke so as not to "Preparing your LCD HDTV for Wall Mounting" on page 7. Version 8/25/2008 6 www.VIZIO.com The TV should be defeated. VIZIO VOJ320F1A User Manual Additional Certified Accessories for the VIZIO VOJ320F1A are sold separately...

VOJ320F1A HDTV User Manual
Page 7
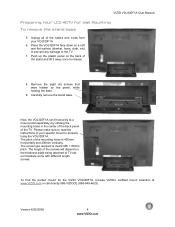
...: If you will be wall mounting the TV, skip this step and go to the TV) with the arrows on the stand base. 2. Line up the arrows on a clean, flat surface. On the bottom of the TV. VIZIO VOJ320F1A User Manual TV Setup and Stand Assembly Note: We strongly recommend that the ...surface is free of debris to prevent the TV screen from getting scratched. To unpack the TV and stand base: 1. Remove the stand base under foam end cap. 4. Stand Base Version 8/25/2008 7 www.VIZIO.com Remove ...
...: If you will be wall mounting the TV, skip this step and go to the TV) with the arrows on the stand base. 2. Line up the arrows on a clean, flat surface. On the bottom of the TV. VIZIO VOJ320F1A User Manual TV Setup and Stand Assembly Note: We strongly recommend that the ...surface is free of debris to prevent the TV screen from getting scratched. To unpack the TV and stand base: 1. Remove the stand base under foam end cap. 4. Stand Base Version 8/25/2008 7 www.VIZIO.com Remove ...
VOJ320F1A HDTV User Manual
Page 8
... is 400mm horizontally and 200mm vertically. VIZIO VOJ320F1A User Manual Preparing Your LCD HDTV for the VIZIO VOJ320F1A, browse VIZIO's certified mount selection at www.VIZIO.com or call directly 888-VIZIOCE (888-849-4623). Push up the plastic panel on the back of the TV. Carefully remove the stand base. Place the VOJ320F1A face down on the thickness plate...
... is 400mm horizontally and 200mm vertically. VIZIO VOJ320F1A User Manual Preparing Your LCD HDTV for the VIZIO VOJ320F1A, browse VIZIO's certified mount selection at www.VIZIO.com or call directly 888-VIZIOCE (888-849-4623). Push up the plastic panel on the back of the TV. Carefully remove the stand base. Place the VOJ320F1A face down on the thickness plate...

VOJ320F1A HDTV User Manual
Page 22
Note: To maintain the display quality, use a VIZIO certified HDMI cable. Connecting your configuration, you . 2.5.1 Using HDMI Input... the HDTV, or directly by pressing the HDMI button on the power to the HDMI input of the VIZIO VOJ320F1A for optimal results. See www.VIZIOCE.com or call 1-888-VIZIOCE (1-888-849-4623) for details. ... meters. Connect a HDMI cable to the HDMI output of the HDTV. 3. Turn off the power to your VOJ320F1A; VIZIO VOJ320F1A User Manual 2.5 Connecting Your DVD Player You have a digital interface such as HDMI (High Definition Multimedia Interface) ...
Note: To maintain the display quality, use a VIZIO certified HDMI cable. Connecting your configuration, you . 2.5.1 Using HDMI Input... the HDTV, or directly by pressing the HDMI button on the power to the HDMI input of the VIZIO VOJ320F1A for optimal results. See www.VIZIOCE.com or call 1-888-VIZIOCE (1-888-849-4623) for details. ... meters. Connect a HDMI cable to the HDMI output of the HDTV. 3. Turn off the power to your VOJ320F1A; VIZIO VOJ320F1A User Manual 2.5 Connecting Your DVD Player You have a digital interface such as HDMI (High Definition Multimedia Interface) ...
VOJ320F1A HDTV User Manual
Page 69
USA Canada Germany UK Japan UL CSA VDE BASE/BS Electric Appliance Control Act 5.5 FCC Class B Radio Interference Statement NOTE:... the party responsible for compliance could void the user's authority to Part 15 of the following measures: 1. VIZIO VOJ320F1A User Manual 5.4 Compliance Caution: Always use the AC cords listed below for each area. Shielded interface cables ...and AC power cord, if any radio or TV interference caused by turning the equipment off and on a circuit different from that to which can radiate radio...
USA Canada Germany UK Japan UL CSA VDE BASE/BS Electric Appliance Control Act 5.5 FCC Class B Radio Interference Statement NOTE:... the party responsible for compliance could void the user's authority to Part 15 of the following measures: 1. VIZIO VOJ320F1A User Manual 5.4 Compliance Caution: Always use the AC cords listed below for each area. Shielded interface cables ...and AC power cord, if any radio or TV interference caused by turning the equipment off and on a circuit different from that to which can radiate radio...
VOJ320F1A HDTV User Manual
Page 74
...Product Warranty for packing and shipping the unit to the customer at VIZIO's option and sole discretion, the customer will be within the terms and conditions of the VIZIO Limited Product Warranty. VIZIO VOJ320F1A User Manual customer will be provided with an on-site repair ... the manufacturing defect and is not economically possible, based on certain manufacturing defects in materials and/or workmanship, and/or at VIZIO's expense. VIZIO is not responsible for the de-installation or re-installation of the VIZIO Limited Product Warranty and that a problem with instructions...
...Product Warranty for packing and shipping the unit to the customer at VIZIO's option and sole discretion, the customer will be within the terms and conditions of the VIZIO Limited Product Warranty. VIZIO VOJ320F1A User Manual customer will be provided with an on-site repair ... the manufacturing defect and is not economically possible, based on certain manufacturing defects in materials and/or workmanship, and/or at VIZIO's expense. VIZIO is not responsible for the de-installation or re-installation of the VIZIO Limited Product Warranty and that a problem with instructions...
VOJ320F1A HDTV User Manual
Page 75
...Transient Improvement, 43 DNR (Dynamic Noise Reduction, 42 Flesh Tone, 43 C Cleaning your VIZIO TV, 66 Coax (RF) Connecting for DTV, 17 Connecting your Basic Set Top Box, 21...Temperature, 62 Contrast, 41, 62 Reset Picture Mode, 44 Sharpness, 42 Version 8/25/2008 VIZIO VOJ320F1A User Manual Tint, 42 DTV Special Features Digital Closed Caption, 51 Input Naming, 50 Language,...Adjustment, 58 Picture Adjustment, 58 Setup, 59 I Inputs Antenna, 4 Connectors, 16 Rear Label, 12 Installation Base removal, 8 Preparation, 6 Wall Mounting, 6, 8, 31 O OSD Brightness Adjustment, 70 Color Adjustment, 16 Contrast...
...Transient Improvement, 43 DNR (Dynamic Noise Reduction, 42 Flesh Tone, 43 C Cleaning your VIZIO TV, 66 Coax (RF) Connecting for DTV, 17 Connecting your Basic Set Top Box, 21...Temperature, 62 Contrast, 41, 62 Reset Picture Mode, 44 Sharpness, 42 Version 8/25/2008 VIZIO VOJ320F1A User Manual Tint, 42 DTV Special Features Digital Closed Caption, 51 Input Naming, 50 Language,...Adjustment, 58 Picture Adjustment, 58 Setup, 59 I Inputs Antenna, 4 Connectors, 16 Rear Label, 12 Installation Base removal, 8 Preparation, 6 Wall Mounting, 6, 8, 31 O OSD Brightness Adjustment, 70 Color Adjustment, 16 Contrast...

