
Download
Page 5
... remote control or injure the operator. The performance of electric shock, do not perform any abnormality occurs. If any way. - Operating your TV changes substantially. • This apparatus shall not be exposed to high voltages, electric shock, and other moisture. - These servicing instructions are qualified to rain or other hazards. Ensure that may be placed on the power cord...
... remote control or injure the operator. The performance of electric shock, do not perform any abnormality occurs. If any way. - Operating your TV changes substantially. • This apparatus shall not be exposed to high voltages, electric shock, and other moisture. - These servicing instructions are qualified to rain or other hazards. Ensure that may be placed on the power cord...
Download
Page 7
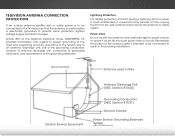
... For added protection of time, unplug the TV from the wall outlet and disconnect the antenna or cable system. Power Lines Do not locate the antenna near overhead light or power circuits, or where it is electrically grounded to proper grounding of the mast and supporting structure, grounding of the lead-in the building installation. Remember, the screen of the grounding electrode...
... For added protection of time, unplug the TV from the wall outlet and disconnect the antenna or cable system. Power Lines Do not locate the antenna near overhead light or power circuits, or where it is electrically grounded to proper grounding of the mast and supporting structure, grounding of the lead-in the building installation. Remember, the screen of the grounding electrode...
Download
Page 8
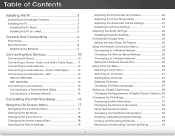
... Parental Controls 32 Accessing the Parental Controls Menu 32 Enabling or Disabling Program Ratings 33 Locking and Unlocking Channels 33 Blocking and Unblocking Content by Rating 33 1 ARC 14 Without HDMI ARC 14 With HDMI ARC 14 Connecting to your Network 15 Connecting to a Wired Network (Best 15 Connecting to a Wireless Network 15 Completing the First-Time Setup 16 Using the On-Screen Menu 17 Navigating the On-Screen Menu 17 Changing the 3D Mode 17 Changing the Input Source 18 Changing the Screen Aspect Ratio 18 Adjusting the Picture Settings...
... Parental Controls 32 Accessing the Parental Controls Menu 32 Enabling or Disabling Program Ratings 33 Locking and Unlocking Channels 33 Blocking and Unblocking Content by Rating 33 1 ARC 14 Without HDMI ARC 14 With HDMI ARC 14 Connecting to your Network 15 Connecting to a Wired Network (Best 15 Connecting to a Wireless Network 15 Completing the First-Time Setup 16 Using the On-Screen Menu 17 Navigating the On-Screen Menu 17 Changing the 3D Mode 17 Changing the Input Source 18 Changing the Screen Aspect Ratio 18 Adjusting the Picture Settings...

Download
Page 9
Changing the Parental Control Passcode 34 Resetting the Content Locks 34 Changing the On-Screen Menu Language 34 Setting the Time Zone 35 Adjusting the CEC Settings 35 Turning the Power Indicator On or Off 36 Using the Reset & Admin Menu 36 Resetting the TV Settings 37 Restoring the TV to Factory Default Settings 37 Performing a Service Check 37 Using the Guided Setup Menu 38 Using Guided Setup 38 Using the Info Window 39 Using the USB Media Player 40 Using the USB Media Player 40 Connecting a USB Thumb Drive to...
Changing the Parental Control Passcode 34 Resetting the Content Locks 34 Changing the On-Screen Menu Language 34 Setting the Time Zone 35 Adjusting the CEC Settings 35 Turning the Power Indicator On or Off 36 Using the Reset & Admin Menu 36 Resetting the TV Settings 37 Restoring the TV to Factory Default Settings 37 Performing a Service Check 37 Using the Guided Setup Menu 38 Using Guided Setup 38 Using the Info Window 39 Using the USB Media Player 40 Using the USB Media Player 40 Connecting a USB Thumb Drive to...
Download
Page 25
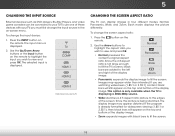
... TV.To use one of the screen. To change the screen aspect ratio: 1. TV COMP HDMI-1 HDMI-2 HDMI-3 Note: Inputs may appear wider than intended. Images may vary by TV Changing the Screen Aspect Ratio The TV can be connected to fit the screen. 18 Each mode displays the picture differently. 5 Changing the Input Source External devices such as DVD players, Blu-Ray Players, and video game consoles can display images in the on-screen menu. Since...
... TV.To use one of the screen. To change the screen aspect ratio: 1. TV COMP HDMI-1 HDMI-2 HDMI-3 Note: Inputs may appear wider than intended. Images may vary by TV Changing the Screen Aspect Ratio The TV can be connected to fit the screen. 18 Each mode displays the picture differently. 5 Changing the Input Source External devices such as DVD players, Blu-Ray Players, and video game consoles can display images in the on-screen menu. Since...
Download
Page 26
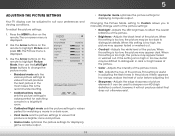
Use the Arrow buttons on -screen menu is displayed. 2. Changing the Picture Mode setting to Custom allows you to manually change the picture mode: VIZIO Picture Picture Mode Backlight Brightness Contrast Color Tint Sharpness Standard - + 50 - + 50 - + 50 - + 50 - +0 - +0 More • Standard mode sets the various picture settings to values that will not produce detail that produce a brighter, more vivid picture. • Game mode optimizes the picture settings for displaying game console output. • Computer mode optimizes the picture settings for watching a ...
Use the Arrow buttons on -screen menu is displayed. 2. Changing the Picture Mode setting to Custom allows you to manually change the picture mode: VIZIO Picture Picture Mode Backlight Brightness Contrast Color Tint Sharpness Standard - + 50 - + 50 - + 50 - + 50 - +0 - +0 More • Standard mode sets the various picture settings to values that will not produce detail that produce a brighter, more vivid picture. • Game mode optimizes the picture settings for displaying game console output. • Computer mode optimizes the picture settings for watching a ...
Download
Page 28
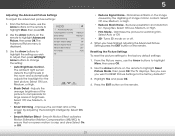
... picture settings: 1. Use the Arrow buttons on the remote to ensure that on-screen motion is displayed. Reduces pixellation and distortion for watching film. Resetting the PicAtBuCre Settings To reset the picture settings to compensate for the best picture. VIZIO Advanced Picture Auto Brightness Control Black Detail Smart Dimming Smooth Motion Effect Reduce Signal Noise Reduce Block Noise Medium Medium On Off Low Low 3. Use the Arrow buttons to Film Mode Auto highlight the setting...
... picture settings: 1. Use the Arrow buttons on the remote to ensure that on-screen motion is displayed. Reduces pixellation and distortion for watching film. Resetting the PicAtBuCre Settings To reset the picture settings to compensate for the best picture. VIZIO Advanced Picture Auto Brightness Control Black Detail Smart Dimming Smooth Motion Effect Reduce Signal Noise Reduce Block Noise Medium Medium On Off Low Low 3. Use the Arrow buttons to Film Mode Auto highlight the setting...
Download
Page 29
... Settings - Sets the volume control properties for the Optical and HDMI ARC output when connected to ON, DTS signals cannot be passed through digital audio outputs. 22 Select On or Off. • Volume Leveling - Restores the audio settings to change Reset Audio Mode the setting: • Balance - The Audio menu is a feature-rich surround sound solution which delivers an immersive surround sound experience from the TV's internal speakers. DTS Studio Sound™ is displayed. Input To cWhidae ngeCtChe equalizer settings...
... Settings - Sets the volume control properties for the Optical and HDMI ARC output when connected to ON, DTS signals cannot be passed through digital audio outputs. 22 Select On or Off. • Volume Leveling - Restores the audio settings to change Reset Audio Mode the setting: • Balance - The Audio menu is a feature-rich surround sound solution which delivers an immersive surround sound experience from the TV's internal speakers. DTS Studio Sound™ is displayed. Input To cWhidae ngeCtChe equalizer settings...

Download
Page 30
... Timers menu is displayed. The Audio menu is displayed. 2. VIZIO Timers Sleep Timer Auto Power Off Off 10 mins 3. 5 Resetting the Audio Settings To reset the audio settings to highlight Sleep Timer and press OK. The TV displays, "Are you sure you don't want to RESET Audio Settings to Off. 5. Use the Arrow buttons on the remote to the factory default settings: 1. If you want the sleep timer to activate, change the setting to the factory defaults?" 4. Activating the Sleep Timer When activated, the TV's sleep timer will turn off after a set...
... Timers menu is displayed. The Audio menu is displayed. 2. VIZIO Timers Sleep Timer Auto Power Off Off 10 mins 3. 5 Resetting the Audio Settings To reset the audio settings to highlight Sleep Timer and press OK. The TV displays, "Are you sure you don't want to RESET Audio Settings to Off. 5. Use the Arrow buttons on the remote to the factory default settings: 1. If you want the sleep timer to activate, change the setting to the factory defaults?" 4. Activating the Sleep Timer When activated, the TV's sleep timer will turn off after a set...
Download
Page 42
... you the most accurate location-based information, such as weather or news. 8. The on the remote. Press the EXIT button on -screen menu is connected and supports CEC. 5. Normal Panoramic 2. Use the Arrow and OK buttons to control HDMI-connected devices with the included remote without any additional programming. Sleep • Timer DePvicitcuree DiAsucdoiovery - Network Settings Help 35 Adjusting the CEC Settings The CEC function on your device's audio using the keypad on the...
... you the most accurate location-based information, such as weather or news. 8. The on the remote. Press the EXIT button on -screen menu is connected and supports CEC. 5. Normal Panoramic 2. Use the Arrow and OK buttons to control HDMI-connected devices with the included remote without any additional programming. Sleep • Timer DePvicitcuree DiAsucdoiovery - Network Settings Help 35 Adjusting the CEC Settings The CEC function on your device's audio using the keypad on the...
Download
Page 45
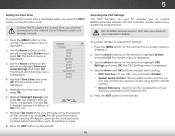
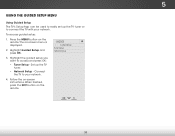
...; Tuner Setup - The on -screen instructions. Follow the on -screen menu is displayed. 2. Press the MENU button on the remote. Highlight Guided Setup and press OK. Connect the TV to your network. Wide Zoom Normal Panoramic Exit 2D 3D ABC Input Wide CC Sleep Timer Picture Audio Network Settings Help 38 Set up the TV tuner or to connect the TV with your network. 4. When finished, press the EXIT button on the remote. VIZIO Guided Setup Tuner Setup Network Setup 3. To access guided setup: 1. 5 Using the Guided Setup Menu Using Guided Setup The TV's Setup App...
...; Tuner Setup - The on -screen instructions. Follow the on -screen menu is displayed. 2. Press the MENU button on the remote. Highlight Guided Setup and press OK. Connect the TV to your network. Wide Zoom Normal Panoramic Exit 2D 3D ABC Input Wide CC Sleep Timer Picture Audio Network Settings Help 38 Set up the TV tuner or to connect the TV with your network. 4. When finished, press the EXIT button on the remote. VIZIO Guided Setup Tuner Setup Network Setup 3. To access guided setup: 1. 5 Using the Guided Setup Menu Using Guided Setup The TV's Setup App...

Download
Page 55
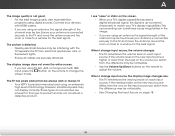
...; Reset the picture settings. See Adjusting the Picture Settings on the TV don't look right. • Adjust the Color and Tint settings in the Picture menu. A The TV displays "No Signal." • Press the INPUT button on the remote control to select a different input source. • If you are using an antenna, the signal strength of the channel may be low. The buttons on the remote aren't working electrical outlet. • Ensure the power cable is no power. •...
...; Reset the picture settings. See Adjusting the Picture Settings on the TV don't look right. • Adjust the Color and Tint settings in the Picture menu. A The TV displays "No Signal." • Press the INPUT button on the remote control to select a different input source. • If you are using an antenna, the signal strength of the channel may be low. The buttons on the remote aren't working electrical outlet. • Ensure the power cable is no power. •...
Download
Page 56
... using an antenna, the signal strength of technology. However, sometimes pixels may be interfering with HDMI cables. • If you are using TV, AV1, AV2, or Component with 480i input, press the button on the remote to a window for the best signal. When I change input source, the volume changes. • The TV remembers the volume level on each input source. When I change input source, the display image changes size. • The TV remembers the viewing mode on each input source...
... using an antenna, the signal strength of technology. However, sometimes pixels may be interfering with HDMI cables. • If you are using TV, AV1, AV2, or Component with 480i input, press the button on the remote to a window for the best signal. When I change input source, the volume changes. • The TV remembers the volume level on each input source. When I change input source, the display image changes size. • The TV remembers the viewing mode on each input source...
Download
Page 59
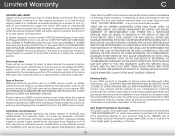
..., normal wear and tear, improper operation, improper voltage supply or power surges, signal issues, damages from 5:00AM to 9:00PM Monday through Friday and 8:00AM to obtain warranty service. To obtain warranty service, contact VIZIO Technical Support via e-mail: TechSupport@VIZIO.com or via phone at VIZIO's option and sole discretion. Type of Service Defective Products must utilize either repair or replace the Product at its sole option...
..., normal wear and tear, improper operation, improper voltage supply or power surges, signal issues, damages from 5:00AM to 9:00PM Monday through Friday and 8:00AM to obtain warranty service. To obtain warranty service, contact VIZIO Technical Support via e-mail: TechSupport@VIZIO.com or via phone at VIZIO's option and sole discretion. Type of Service Defective Products must utilize either repair or replace the Product at its sole option...
Download
Page 2
... can damage the remote control or injure the operator. Any other than that may be observed for an extended period of time, unplug the power cord. • To reduce risk of electric shock, do not perform any heat source, such as when the power-supply cord or plug is damaged, liquid has been spilled or objects have an electrician install the correct...
... can damage the remote control or injure the operator. Any other than that may be observed for an extended period of time, unplug the power cord. • To reduce risk of electric shock, do not perform any heat source, such as when the power-supply cord or plug is damaged, liquid has been spilled or objects have an electrician install the correct...
Download
Page 13
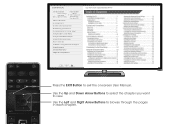
... to exit the on-screen User Manual. Table of Contents Installing the TV Controls and Connections Connecting your Devices Completing the First-Time Setup Using the On-Screen Menu Using the USB Media Player Using VIZIO Internet Apps How to View 3D Troubleshooting & Technical Support Specifications Limited Warranty Legal & Compliance LCD HDTV WITH VIZIO INTERNET APPS® MENU Press the EXIT Button to view. Use the Left and Right Arrow Buttons to page, use Number Pad, then press OK. GUIDE INPUT LIST EXIT BACK USER MANUAL USE YOUR REMOTE Previous Page Next Page...
... to exit the on-screen User Manual. Table of Contents Installing the TV Controls and Connections Connecting your Devices Completing the First-Time Setup Using the On-Screen Menu Using the USB Media Player Using VIZIO Internet Apps How to View 3D Troubleshooting & Technical Support Specifications Limited Warranty Legal & Compliance LCD HDTV WITH VIZIO INTERNET APPS® MENU Press the EXIT Button to view. Use the Left and Right Arrow Buttons to page, use Number Pad, then press OK. GUIDE INPUT LIST EXIT BACK USER MANUAL USE YOUR REMOTE Previous Page Next Page...

Download
Page 16
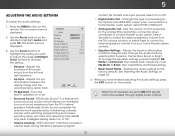
... higher. Use the Arrow Buttons to display the TV Settings menu. The Guided Setup menu is displayed. VIZIO TV Settings Picture Audio Timers Network Tuner CC CC System Guided Setup User Manual Wide VIZIO Guided Setup ZoToumner SeNtuoprmal Panoramic Network Setup Exit 2D 3D ABC Input Wide CC Wide Exit Input Sleep Timer Picture Audio Sleep Timer Network Settings Help Networ The Network Setup guide is displayed. If you will need: Wireless Router High-speed Internet connection SSID (Wireless network name) Network Password For streaming video, your Internet Service Provider...
... higher. Use the Arrow Buttons to display the TV Settings menu. The Guided Setup menu is displayed. VIZIO TV Settings Picture Audio Timers Network Tuner CC CC System Guided Setup User Manual Wide VIZIO Guided Setup ZoToumner SeNtuoprmal Panoramic Network Setup Exit 2D 3D ABC Input Wide CC Wide Exit Input Sleep Timer Picture Audio Sleep Timer Network Settings Help Networ The Network Setup guide is displayed. If you will need: Wireless Router High-speed Internet connection SSID (Wireless network name) Network Password For streaming video, your Internet Service Provider...

Download
Page 21
... -screen menu has guided setup. If it back on the remote to ensure that some television channels add black bars to use another internet-connected device. Select the type of the TV. • Press the MUTE button on . The Setup App will be lost! There are turned on. • Press the INPUT button on the side of setup you are connecting wirelessly, try plugging the power cord into a different outlet. Be sure TV Speakers...
... -screen menu has guided setup. If it back on the remote to ensure that some television channels add black bars to use another internet-connected device. Select the type of the TV. • Press the MUTE button on . The Setup App will be lost! There are turned on. • Press the INPUT button on the side of setup you are connecting wirelessly, try plugging the power cord into a different outlet. Be sure TV Speakers...
Download
Page 23
... operation, improper voltage supply or power surges, signal issues, damages from shipping, acts of God, any type of customer misuse, modifications or adjustments, as well as installation and set-up issues or any repairs attempted by this warranty is serviced, regardless of protection. THERE ARE NO EXPRESS WARRANTIES OTHER THAN THOSE LISTED OR DESCRIBED ABOVE. Replacement parts and Products are not covered. THIS WARRANTY IS SUBJECT TO CHANGE WITHOUT...
... operation, improper voltage supply or power surges, signal issues, damages from shipping, acts of God, any type of customer misuse, modifications or adjustments, as well as installation and set-up issues or any repairs attempted by this warranty is serviced, regardless of protection. THERE ARE NO EXPRESS WARRANTIES OTHER THAN THOSE LISTED OR DESCRIBED ABOVE. Replacement parts and Products are not covered. THIS WARRANTY IS SUBJECT TO CHANGE WITHOUT...

Download
Page 2
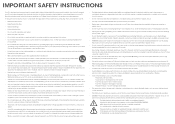
... owners. VIZIO, the V logo, Where Vision Meets Value, Razor LED and other VIZIO trademarks are subject to 1 Yes Smooth Motion Yes Remote Control Type Energy Star Qualified Wall Mount & Screw Size CONNECTIONS XRT510 Yes 400mm (V) x 400mm (H), M6 HDMI Inputs 4 Component Video Inputs 1 Composite Inputs 1 (shared with the latest in Dolby and DTS audio technology will immerse you in theater quality surround sound. Theater 3D® Faster Smart TV Razor LED™ Picture...
... owners. VIZIO, the V logo, Where Vision Meets Value, Razor LED and other VIZIO trademarks are subject to 1 Yes Smooth Motion Yes Remote Control Type Energy Star Qualified Wall Mount & Screw Size CONNECTIONS XRT510 Yes 400mm (V) x 400mm (H), M6 HDMI Inputs 4 Component Video Inputs 1 Composite Inputs 1 (shared with the latest in Dolby and DTS audio technology will immerse you in theater quality surround sound. Theater 3D® Faster Smart TV Razor LED™ Picture...


